![[Compaq]](../../images/hp.gif)
![[Go to the documentation home page]](../../images/buttons/hp_bn_site_home.gif)
![[How to order documentation]](../../images/buttons/hp_bn_order_docs.gif)
![[Help on this site]](../../images/buttons/hp_bn_site_help.gif)
![[How to contact us]](../../images/buttons/hp_bn_comments.gif)
![[OpenVMS documentation]](../../images/hp_ovmsdoc_sec_head.gif)
| Document revision date: 24 June 2002 | |
|
|
|
|
|
|
http://www.openvms.compaq.com/
.
.
.
|
Question: Could you tolerate the following
event?
|
Level of Security Requirements Based on
Toleration Responses
|
||
|
Low
|
Medium
|
High
|
|
|
A
user knowing the images being executed on your
system
|
Y
|
Y
|
N
|
|
A
user knowing the names of another user’s files
|
Y
|
Y
|
N
|
|
A
user accessing the file of another user in the group
|
Y
|
Y
|
N
|
|
An outsider knowing the name of the system
just dialed into
|
Y
|
Y
|
N
|
|
A
user copying files of other users
|
Y
|
N
|
N
|
|
A
user reading another user’s electronic mail
|
Y
|
N
|
N
|
|
A
user writing data into another user’s file
|
Y
|
N
|
N
|
|
A
user deleting another user’s file
|
Y
|
N
|
N
|
|
A
user being able to read sections of a disk that might contain
various old files
|
Y
|
N
|
N
|
|
A
user consuming machine time and resources to perform unrelated or
unauthorized work, possibly even playing games
|
Y
|
N
|
N
|
|
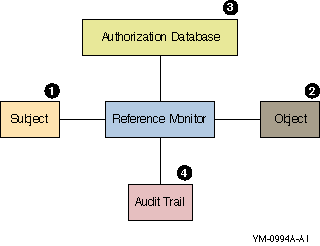
Item
|
Element
|
Description
|
|---|---|---|
|
1
|
Subjects
|
Active entities, such as user processes,
that gain access to information on behalf of people.
|
|
2
|
Objects
|
Passive repositories of information to be
protected, such as files.
|
|
3
|
Authorization database
|
Repository for the security attributes of
subjects and objects. From these attributes, the reference
monitor determines what kind of access (if any) is
authorized.
|
|
4
|
Audit trail
|
Record of all security-relevant events, such
as access attempts, successful or not.
|
|
Class Name
|
Definition
|
|---|---|
|
Capability
|
A
resource to which the system controls access; currently, the only
defined capability is the vector processor.
|
|
Common event flag cluster
|
A
set of 32 event flags that enable cooperating processes to post
event notifications to each other.
|
|
Device
|
A
class of peripherals connected to a processor that are capable of
receiving, storing, or transmitting data.
|
|
File
|
Files-11 On-Disk Structure Level 2 (ODS-2)
files and directories.
|
|
Group global section
|
A
shareable memory section potentially available to all processes
in the same group.
|
|
Logical name table
|
A
shareable table of logical names and their equivalence names for
the system or a particular group.
|
|
Queue
|
A
set of jobs to be processed in a batch, terminal, server, or
print job queue.
|
|
Resource domain
|
A
namespace controlling access to the lock manager’s
resources.
|
|
Security class
|
A
data structure containing the elements and management routines
for all members of the security class.
|
|
System global section
|
A
shareable memory section potentially available to all processes
in the system.
|
|
Volume
|
A
mass storage medium, such as a disk or tape, that is in ODS-2
format. Volumes contain files and may be mounted on
devices.
|
|
File
|
Contents
|
Data Used to Interpret
|
|---|---|---|
|
#SYSUAF.DAT
|
User names
|
Logins
|
|
Passwords
|
Logins
|
|
|
UICs
|
Access control checks
|
|
|
#NETPROXY.DAT
|
User names
|
Logins
|
|
#NET$PROXY.DAT
|
User names
|
Logins
|
|
#RIGHTSLIST.DAT
|
Rights identifiers
|
Access control checks
|
|
#VMS$OBJECTS.DAT
|
UICs
|
Access control checks
|
|
Protection codes
|
Access control checks
|
|
|
Access control lists
|
Access control checks
|
|
|
#VMS$AUDIT_
#SERVER.DAT |
Auditable events
|
Reporting of events
|
|
Destination
|
Events Audited by Default
|
|---|---|
|
Log file or terminal display
|
Authorization database changes
|
|
Intrusion attempts
|
|
|
Login failures
|
|
|
Use of DCL command SET AUDIT
|
|
|
Events triggered by Audit or Alarm
ACEs
|

|
Secure Passwords
|
Insecure Passwords
|
|---|---|
|
Nonsense syllables:
aladaskgam eojfuvcue joxtyois |
Words with a strong personal
association:
your name the name of a loved one the name of your pet the name of your town the name of your automobile |
|
A
mixed string:
492_weid $924spa zu_$rags |
A
work-related term:
your company name a special project your work group name |
|
Failure Indicator
|
Reason
|
|---|---|
|
No response from the terminal.
|
A
defective terminal, a terminal that requires a system password, a
terminal that is not powered on, or a communications problem
caused by defective wiring or by a misconfigured or
malfunctioning modem.
|
|
No response from any terminal.
|
The system is down or
overloaded.
|
|
No response from the terminal when you enter
the system password.
|
The system password changed.
|
|
System messages:
|
|
|
“User authorization
failure”
|
A
typing error in your user name or password. The account or
password expired.
|
|
“Not authorized to log in from this
source”
|
Your particular class of login (local,
dialup, remote, interactive, batch, or network) is
prohibited.
|
|
“Not authorized to log in at this
time”
|
You do not have access to log in during this
hour or this day of the week.
|
|
“User authorization failure”
(and no known user failure occurred)
|
An apparent break-in has been attempted at
the terminal using your user name, and the system has temporarily
disabled all logins at that terminal by your user
name.
|
%SET-E-INVPWDLEN, invalid password length - password not changed
 Note
NoteYour password has expired; you must set a new password to log in New password:
My password is GOBBLEDYGOOK.
NODE"username password"::disk:[directory]file.typ
%%%%%%%%%%%  OPCOM  7-DEC-2001 07:21:11.10  %%%%%%%%%%%
Message from user AUDIT$SERVER on BOSTON
Security audit (SECURITY) on BOSTON, system id: 19424
Auditable event:        Attempted file access
Event time:              7-DEC-2001 07:21:10.84
PID:                    23E00231
Username:               ABADGUY
Image name:             BOSTON$DUA0:[SYS0.SYSCOMMON.][SYSEXE]DELETE.EXE
Object name:            _BOSTON$DUA1:[RWOODS]CONFIDREVIEW.MEM;1
Object type:            file
Access requested:       DELETE
Status:                 %SYSTEM-S-NORMAL, normal successful completion
Privileges used:        SYSPRV
|
Events Initiating Security Audits or
Alarms
|
|
|---|---|
|
Logins, logouts, login failures, and
break-in attempts
Volume mounts and dismounts |
Modifications to:
System and user passwords System time System authorization file Network proxy file Rights database SYSGEN parameters |
|
Connection or termination of logical
links
|
Execution of:
SET AUDIT command NCP commands |
|
Creation and deletion of selected
protected objects |
Installation of images
|
|
Selected types of access and deaccess to
selected protected objects
|
Access event requested by an ACL on a
protected object
|
|
Successful or unsuccessful use of a
privilege or an identifier
|
Use of the process control system services,
including $CREPRC and $DELPRC
|
Note

[member]
[group,member]
[group,member]
|
Type of UIC
|
Example
|
Meaning
|
|---|---|---|
|
Alphanumeric
|
[USER,FRED]
|
Group USER, member FRED
|
|
[EXEC,JONES]
|
Group EXEC, member JONES
|
|
|
[JONES]
|
Group EXEC, member JONES
|
|
|
Numeric
|
[200,10]
|
Group 200, member 10
|
|
[3777,3777]
|
Group 3777, member 3777
|
|
Type
|
Description
|
Format
|
Example
|
|---|---|---|---|
|
Environmental identifiers
|
Describe different types of users based on
their initial entry into the system.
|
Alphanumeric strings automatically created
by the system. See Section 3.4 for
details.
|
BATCH, NETWORK,
INTERACTIVE, LOCAL, DIALUP, REMOTE |
|
General
identifiers |
Defined by the security
administrator.
|
Alphanumeric strings of 1 through 31
characters with at least one alphabetic character. Valid
characters include numbers 0 through 9, characters A through Z
and a through z, the dollar sign ($) and the underscore
(_).
|
SALES,
PERSONNEL, DATA_ENTRY, RESERVE_DESK |
|
UIC identifiers
|
Based on a user’s identification code
(UIC), which uniquely identifies a user on the system and defines
the group to which the user belongs.
|
Alphanumeric UICs, with or without brackets.
Valid characters are the same as those for a general
identifier.
|
[GROUP1,JONES],
[JONES], GROUP1, JONES |
|
Facility
identifiers |
Defined by the application.
|
Same as a general identifier. See the OpenVMS Programming Concepts
Manual for details.
|
DBM$MOD_SCHEMA
|
.
.
.
Message from user AUDIT$SERVER on FNORD
Security alarm (SECURITY) and security audit (SECURITY) on ACCOUNTS,
                          system id: 19662
Auditable event:     Object deletion
Event information:   file deletion request (IO$_DELETE)
Event time:          24-APR-2001 13:17:24.59
PID:                 34200094
Process name:        _TWA2:
Username:            GREG
Process owner:       [DOC,GREG]
Terminal name:       TWA2:
Image name:          DSA2264:[SYS51.SYSCOMMON.][SYSEXE]DELETE.EXE
Object class name:   FILE
Object owner:        [SYSTEM]
Object protection:   SYSTEM:RWEDC, OWNER:RWEDC, GROUP:RE, WORLD:RE
File name:           _DSA2200:[GREG]93_FORECAST.DAT;1
File ID:             (17481,6299,1)
Access requested:    DELETE
Matching ACE:        (IDENTIFIER=MINDCRIME,ACCESS=NONE)
Sequence key:        00008A41
Status:              %SYSTEM-F-NOPRIV, no privilege for
                     attempted operation
 8-OCT-2001 16:58:58.77
User: PUTERMAN  Process ID:   27E00496
Node: FNORD     Process name: "Hobbit"Authorized privileges:

 ACNT      ALLSPOOL  ALTPRI   AUDIT    BUGCHK   BYPASS  CMEXEC    CMKRNL
 DIAGNOSE  DOWNGRADE EXQUOTA  GROUP    GRPNAM   GRPPRV  IMPERSONATE IMPORT
 LOG_IO    MOUNT     NETMBX   OPER     PFNMAP   PHY_IO  PRMCEB    PRMGBL
 PRMMBX    PSWAPM    READALL  SECURITY SETPRV   SHARE   SHMEM     SYSGBL
 SYSLCK    SYSNAM    SYSPRV   TMPMBX   UPGRADE  VOLPRO  WORLD

Process privileges:
 NETMBX               may create network device
 TMPMBX               may create temporary mailbox
[user category: access allowed (,user category: access allowed,...)]
|
Class Name
|
Definition
|
|---|---|
|
Capability
|
A
resource to which the system controls access; currently, the only
defined capability is the vector processor.
|
|
Common event flag cluster
|
A
set of 32 event flags that enable cooperating processes to post
event notifications to each other.
|
|
Device
|
A
class of peripherals connected to a processor that are capable of
receiving, storing, or transmitting data.
|
|
File
|
Files-11 On-Disk Structure Level 2 (ODS-2)
files and directories.
|
|
Group global section
|
A
shareable memory section potentially available to all processes
in the same group.
|
|
Logical name table
|
A
shareable table of logical names and their equivalence names for
the system or a particular group.
|
|
Queue
|
A
set of jobs to be processed in a batch, terminal, server, or
print job queue.
|
|
Resource domain
|
A
namespace controlling access to the lock manager’s
resources.
|
|
Security class
|
A
data structure containing the elements and management routines
for all members of the security class.
|
|
System global section
|
A
shareable memory section potentially available to all processes
in the system.
|
|
Volume
|
A
mass storage medium, such as a disk or tape, that is in ODS-2
format. Volumes contain files and may be mounted on
devices.
|
.
.
.
|
SHOW SECURITY
|
|
|
DIRECTORY/ACL
|
|
|
DIRECTORY/SECURITY
|
|
|
DIRECTORY/FULL
|
|
|
SHOW LOGICAL/FULL/STRUCTURE
|
|
|
SHOW DEVICE/FULL
|
|
|
SHOW QUEUE/FULL
|
WORK_DISK$:[GREG]TAXES_91.DAT;1 object of class FILE

     Owner: [FINANCE,GREG]
     Protection: (System: RWED, Owner: RW, Group:RW, World:RWED)
     Access Control List: ...
WORK_DISK$:[GREG]RECORDS_91.DAT object of class FILE
     Owner: [VMS,GREG]
     Protection: (System: RWED, Owner: RWED, Group: RWED, World: RE)
WORK_DISK$:[GREG]RECORDS_91.DAT object of class FILE
     Owner: [VMS,GREG]
     Protection: (System: RWED, Owner: RWED, Group: RE, World:)
(DEFAULT_PROTECTION[,options],protection-code)
|
BYPASS
|
A
user with BYPASS privilege receives all types of access to the
object, regardless of its protection.
|
|
GRPPRV
|
A
user with GRPPRV privilege whose UIC group matches the group of
the owner of the object receives the same access accorded to
users in the system category. Thus, the user with GRPPRV
privilege is able to manage any of the group’s
objects.
|
|
READALL
|
A
user with READALL privilege receives read access to the object,
even if that access is denied by the ACL and the protection code.
In addition, the user can receive any other access granted
through the protection code.
|
|
SYSPRV
|
A
user with SYSPRV privilege receives the access accorded to users
in the system category.
|
|
Topic
|
Description
|
|---|---|
|
Naming rules
|
A
summary of naming conventions for objects in the
class.
|
|
Types of access
|
Access types supported for the class.
Boldface type indicates the abbreviation of an access type, such
as R for read access.
|
|
Template profile
|
The default profile applied to new objects
of the class. Site security administrators can modify the default
profiles. Use the SHOW SECURITY command to display current
template settings.
|
|
Privilege requirements
|
Privileges, if any, required for certain
operations on the object.
|
|
Kinds of auditing performed
|
Events that trigger an audit event message
(assuming the event class is enabled).
|
|
Permanence of the object
|
Storage of security profiles. Explains if
the security elements are stored from one system startup to
another and if so, where the elements are stored.
|
|
Use
|
Gives a process the right to make use of the
vector processor
|
|
Control
|
Gives you the right to change the protection
and ownership elements of the object
|
|
Template Name
|
Owner UIC
|
Protection Code
|
|---|---|---|
|
DEFAULT
|
[SYSTEM]
|
S:U,O:U,G:U,W:U
|
|
Event Audited
|
When Audit Occurs
|
|---|---|
|
Access
|
The first time after image activation that
the process uses a vector instruction
|
|
Associate
|
Gives a process the right to establish an
association with the named cluster so the process can access
event flags.
|
|
Delete
|
Gives a process the right to mark a
permanent event flag cluster for deletion with the Delete Common
Event Flag Cluster ($DLCEFC) system service. The actual deletion
occurs once all processes disassociate from the
cluster.
|
|
Control
|
Gives you the right to modify the protection
elements of the common event flag cluster.
|
|
Template Name
|
Owner UIC
|
Protection Code
|
|---|---|---|
|
DEFAULT
|
[0,0]
|
S:AD,O:AD,G:A,W
|
|
Event Audited
|
When Audit Occurs
|
|---|---|
|
Creation
|
When the first process to associate with a
particular cluster calls $ASCEFC
|
|
Access
|
Whenever subsequent callers to $ASCEFC
associate with the cluster
|
|
Deaccess
|
When a process calls $DACEFC or associates
with another cluster or at image rundown
|
|
Deletion
|
When the process calls $DLCEFC
|
|
Read
|
Gives you the right to read data from the
device
|
|
Write
|
Gives you the right to write data to the
device
|
|
Physical
|
Gives you the right to perform physical I/O
operations to the device
|
|
Logical
|
Gives you the right to perform logical I/O
operations to the device
|
|
Control
|
Gives you the right to change the protection
elements and owner of the device
|
|
Template Name
|
Device Type
|
Owner UIC
|
Protection Code
|
|---|---|---|---|
|
BUS
|
DC$_BUS
|
[SYSTEM]
|
S:RWPL,O:RWPL,G,W
|
|
CARDREADER
|
DC$_CARD
|
[SYSTEM]
|
S:RWPL,O:RWPL,G,W
|
|
COMMUNICATION
|
DC$_SCOM
|
[SYSTEM]
|
S:RWPL,O:RWPL,G,W
|
|
DEFAULT
|
[SYSTEM]
|
S:RWPL,O:RWPL,G:RWPL,W:RWPL
|
|
|
DISK
|
DC$_DISK
|
[SYSTEM]
|
S:RWPL,O:RWPL,G:R,W
|
|
MAILBOX
|
DC$_MAILBOX
|
[SYSTEM]
|
S:RWPL,O:RWPL,G:RWPL,W:RWPL
|
|
PRINTER
|
DC$_LP
|
[SYSTEM]
|
S:RWPL,O:RWPL,G,W
|
|
REALTIME
|
DC$_REALTIME
|
[SYSTEM]
|
S:RWPL,O:RWPL,G:RWPL,W:RWPL
|
|
TAPE
|
DC$_TAPE
|
[SYSTEM]
|
S:RWPL,O:RWPL,G:R,W
|
|
TERMINAL
|
DC$_TERM
|
[SYSTEM]
|
S:RWPL,O:RWPL,G,W
|
|
WORKSTATION
|
DC$_WORKSTATION
|
[SYSTEM]
|
S:RWPL,O:RWPL,G:RWPL,W:RWPL
|
Note$ SET SECURITY/CLASS=DEVICE - _$ /PROTECTION=(S:RWLP,O:RWLP,G:RW,W:R) FTA0:
|
Event Audited
|
When Audit Occurs
|
|---|---|
|
Access
|
For nonshareable devices, when the process
calls $ASSIGN; for a shareable device, when the process calls
$QIO
|
|
Creation
|
When a process creates a virtual device like
a mailbox
|
|
Deletion
|
When a process deletes a virtual device like
a mailbox
|
|
Read
|
Gives you the right to read, print, or copy
a disk file. With directory files, read access gives you the
right to read or list a file and use a file name with wildcard
characters to look up files. Read access implies execute
access.
|
|
Write
|
Gives you the right to write to or change
the contents of a file but not delete it. Write access allows
modification of the file elements that describe the contents of
the file. Write access allows creation of a new version of an
existing file’s primary name. With directory files, write
access gives you the right to make or delete an entry in the
catalog of files.
|
|
Execute
|
Gives you the right to execute a file that
contains an executable program image or DCL command procedure.
With a directory file, execute access gives you the right to look
up files whose names you know.
|
|
Delete
|
Gives you the right to delete a file. To
delete a file, you must have delete access to the file and write
access to the directory that contains the file. To remove or
rename a file’s primary name also requires delete
access.
|
|
Control
|
Gives you the right to change the protection
code and ACL. You need to satisfy one of the following conditions
to change the owner:
• Hold both the old and the new owner
identifier.
• Hold the Resource
attribute to the identifier that owns the object while also being
allowed control access to the object through an ACL on the
object.
• Qualify as a system user,
hold SYSPRV or BYPASS privilege, or hold a UIC that matches that
of the owner of the volume containing the file or
directory.
• Hold the GRPPRV privilege
while also holding a UIC in the same group as the object
owner.
|
Note|
Event Audited
|
When Audit Occurs
|
|---|---|
|
Access
|
When a process opens, reads, writes, or
executes a file or inquires about its attributes
|
|
Creation
|
When a process creates a file
|
|
Deaccess
|
When a process closes a file
|
|
Deletion
|
When a process deletes a file
|
Caution|
Read
|
Gives you the right to map the section for
read access.
|
|
Write
|
Gives you the right to map the section for
write access.
|
|
Execute
|
Gives you the right to map the section for
read access. Only software running in executive or kernel mode
can request this access.
|
|
Control
|
|
Type
|
Template Name
|
Owner UIC
|
Protection Code
|
|---|---|---|---|
|
System
|
DEFAULT
|
[0,0]
|
S:RWE,O:RWE,G:RWE,W:RWE
|
|
Group
|
DEFAULT
|
[0,0]
|
S:RWE,O:RWE,G:RWE,W:RWE
|
|
Event Audited
|
When Audit Occurs
|
|---|---|
|
Creation
|
When a page file-backed or a PFN global
section is created by the Create and Map Section system service
($CRMPSC).
|
|
Access
|
When an existing page file-backed or a PFN
global section is accessed with either $CRMPSC or the Map Global
Section system service ($MGBLSC). The operating system audits
access to a file-backed global section as a file
access.
|
|
Deaccess
|
At image or process rundown when the process
virtual address space is reset or deleted.
|
|
Deletion
|
If a process with PRMGBL privilege, PFNMAP
privilege, or SYSGBL privilege (in the case of a system global
section) deletes a permanent global section, the operating system
audits the event through the use of privilege.
|
|
Read
|
|
|
Write
|
|
|
Create
|
|
|
Delete
|
|
|
Control
|
|
Template Name
|
Owner UIC
|
Protection Code
|
|---|---|---|
|
DEFAULT
|
[0,0]
|
S:RW,O:RW,G:R,W:R
|
|
GROUP
|
[0,*]
|
S:RWCD,O:R,G:R,W
|
|
JOB
|
[0,0]
|
S:RWCD,O:RWCD,G,W
|
|
Event Audited
|
When Audit Occurs
|
|---|---|
|
Access
|
When translating a name, when creating a
name or a descendent table, or when deleting a name or a
descendent table
|
|
Creation
|
During access to a parent table for the
right to create a table or when the table itself is
created
|
|
Read
|
Gives you the right to see the security
elements of either a queue or a job in the queue.
|
|
Submit
|
Gives you the right to place jobs in the
queue.
|
|
Delete
|
Gives you the right to either delete a job
in the queue or modify the elements of a job.
|
|
Manage
|
Gives you the right to affect any job in the
queue. You can start, stop, or delete a queue and change its
status and any elements that are unrelated to
security.
|
|
Control
|
Gives you the right to modify the protection
elements and owner of a queue.
|
|
Template Name
|
Owner UIC
|
Protection Code
|
|---|---|---|
|
DEFAULT
|
[SYSTEM]
|
S:M,O:D,G:R,W:S
|
|
Event Audited
|
When Audit Occurs
|
|---|---|
|
Access
|
When a job is submitted to the queue and
when either a job or queue is modified.
|
|
Creation
|
When a queue is initialized.
|
|
Deletion
|
When a process deletes a job from the queue
or when the queue itself is deleted. (To enable auditing for
queue deletions, enable auditing for manage [M] access to the
queue.)
|
|
Read
|
Gives you the right to read lock value
blocks in the domain, including the right to use the $GETLKI
system service to retrieve it
|
|
Write
|
Gives you the right to write to lock value
blocks in the domain
|
|
Lock
|
Gives you the right to take locks using
$ENQ, release locks using $DEQ, and obtain information about the
lock database using $GETLKI
|
|
Control
|
Gives you the right to modify the protection
elements of a resource domain
|
|
Template Name
|
Owner UIC
|
Protection Code
|
|---|---|---|
|
DEFAULT
|
[n,*]
|
S:RWL,O:RWL,G:RWL,W
|
|
Event Audited
|
When Audit Occurs
|
|---|---|
|
Access
|
When a process calls $SET_RESOURCE_DOMAIN or
$ENQ to join a domain
|
|
Creation
|
The first time a process joins the resource
domain
|
|
Deaccess
|
When a process called $SET_RESOURCE_DOMAIN
or at image or process rundown
|
|
CAPABILITY
|
COMMON_EVENT_CLUSTER
|
|
DEVICE
|
FILE
|
|
GROUP_GLOBAL_SECTION
|
LOGICAL_NAME_TABLE
|
|
QUEUE
|
RESOURCE_DOMAIN
|
|
SECURITY_CLASS
|
SYSTEM_GLOBAL_SECTION
|
|
VOLUME
|
|
Read
|
Gives you the right to read a template
profile. Template profiles contain the security elements assigned
to new objects.
|
|
Write
|
Gives you the right to modify the values of
a template profile.
|
|
Control
|
Gives you the right to modify the security
profile of a security class object. Control access implies read
and write access.
|
|
Template Name
|
Owner UIC
|
Protection Code
|
|---|---|---|
|
DEFAULT
|
[SYSTEM]
|
S:RW,O:RW,G:R,W:R
|
|
Event Audited
|
When Audit Occurs
|
|---|---|
|
Access
|
When a process enters the DCL command SET
SECURITY or SHOW SECURITY with the /CLASS=SECURITY_CLASS
qualifier or when it uses the name SECURITY_CLASS in a call to
the system service $SET_SECURITY or $GET_SECURITY
|
|
Read
|
Gives you the right to examine file names
and print and copy files on a volume.
|
|
Write
|
Gives you the right to modify or write to
existing files on a volume. Whether the subject may perform the
operation on a specific file is determined by the file’s
protection. To be meaningful, write access requires read
access.
|
|
Create
|
Gives you the right to create files on a
disk volume and to subsequently modify them. Create access also
requires read and write access.
|
|
Delete
|
Gives you the right to delete files on a
disk volume, provided the user has proper access rights at the
directory and file level. Delete access requires read
access.
|
|
Control
|
Gives you the right to change the protection
and ownership elements of the volume.
|
|
Template Name
|
Owner UIC
|
Protection Code
|
|---|---|---|
|
DEFAULT
|
[0,0]
|
S:RWCD,O:RWCD,G:RWCD,W:RWCD
|
|
Event Audited
|
When Audit Occurs
|
|---|---|
|
Access
|
During any file system
operation
|
|
Security Area
|
Site Requirements
|
|---|---|
|
Passwords
|
Schedule for password changes.
|
|
Process for controlling minimum password
length and expiration periods.
|
|
|
Schedule for system password
changes.
|
|
|
Accounts
|
Procedure to grant accounts on computer
systems, for example, statement of need, signature of requester,
requester’s manager, system manager, or person setting up
the account. (Accounts can never be shared.)
|
|
Procedure to deactivate accounts due to
organizational changes, for example, employee transfers or
terminations.
|
|
|
Timetable for reauthorizing accounts,
usually once every 6 to 12 months.
|
|
|
Directive to deactivate accounts that are
not used on a regular basis.
|
|
|
Time periods for access.
|
|
|
Timetable for expiring
accounts.
|
|
|
Procedure for requesting privileges that
rigorously controls allocation.
|
|
|
Requirement to use nonprivileged accounts
for privileged users performing normal system
activity.
|
|
|
Schedule for verifying inactive
accounts.
|
|
|
List of approved security
tools.
|
|
|
Security events to audit
|
Logins from selected or all
sources.
|
|
Changes to authorization file
records.
|
|
|
Other uses of privilege and system
management actions.
|
|
|
Modifications to the known file list through
the Install utility.
|
|
|
Modification to the network configuration
database, using the network control program (NCP).
|
|
|
Physical access to the computer
room
|
A
written list of authorized personnel with the reason for access
included. Typically, one person would be responsible for keeping
this list current.
|
|
Storage of a visitor log in a secure
area.
|
|
|
Locked access doors and a documented
procedure for assigning keys, key cards, and combinations. (These
access controls change periodically and on transfer or
termination of employees.)
|
|
|
Physical access to terminals and personal
computers located outside the computer room
|
Use of programs to log out terminals that
have not been used for a given period of time.
|
|
Security awareness programs for the
organization (beyond computer personnel); topics may
include:
• Maintaining a list of approved
software.
• Keeping desktops clear of
hardcopy information relating to the computer system, network
passwords, and other system account information.
• Locking disks and file
cabinets.
• Keeping diskettes
inaccessible in or near workstations.
• Keeping keys out of open
view.
|
|
|
Dialup numbers
|
List of authorized users.
|
|
Schedule for changing numbers periodically
and procedures for notifying users of number
changes.
|
|
|
A
policy to minimize publishing dialup numbers.
|
|
|
Policy about changing passwords periodically
and when employees with access are terminated.
|
|
|
Password protection, either in the modems or
terminal servers, or system passwords on host dialup
ports.
|
|
|
Documentation available about:
• A dial-back system
• Details about the
network
• Terminal equipment
installed
• Terminal switching
systems
• Details about all
terminal devices connected to the network
• Details about all dialup
equipment
|
|
|
Communications
|
Denial of access into privileged accounts if
using passwords over TCP/IP, LAT, or Ethernet links.
|
|
Use of authentication cards for network
logins into privileged accounts.
|
$ ! SESSIONLOG.COM - log in to specified account with terminal session
$ ! logging enabled.
$ !
$ WRITE SYS$OUTPUT "Please log in to the account of your choice."
$ WRITE SYS$OUTPUT "Your terminal session will be recorded."
$ WRITE SYS$OUTPUT ""$ !
$ ! Acquire the intended user name and save it in a temporary file. Use
$ ! it to name the log file, and pass it as the first line of input to
$ ! LOGIN.
$ !
$ READ/PROMPT="Username: " SYS$COMMAND USERNAME
$ PID = F$GETJPI (0, "PID")
$ OPEN/WRITE OUTPUT USERNAME’PID’.TMP
$ WRITE OUTPUT USERNAME
$ CLOSE OUTPUT
$ DEFINE/USER SYS$INPUT USERNAME’PID’.TMP
$ SET HOST 0 /LOG=’USERNAME’.LOG
$ DELETE USERNAME’PID’.TMP;0
$ LOGOUT
$ ! CHECKLOG.COM - ensure that the account is being logged in to
$ ! the USER_LOG account.
$ !
$ IF F$MODE () .NES. "INTERACTIVE" THEN EXIT
$ !
$ ! Verify that the connection originated from the local node and
$ ! from the USER_LOG account.
$ !
$ IF F$LOGICAL ("SYS$NODE") .EQS. F$LOGICAL ("SYS$REM_NODE")-
_$ .AND. F$LOGICAL ("SYS$REM_ID") .EQS. "USER_LOG"-
_$ THEN GOTO OK
$ WRITE SYS$OUTPUT "You may log in to this account only with ",-
_$  "the USER_LOG  account."$ LOGOUT
$ !
$ ! When the login has been verified, enable Ctrl/Y to
$ ! release the account, invoke the user’s LOGIN.COM, and turn
$ ! control over to the user.
$ !
$ OK:
$ SET CONTROL_Y
$ IF F$SEARCH ("LOGIN.COM") .EQS. "" THEN EXIT
$ @LOGIN
|
Categories
|
Qaulifier
|
Description
|
|---|---|---|
|
Time of day
|
/ACCESS
|
By default, a user has full access every
day. By specifying an access time, you prevent access at all
other times. Identify hours on primary days with the keyword
PRIMARY; identify hours on secondary days with the keyword
SECONDARY.
|
|
/DIALUP
|
Specifies hours of access permitted for
dialup logins.
|
|
|
/LOCAL
|
Specifies hours of access for interactive
logins from local terminals.
|
|
|
Days of week
|
/PRIMEDAYS
|
Defines the primary and secondary days of
the week for logging in.
|
|
Mode of operation
|
/BATCH
|
Specifies the hours of access permitted for
batch jobs.
|
|
/INTERACTIVE
|
Specifies the hours of access for
interactive logins.
|
|
|
/NETWORK
|
Specifies the hours of access permitted for
network batch jobs.
|
|
|
/REMOTE
|
Specifies hours during which access is
permitted for interactive logins from network remote terminals
(with the DCL command SET HOST).
|
|
|
Allocation of resources
|
/DEVICE
|
Specifies the name of the user’s
default device at login.
|
|
/DIRECTORY
|
Specifies the name of the user’s
default directory at login.
|
|
|
Validity of account
|
/EXPIRATION
|
Specifies the expiration date and time of
the account.
|
|
/FLAGS=DISUSER
|
Disables the account so the user cannot log
in.
|
|
|
External authentication
|
/FLAGS=EXTAUTH
|
Specifies that the user is externally
authenticated.
|
/PRIMEDAYS=(NOMONDAY,TUESDAY,WEDNESDAY,THURSDAY,FRIDAY,SATURDAY,NOSUNDAY)
/NOBATCH=(PRIMARY, 9-17)
/EXPIRATION=30-DEC-2001
|
If Users Need to...
|
Create This Type of Account...
|
|---|---|
|
Perform work of a general nature, such as
program development or text editing
|
Interactive
|
|
Perform routine computer tasks requiring
limited activities
|
Captive
|
|
Run batch operations during unsupervised
periods
|
Captive
|
|
Run applications programs with confidential
information
|
Captive
|
|
Use network applications like
MAIL
|
Restricted
|
|
Access resources on your system from a
remote system (in a limited manner)
|
Captive or restricted
|
|
Use network proxy accounts
|
Restricted
|
|
Use authentication systems like smart
cards
|
Restricted
|
|
Use accounts created as part of a layered
product installation
|
Restricted
|
|
Perform privileged operations
|
Interactive, restricted, or
captive
|
|
Access resources from a remote system
without a password
|
Captive
|
|
Automatically log in to an application
terminal
|
Captive or restricted
|
|
Log in at the OpenVMS login prompt using
their external user IDs and passwords
|
Externally authenticated
|
.
.
.
|
Qualifier
|
Description
|
|---|---|
|
/CLI
|
Specifies the name of an alternate command
language interpreter
|
|
/COMMAND
|
Overrides the default login command
procedure
|
|
/NOCOMMAND
|
Disables execution of the default login
command procedure
|
|
/DISK
|
Requests an alternate default
disk
|
|
/TABLES
|
Specifies the name of an alternate CLI
table
|
READ/PROMPT="Enter date: " SYS$COMMAND DATE
$ if f$mode() .nes. "INTERACTIVE" then $logout
$ term = f$logical("SYS$COMMAND")
$ if f$locate("_T", term) .eq. 0 then $goto allow
$ if f$locate("_OP",term) .ne. 0 then $logout
$allow:
$ set control=(y,t)
$ deassign sys$input
$ previous_sysinput == f$logical("SYS$INPUT")
$ on error then goto next_command
$ on control_y then goto next_command
$ set control=(y,t)
$
$next_command:
$ on error then goto next_command
$ on control_y then goto next_command
$
$ if previous_sysinput .nes. f$logical("SYS$INPUT") then deassign sys$input
$ read/end=next_command/prompt="$ " sys$command command
$ command == f$edit(command,"UPCASE,TRIM,COMPRESS")
$ if f$length(command) .eq. 0 then goto next_command
$
$ delete = "delete"$ delete/symbol/local/all
$ if f$locate("@",command) .ne. f$length(command) then goto illegal_command
$ if f$locate("=",command) .ne. f$length(command) then goto illegal_command
$ if f$locate("F$",command) .ne. f$length(command) then goto illegal_command
$ verb = f$element(0," ",command)
$
$ if verb .eqs. "LOGOUT" then goto do_logout
$ if verb .eqs. "HELP" then goto do_help
$
$ write sys$output "%CAPTIVE-W-IVVERB, unrecognized command \",verb,"\"
$ goto next_command
$
$illegal_command:
$ write sys$output "%CAPTIVE-W-ILLEGAL, bad characters in command line"
$ goto next_command
$
$do_logout:
$ logout
$ goto next_command
$
$do_help:
$ define sys$input sys$command
$ help
$ goto next_command
MODIFY guest-account/LGICMD=SYS$MANAGER:filename.COM
SET ON
SET NOCONTROLY
ON ERROR THEN LOGOUT/BRIEF
DELETE/SYMBOL LOGOUT/GLOBAL
Note(pre-expired)
Note%SET-F-UAFERR, error accessing authorization file -RMS-E-RNF, record not found
ADD newusername /PASSWORD=(primarypwd, secondarypwd)
MODIFY username /PASSWORD=("", secondarypwd)
Note1 > >>
Note Note/FLAGS=DISFORCE_PWD_CHANGE
/FLAGS=NODISFORCE_PWD_CHANGE
Note/ALGORITHM=keyword=type [=value]
|
System Logical Name
|
Default
|
Min
|
Max
|
Units
|
|---|---|---|---|---|
|
SYS$PASSWORD_HISTORY_LIFETIME
|
365
|
1
|
28000
|
Days
|
|
SYS$PASSWORD_HISTORY_LIMIT
|
60
|
1
|
2000
|
Absolute count
|
Caution Note|
Bit #
|
Status
|
Description
|
|---|---|---|
|
0
|
ON
|
Enable external authentication. Users who
are tagged in the SYSUAF file as externally authenticated use the
external authenticator to log in.
|
|
OFF
|
Disable external authentication. If local
authentication is enabled (that is, bit 1 is ON), then the system
attempts local authentication with the user’s normal SYSUAF
user name and password. If local authentication is disabled,
login is not allowed for externally authenticated
users.
|
|
|
1
|
ON
|
Enable local authentication. If bit 0 is
off, the system automatically logs the user in using local
authentication. (The system effectively ignores the EXTAUTH flag
in the user’s SYSUAF record.) If bit 0 is on but the
external authentication server is not running, the user can
request local authentication using the /LOCAL_PASSWORD
qualifier.
|
|
OFF
|
Disable local authentication. A user can
force local authentication using the /LOCAL_PASSWORD qualifier.
You must have SYSPRV privilege to use this qualifier when bit 1
is OFF.
|
|
|
2
|
ON
|
Reserved by Compaq.
|
|
OFF
|
Reserved by Compaq.
|
|
|
3
|
ON
|
Enable forced uppercase terminal input
during login; this is equivalent to the RMS ROP$V_CVT option for
the login device. Setting this bit restores previous OpenVMS
behavior but does not allow case-sensitive input of user name and
password.
|
|
OFF
|
Disable forced uppercase terminal input
during login.
|
|
|
4
|
ON
|
Disable local password synchronization. The
system does not perform password synchronization from the
external authenticator to the SYSUAF.
|
|
OFF
|
Enable local password synchronization.
During a successful login, the system attempts to synchronize the
SYSUAF password with the external password (if they are
different) by calculating the OpenVMS hash value of the external
password used for logins and storing the hash value in the SYSUAF
file.
|
|
|
31
|
ON
|
Enable OPCOM debug messages, which are
displayed when users log in or use the SET PASSWORD command.
These messages can help diagnose potential problems with the
configuration of external authentication.
|
|
OFF
|
Disable OPCOM debug messages.
|
$ SET SERVER ACME/START
$ SET SERVER ACME/EXIT [/ABORT]
$ SET SERVER ACME/CONFIGURE=(NAME=VMS)
$ SET SERVER ACME/CONFIGURE=(NAME=MSV1_0,CRED=NT, FAC=PWRK)
Note$ SET SERVER ACME/ENABLE[=NAME=agent]
$ SHOW SERVER ACME [/FULL] [/AGENT=agent]
$ SET SERVER ACME/TRACE=n
|
Flag
|
Description
|
|---|---|
|
VMSAUTH
|
The account can use standard (SYSUAF)
authentication when the EXTAUTH flag would otherwise require
external authentication. An application specifies the VMS domain
of interpretation when calling SYS$ACM to request standard VMS
authentication for a user account that normally uses external
authentication.
|
|
DISPWDSYNCH
|
Do not synchronize the external password for
this account. See the GUARD PASSWORD control bit in the
SECURITY_POLICY system parameter for systemwide password
synchronization control.
|
|
Task
|
Command
|
Example
|
|---|---|---|
|
Adding terminal/user name
association
|
ALF ADD
|
ALF ADD TTA5 RENOLDS
|
|
Adding terminal server/user name
association
|
ALF ADD/PORT
|
"M34C3/LC-1-2" RENOLDS
|
|
Displaying records in ALF file
|
ALF SHOW
|
ALF SHOW TTA5
ALF SHOW /USERNAME=PONTRE |
|
Removing terminal/user name
association
|
ALF REMOVE
|
ALF REMOVE TTA3
ALF REMOVE /USERNAME=DOUGLAS |
SET TERMINAL/PERMANENT/SECURE/DISCONNECT term-id
/NOMODEM/SECURE/DISCONNECT/NOAUTOBAUD/PERMANENT
/MODEM/AUTOBAUD/NOSECURE/DISCONNECT/PERMANENT
|
Field
|
Description
|
|---|---|
|
Intrusion class
|
The general source of failure:
• Network: failure originating
from a remote node, using a valid user name
• Terminal: failure
originating from one terminal
• Term_User: failure
originating from one terminal, using a valid user
name
• Username: failure
attempting to create a detached process
|
|
Type
|
Severity of login failure:
• Suspect
• Intruder
The system parameters for threshold count
(LGI_BRK_LIM) and monitoring period (LGI_BRK_TMO) define when a
suspect becomes an intruder.
|
|
Count
|
Number of login failures associated with a
particular source.
|
|
Expiration
|
Date and time when a suspect’s record
is deleted or when an intruder is allowed another chance to log
in. When an intruder’s record reaches its expiration time,
it becomes a suspect, and the failure count is reset to
LGI_BRK_LIM. The expiration time is reset to the old expiration
plus LGI_BRK_TMO.
|
|
Source
|
Origin of the login failure:
• Node and user name if Network
class
• Terminal if Terminal
class
• Terminal and user name if
Term_User class
• User name if Username
class
|
Intrusion    Type      Count       Expiration             Source
   NETWORK   SUSPECT     1    2-Jan-2002 13:20:30.89    PCD025::

Intrusion    Type      Count       Expiration             Source
   NETWORK   SUSPECT     5    2-Jan-2002 13:36:39.42    DENIM::SYSTEM
   NETWORK   SUSPECT     2    2-Jan-2002 13:25:17.30    N1KDO::SYSTEM

Intrusion    Type      Count       Expiration             Source
   NETWORK   SUSPECT     2    2-Jan-2002 13:07:57.95    OMNI:.LOWELL.ASH::TESTER
   NETWORK   INTRUDER    8    2-Jan-2002 11:06:50.51    OMNI:.BOSTON.BIRCH::MAPLE

Intrusion    Type      Count       Expiration             Source
   NETWORK   SUSPECT     2    2-Jan-2002 13:20:10.09    JETTE::TIPH
   NETWORK   SUSPECT     1    2-Jan-2002 13:21:40.75    FTSR::TFREDERICK
|
Time of Login Failure
|
Failure Count
|
Extension of Monitoring Period
|
|---|---|---|
|
6:00
|
0
|
George fails to log in, and the system
starts to monitor logins from George’s terminal. It
monitors for the next 5 minutes.
|
|
6:00:30
|
1
|
Thirty seconds later, with 4.5 minutes left
in the monitoring period, George fails again. The monitoring
period is extended by 5 minutes. Thus, the system monitors George
for login failures during the next 9.5 minutes.
|
|
6:01
|
2
|
Thirty seconds later, 9 minutes remain in
his monitoring period, and the system extends it by 5
minutes.
|
|
6:02
|
3
|
One minute later, George has 13 minutes in
his monitoring period, and the system extends it by 5
minutes.
|
|
6:02:30
|
4
|
Thirty seconds later, George has 17.5
minutes in the monitoring perod, and the system extends it by 5
minutes. Thus, the system monitors George for login failures
during the next 22.5 minutes.
|
|
6:04:30
|
5
|
Two minutes later, George makes a sixth
attempt. Even though the monitoring period allows the time, he
runs out of chances. He becomes an intruder and can no longer
access the system.
|
|
If You Want to Control...
|
Set the Parameter
|
Description
|
|---|---|---|
|
Login time period
|
LGI_PWD_TMO
|
Allows time to:
• Enter the correct system
password (if used).
• Enter personal account
passwords.
• Enter the old password,
enter a new password, and verify it when using the SET PASSWORD
command.
|
|
Number of times a person can try to log in
over a phone line or network connection
|
LGI_RETRY_LIM
|
Allows a person to retry the login sequence
without losing the phone connection or network link as long as
the retry time (LGI_RETRY_TMO) allows. Someone can reconnect and
reattempt login as long as the break-in limit (LGI_BRK_LIM) has
not been exceeded during the monitoring period.
|
|
Interval between login attempts over phone
lines or network connection
|
LGI_RETRY_TMO
|
Specifies the number of seconds allowed
between login attempts after a login failure. If there is no user
response after a login failure for LGI_RETRY_TMO seconds,
LOGINOUT disconnects the session.
|
|
Number of login chances
|
LGI_BRK_LIM
|
Specifies the number of login failures
during the monitoring period that triggers evasive action. The
failure count applies independently to login attempts by each
user name, terminal, and node.
|
|
Length of failure monitoring
period
|
LGI_BRK_TMO
|
Indicates the time increment added to the
suspect’s expiration time each time a login failure occurs.
Once the expiration period passes, prior failures are discarded,
and the subject is given a clean slate.
|
|
Association of user name and terminal name
in intrusion database source name
|
LGI_BRK_TERM
|
Controls whether failures from terminal
class logins are counted by terminal, by user (the default), or
by user across all terminals. LAT is tracked back to the
originating port based on the contents of the TT_ACCPORNAM
field.
|
|
Duration of login denial
|
LGI_HID_TIM
|
Specifies the duration of login denial. The
value of this parameter times a random number (between 1 and 1.5)
determines the actual length of evasive action when the failure
count has exceeded LGI_BRK_LIM.
|
|
Intruder’s account
|
LGI_BRK_DISUSER
|
Enables the DISUSER flag in user’s
authorization record, permanently locking out that
account.
|
|
Department
|
Employee
|
Function
|
|---|---|---|
|
Executive
|
Samuel Gibson
|
President
|
|
Olivia Westwood
|
Treasurer
Head of Computer Operations |
|
|
Accounting
|
Carlo Ruiz
|
Payroll
|
|
Rich Smith
|
Bookkeeping
|
|
|
Rod Jacobs
|
Clerk
|
|
|
Ruth Ross
|
Clerk
|
|
|
Marketing
|
Jason Chang
|
Forecasting
|
|
Alana Mack
|
Sales Reporting
|
|
|
Shipping
|
Scott Giles
|
Inventory Control
|
|
Administration
|
Jane Simon
|
Correspondence Management
Paycheck Printing |
(IDENTIFIER=OWESTWOOD,ACCESS=READ+WRITE+EXECUTE+DELETE)
(IDENTIFIER=CRUIZ,ACCESS=READ+WRITE+EXECUTE+DELETE)
(IDENTIFIER=RSMITH,ACCESS=READ+WRITE+EXECUTE+DELETE)
(IDENTIFIER=JSIMON,ACCESS=READ)
(IDENTIFIER=SGIBSON,ACCESS=READ)
(IDENTIFIER=PAYROLL,ACCESS=READ+WRITE+EXECUTE+DELETE)
(IDENTIFIER=JSIMON,ACCESS=READ)
(IDENTIFIER=SGIBSON,ACCESS=READ)
(IDENTIFIER=DIALUP,ACCESS=NONE)
RENAME/IDENTIFIER old-identifier new-identifier
|
Dynamic attribute
|
Allows holders of the identifier to remove
and to restore the identifier from the process rights list by
using the DCL command SET RIGHTS_LIST.
|
|
Resource attribute
|
Allows holders of the identifier to charge
disk space to the identifier. It is used for file
objects.
|
|
Subsystem attribute
|
|
|
No Access attribute
|
Makes any access rights of the identifier
null and void. This attribute is intended as a modifier for a
resource identifier or for purposes unrelated to access
control.
|
|
Holder Hidden attribute
|
Prevents someone from getting a list of
users who hold an identifier unless that person owns the
identifier.
|
|
Name Hidden attribute
|
Allows holders of an identifier to have it
translated (either from binary to ASCII or vice versa), but
prevents unauthorized users from translating the
identifier.
|
|
Category
|
Privilege
|
Activity Permitted
|
|---|---|---|
|
None
|
None
|
Deny activities requiring
privileges
|
|
Normal
|
NETMBX
TMPMBX |
Create network connections
Create temporary mailbox |
|
Group
|
GROUP
GRPPRV |
Control processes in the same group
Gain access through the system protection field of the group’s objects |
|
Devour
|
ACNT
ALLSPOOL BUGCHK EXQUOTA GRPNAM PRMCEB PRMGBL PRMMBX SHMEM |
Disable accounting
Allocate spooled devices Make bugcheck error log entries Exceed disk quotas Insert group logical names in the name table Create/delete permanent common event flag clusters Create permanent global sections Create permanent mailboxes Create/delete structures in shared memory |
|
System
|
ALTPRI
AUDIT OPER PSWAPM WORLD SECURITY SYSLCK |
Set base priority higher than allotment
Generate audit records Perform operator functions Change process swap mode Control any process Perform security-related functions Lock systemwide resources |
|
Objects
|
DIAGNOSE
IMPORT MOUNT READALL SYSGBL VOLPRO |
Diagnose devices
Mount a nonlabeled tape volume Execute mount volume QIO Possess read access to all system objects Create systemwide global sections Override volume protection |
|
All
|
BYPASS
CMEXEC CMKRNL IMPERSONATE DOWNGRADE LOG_IO PFNMAP PHY_IO SETPRV SHARE SYSNAM SYSPRV UPGRADE |
Disregard protection
Change to executive mode Change to kernel mode Create detached processes of arbitrary UIC Write to a lower secrecy object or lower an object’s classification Issue logical I/O requests Map to specific physical pages Issue physical I/O requests Enable any privilege Access devices allocated to other users Insert system logical names in the name table Access objects through the system protection field Write to a higher integrity object or raise an object’s integrity level |
|
Type of User
|
Minimum Privileges
|
|---|---|
|
General
|
TMPMBX, NETMBX
|
|
Operator
|
OPER
|
|
Group manager
|
GROUP, GRPPRV
|
|
System manager/administrator
|
SYSPRV, OPER, SYSNAM, CMKRNL1 (SEE NOTE)
|
|
Security administrator
|
SECURITY, AUDIT, READALL
|
Note
(S:RWED,O:RWED,G:RE,W)
(S:RWED,O:RWED,G:R,W)
(S:RWED,O:RW,G:R,W)
(DEFAULT_PROTECTION,S:RWED,O:RWED,G,W)
SET PROTECTION=(S:RWED,O:RWED,G,W)/DEFAULT
.
.
.

.
.
.
SET SECURITY/CLASS=SECURITY_CLASS/PROFILE=TEMPLATE=template-name
Note$ SET SECURITY/CLASS=DEVICE - _$ /PROTECTION=(S:RWLP,O:RWLP,G:RW,W:R) FTA0:
|
Command
|
Function
|
|---|---|
|
DIRECTORY/ACL
|
Displays the ACL for the file
|
|
DIRECTORY/OWNER
|
Displays the file owner’s
UIC
|
|
DIRECTORY/PROTECTION
|
Displays the file’s protection
code
|
|
DIRECTORY/SECURITY
|
Combines and displays file information
produced by DIRECTORY/ACL, DIRECTORY/OWNER, and
DIRECTORY/PROTECTION
|
|
EDIT/ACL
|
Invokes the access control list editor (ACL
editor)
|
|
SET PROTECTION/DEFAULT
|
Establishes the default protection to be
applied to all files subsequently created
|
|
SET SECURITY
|
Modifies the security profile of any object:
the owner, protection code, and ACL
|
|
SHOW SECURITY
|
Displays the ownership, UIC protection code,
and ACL of a protected object
|
CautionDEL*ETE :== "DELETE/ERASE"PUR*GE :== "PURGE/ERASE"
|
Class
|
Description
|
|---|---|
|
ACL
|
Access to any object holding a
security-auditing ACE.
|
|
Audit
|
All uses of the SET AUDIT command. This
category cannot be disabled.
|
|
Authorization
|
All changes to the authorization
database:
• System user authorization file
(SYSUAF.DAT)
• Network proxy
authorization file (NETPROXY.DAT or NET$PROXY.DAT)
• Rights database
(RIGHTSLIST.DAT)
|
|
Break-in
|
All intrusion attempts: batch, detached,
dialup, local, network, remote.
|
|
Logfailure
|
All login failures: batch, dialup, local,
remote, network, subprocess, detached, server.
|
Message from user AUDIT$SERVER on BILBO
Security alarm (SECURITY) and security audit (SECURITY) on BILBO,
                       system id: 19662
Auditable event:       Object deletion
Event information:     file deletion request (IO$_DELETE)
Event time:            24-APR-2001 13:17:24.59
PID:                   47400085
Process name:          Hobbit
Username:              ROBINSON
Process owner:         [ACCOUNTING,ROBINSON]
Terminal name:         OPA0:
Image name:            DSA2264:[SYS51.SYSCOMMON.][SYSEXE]DELETE.EXE
Object class name:     FILE
Object owner:          [SYSTEM]
Object protection:     SYSTEM:RWED, OWNER:RWED, GROUP:RE, WORLD:RE
File name:             _DSA2200:[ROBINSON]FOO.BAR;1
File ID:               (17481,6299,1)
Access requested:      DELETE
Matching ACE:          (IDENTIFIER=MINDCRIME,ACCESS=NONE)
Sequence key:          00008A41
Status:                %SYSTEM-F-NOPRIV, no privilege for attempted operation
|
ACE Type
|
Description
|
|---|---|
|
Alarm ACE
|
Writes an event message to the operator
terminal whenever the object is accessed in the specified manner.
It has the following syntax:
(ALARM=SECURITY[,OPTIONS=options],ACCESS=access-type[+access-type...]) |
|
Audit ACE
|
Writes an event message to the security
audit log file whenever the object is accessed in the specified
manner. It has the following syntax:
(AUDIT=SECURITY [,OPTIONS=options],ACCESS=access-type[+access-type...]) |
|
Event Class
|
Description
|
|---|---|
|
Access
|
Access requests to all objects in a class.
You can audit selected types of access, both privileged and
nonprivileged, to all protected objects of a particular
class.
|
|
ACL
|
Events requested by a security Audit or
Alarm ACE in the ACL of an object.
|
|
Authorization
|
Modification of any portion of SYSUAF.DAT,
NETPROXY.DAT, NET$PROXY.DAT, or RIGHTSLIST.DAT.
|
|
Breakin
|
Intrusion attempts.
|
|
Connection
|
Logical link connections or terminations
through SYSMAN, DECnet Phase IV,1 Compaq DECwindows Motif for OpenVMS, or
an interprocess communication (IPC) call.
|
|
Create
|
Creation of a protected object.
|
|
Deaccess
|
Deaccess from a protected
object.
|
|
Delete
|
Deletion of a protected object.
|
|
Identifier
|
Use of identifiers as
privileges.
|
|
Install
|
Modifications made to the known file list
through the Install utility.
|
|
Logfailure
|
Unsuccessful login attempts.
|
|
Login
|
Successful login attempts.
|
|
Logout
|
Logouts.
|
|
Mount
|
Volume mounts and dismounts.
|
|
NCP
|
Modification to the network configuration
database, using the network control program (NCP).
|
|
Privilege
|
Successful or unsuccessful use of
privilege.
|
|
Process
|
Use of one or more of the process control
system services.
|
|
SYSGEN
|
Modification of a system parameter with the
System Generation utility (SYSGEN) or AUTOGEN.
|
|
Time
|
Modification of system time.
|
|
Greater Privilege
|
Privilege It Implies
|
|---|---|
|
PRMMBX
|
TMPMBX
|
|
CMKRNL
|
CMEXEC
|
|
SYSNAM
|
GRPNAM
|
|
WORLD
|
GROUP
|
|
SYSPRV
|
GRPPRV
|
|
BYPASS
|
SYSPRV, GRPPRV, READALL, DOWNGRADE,
UPGRADE
|
|
Low
|
Medium
|
High
|
|
|---|---|---|---|
|
Goal
|
Monitor local events with high
impact
|
Track changes to system
definition
|
Monitor database changes; track use of
process control system services
Monitor network connections through DECnet Phase IV (VAX only) |
|
Classes to Enable as Alarms
|
ACL, authorization, break-in (all types),
logfailure (all types)
|
Same as low category plus use of SECURITY
privilege
|
Same as medium category plus INSTALL, time,
SYSGEN, unsuccessful privilege use
|
|
Classes to Enable as Audits
|
ACL, authorization, breakin (all types),
logfailure (all types)
|
All of low category plus INSTALL; time;
SYSGEN; privilege; logins (all types); logouts (all types);
access of files through BYPASS, SYSPRV, and READALL privileges;
unsuccessful access to files, devices, and volumes
|
All of medium category plus identifier,
process, unsuccessful access to protected objects, NCP,
connection (VAX only)
|
System security alarms currently enabled for:
  Authorization
  Breakin:       dialup,local,remote,network,detached

System security audits currently enabled for:
  ACL
  Authorization
  INSTALL
  Time
  SYSGEN
  Breakin:       dialup,local,remote,network,detached
  Login:         batch,dialup,local,remote,network,subprocess,detached,server
  Logfailure:    batch,dialup,local,remote,network,subprocess,detached,server
  Logout:        batch,dialup,local,remote,network,subprocess,detached,server

  Privilege use:
    ACNT      ALLSPOOL  ALTPRI    AUDIT     BUG       BYPASS    CMEXEC    CMKRNL
    DIAGNOSE  DOWNGRADE EXQUOTA   GROUP     GRPNAM    GRPPRV    IMPORT    IMPERSONATE
    LOG_IO    MOUNT     NETMBX    OPER      PFNMAP    PHY_IO    PRMCEB    PRMGBL
    PRMMBX    PSWAPM    READALL   SECURITY  SETPRV    SHARE     SHMEM     SYSGBL
    SYSLCK    SYSNAM    SYSPRV    TMPMBX    UPGRADE   VOLPRO    WORLD

  Privilege failure:
    ACNT      ALLSPOOL  ALTPRI    AUDIT     BUGCHK    BYPASS    CMEXEC    CMKRNL
    DIAGNOSE  DOWNGRADE EXQUOTA   GROUP     GRPNAM    GRPPRV    IMPORT    IMPERSONATE
    LOG_IO    MOUNT     NETMBX    OPER      PFNMAP    PHY_IO    PRMCEB    PRMGBL
    PRMMBX    PSWAPM    READALL   SECURITY  SETPRV    SHARE     SHMEM     SYSGBL
    SYSLCK    SYSNAM    SYSPRV    TMPMBX    UPGRADE   VOLPRO    WORLD

  FILE access:
    SYSPRV:      read,write,execute,delete,control
    BYPASS:      read,write,execute,delete,control
    READALL:     read,write,execute,delete,control
|
Characteristic
|
Advantage
|
|---|---|
|
Binary
|
A
binary file requires the least amount of disk space.
|
|
Clusterwide
|
A
clusterwide file, when processed by the Audit Analysis utility,
results in one report of security-relevant events in the
cluster.
|
|
Sequential record format
|
A
sequential record format is easily analyzed by user-written
programs. See the OpenVMS System
Management Utilities Reference Manual for a description of
the message format of the security audit log file.
|
$ IF .NOT. F$GETDVI("$1$DUA2","MNT") -
_$ THEN MOUNT/SYSTEM $1$DUA2 AUDIT AUDIT$ /NOREBUILD
$ DEFINE/SYSTEM/EXEC VMS$AUDIT_SERVER AUDIT$:[AUDIT]VMS$AUDIT_SERVER.DAT
$ DEFINE/USER SYS$COMMAND OPA0:
$ REPLY/DISABLE=SECURITY
$ DEFINE/USER SYS$COMMAND TTA3:
$ REPLY/ENABLE=SECURITY
NoteSET AUDIT/LISTENER=device-name
ANALYZE/AUDIT file-name
|
Type
|
Qualifier
|
Description
|
|---|---|---|
|
Content
|
/BEFORE
|
Extracts event messages logged before the
specified time.
|
|
/SINCE
|
Extracts event messages logged after the
specified of time.
|
|
|
/EVENT_TYPE
|
||
|
/SELECT
|
Extracts event messages based on data in the
messages. (For example, /SELECT=USERNAME=JSNOOP lists only
security event messages generated by user JSNOOP.)
|
|
|
/IGNORE
|
Excludes event messages from the report
based on data in the messages.
|
|
|
Format
|
/BRIEF
|
Produces a report with one line of
information about each record in the audit log file, such as the
type of event, when it occurred, and the terminal from which it
originated (see Brief Audit Report).
This is the default.
|
|
/FULL
|
Provides all possible data for each record
in the audit log file being processed (see One Record from a Full Audit Report). Appendix D provides sample alarm messages for
each event class.
|
|
|
/SUMMARY
|
Lists the total number of audit messages for
each event class in the log file being analyzed (see Summary of Events in an Audit Log File). It can
also plot the aggregate events per hour on each
node.
|
|
|
/BINARY
|
Produces a binary file so you can extract
records for further analysis using your own data reduction tools.
See the OpenVMS System
Management Utilities Reference Manual for a description of
the audit message record format.
|
|
|
Destination
|
/OUTPUT
|
Specifies the report destination. By
default, it goes to SYS$OUTPUT.
|
      Date / Time       Type    Subtype     Node  Username  ID    Term
--------------------------------------------------------------------------
 1-NOV-2000 16:00:03.37 ACCESS  FILE_ACCESS HERE  SYSTEM   5B600AE4
 1-NOV-2000 16:00:59.66 LOGIN   SUBPROCESS  GONE  ROBINSON 3BA011D4
 1-NOV-2000 16:02:37.31 LOGIN   SUBPROCESS  GONE  MILANT   000000D5
 1-NOV-2000 16:06:36.40 LOGFAIL LOCAL       SUPER MBILLS   000000E5 _TTA1:
.
.
.
Security audit (SECURITY) on FNORD, system id: 19728
Auditable event:          Object access
Event time:               6-AUG-2000 11:54:16.21
PID:                      3D200117
Process name:             Hobbit
Username:                 PATTERSON
Process owner:            [ACCOUNTING,PATTERSON]
Terminal name:            RTA1:
Object class name:        LOGICAL_NAME_TABLE
Object name:              LNM$SYSTEM_DIRECTORY
Access requested:         WRITE
Status:                   %SYSTEM-S-NORMAL, normal successful completion
Privileges used:          SYSPRV
Total records read:        9701          Records selected:       9701
Record buffer size:        1031
Successful logins:          542          Object creates:         1278
Successful logouts:         531          Object accesses:        3761
Login failures:              35          Object deaccesses:      2901
Breakin attempts:             2          Object deletes:          301
System UAF changes:          10          Volume (dis)mounts:       50
Rights db changes:            8          System time changes:       0
Netproxy changes:             5          Server messages:           0
Audit changes:                7          Connections:               0
Installed db changes:        50          Process control audits:    0
Sysgen changes:               9          Privilege audits:         91
NCP command lines:          120
      Date / Time       Type    Subtype    Node   Username  ID    Term
--------------------------------------------------------------------------
.
.
.
26-OCT-2000 16:06:09.17 LOGFAIL REMOTE     BOSTON KOVACS 5BC002EA _RTA14:
26-OCT-2000 16:06:22.01 LOGFAIL REMOTE     BOSTON KOVACS 5BC002EA _RTA14:
26-OCT-2000 16:06:34.17 LOGFAIL REMOTE     BOSTON KOVACS 5BC002EA _RTA14:
26-OCT-2000 16:06:45.50 LOGFAIL REMOTE     BOSTON KOVACS 5BC002EA _RTA14:
26-OCT-2000 16:07:12.39 LOGIN   REMOTE     BOSTON KOVACS 5BC002EA _RTA14:
26-OCT-2000 16:23:42.45 SYSUAF  SYSUAF_ADD BOSTON KOVACS 5BC002EA _RTA14:
.
.
.
   .
   .
   .
Security alarm (SECURITY) and security audit (SECURITY) on BOSTON,
                        system id: 20011
Auditable event:        Remote interactive login failure
Event time:             26-OCT-2000 16:06:09.17
PID:                    5BC002EA
Username:               KOVACS
Terminal name:          _RTA14:
Remote nodename:        NACHWA         Remote node id:      7300
Remote username:        FOLLEN
Status:                 %LOGIN-F-INVPWD, invalid password
   .
   .
   .
Security alarm (SECURITY) and security audit (SECURITY) on BOSTON,
                        system id: 20011
Auditable event:        Remote interactive login
Event time:             26-OCT-2000 16:07:12.39
PID:                    5BC002EA
Username:               KOVACS
Terminal name:          _RTA14:
Remote nodename:        NACHWA         Remote node id:      7300
Remote username:        FOLLEN
List of audit journals:
  Journal name:           SECURITY
  Journal owner:          (system audit journal)
  Destination:            SYS$COMMON:[SYSMGR]SECURITY.AUDIT$JOURNAL
  Monitoring:             enabled
    Warning thresholds,   Block count:    100   Duration:  2 00:00:00.0
    Action thresholds,    Block count:     25   Duration:  0 00:30:00.0

Security auditing server characteristics:
  Database version:       4.4
  Backlog (total):        100, 200, 300
  Backlog (process):      5, 2
  Server processing intervals:
    Archive flush:        0 00:01:00.00
    Journal flush:        0 00:05:00.00
    Resource scan:        0 00:05:00.00
  Final resource action:  purge oldest audit events

Security archiving information:
  Archiving events:       none
  Archive destination:

System security alarms currently enabled for:
  ACL
  Authorization
  Breakin:     dialup,local,remote,network,detached
  Logfailure:  batch,dialup,local,remote,network,subprocess,detached,server

System security audits currently enabled for:
  ACL
  Authorization
  Breakin:     dialup,local,remote,network,detached
  Logfailure:  batch,dialup,local,remote,network,subprocess,detached,server
$ !
$ DEFINE /SYSTEM /EXECUTIVE SYS$AUDIT_SERVER_INHIBIT yes
$ !
$ !
$ SET AUDIT/SERVER=INITIATE
$ !
|
Control Stages
|
Total Message Backlog (Default)
|
Process Backlog Limit (Default)
|
|---|---|---|
|
1
|
100
|
5
|
|
2
|
200
|
2
|
|
3
|
300
|
None
|
|
CACHE_SERVER
|
CLUSTER_SERVER
|
|
CONFIGURE
|
DFS$COM_ACP
|
|
DNS$ADVER
|
IPCACP
|
|
JOB_CONTROL
|
NETACP
|
|
NET$ACP
|
OPCOM
|
|
REMACP
|
SHADOW_SERVER
|
|
SMISERVER
|
SWAPPER
|
|
TP_SERVER
|
VWS$DISPLAYMGR
|
|
VWS$EMULATORS
|
|
Option
|
Description
|
|---|---|
|
Crash
|
Crash the system if the audit server runs
out of memory.
|
|
Ignore_New
|
Ignore new event messages until memory is
available. New event messages are lost but event messages in
memory are saved.
|
|
Purge_Old (default)
|
Remove old event messages until memory is
available for the most current messages.
|
|
Device and Directory
|
File Name
|
|---|---|
|
SYS$SYSTEM
|
AUTHORIZE.EXE
|
|
F11BXQP.EXE
|
|
|
LOGINOUT.EXE
|
|
|
DCL.EXE
|
|
|
JOBCTL.EXE
|
|
|
SYSUAF.DAT
|
|
|
NETPROXY.DAT
|
|
|
RIGHTSLIST.DAT
|
|
|
STARTUP.COM
|
|
|
VMS$OBJECTS.DAT
|
|
|
SYS$LIBRARY
|
SECURESHR.EXE
|
|
SECURESHRP.EXE
|
|
|
SYS$MANAGER
|
VMS$AUDIT_SERVER.DAT
|
|
SY*.COM
|
|
|
VMSIMAGES.DAT
|
|
|
SYS$SYSROOT
|
[000000]SYSEXE.DIR
|
|
[000000]SYSLIB.DIR
|
|
|
[000000]SYS$LDR.DIR
|
|
|
[000000]SYSMGR.DIR
|
|
File
|
Description
|
|---|---|
|
NETOBJECT.DAT
|
Contains the DECnet object database. Among
the information contained in this file is the list of known
DECnet server accounts and passwords.
|
|
NETPROXY.DAT
NET$PROXY.DAT |
Contains the network proxy database. This
file is maintained by the Authorize utility
(AUTHORIZE).
|
|
QMAN$MASTER.DAT
|
Contains the master queue manager database.
This file contains the security information for all shared batch
and print queues. If two or more nodes intend to participate in a
shared queuing system, a single copy of this file must be
maintained on a shared disk.
|
|
RIGHTSLIST.DAT
|
Contains the rights identifier database.
This file is maintained by AUTHORIZE and by various rights
identifier system services.
|
|
SYSALF.DAT
|
Contains the system autologin file. This
file is maintained by the System Management utility
(SYSMAN).
|
|
SYSUAF.DAT
|
Contains the system user authorization file.
This file is maintained by AUTHORIZE and modifiable through the
Set User Authorization Information ($SETUAI) system
service.
|
|
SYSUAFALT.DAT
|
Contains the system alternate user
authorization file. This file serves as a backup to SYSUAF.DAT
and is enabled through the SYSUAFALT system
parameter.
|
|
VMS$OBJECTS.DAT
|
Contains the cluster-visible object
database. Among the information contained in this file are the
security profiles for all cluster-visible objects.
|
|
File
|
Description
|
|---|---|
|
VMS$AUDIT_SERVER.DAT
|
Contains information related to security
auditing, such as enabled security-auditing events and the
destination of the system security audit log file.
|
|
VMS$PASSWORD_HISTORY.DATA
|
Contains the system password history
database. This file is maintained by the SET PASSWORD
utility.
|
|
VMSMAIL_PROFILE.DATA
|
Contains the system mail database. This file
is maintained by the Mail utility (MAIL). It holds mail profiles
for all system users as well as a list of all mail forwarding
addresses in use on the system.
|
|
VMS$PASSWORD_DICTIONARY.DATA
|
Contains the system password dictionary. The
system password dictionary is a list of English words and phrases
that cannot be used as account passwords.
|
|
VMS$PASSWORD_POLICY
|
Contains any site-specific password filters.
This file is created and installed by the security administrator
or system manager. (See Section 7.3.3.3
for details on password filters.)
|
|
File
|
Coordination Required
|
Result of Poor Synchronization
|
|---|---|---|
|
VMS$AUDIT_SERVER.DAT
|
Update after any SET AUDIT
command.
|
Possible partitioning of auditing
domains
|
|
NETOBJECT.DAT
|
Update all versions after any NCP SET OBJECT
or DEFINE OBJECT command.
|
Unexplained network login failures and
unauthorized network access
|
|
NETPROXY.DAT
NET$PROXY.DAT |
Update all versions after any AUTHORIZE
proxy command.
|
Unexplained network login failures and
unauthorized network access
|
|
RIGHTSLIST.DAT
|
Update all versions after any change to any
identifier or holder records.
|
Possible unauthorized system access and
unauthorized access to protected objects
|
|
SYSALF.DAT
|
Update all versions after any SYSMAN ALF
command.
|
Unexplained login failures and unauthorized
system access
|
|
SYSUAF.DAT
|
Possible unexplained login failures and
unauthorized system access.
|
|
|
SYSUAFALT.DAT
|
Update all versions after any change to any
authorization records in this file.
|
Possible unexplained login failures and
unauthorized system access
|
|
VMS$OBJECTS.DAT
|
Update all versions after any change to the
security profile of a cluster-visible object or after new
cluster-visible objects are created. (See Section 11.5 for details.)
|
Possible unauthorized access to protected
objects
|
|
VMSMAIL_PROFILE.DATA
|
Update all versions after any changes to
mail forwarding parameters.
|
Possible authorized disclosure of
information
|
|
VMS$PASSWORD_HISTORY.DATA
|
Update all versions after any password
change.
|
Possible violation of the system password
policy
|
|
VMS$PASSWORD_DICTIONARY.DATA
|
Update all versions after any site-specific
additions.
|
Possible violation of the system password
policy
|
|
VMS$PASSWORD_POLICY
|
Install common version on all
nodes.
|
Possible violation of the system password
policy
|
|
Internal Name
|
$SETUAI Item Code
|
|---|---|
|
UAF$R_DEF_CLASS
|
UAI$_DEF_CLASS
|
|
UAF$Q_DEF_PRIV
|
UAI$_DEF_PRIV
|
|
UAF$B_DIALUP_ACCESS_P
|
UAI$_DIALUP_ACCESS_P
|
|
UAF$B_DIALUP_ACCESS_S
|
UAI$_DIALUP_ACCESS_S
|
|
UAF$B_ENCRYPT
|
UAI$_ENCRYPT
|
|
UAF$B_ENCRYPT2
|
UAI$_ENCRYPT2
|
|
UAF$Q_EXPIRATION
|
UAI$_EXPIRATION
|
|
UAF$L_FLAGS
|
UAI$_FLAGS
|
|
UAF$B_LOCAL_ACCESS_P
|
UAI$_LOCAL_ACCESS_P
|
|
UAF$B_LOCAL_ACCESS_S
|
UAI$_LOCAL_ACCESS_S
|
|
UAF$B_NETWORK_ACCESS_P
|
UAI$_NETWORK_ACCESS_P
|
|
UAF$B_NETWORK_ACCESS_S
|
UAI$_NETWORK_ACCESS_S
|
|
UAF$B_PRIME_DAYS
|
UAI$_PRIMEDAYS
|
|
UAF$Q_PRIV
|
UAI$_PRIV
|
|
UAF$Q_PWD
|
UAI$_PWD
|
|
UAF$Q_PWD2
|
UAI$_PWD2
|
|
UAF$Q_PWD_DATE
|
UAI$_PWD_DATE
|
|
UAF$Q_PWD2_DATE
|
UAI$_PWD2_DATE
|
|
UAF$B_PWD_LENGTH
|
UAI$_PWD_LENGTH
|
|
UAF$Q_PWD_LIFETIME
|
UAI$_PWD_LIFETIME
|
|
UAF$B_REMOTE_ACCESS_P
|
UAI$_REMOTE_ACCESS_P
|
|
UAF$B_REMOTE_ACCESS_S
|
UAI$_REMOTE_ACCESS_S
|
|
UAF$R_MAX_CLASS
|
UAI$_MAX_CLASS
|
|
UAF$R_MIN_CLASS
|
UAI$_MIN_CLASS
|
|
UAF$W_SALT
|
UAI$_SALT
|
|
UAF$L_UIC
|
Not applicable
|
|
Class
|
Visibility in Cluster
|
Location of Profile
|
|---|---|---|
|
Capabilities
|
Visible only to local node.
|
Stored on local node.
|
|
Devices
|
Some can be visible
clusterwide.
|
Profiles stored in VMS$OBJECTS.
|
|
Files
|
Visible clusterwide.
|
Stored in file header.
|
|
Global sections
|
Visible only to local node.
|
Stored on local node.
|
|
Logical name tables
|
Visible only to local node.
|
Stored on local node.
|
|
Queues
|
Visible clusterwide.
|
|
|
Resource domains
|
Visible clusterwide.
|
Stored in VMS$OBJECTS.
|
|
Security class
|
Visible clusterwide.
|
Stored in VMS$OBJECTS.
|
|
Volumes
|
Can be visible clusterwide.
|
Stored on the volume.
|
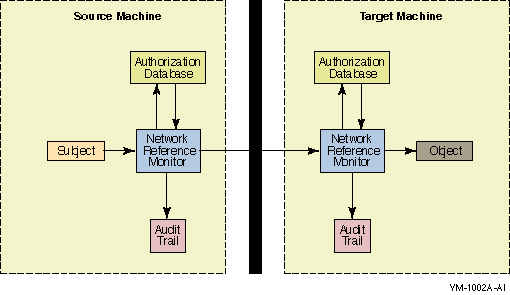
COPY remotenode::file-spec file-spec
COPY remotenode"proxyacct"::file-spec file-spec
|
Command
|
Argument
|
Description
|
|---|---|---|
|
ADD/PROXY
|
node::remoteuser
localuser[,...] |
Adds proxy access for the specified
user.
|
|
CREATE/PROXY
|
Creates a network proxy authorization
file.
|
|
|
LIST/PROXY
|
Creates a listing file of all proxy accounts
and all remote users with proxy access to the
accounts.
|
|
|
MODIFY/PROXY
|
node::remoteuser
|
Modifies proxy access for the specified
user.
|
|
REMOVE/PROXY
|
Deletes proxy access for the specified
user.
|
|
|
SHOW/PROXY
|
*
node::remoteuser |
Displays proxy access allowed for the
specified user.
|
.
.
.
.
.
.
|
Object
Name |
Directory and
User (Account) Name |
UIC
|
|---|---|---|
|
FAL
|
FAL$SERVER
|
[376,373]
|
|
MAIL
|
MAIL$SERVER
|
[376,374]
|
|
MIRROR
|
MIRRO$SERVER1 (SEE
NOTE)
|
[376,367]
|
|
$MOM
|
VMS$COMMON:[MOM$SYSTEM]2 (SEE
NOTE)
|
[376,375]
|
|
NML
|
NML$SERVER
|
[376,371]
|
|
PHONE
|
PHONE$SERVER
|
[376,372]
|
|
VPM
|
VPM$SERVER
|
[376,370]
|
Username: MAIL$SERVER            Owner:  MAIL$SERVER
Account:  MAIL$SERVER DEFAULT    UIC:    [376,374] ([DECNET,MAIL$SERVER])
CLI:      DCL                    Tables:
Default:  SYS$SPECIFIC:[MAIL$SERVER]
LGICMD:
Login Flags:  Restricted
Primary days:   Mon Tue Wed Thu Fri Sat Sun
Secondary days:
Primary   000000000011111111112222  Secondary 000000000011111111112222
Day Hours 012345678901234567890123  Day Hours 012345678901234567890123
Network:  ##### Full access ######            ##### Full access ######
Batch:    -----  No access  ------            -----  No access  ------
Local:    -----  No access  ------            -----  No access  ------
Dialup:   -----  No access  ------            -----  No access  ------
Remote:   -----  No access  ------            -----  No access  ------
Expiration:            (none)    Pwdminimum:  6   Login Fails:     0
Pwdlifetime:           (none)    Pwdchange:  (none)
Last Login:            (none) (interactive), (none) (non-interactive)
Maxjobs:         0  Fillm:        16  Bytlm:        12480
Maxacctjobs:     0  Shrfillm:      0  Pbytlm:           0
Maxdetach:       0  BIOlm:        12  JTquota:       1024
Prclm:           0  DIOlm:         6  WSdef:          180
Prio:            4  ASTlm:        16  WSquo:          200
Queprio:         0  TQElm:        10  WSextent:         0
CPU:        (none)  Enqlm:        20  Pgflquo:      25600

Authorized Privileges:
  TMPMBX NETMBX
Default Privileges:
  TMPMBX NETMBX
Caution NoteSET HOST/DTE device-name:
SET HOST/DTE/DIAL=number device-name:
%REM-S-END - control returned to local-nodename::
$
%SET-I-SWINPRG The line you are currently logged over is becoming
               a DECnet line
Commands issued at both the local OpenVMS node (LOCALA)
and the remote OpenVMS node (REMOTC):
Commands issued at the remote node (REMOTC):
Commands issued at the local node (LOCALA):
! After dialing in automatically to REMOTC,
! log in to your account on REMOTC.
(S:RWED,O:RWED,G:R,W)
             Access Requirements to CENTRL::PROJ:[DESGN_PROJECTS]
                       Owned by [DESIGNERS,MGR]
Users & Nodes
                  Subdirectory LEVI         Subdirectory BETSEY
                    Project Files             Project Files
                     LEVIGRAY*.*              BETSEYHARLOW*.*

FRISCO::ALBION            R                        RW
FRISCO::ELTON             R                        RW
LA::IRVING                R                        RW
CENTRL::DIANTHA          RWED                     NONE
CENTRL::BRITTANIA        RWED                     NONE
CENTRL::ALBERT           NONE                     RWED
CENTRL::DELIA            NONE                     RWED
BOS::AYLMER               RW                       R
WASH::LAVINA              RW                       R
DESGN_PROJECTS.DIR

(IDENTIFIER=DIANTHA,OPTIONS=PROTECTED,ACCESS=EXECUTE)
(IDENTIFIER=BRITTANIA,OPTIONS=PROTECTED,ACCESS=EXECUTE)
(IDENTIFIER=ALBERT,OPTIONS=PROTECTED,ACCESS=EXECUTE)
(IDENTIFIER=DELIA,OPTIONS=PROTECTED,ACCESS=EXECUTE)
(IDENTIFIER=AYLMER,OPTIONS=PROTECTED,ACESS=EXECUTE)
(IDENTIFIER=LAVINA,OPTIONS=PROTECTED,ACCESS=EXECUTE)
(IDENTIFIER=ALBION,OPTIONS=PROTECTED,ACCESS=EXECUTE)
(IDENTIFIER=ELTON,OPTIONS=PROTECTED,ACCESS=EXECUTE)
(IDENTIFIER=IRVING,OPTIONS=PROTECTED,ACCESS=EXECUTE)
[DESGN_PROJECTS]LEVI.DIR

(IDENTIFIER=DIANTHA,OPTIONS=PROTECTED,ACCESS=READ+WRITE+EXECUTE+CONTROL)
(IDENTIFIER=DIANTHA,OPTIONS=DEFAULT+PROTECTED,ACCESS=READ+WRITE+EXECUTE
    +DELETE+CONTROL)
(IDENTIFIER=BRITTANIA,OPTIONS=PROTECTED,ACCESS=READ+WRITE+EXECUTE+CONTROL)
(IDENTIFIER=BRITTANIA,OPTIONS=DEFAULT+PROTECTED,ACCESS=READ+WRITE+EXECUTE
    +DELETE+CONTROL)
(IDENTIFIER=AYLMER,OPTIONS=PROTECTED,ACCESS=READ+WRITE)
(IDENTIFIER=AYLMER,OPTIONS=DEFAULT+PROTECTED,ACCESS=READ+WRITE)
(IDENTIFIER=LAVINA,OPTIONS=PROTECTED,ACCESS=READ+WRITE)
(IDENTIFIER=LAVINA,OPTIONS=DEFAULT+PROTECTED,ACCESS=READ+WRITE)
(IDENTIFIER=ALBION,OPTIONS=PROTECTED,ACCESS=READ)
(IDENTIFIER=ALBION,OPTIONS=DEFAULT+PROTECTED,ACCESS=READ)
(IDENTIFIER=ELTON,OPTIONS=PROTECTED,ACCESS=READ)
(IDENTIFIER=ELTON,OPTIONS=DEFAULT+PROTECTED,ACCESS=READ)
(IDENTIFIER=IRVING,OPTIONS=PROTECTED,ACCESS=READ)
(IDENTIFIER=IRVING,OPTIONS=DEFAULT+PROTECTED,ACCESS=READ)


[DESGN_PROJECTS]BETSEY.DIR

(IDENTIFIER=ALBERT,OPTIONS=PROTECTED,ACCESS=READ+WRITE+EXECUTE+CONTROL)
(IDENTIFIER=ALBERT,OPTIONS=DEFAULT+PROTECTED,ACCESS=READ+WRITE+EXECUTE
    +DELETE+CONTROL)
(IDENTIFIER=DELIA,OPTIONS=PROTECTED,ACCESS=READ+WRITE+EXECUTE+CONTROL)
(IDENTIFIER=DELIA,OPTIONS=DEFAULT+PROTECTED,ACCESS=READ+WRITE+EXECUTE
    +DELETE+CONTROL)
(IDENTIFIER=ALBION,OPTIONS=PROTECTED,ACCESS=READ+WRITE)
(IDENTIFIER=ALBION,OPTIONS=DEFAULT+PROTECTED,ACCESS=READ+WRITE)
(IDENTIFIER=ELTON,OPTIONS=PROTECTED,ACCESS=READ+WRITE)
(IDENTIFIER=ELTON,OPTIONS=DEFAULT+PROTECTED,ACCESS=READ+WRITE)
(IDENTIFIER=IRVING,OPTIONS=PROTECTED,ACCESS=READ+WRITE)
(IDENTIFIER=IRVING,OPTIONS=DEFAULT+PROTECTED,ACCESS=READ+WRITE)
(IDENTIFIER=AYLMER,OPTIONS=PROTECTED,ACCESS=READ)
(IDENTIFIER=AYLMER,OPTIONS=DEFAULT+PROTECTED,ACCESS=READ)
(IDENTIFIER=LAVINA,OPTIONS=PROTECTED,ACCESS=READ)
(IDENTIFIER=LAVINA,OPTIONS=DEFAULT+PROTECTED,ACCESS=READ)

(SUBSYSTEM,{IDENTIFIER=identifier[,ATTRIBUTES=attributes]})
(IDENTIFIER=identifier, ACCESS=access-type[+...])
(ID=MEMBERS_SUBSYSTEM+MEMBERS_ADMIN, ACCESS=READ+WRITE)

.
.
.
TTA1 object of class QUEUE
     Owner: [SYSTEM]
     Protection: (System: M, Owner: D, Group, World)
     Access Control List:
          (IDENTIFIER=SUPPLIERS_SUBSYSTEM+ACCOUNTS_PAYABLE,-
           ACCESS=READ+SUBMIT+MANAGE+DELETE)
          (IDENTIFIER=*,ACCESS=NONE)
$   SET NOON
$   OLD_PRIV = F$SETPRV("NOALL,SYSPRV,CMKRNL,OPER")
$   OLD_DEFAULT = F$ENVIRONMENT("DEFAULT")
$
$   ON CONTROL_Y THEN GOTO LEAVE
$
$   IF P1 .EQS. "REMOVE" THEN GOTO CLEANUP
$   IF P1 .EQS. "VERIFY" THEN SET VERIFY
$!
$! Create the subsystem identifier and the identifiers for personnel
$! performing two different tasks.
$!
$   SET DEFAULT SYS$SYSTEM
$   RUN AUTHORIZE
ADD/IDENTIFIER SUPPLIERS_SUBSYSTEM/ATTRIBUTES=(RESOURCE,SUBSYSTEM)
ADD/IDENTIFIER SUPPLIERS_ORDERS
ADD/IDENTIFIER ACCOUNTS_PAYABLE
!
! Grant the subsystem identifier to the subsystem manager: McGrey.
!
GRANT/IDENTIFIER SUPPLIERS_SUBSYSTEM MCGREY/ATTRIBUTE=(RESOURCE,SUBSYSTEM)
$!
$! Set up the print queue.

$!
$   INITIALIZE/QUEUE/START TTA1
$   SET SECURITY/ACL=(-
      (ID=SUPPLIERS_SUBSYSTEM+ACCOUNTS_PAYABLE,ACCESS=READ+SUBMIT+MANAGE+DELETE), -
      (ID=*,ACCESS=NONE) )/PROTECTION=(G,W)/CLASS=QUEUE TTA1:

$!
$! Create the directory root to hold the subsystem.
$!
$!
$! Assume that we logged in as McGrey.
$!
$   SET RIGHTS_LIST/ENABLE SUPPLIERS_SUBSYSTEM/ATTRIBUTE=(RESOURCE,SUBSYSTEM)
$   SET DEFAULT SYS$SYSDEVICE:[SUPPLIERS_SUBSYSTEM]
$!
$! Create the directories for the images and the data files.
$!
$   CREATE/DIR [SUPPLIERS_SUBSYSTEM.EXE]/PROTECTION=(G,W)
$   CREATE/DIR [SUPPLIERS_SUBSYSTEM.LIB]/PROTECTION=(G,W)
$   SET SECURITY/ACL=( (ID=SUPPLIERS_ORDERS,ACCESS=EXECUTE), -
          (ID=ACCOUNTS_PAYABLE,ACCESS=EXECUTE), -
          (ID=SUPPLIERS_ORDERS,OPTIONS=DEFAULT,ACCESS=EXECUTE), -
          (ID=ACCOUNTS_PAYABLE,OPTIONS=DEFAULT,ACCESS=EXECUTE) )/DELETE -
                      [SUPPLIERS_SUBSYSTEM]LIB.DIR
$!
$! Emulate the creation of the subsystem images.
$!
$   SET DEFAULT [.EXE]
$   CREATE ORDERS.MAR
        .ENTRY  START,0
        $setpri_s pri=#0
10$:  BRB 10$
        ret
        .END  START
$   MACRO ORDERS
$   LINK ORDERS
$   SET SECURITY/PROTECTION=(W:RWED) ORDERS.MAR;*,.OBJ;*
$   DELETE ORDERS.MAR;*,.OBJ;*
$   COPY ORDERS.EXE PAYMENTS.EXE
$!
$! Apply the appropriate protection to the images.
$!
$   SET SECURITY/ACL=(ID=SUPPLIERS_ORDERS,ACCESS=EXECUTE)/DELETE PAYMENTS.EXE
$   SET SECURITY/ACL=(SUBSYSTEM,ID=SUPPLIERS_SUBSYSTEM,ATTRIBUTES=RESOURCE) ORDERS.EXE
$   SET SECURITY/ACL=(SUBSYSTEM,ID=SUPPLIERS_SUBSYSTEM,ATTRIBUTES=RESOURCE) PAYMENTS.EXE
$!
$! Create and protect the data files used by the applications.
$!
$   SET DEFAULT [-.LIB]
$   CREATE ORDERS.DAT
$   CREATE PAYMENTS.DAT
$   SET SECURITY/ACL=( (ID=SUPPLIERS_SUBSYSTEM,ACCESS=READ+WRITE), -
          (ID=*,ACCESS=NONE) ) ORDERS.DAT
$   SET SECURITY/LIKE=(NAME=ORDERS.DAT) PAYMENTS.DAT
$!
$! Show the directory structure and the queue protection.
$!
$   SET DEFAULT ’OLD_DEFAULT’
$   DEFINE SYS$OUTPUT SUBSYS.LIS
$   DIRECTORY/SECURITY SYS$SYSDEVICE:[000000]SUPPLIERS_SUBSYSTEM.DIR
$   DIRECTORY/SECURITY SYS$SYSDEVICE:[SUPPLIERS_SUBSYSTEM...]

$   SHOW SECURITY/CLASS=QUEUE TTA1

$   DEASSIGN SYS$OUTPUT
$
$ LEAVE:
$   IF P1 .EQS. "VERIFY" THEN SET NOVERIFY
$   SET DEFAULT ’OLD_DEFAULT’
$   SET PROC/PRIV=(’OLD_PRIV’)
$   EXIT
$
$ CLEANUP:
$   SET PROC/PRIV=BYPASS
$   SET DEFAULT SYS$SYSDEVICE:[000000]
$   DELETE [SUPPLIERS_SUBSYSTEM...]*.*.*
$   DELETE [SUPPLIERS_SUBSYSTEM]EXE.DIR;
$   DELETE [SUPPLIERS_SUBSYSTEM]LIB.DIR;
$   DELETE SUPPLIERS_SUBSYSTEM.DIR;
$   STOP/QUE/NEXT TTA1
$   DELETE/QUEUE TTA1
$   GOTO LEAVE
|
Task
|
Interface
|
|---|---|
|
Perform file system operations:
|
|
|
Modify file ownership
|
SET SECURITY/OWNER, $QIO request to
F11BXQP
|
|
Access a file that is marked for
deletion
|
$QIO request to F11A ACP or
F11BXQP
|
|
Access a file that is deaccess
locked
|
$QIO request to F11A ACP or
F11BXQP
|
|
Override creation of an owner ACE on a newly
created file
|
$QIO request to F11BXQP
|
|
Clear the directory bit in a
directory’s file header
|
$QIO request to F11BXQP
|
|
Operate on an extension header
|
$QIO request to F11BXQP
|
|
Acquire or release a volume
lock
|
$QIO request to F11BXQP
|
|
Force mount verification on a
volume
|
$QIO request to F11BXQP
|
|
Create a file access window with the no
access lock bit set
|
$QIO request to F11BXQP
|
|
Specify null lock mode for volume
lock
|
$QIO request to F11BXQP
|
|
Access a locked file
|
$QIO request to F11BXQP
|
|
Enable or disable disk quotas on a
volume
|
$QIO request to F11BXQP
|
|
Operate on network databases:
|
|
|
Display permanent network database
records
|
NCP
|
|
Display permanent DECnet object
password
|
NCP
|
|
Display volatile DECnet object
password
|
NCP
|
|
Adjust discretionary or mandatory access
controls:
|
|
|
Read a user authorization
record
|
$GETUAI
|
|
Modify a user authorization
record
|
$SETUAI
|
|
Modify mailbox protection
|
$QIO request request to the mailbox driver
(MBDRIVER)
|
|
Modify shared memory mailbox
protection
|
$QIO request request to the mailbox driver
(MBXDRIVER)
|
|
Bypass discretionary or mandatory object
protection
|
$CHKPRO
|
|
Miscellaneous:
|
|
|
Initialize a magnetic tape
|
$INIT_VOL
|
|
Unload an InfoServer system
|
$QIO request to the InfoServer system
(DADDRIVER)
|
|
Task
|
Interface
|
|---|---|
|
Modify a multiprocessor
operation
|
START/CPU, STOP/CPU
|
|
Modify systemwide RMS defaults
|
SET RMS/SYSTEM
|
|
Suspend a process in kernel
mode
|
SET PROCESS/SUSPEND=KERNEL
|
|
Modify another process’ rights list or
its nondynamic identifier attributes
|
SET RIGHTS_LIST
|
|
Grant an identifier with modified
attributes
|
SET RIGHTS/ATTRIBUTE
|
|
Modify the system rights list
|
SET RIGHTS_LIST/SYSTEM
|
|
Change a process UIC
|
SET UIC
|
|
Modify the number of interlocked queue
retries
|
$QIO request to an Ethernet 802 driver
(DEBNA/NI)
|
|
Connect to a device interrupt
vector
|
$QIO request to an interrupt vector
(CONINTERR)
|
|
Start or modify a line in Genbyte
mode
|
$QIO request to a synchronous communications
line (XGDRIVER)
|
|
Set the spin-wait time on the port command
register
|
$QIO request to an Ethernet 802 driver
(DEBNA)
|
|
Modify a known image list
|
INSTALL
|
|
Process the following item
codes:
SJC$_ACCOUNT_NAME item
SJC$_UIC
SJC$_USERNAME
|
Send to Job Controller system service
($SNDJBC)
|
|
Create a detached process with unrestricted
quotas
|
RUN/DETACHED, $CREPRC
|
|
Examine the internals of the running
system
|
ANALYZE/SYSTEM
|
|
Task
|
Interface
|
|---|---|
|
Issue a $QIO request with associated
diagnostic buffer
|
$QIO
|
|
Modify the number of interlocked queue
retries
|
$QIO request to an Ethernet 802 driver
(DEBNA/NI)
|
|
Set the spin-wait time on the port command
register
|
$QIO request to an Ethernet 802 driver
(DEBNA)
|
|
Access the Diagnostic and Utilities Protocol
(DUP) class driver
|
$QIO request to the DUP class driver used by
SET HOST/HSC (FYDRIVER)
|
|
Execute a special passthrough function in
the SCSI generic class driver
|
$QIO request to the SCSI driver
(GKDRIVER)
|
|
Process a diagnostic buffer
|
$QIO request to a TU58 magnetic tape
(TUDRIVER)
|
|
Task
|
Interface
|
|---|---|
|
Modify object ownership
|
SET SECURITY/OWNER, $QIO request to
F11BXQP
|
|
Read or modify a user authorization
record
|
$GETUAI, $SETUAI
|
|
File system operations:
|
$QIO request to F11BXQP
|
|
• Override the creation of an
owner ACE on a newly created file
• Clear the directory bit
in a directory’s file header
• Acquire or release a
volume lock
• Force mount verification
on a volume
• Create a file access
window with the no access lock bit set
• Specify a null lock mode
for a volume lock
• Access a locked
file
• Enable or disable disk
quotas on a volume
|
Note|
Task
|
Interface
|
|---|---|
|
Issue physical I/O calls to a private,
non-file-structured device
|
$QIO
|
|
Modify the following terminal
attributes:
HANGUP SET_SPEED SECURE_SERVER |
SET TERMINAL (or TTDRIVER)
/[NO]HANGUP /[NO]SET_SPEED /[NO]SECURE_SERVER |
|
Task
|
Interface
|
|---|---|
|
Modify device protection
|
SET PROTECTION/DEVICE
|
|
Modify device ownership
|
SET PROTECTION/DEVICE/OWNER
|
|
Access the System Management
utility
|
SYSMAN
|
|
Perform operator tasks:
|
|
|
Issue a broadcast reply
|
REPLY, $SNDOPR
|
|
Cancel a system operator
request
|
REPLY/ABORT, $SNDOPR
|
|
Initialize the system operator log
file
|
$SNDOPR
|
|
Reply to a pending system operator
request
|
REPLY/TO, REPLY/PENDING,
REPLY/INITIALIZE_TAPE, $SNDOPR
|
|
Issue a system operator request
|
REQUEST, $SNDOPR
|
|
Enable system operator classes
|
REPLY/ENABLE, $SNDOPR, $SNDMSG
|
|
Disable system operator classes
|
REPLY/DISABLE, $SNDOPR
|
|
Send a broadcast message
|
$BRKTHRU, $BRDCST
|
|
Write an event to the operator
log
|
$SNDOPR
|
|
Initialize a system operator
log
|
REPLY/LOG, $SNDOPR
|
|
Close the current operator log
|
REPLY/NOLOG, $SNDOPR
|
|
Send a message to an operator
|
REPLY, $SNDOPR
|
|
Enable or disable autostart
|
$SNDJBC (SJC$_DISABLE_AUTO_START,
SJC$_ENABLE_AUTO_START)
|
|
Stop all queues
|
$SNDJBC
(SJC$_STOP_ALL_QUEUES_ON_NODE)
|
|
Modify the characteristics of
devices:
|
|
|
Modify device availability
|
SET DEVICE/[NO]AVAILABLE
|
|
Modify device dual-porting
|
SET DEVICE/[NO]DUAL_PORT
|
|
Modify device error logging
|
SET DEVICE/[NO]ERROR_LOGGING
|
|
Modify device spooling
|
SET DEVICE/[NO]SPOOLED
|
|
Modify default definitions of
days:
|
|
|
Set default day type to PRIMARY
|
SET DAY/PRIMARY
|
|
Set default day type to
SECONDARY
|
SET DAY/SECONDARY
|
|
Return day type to DEFAULT
|
SET DAY/DEFAULT
|
|
Modify or override login
limits:
|
|
|
Modify interactive login limit
|
SET LOGIN/INTERACTIVE
|
|
Modify network login limit
|
SET LOGIN/NETWORK
|
|
Modify batch login limit
|
SET LOGIN/BATCH
|
|
Create and modify queues:
|
|
|
Bypass discretionary access to a
queue
|
|
|
Create a queue
|
$SNDJBC (SJC$_CREATE_QUEUE)
|
|
Define queue characteristics
|
$SNDJBC
(SJC$_DEFINE_CHARACTERISTICS)
|
|
Define forms
|
$SNDJBC (SJC$_DEFINE_FORM)
|
|
Delete characteristics
|
$SNDJBC
(SJC$_DELETE_CHARACTERISTICS)
|
|
Delete forms
|
$SNDJBC (SJC$_DELETE_FORM)
|
|
Set the base priority of batch
processes
|
$SNDJBC (SJC$_BASE_PRIORITY)
|
|
Set the scheduling priority of a
job
|
$SNDJBC (SJC$_PRIORITY)
|
|
Start accounting
|
SET ACCOUNTING/ENABLE, $SNDJBC
(SJC$_START_ACCOUNTING)
|
|
Stop accounting
|
SET ACCOUNTING/DISABLE, $SNDJBC
(SJC$_STOP_ACCOUNTING)
|
|
Operate the LAT device:
|
|
|
Transmit LAT solicit information
message
|
$QIO request to a LAT port driver
(LTDRIVER)
|
|
Set static rating for LAT
service
|
$QIO request to a LAT port driver
(LTDRIVER)
|
|
Read last LAT response message
buffer
|
$QIO request to a LAT port driver
(LTDRIVER)
|
|
Change port type from dedicated to
application
|
$QIO request to a LAT port driver
(LTDRIVER)
|
|
Change port type from application to
dedicated
|
$QIO request to a LAT port driver
(LTDRIVER)
|
|
Modify tape operations:
|
|
|
Specify number of file window-mapping
pointers
|
MOUNT/WINDOWS, $MOUNT
|
|
Mount a volume with an alternate
ACP
|
MOUNT/PROCESSOR, $MOUNT
|
|
Mount a volume with alternate cache
limits
|
MOUNT/CACHE, $MOUNT
|
|
Modify write caching for a tape
controller
|
MOUNT/CACHE, $MOUNT
|
|
Modify ODS1 directory FCB cache
limit
|
SET VOLUME/ACCESSED, MOUNT/ACCESSED,
$MOUNT
|
|
Perform network operations:
|
|
|
Connect to an object while executor state is
restricted
|
|
|
Read network event-logging
buffer
|
NETACP
|
|
Modify network volatile
database
|
NETACP
|
|
Access the permanent database for an
update
|
DECnet/NML
|
|
Connect to a DECnet circuit
|
$QIO request to the DECnet downline load and
loopback class driver (NDDRIVER)
|
|
Display the permanent DECnet service
password
|
NCP
|
|
Display the volatile DECnet service
password
|
NCP
|
|
Control character conversion by
terminals:
|
|
|
Load terminal fallback table
|
TFU, $QIO request to the terminal fallback
driver (FBDRIVER)
|
|
Unload terminal fallback table
|
TFU, $QIO request to the terminal fallback
driver (FBDRIVER)
|
|
Establish system default terminal fallback
table
|
TFU, $QIO request to the terminal fallback
driver (FBDRIVER)
|
|
Control cluster operations:
|
|
|
Request expected votes
modification
|
SET CLUSTER/EXPECTED_VOTES
|
|
Request MSCP serving of a
device
|
SET DEVICE/SERVED
|
|
Request quorum modification
|
SET CLUSTER/QUORUM
|
|
Add an adapter to the failover
list
|
$QIO request to the DEBNI BI bus NI driver
(EFDRIVER)
|
|
Remove an adapter from the failover
list
|
$QIO request to the DEBNI BI bus NI driver
(EFDRIVER)
|
|
Set an adapter to be the current
adapter
|
$QIO request to the DEBNI BI bus NI driver
(EFDRIVER)
|
|
Set the new adapter test
interval
|
$QIO request to the DEBNI BI bus NI driver
(EFDRIVER)
|
|
Privileges
|
Task
|
Interface
|
|---|---|---|
|
OPER and CMKRNL
|
Mount a volume with a private
ACP
|
MOUNT/PROCESSOR, $MOUNT
|
|
OPER and LOG_IO
|
Set the system time
|
SET TIME, $SETIME
|
|
OPER and SYSNAM
|
Start or stop the queue manager
|
START/QUEUE/MANAGER, STOP/QUEUE/MANAGER,
$SNDJBC
|
|
OPER and VOLPRO
|
Initialize a blank tape or override access
checks while initializing a blank tape
|
$INIT_VOL, MOUNT, $MOUNT
|
|
Task
|
Interface
|
|---|---|
|
Access an individual shadow-set member
unit
|
$ASSIGN, $QIO
|
|
Create or delete a watchpoint
|
$QIO request to the SMP watchpoint driver
(WPDRIVER)
|
|
Map an LTA device to a server/port
(IO$_TTY_PORT!IO$M_LT_MAPPORT)
|
$QIO request to a LAT port driver
(LTDRIVER)
|
|
Issue the following I/O
requests:
• Logical I/O
request
• Logical or virtual I/O
request with IO$M_MSCPMODIFS modifier
• Physical I/O to private,
non-file-structured device
|
$QIO
|
|
Modify the following terminal
attributes:
HANGUP SET_SPEED SECURE_SERVER |
SET TERMINAL or the terminal driver
(TTDRIVER)
/[NO]HANGUP /[NO]SET_SPEED /[NO]SECURE_SERVER |
|
Issue IO$_ACCESS (diagnostic) function to
DEBNA/NI device driver
|
$QIO request to a synchronous communications
line (XGDRIVER)
|
|
Enable Ethernet promiscuous mode
listening
|
|
|
Issue IO$_ACCESS (diagnostic) function to
Ethernet common driver
|
|
Task
|
Interface
|
|---|---|
|
Read a user authorization
record
|
$GETUAI
|
|
Display permanent network database
records
|
NCP
|
|
Task
|
Interface
|
|---|---|
|
Display system auditing information about
the system audit log file, audit server settings, and so
on
|
SHOW AUDIT
|
|
Display Hidden ACEs
|
SHOW SECURITY
|
|
Display the system intrusion list or delete
a record
|
SHOW INTRUSION,
DELETE/INTRUSION
|
|
Enable the security operator
terminal
|
REPLY/ENABLE=SECURITY, $SNDOPR
|
|
Enable protected subsystems on a
volume
|
MOUNT/SUBSYSTEM, $MOUNT, SET
VOLUME/SUBSYSTEM
|
|
Task
|
Interface
|
|---|---|
|
Access a MAIL maintenance
record
|
MAIL
|
|
Modify a MAIL forward record
|
MAIL
|
|
Declare a network object
|
NETACP
|
|
Create an IPC association
|
$IPC
|
|
With CMKRNL, add or remove an identifier to
system rights list
|
SET RIGHTS_LIST/SYSTEM, $GRANTID,
$REVOKID
|
|
Task
|
Interface
|
|---|---|
|
Modify a file’s expiration
date
|
SET FILE/EXPIRATION
|
|
Modify the number of interlocked queue
retries
|
$QIO request to an Ethernet 802 driver
(DEBNA/NI)
|
|
Set the spin-wait time on the port command
register
|
$QIO request to an Ethernet 802 driver
(DEBNA)
|
|
Set the FROM field in a mail
message
|
MAIL routines
|
|
Access a MAIL maintenance
record
|
MAIL
|
|
Modify or delete a MAIL database
record
|
MAIL
|
|
Modify the group number and password of a
local area cluster
|
CLUSTER_AUTHORIZE component of
SYSMAN
|
|
Perform transaction recovery, join a
transaction as coordinator, transition a transaction
|
DECdtm software
|
|
Task
|
Interface
|
|---|---|
|
Initialize a magnetic tape
|
$INIT_VOL
|
|
Override creation of an owner ACE on a newly
created file
|
$QIO request to F11BXQP
|
|
Clear the directory bit in a
directory’s file header
|
$QIO request to the F11BXQP, SET
FILE/NODIRECTORY
|
|
Acquire or release a volume
lock
|
$QIO request to F11BXQP
|
|
Force mount verification on a
volume
|
$QIO request to F11BXQP
|
|
Create a file access window with the no
access lock bit set
|
$QIO request to F11BXQP
|
|
Specify null lock mode for a volume
lock
|
$QIO request to F11BXQP
|
|
Access a locked file
|
$QIO request to F11BXQP
|
|
Disable disk quotas on volume
|
$QIO request to F11BXQP
|
|
Enable disk quotas on volume
|
$QIO request to F11BXQP
|
|
Task
|
Interface
|
|---|---|
|
Dismount a volume
|
DISMOUNT/ABORT, $DISMOU
|
|
Initialize a volume
|
$INIT_VOL
|
|
Mount foreign multivolume magnetic tape
set
|
MOUNT/MULTI_VOLUME
|
|
Override volume labels or
accessibility
|
$MOUNT
|
|
Initialize blank tape
|
REPLY/BLANK_TAPE, $SNDOPR
|
|
Override access while initializing a
magnetic tape after a file access error
|
$INIT_VOL
|
|
Override write-locking of volume on
errors
|
$MOUNT
|
|
Override write protection of former shadow
set member
|
$MOUNT
|
|
Override volume expiration, protection, or
ownership
|
$MOUNT
|
|
Files
|
Protection
|
|
|
[VMS$COMMON]
|
||
|
DECW$DEFAULTS.DIR
|
MOM$SYSTEM.DIR
|
S:RWE,O:RWE,G:RE,W:RE
|
|
SYS$KEYMAP.DIR
|
SYS$LDR.DIR
|
|
|
SYS$STARTUP.DIR
|
SYSCBI.DIR
|
|
|
SYSERR.DIR
|
SYSEXE.DIR
|
|
|
SYSFONT.DIR
|
SYSHLP.DIR
|
|
|
SYSLIB.DIR
|
SYSMAINT.DIR
|
|
|
SYSMGR.DIR
|
SYSMSG.DIR
|
|
|
SYSTEST.DIR
|
SYSUPD.DIR
|
|
|
VUE$LIBRARY.DIR
|
||
|
[VMS$COMMON.SYS$KEYMAP]
|
||
|
DECW.DIR
|
S:RWE,O:RWE,G:RE,W:RE
|
|
|
[VMS$COMMON.SYS$KEYMAP.DECW]
|
||
|
SYSTEM.DIR
|
USER.DIR
|
S:RWE,O:RWE,G:RE,W:RE
|
|
[VMS$COMMON.SYSEXE]
|
||
|
ISL_LVAX_061.SYS
|
ISL_SVAX_061.SYS
|
S:RWED,O:RWED,G:RE,W:RE
|
|
NETPROXY.DAT
|
S:RWE,O:RWE,G:RWE,W
|
|
|
NET$PROXY.DAT
|
S:RWE,O:RWE,G:RWE,W
|
|
|
MSGHLP$MAIN.EXE
|
S:RE,O:RE,G:RE,W:RE
|
|
|
RIGHTSLIST.DAT
|
S:RWED,O:RWED,G:R,W
|
|
|
SYSUAF.DAT
|
S:RWE,O:RWE,G:RWE,W
|
|
|
SYVMS$OBJECTS.DATSUAF.DAT
|
S:RWE,O:RWE,G:RE,W
|
|
|
[VMS$COMMON.SYSFONT]
|
||
|
DECW.DIR
|
PS_FONT_METRICS.DIR
|
S:RWE,O:RWE,G:RE,W:RE
|
|
VWS.DIR
|
XDPS.DIR
|
|
|
[VMS$COMMON.SYSFONT]
|
||
|
DECW.DIR
|
PS_FONT_METRICS.DIR
|
S:RWE,O:RWE,G:RE,W:RE
|
|
VWS.DIR
|
XDPS.DIR
|
|
|
[VMS$COMMON.SYSFONT.DECW]
|
||
|
100DPI.DIR
|
75DPI.DIR
|
S:RWE,O:RWE,G:RE,W:RE
|
|
COMMON.DIR
|
CURSOR16.DIR
|
|
|
CURSOR32.DIR
|
USER_100DPI.DIR
|
|
|
USER_75DPI.DIR
|
USER_COMMON.DIR
|
|
|
USER_CURSOR16.DIR
|
USER_CURSOR32.DIR
|
|
|
[VMS$COMMON.SYSHLP]
|
||
|
DECW.DIR
|
VMSDOC.DIR
|
S:RWE,O:RWE,G:RE,W:RE
|
|
MSGHLP$ENGLISH.EXE
|
S:RE,O:RE,G:RE,W:RE
|
|
|
EXAMPLES.DIR
|
S:RWE,O:RWE,G:RE,W:RE
|
|
|
[VMS$COMMON.SYSLIB]
|
||
|
CDA$ACCESS.EXE
|
DECW$DWTLIBSHR.EXE
|
S:RW,O:RWED,G:R,W:R
|
|
DECW$PRINTWGTSHR.EXE
|
DECW$XLIBSHR.EXE
|
|
|
MSGHLP$ENGLISH.EXE
|
MSGHLP$SHARE.EXE
|
S:RE,O:RE,G:RE,W:RE
|
|
VMS$PASSWORD_DIC TIONARY.DATA
|
S:RE,O:RE,G,W
|
|
|
XDPS$DPSBINDINGSSHR.EXE
|
XDPS$DPSCLIENTSHR.EXE
|
S:RW,O:RWED,G:R,W:R
|
|
XDPS$DPSLIBSHR.EXE
|
XNL$SHR.EXE
|
|
|
[VMS$COMMON.SYSMGR]
|
||
|
SECURITY.AUDIT$JOURNAL
|
S:RWED,O:RWED,G:RE,W
|
|
|
VMS$AUDIT_SERVER.DAT
|
S:RWE,O:RWE,G:RE,W
|
|
|
WELCOME.TEMPLATE
|
WELCOME.TXT
|
S:RWED,O:RWED,G:RE,W:RE
|
|
[VMS$COMMON.VUE$LIBRARY]
|
||
|
SYSTEM.DIR
|
USER.DIR
|
S:RWE,O:RWE,G:RE,W:RE
|
Directory SYS$SYSDEVICE:[VMS$COMMON]

DECW$DEFAULTS.DIR;1     MOM$SYSTEM.DIR;1
SYS$KEYMAP.DIR;1        SYS$LDR.DIR;1
SYS$STARTUP.DIR;1       SYSCBI.DIR;1
SYSERR.DIR;1            SYSEXE.DIR;1
SYSFONT.DIR;1           SYSHLP.DIR;1
SYSLIB.DIR;1            SYSMAINT.DIR;1
SYSMGR.DIR;1            SYSMSG.DIR;1
SYSTEST.DIR;1           SYSUPD.DIR;1
VUE$LIBRARY.DIR;1

Total of 17 files.

Directory SYS$SYSDEVICE:[VMS$COMMON.DECW$DEFAULTS]

SYSTEM.DIR;1            USER.DIR;1

Total of 2 files.
Directory SYS$SYSDEVICE:[VMS$COMMON.DECW$DEFAULTS.SYSTEM]

DBG$HA_DEFAULTS.DAT;1   PCSI$MUI.UID;1
PCSI.DAT;1              VMSDEBUG.DAT;1

Total of 4 files.

Directory SYS$SYSDEVICE:[VMS$COMMON.MOM$SYSTEM]

READ_ADDR.SYS;1

Total of 1 file.
Directory SYS$SYSDEVICE:[VMS$COMMON.SYS$KEYMAP]

DECW.DIR;1

Total of 1 file.

Directory SYS$SYSDEVICE:[VMS$COMMON.SYS$KEYMAP.DECW]

SYSTEM.DIR;1            USER.DIR;1

Total of 2 files.
Directory SYS$SYSDEVICE:[VMS$COMMON.SYS$KEYMAP.DECW.SYSTEM]

AUSTRIAN_GERMAN_LK201LG_DP.DECW$KEYMAP;1           AUSTRIAN_GERMAN_LK201LG_TW.DECW$KEYMAP;1
AUSTRIAN_GERMAN_LK201NG_DP.DECW$KEYMAP;1           AUSTRIAN_GERMAN_LK201NG_TW.DECW$KEYMAP;1
AUSTRIAN_GERMAN_LK401AG_TW.DECW$KEYMAP;1           BELGIAN_FRENCH_LK201LP_DP.DECW$KEYMAP;1
BELGIAN_FRENCH_LK201LP_TW.DECW$KEYMAP;1            BELGIAN_FRENCH_LK401AP_DP.DECW$KEYMAP;1
BELGIAN_FRENCH_LK401AP_TW.DECW$KEYMAP;1            BELGIAN_LK444_VT.DECW$KEYMAP;1
BRITISH_LK201LE_DP.DECW$KEYMAP;1                   BRITISH_LK201LE_TW.DECW$KEYMAP;1
BRITISH_LK401AA_DP.DECW$KEYMAP;1                   BRITISH_LK401AA_TW.DECW$KEYMAP;1
CANADIAN_FRENCH_LK201LC_DP.DECW$KEYMAP;1           CANADIAN_FRENCH_LK201LC_TW.DECW$KEYMAP;1
CANADIAN_FRENCH_LK401AC_DP.DECW$KEYMAP;1           CANADIAN_FRENCH_LK401AC_TW.DECW$KEYMAP;1
CZECH_LK401_BV.DECW$KEYMAP;1                       DANISH_LK201LD_DP.DECW$KEYMAP;1

DANISH_LK201LD_TW.DECW$KEYMAP;1                    DANISH_LK201RD_DP.DECW$KEYMAP;1
DANISH_LK201RD_TW.DECW$KEYMAP;1                    DANISH_LK401AD_DP.DECW$KEYMAP;1
DANISH_LK401AD_TW.DECW$KEYMAP;1                    DENMARK_LK444_VT.DECW$KEYMAP;1
DUTCH_LK201LH_DP.DECW$KEYMAP;1                     DUTCH_LK201LH_TW.DECW$KEYMAP;1
DUTCH_LK201NH.DECW$KEYMAP;1                        DUTCH_LK401AH.DECW$KEYMAP;1
FINNISH_LK201LF_DP.DECW$KEYMAP;1                   FINNISH_LK201LF_TW.DECW$KEYMAP;1
FINNISH_LK201NX_DP.DECW$KEYMAP;1                   FINNISH_LK201NX_TW.DECW$KEYMAP;1
FINNISH_LK401AF_DP.DECW$KEYMAP;1                   FINNISH_LK401AF_TW.DECW$KEYMAP;1
FLEMISH_LK201LB_DP.DECW$KEYMAP;1                   FLEMISH_LK201LB_TW.DECW$KEYMAP;1
FLEMISH_LK401AB_DP.DECW$KEYMAP;1                   FLEMISH_LK401AB_TW.DECW$KEYMAP;1
FRANCE_LK444_VT.DECW$KEYMAP;1                      GERMANY_LK444_VT.DECW$KEYMAP;1

HUNGARIAN_LK401_BQ.DECW$KEYMAP;1                   ICELANDIC_LK201LU_DP.DECW$KEYMAP;1
ICELANDIC_LK201LU_TW.DECW$KEYMAP;1                 ITALIAN_LK201LI_DP.DECW$KEYMAP;1
ITALIAN_LK201LI_TW.DECW$KEYMAP;1                   ITALIAN_LK401AI_DP.DECW$KEYMAP;1
ITALIAN_LK401AI_TW.DECW$KEYMAP;1                   ITALY_LK444_VT.DECW$KEYMAP;1
NORTH_AMERICAN_LK201LA.DECW$KEYMAP;1               NORTH_AMERICAN_LK401AA.DECW$KEYMAP;1
NORWAY_LK444_VT.DECW$KEYMAP;1                      NORWEGIAN_LK201LN_DP.DECW$KEYMAP;1
NORWEGIAN_LK201LN_TW.DECW$KEYMAP;1                 NORWEGIAN_LK201RN_DP.DECW$KEYMAP;1
NORWEGIAN_LK201RN_TW.DECW$KEYMAP;1                 NORWEGIAN_LK401AN_DP.DECW$KEYMAP;1
NORWEGIAN_LK401AN_TW.DECW$KEYMAP;1                 POLISH_LK401_BP.DECW$KEYMAP;1
PORTUGAL_LK444_VT.DECW$KEYMAP;1                    PORTUGUESE_LK201LV.DECW$KEYMAP;1
PORTUGUESE_LK401AV.DECW$KEYMAP;1                   RUSSIAN_LK401_BT.DECW$KEYMAP;1
SLOVAK_LK401_CZ.DECW$KEYMAP;1                      SPAIN_LK444_VT.DECW$KEYMAP;1
SPANISH_LK201LS_DP.DECW$KEYMAP;1                   SPANISH_LK201LS_TW.DECW$KEYMAP;1
SPANISH_LK401AS_DP.DECW$KEYMAP;1                   SPANISH_LK401AS_TW.DECW$KEYMAP;1

SWEDEN_LK444_VT.DECW$KEYMAP;1                      SWEDISH_LK201LM_DP.DECW$KEYMAP;1
SWEDISH_LK201LM_TW.DECW$KEYMAP;1                   SWEDISH_LK201NM_DP.DECW$KEYMAP;1
SWEDISH_LK201NM_TW.DECW$KEYMAP;1                   SWEDISH_LK401AM_DP.DECW$KEYMAP;1
SWEDISH_LK401AM_TW.DECW$KEYMAP;1                   SWISS_FRENCH_LK201LK_DP.DECW$KEYMAP;1
SWISS_FRENCH_LK201LK_TW.DECW$KEYMAP;1              SWISS_FRENCH_LK401AK_DP.DECW$KEYMAP;1
SWISS_FRENCH_LK401AK_TW.DECW$KEYMAP;1              SWISS_GERMAN_LK201LL_DP.DECW$KEYMAP;1
SWISS_GERMAN_LK201LL_TW.DECW$KEYMAP;1              SWISS_GERMAN_LK401AL_DP.DECW$KEYMAP;1
SWISS_GERMAN_LK401AL_TW.DECW$KEYMAP;1              SWISS_LK444_VT.DECW$KEYMAP;1
UK_LK201RE.DECW$KEYMAP;1                           UK_LK401AA.DECW$KEYMAP;1
UK_LK444_VT.DECW$KEYMAP;1                          US_LK201RE.DECW$KEYMAP;1
US_LK401AA.DECW$KEYMAP;1                           US_LK443_VT.DECW$KEYMAP;1

Total of 92 files.
Directory SYS$SYSDEVICE:[VMS$COMMON.SYS$LDR]

CLASS_SCHEDULER.EXE;1                              CNDRIVER.EXE;1
CONINTERR.EXE;1                                    CPULOA.EXE;1
CRDRIVER.EXE;1                                     CS9AQDRIVER.EXE;1
CSDRIVER.EXE;1                                     CTDRIVER.EXE;1
CVDRIVER.EXE;1                                     CWDRIVER.EXE;1
DBDRIVER.EXE;1                                     DDDRIVER.EXE;1
DDIF$RMS_EXTENSION.EXE;1                           DKDRIVER.EXE;1
DLDRIVER.EXE;1                                     DMDRIVER.EXE;1
DQDRIVER.EXE;1                                     DRDRIVER.EXE;1
DSDRIVER.EXE;1                                     DUDRIVER.EXE;1
DVDRIVER.EXE;1                                     DXDRIVER.EXE;1
DYDRIVER.EXE;1                                     DZDRIVER.EXE;1
ECDRIVER.EXE;1                                     EFDRIVER.EXE;1
EPDRIVER.EXE;1                                     ERRORLOG.EXE;1
ESDRIVER.EXE;1                                     ESS$DADDRIVER.EXE;1
ESS$LADDRIVER.EXE;1                                ESS$LASTDRIVER.EXE;1
ESS$MADDRIVER.EXE;1                                ETDRIVER.EXE;1
EVENT_FLAGS_AND_ASTS.EXE;1                         EXCEPTION.EXE;1
EXDRIVER.EXE;1                                     EXEC_INIT.EXE;1
EZDRIVER.EXE;1                                     FBDRIVER.EXE;1
FCDRIVER.EXE;1                                     FPEMUL.EXE;1
FQDRIVER.EXE;1                                     FTDRIVER.EXE;1
FXDRIVER.EXE;1                                     FYDRIVER.EXE;1
GAADRIVER.EXE;1                                    GABDRIVER.EXE;1
GBBDRIVER.EXE;1                                    GCADRIVER.EXE;1
GCBDRIVER.EXE;1                                    GDDRIVER.EXE;1
GEBDRIVER.EXE;1                                    GECDRIVER.EXE;1
GFBDRIVER.EXE;1                                    GKDRIVER.EXE;1
IKDRIVER.EXE;1                                     IMAGE_MANAGEMENT.EXE;1
IMDRIVER.EXE;1                                     INDRIVER.EXE;1
IO_ROUTINES.EXE;1                                  LADRIVER.EXE;1
LCDRIVER.EXE;1                                     LIDRIVER.EXE;1
LMF$GROUP_TABLE.EXE;1                              LOCKING.EXE;1
LOGICAL_NAMES.EXE;1                                LPDRIVER.EXE;1
LTDRIVER.EXE;1                                     MBXDRIVER.EXE;1
MESSAGE_ROUTINES.EXE;1                             MKDRIVER.EXE;1
NDDRIVER.EXE;1                                     NET$CSMACD.EXE;1
NET$FDDI.EXE;1                                     NETDRIVER.EXE;1
NODRIVER.EXE;1                                     PADRIVER.EXE;1
PAGE_MANAGEMENT.EXE;1                              PBDRIVER.EXE;1
PDDRIVER.EXE;1                                     PEDRIVER.EXE;1
PIDRIVER.EXE;1                                     PKBDRIVER.EXE;1
PKCDRIVER.EXE;1                                    PKIDRIVER.EXE;1
PKNDRIVER.EXE;1                                    PKRDRIVER.EXE;1
PKSDRIVER.EXE;1                                    PKXDRIVER.EXE;1
PRIMITIVE_IO.EXE;1                                 PROCESS_MANAGEMENT.EXE;1
PUDRIVER.EXE;1                                     PWDRIVER.EXE;1
RECOVERY_UNIT_SERVICES.EXE;1                       RMS.EXE;1
RTTDRIVER.EXE;1                                    RXDRIVER.EXE;1
SECURITY.EXE;1                                     SHDRIVER.EXE;1
SNAPSHOT_SERVICES.EXE;1                            SODRIVER.EXE;1
SYS$CLUSTER.EXE;1                                  SYS$IPC_SERVICES.EXE;1
SYS$NETWORK_SERVICES.EXE;1                         SYS$SCS.EXE;1
SYS$TRANSACTION_SERVICES.EXE;1                     SYS$UTC_SERVICES.EXE;1
SYS.EXE;2                                          SYSDEVICE.EXE;1
SYSGETSYI.EXE;1                                    SYSLDR_DYN.EXE;1
SYSLICENSE.EXE;1                                   SYSLOA1202.EXE;1
SYSLOA1302.EXE;1                                   SYSLOA1303.EXE;1
SYSLOA1701.EXE;1                                   SYSLOA410.EXE;1
SYSLOA41D.EXE;1                                    SYSLOA41W.EXE;1
SYSLOA420.EXE;1                                    SYSLOA42D.EXE;1
SYSLOA42S.EXE;1                                    SYSLOA42W.EXE;1
SYSLOA43.EXE;1                                     SYSLOA43D.EXE;1
SYSLOA43S.EXE;1                                    SYSLOA43W.EXE;1
SYSLOA440.EXE;1                                    SYSLOA46.EXE;1
SYSLOA49.EXE;1                                     SYSLOA520.EXE;1
SYSLOA60.EXE;1                                     SYSLOA600.EXE;1
SYSLOA640.EXE;1                                    SYSLOA64D.EXE;1
SYSLOA650.EXE;1                                    SYSLOA65D.EXE;1
SYSLOA660.EXE;1                                    SYSLOA66D.EXE;1
SYSLOA670.EXE;1                                    SYSLOA67D.EXE;1
SYSLOA690.EXE;1                                    SYSLOA69D.EXE;1
SYSLOA700.EXE;1                                    SYSLOA70D.EXE;1
SYSLOA730.EXE;1                                    SYSLOA750.EXE;1
SYSLOA780.EXE;1                                    SYSLOA790.EXE;1
SYSLOA8NN.EXE;1                                    SYSLOA8PS.EXE;1
SYSLOA8SS.EXE;1                                    SYSLOA9AQ.EXE;1
SYSLOA9CC.EXE;1                                    SYSLOA9RR.EXE;1
SYSLOAUV1.EXE;1                                    SYSLOAUV2.EXE;1
SYSLOAWS1.EXE;1                                    SYSLOAWS2.EXE;1
SYSLOAWSD.EXE;1                                    SYSTEM_DEBUG.EXE;1
SYSTEM_PRIMITIVES.EXE;1                            SYSTEM_PRIMITIVES_MIN.EXE;1
SYSTEM_SYNCHRONIZATION.EXE;1                       SYSTEM_SYNCHRONIZATION_MIN.EXE;1
SYSTEM_SYNCHRONIZATION_SPC.EXE;1                   SYSTEM_SYNCHRONIZATION_UNI.EXE;1
TFDRIVER.EXE;1                                     TMDRIVER.EXE;1
TSDRIVER.EXE;1                                     TTDRIVER.EXE;1
TUDRIVER.EXE;1                                     TVDRIVER.EXE;1
VAXCLUSTER_CACHE.EXE;1                             VAXEMUL.EXE;1
VBSS.EXE;1                                         VECTOR_PROCESSING.EXE;1
VMS$SYSTEM_IMAGES.DATA;1                           VVIEF_BOOTSTRAP.EXE;1
WORKING_SET_MANAGEMENT.EXE;1                       WPDRIVER.EXE;1
WSDRIVER.EXE;1                                     XADRIVER.EXE;1
XDDRIVER.EXE;1                                     XEDRIVER.EXE;1
XFDRIVER.EXE;1                                     XIDRIVER.EXE;1
XMDRIVER.EXE;1                                     XQDRIVER.EXE;1
XTDRIVER.EXE;1                                     YCDRIVER.EXE;1
YEDRIVER.EXE;1                                     YFDRIVER.EXE;1
YIDRIVER.EXE;1

Total of 195 files.
Directory SYS$SYSDEVICE:[VMS$COMMON.SYS$STARTUP]

DEBUG$STARTUP.COM;1                                DECDTM$SHUTDOWN.COM;1
DECDTM$STARTUP.COM;1                               DNS$CLERK_STARTUP.COM;1
DNS$CLERK_STOP.COM;1                               ESS$LAD_STARTUP.COM;1
ESS$LAD_STARTUP.DAT;1                              ESS$LAST_STARTUP.COM;1
ESS$LAST_STARTUP.DAT;1                             ESS$STARTUP.COM;1
IPC$STARTUP.COM;1                                  LAT$CONFIG.COM;1
LAT$STARTUP.COM;1                                  LICENSE_CHECK.EXE;1
VMS$BASEENVIRON-050_LIB.COM;1                      VMS$BASEENVIRON-050_SMISERVER.COM;1
VMS$BASEENVIRON-050_VMS.COM;1                      VMS$CONFIG-050_AUDIT_SERVER.COM;1
VMS$CONFIG-050_CACHE_SERVER.COM;1                  VMS$CONFIG-050_CSP.COM;1

VMS$CONFIG-050_ERRFMT.COM;1                        VMS$CONFIG-050_JOBCTL.COM;1
VMS$CONFIG-050_LMF.COM;1                           VMS$CONFIG-050_OPCOM.COM;1
VMS$CONFIG-050_SECURITY_SERVER.COM;1               VMS$CONFIG-050_SHADOW_SERVER.COM;1
VMS$CONFIG-050_VMS.COM;1                           VMS$DEVICE_STARTUP.COM;1
VMS$INITIAL-050_CONFIGURE.COM;1                    VMS$INITIAL-050_LIB.COM;1
VMS$INITIAL-050_VMS.COM;1                          VMS$LAYERED.DAT;1
VMS$LPBEGIN-050_STARTUP.COM;1                      VMS$PHASES.DAT;1
VMS$VMS.DAT;1

Total of 35 files.

Directory SYS$SYSDEVICE:[VMS$COMMON.SYSERR]

ERRSNAP.COM;1

Total of 1 file.
Directory SYS$SYSDEVICE:[VMS$COMMON.SYSEXE]

ACC.EXE;1                                          ACLEDT.EXE;1
AGEN$FEEDBACK.EXE;1                                ANALAUDIT.EXE;1
ANALIMDMP.EXE;1                                    ANALYZBAD.EXE;1
ANALYZOBJ.EXE;1                                    ANALYZRMS.EXE;1
AUDIT_SERVER.EXE;1                                 AUTHORIZE.EXE;1
BACKUP.EXE;1                                       BADBLOCK.EXE;1
BOOT58.EXE;1                                       BOOTBLOCK.EXE;1
CDU.EXE;1                                          CHECKSUM.EXE;1
CIA.EXE;1                                          CLUE.EXE;1
CONFIGURE.EXE;1                                    CONVERT.EXE;1
CONVERT_PROXY.EXE;1                                COPY.EXE;1
CREATE.EXE;1                                       CREATEFDL.EXE;1
CSP.EXE;1                                          CVTNAFV5.EXE;1
DBLMSGMGR.EXE;1                                    DCL.EXE;1
DCLDEF.STB;1                                       DECDTMDEF.STB;1
DECW$DWT_DECNET.EXE;1                              DECW$DWT_FONT_DAEMON.EXE;1
DECW$DWT_STARTXTDRIVER.EXE;1                       DECW$FONTCOMPILER.EXE;1
DECW$MKFONTDIR.EXE;1                               DECW$SERVER_MAIN.EXE;1
DECW$SETSHODIS.EXE;1                               DELETE.EXE;1
DIFF.EXE;1                                         DIRECTORY.EXE;1
DISKQUOTA.EXE;1                                    DISMOUNT.EXE;1
DNS$ADVER.EXE;1                                    DNS$ANALYZE.EXE;1
DNS$SOLICIT.EXE;1                                  DSRINDEX.EXE;1
DSRTOC.EXE;1                                       DTEPAD.EXE;1
DTR.COM;1                                          DTRECV.EXE;1
DTSEND.EXE;1                                       DUMP.EXE;1
EDF.EXE;1                                          EDT.EXE;1
ERF.EXE;1                                          ERFADPTR.EXE;1
ERFBRIEF.EXE;1                                     ERFBUS.EXE;1
ERFCNTRL.EXE;1                                     ERFCVAX.EXE;1
ERFDISK.EXE;1                                      ERFDISK2.EXE;1
ERFMISC.EXE;1                                      ERFMSCP.EXE;1
ERFNVAX.EXE;1                                      ERFRLTIM.EXE;1
ERFSCSI.EXE;1                                      ERFSUMM.EXE;1
ERFTAPE.EXE;1                                      ERFUVAX.EXE;1
ERFV14.EXE;1                                       ERFV9000.EXE;1
ERFVAX7XX.EXE;1                                    ERFVX8200.EXE;1
ERFVX8600.EXE;1                                    ERFVX87XX.EXE;1
ERFXRP.EXE;1                                       ERRFMT.EXE;1
ERRSNAP.EXE;1                                      ESS$ISL_VMSLOAD.EXE;1
ESS$LADCP.EXE;1                                    ESS$LASTCP.EXE;1
EVL.COM;1                                          EVL.EXE;1
EXCHANGE$NETWORK.EXE;1                             EXCHANGE.EXE;1
F11AACP.EXE;1                                      F11BXQP.EXE;1
F11CACP.EXE;1                                      F11DACP.EXE;1
FAL.COM;1                                          FAL.EXE;1
FILESERV.EXE;1                                     HLD.COM;1
HLD.EXE;1                                          HSCPAD.EXE;1
IMGDEF.STB;1                                       INIT.EXE;1
INPSMB.EXE;1                                       INSTALL.EXE;1
IPCACP.EXE;1                                       IPCDEF.STB;1
ISL_LVAX_061.SYS;1                                 ISL_SVAX_061.SYS;1
JBC$COMMAND.EXE;1                                  JBC$JOB_CONTROL.EXE;1
LALOAD.EXE;1                                       LALOADER.EXE;1
LATACP.EXE;1                                       LATCP.EXE;1
LATSYM.EXE;1                                       LIBRARIAN.EXE;1
LINK.EXE;1                                         LMCP.EXE;1
LMF$LICENSE.LDB;1                                  LMF$LURT.DAT;1
LMF.EXE;1                                          LOGINOUT.EXE;1
LTPAD.EXE;1                                        MACRO32.EXE;1
MAIL.COM;1                                         MAIL.EXE;1
MAILEDIT.COM;1                                     MAIL_SERVER.EXE;1
MESSAGE.EXE;1                                      MIRROR.COM;1
MIRROR.EXE;1                                       MOM.COM;1
MOM.EXE;1                                          MONITOR.EXE;1
MSCP.EXE;1                                         MSGHLP$MAIN.EXE;1
MTAAACP.EXE;1                                      NCP.EXE;1
NCS.EXE;1                                          NET$NAME_SERVER.EXE;1
NETACP.EXE;1                                       NETDEF.STB;1
NETSERVER.COM;1                                    NETSERVER.EXE;1
NICONFIG.COM;1                                     NICONFIG.EXE;1
NML.COM;1                                          NML.EXE;1
OPCCRASH.EXE;1                                     OPCOM.EXE;1
PATCH.EXE;1                                        PCSI$MAIN.EXE;1
PHONE.COM;1                                        PHONE.EXE;1
PRTSMB.EXE;1                                       QMAN$QUEUE_MANAGER.EXE;1
QUEMAN.EXE;1                                       RECLAIM.EXE;1
RECOVER.EXE;1                                      REMACP.EXE;1
RENAME.EXE;1                                       REPLY.EXE;1
REQSYSDEF.STB;1                                    REQUEST.EXE;1
RIGHTSLIST.DAT;1                                   RMS.STB;1
RMSDEF.STB;1                                       RMSREC$SERVER.EXE;1
RTB.EXE;1                                          RTPAD.EXE;1
RUNDET.EXE;1                                       RUNOFF.EXE;1
SA_STARTUP.COM;1                                   SCSDEF.STB;1
SDA.EXE;1                                          SDLNPARSE.EXE;1
SEARCH.EXE;1                                       SECURITY_SERVER.EXE;1
SET.EXE;1                                          SETAUDIT.EXE;1
SETFILENOMOVE.COM;1                                SETFILENOMOVE.EXE;1
SETP0.EXE;1                                        SETRIGHTS.EXE;1
SETSHOSECUR.EXE;1                                  SETSHOSERVER.EXE;1
SETWATCH.EXE;1                                     SHADOW_SERVER.EXE;1
SHOW.EXE;1                                         SHUTDOWN.COM;1
SHWCLSTR.EXE;1                                     SMGBLDTRM.EXE;1
SMGMAPTRM.EXE;1                                    SMGTERMS.TXT;1
SMISERVER.EXE;1                                    SMPUTIL.EXE;1
SNAPSHOT$DRIVER.DAT;1                              SNAPSHOT$IMAGE.DAT;1
SNAPSHOT$LOADED_IMAGES.DAT;1                       SNAPSHOT$WATCHDOG.EXE;1
SNAPSHOT.EXE;1                                     SORTMERGE.EXE;1
STABACCOP.EXE;1                                    STABACKUP.EXE;1
STACONFIG.EXE;1                                    STANDCONF.EXE;1
STARTUP.COM;1                                      STASYSGEN.EXE;1
STOPREM.EXE;1                                      SUBMIT.EXE;1
SUCCESS.COM;1                                      SUMSLP.EXE;1
SYS.MAP;1                                          SYS.STB;1
SYSBOOT.EXE;1                                      SYSBOOT_XDELTA.EXE;1
SYSDEF.STB;1                                       SYSGEN.EXE;1
SYSINIT.EXE;1                                      SYSMAN.EXE;1
SYSUAF.DAT;1                                       SYSUAF.TEMPLATE;1
TECO32.EXE;1                                       TERMTABLE.EXE;1
TERMTABLE.TXT;1                                    TERTIARY_VMB.EXE;1
TFF$MASTER.DAT;1                                   TFU.EXE;1
TMSCP.EXE;1                                        TPSERV.EXE;1
TPU.EXE;1                                          TYPE.EXE;1
UNLOCK.EXE;1                                       UTC$CONFIGURE_TDF.EXE;1
VERIFY.EXE;1                                       VMB.EXE;1
VMB9AQ.EXE;1                                       VMOUNT.EXE;1
VMS$CREATE_SYSDIRS.COM;1                           VMS$FILE_ATTRIBUTES.DAT;1
VMS$IMAGE_VERSION.DAT;1                            VMS$INSTALL_UPG_DATA.COM;1
VMS$OBJECTS.DAT;1                                  VMSHELP.EXE;1
VMSPARAMS.DAT;1                                    VPM.EXE;1
WP.EXE;1                                           WRITEBOOT.EXE;1
XFLOADER.EXE;1

Total of 245 files.
Directory SYS$SYSDEVICE:[VMS$COMMON.SYSFONT]

DECW.DIR;1                                         PS_FONT_METRICS.DIR;1
VWS.DIR;1                                          XDPS.DIR;1

Total of 4 files.

Directory SYS$SYSDEVICE:[VMS$COMMON.SYSFONT.DECW]

100DPI.DIR;1                                       75DPI.DIR;1
COMMON.DIR;1                                       CURSOR16.DIR;1
CURSOR32.DIR;1                                     USER_100DPI.DIR;1
USER_75DPI.DIR;1                                   USER_COMMON.DIR;1
USER_CURSOR16.DIR;1                                USER_CURSOR32.DIR;1

Total of 10 files.
Directory SYS$SYSDEVICE:[VMS$COMMON.SYSFONT.DECW.100DPI]

AVANTGARDE_BOOK10_100DPI.DECW$FONT;1               AVANTGARDE_BOOK12_100DPI.DECW$FONT;1
AVANTGARDE_BOOK14_100DPI.DECW$FONT;1               AVANTGARDE_BOOK18_100DPI.DECW$FONT;1
AVANTGARDE_BOOK24_100DPI.DECW$FONT;1               AVANTGARDE_BOOK8_100DPI.DECW$FONT;1
AVANTGARDE_BOOKOBLIQUE10_100DPI.DECW$FONT;1        AVANTGARDE_BOOKOBLIQUE12_100DPI.DECW$FONT;1
AVANTGARDE_BOOKOBLIQUE14_100DPI.DECW$FONT;1        AVANTGARDE_BOOKOBLIQUE18_100DPI.DECW$FONT;1
AVANTGARDE_BOOKOBLIQUE24_100DPI.DECW$FONT;1        AVANTGARDE_BOOKOBLIQUE8_100DPI.DECW$FONT;1
AVANTGARDE_DEMI10_100DPI.DECW$FONT;1               AVANTGARDE_DEMI12_100DPI.DECW$FONT;1
AVANTGARDE_DEMI14_100DPI.DECW$FONT;1               AVANTGARDE_DEMI18_100DPI.DECW$FONT;1
AVANTGARDE_DEMI24_100DPI.DECW$FONT;1               AVANTGARDE_DEMI8_100DPI.DECW$FONT;1
AVANTGARDE_DEMIOBLIQUE10_100DPI.DECW$FONT;1        AVANTGARDE_DEMIOBLIQUE12_100DPI.DECW$FONT;1
AVANTGARDE_DEMIOBLIQUE14_100DPI.DECW$FONT;1        AVANTGARDE_DEMIOBLIQUE18_100DPI.DECW$FONT;1
AVANTGARDE_DEMIOBLIQUE24_100DPI.DECW$FONT;1        AVANTGARDE_DEMIOBLIQUE8_100DPI.DECW$FONT;1

COURIER10_100DPI.DECW$FONT;1                       COURIER12_100DPI.DECW$FONT;1
COURIER14_100DPI.DECW$FONT;1                       COURIER18_100DPI.DECW$FONT;1
COURIER24_100DPI.DECW$FONT;1                       COURIER8_100DPI.DECW$FONT;1
COURIER_BOLD10_100DPI.DECW$FONT;1                  COURIER_BOLD12_100DPI.DECW$FONT;1
COURIER_BOLD14_100DPI.DECW$FONT;1                  COURIER_BOLD18_100DPI.DECW$FONT;1
COURIER_BOLD24_100DPI.DECW$FONT;1                  COURIER_BOLD8_100DPI.DECW$FONT;1
COURIER_BOLDOBLIQUE10_100DPI.DECW$FONT;1           COURIER_BOLDOBLIQUE12_100DPI.DECW$FONT;1
COURIER_BOLDOBLIQUE14_100DPI.DECW$FONT;1           COURIER_BOLDOBLIQUE18_100DPI.DECW$FONT;1
COURIER_BOLDOBLIQUE24_100DPI.DECW$FONT;1           COURIER_BOLDOBLIQUE8_100DPI.DECW$FONT;1
COURIER_OBLIQUE10_100DPI.DECW$FONT;1               COURIER_OBLIQUE12_100DPI.DECW$FONT;1
COURIER_OBLIQUE14_100DPI.DECW$FONT;1               COURIER_OBLIQUE18_100DPI.DECW$FONT;1
COURIER_OBLIQUE24_100DPI.DECW$FONT;1               COURIER_OBLIQUE8_100DPI.DECW$FONT;1

DECW$FONT_ALIAS_100DPI.DAT;1                       DECW$FONT_ALIAS_GS_100DPI.DAT;1
DECW$FONT_DIRECTORY_100DPI.DAT;1                   DECW$SESSION_100DPI.DECW$FONT;1
DUTCH801_DECMATH_EXTENSION10_100DPI.DECW$FONT;1    DUTCH801_DECMATH_EXTENSION12_100DPI.DECW$FONT;1
DUTCH801_DECMATH_EXTENSION14_100DPI.DECW$FONT;1    DUTCH801_DECMATH_EXTENSION8_100DPI.DECW$FONT;1
DUTCH801_DECMATH_ITALIC10_100DPI.DECW$FONT;1       DUTCH801_DECMATH_ITALIC12_100DPI.DECW$FONT;1
DUTCH801_DECMATH_ITALIC14_100DPI.DECW$FONT;1       DUTCH801_DECMATH_ITALIC8_100DPI.DECW$FONT;1
DUTCH801_DECMATH_SYMBOL10_100DPI.DECW$FONT;1       DUTCH801_DECMATH_SYMBOL12_100DPI.DECW$FONT;1
DUTCH801_DECMATH_SYMBOL14_100DPI.DECW$FONT;1       DUTCH801_DECMATH_SYMBOL8_100DPI.DECW$FONT;1
FIXED_100DPI.DECW$FONT;1                           HELVETICA10_100DPI.DECW$FONT;1

HELVETICA12_100DPI.DECW$FONT;1                     HELVETICA14_100DPI.DECW$FONT;1
HELVETICA18_100DPI.DECW$FONT;1                     HELVETICA24_100DPI.DECW$FONT;1
HELVETICA8_100DPI.DECW$FONT;1                      HELVETICA_BOLD10_100DPI.DECW$FONT;1
HELVETICA_BOLD12_100DPI.DECW$FONT;1                HELVETICA_BOLD14_100DPI.DECW$FONT;1
HELVETICA_BOLD18_100DPI.DECW$FONT;1                HELVETICA_BOLD24_100DPI.DECW$FONT;1
HELVETICA_BOLD8_100DPI.DECW$FONT;1                 HELVETICA_BOLDOBLIQUE10_100DPI.DECW$FONT;1
HELVETICA_BOLDOBLIQUE12_100DPI.DECW$FONT;1         HELVETICA_BOLDOBLIQUE14_100DPI.DECW$FONT;1
HELVETICA_BOLDOBLIQUE18_100DPI.DECW$FONT;1         HELVETICA_BOLDOBLIQUE24_100DPI.DECW$FONT;1
HELVETICA_BOLDOBLIQUE8_100DPI.DECW$FONT;1          HELVETICA_OBLIQUE10_100DPI.DECW$FONT;1
HELVETICA_OBLIQUE12_100DPI.DECW$FONT;1             HELVETICA_OBLIQUE14_100DPI.DECW$FONT;1
HELVETICA_OBLIQUE18_100DPI.DECW$FONT;1             HELVETICA_OBLIQUE24_100DPI.DECW$FONT;1
HELVETICA_OBLIQUE8_100DPI.DECW$FONT;1              INTERIM_DM_EXTENSION14_100DPI.DECW$FONT;1
INTERIM_DM_ITALIC14_100DPI.DECW$FONT;1             INTERIM_DM_SYMBOL14_100DPI.DECW$FONT;1

LUBALINGRAPH_BOOK10_100DPI.DECW$FONT;1             LUBALINGRAPH_BOOK12_100DPI.DECW$FONT;1
LUBALINGRAPH_BOOK14_100DPI.DECW$FONT;1             LUBALINGRAPH_BOOK18_100DPI.DECW$FONT;1
LUBALINGRAPH_BOOK24_100DPI.DECW$FONT;1             LUBALINGRAPH_BOOK8_100DPI.DECW$FONT;1
LUBALINGRAPH_BOOKOBLIQUE10_100DPI.DECW$FONT;1      LUBALINGRAPH_BOOKOBLIQUE12_100DPI.DECW$FONT;1
LUBALINGRAPH_BOOKOBLIQUE14_100DPI.DECW$FONT;1      LUBALINGRAPH_BOOKOBLIQUE18_100DPI.DECW$FONT;1
LUBALINGRAPH_BOOKOBLIQUE24_100DPI.DECW$FONT;1      LUBALINGRAPH_BOOKOBLIQUE8_100DPI.DECW$FONT;1
LUBALINGRAPH_DEMI10_100DPI.DECW$FONT;1             LUBALINGRAPH_DEMI12_100DPI.DECW$FONT;1
LUBALINGRAPH_DEMI14_100DPI.DECW$FONT;1             LUBALINGRAPH_DEMI18_100DPI.DECW$FONT;1
LUBALINGRAPH_DEMI24_100DPI.DECW$FONT;1             LUBALINGRAPH_DEMI8_100DPI.DECW$FONT;1
LUBALINGRAPH_DEMIOBLIQUE10_100DPI.DECW$FONT;1      LUBALINGRAPH_DEMIOBLIQUE12_100DPI.DECW$FONT;1
LUBALINGRAPH_DEMIOBLIQUE14_100DPI.DECW$FONT;1      LUBALINGRAPH_DEMIOBLIQUE18_100DPI.DECW$FONT;1
LUBALINGRAPH_DEMIOBLIQUE24_100DPI.DECW$FONT;1      LUBALINGRAPH_DEMIOBLIQUE8_100DPI.DECW$FONT;1

LUCIDABRIGHT08_100DPI.DECW$FONT;1                  LUCIDABRIGHT10_100DPI.DECW$FONT;1
LUCIDABRIGHT12_100DPI.DECW$FONT;1                  LUCIDABRIGHT14_100DPI.DECW$FONT;1
LUCIDABRIGHT18_100DPI.DECW$FONT;1                  LUCIDABRIGHT19_100DPI.DECW$FONT;1
LUCIDABRIGHT24_100DPI.DECW$FONT;1                  LUCIDABRIGHT_DEMI08_100DPI.DECW$FONT;1
LUCIDABRIGHT_DEMI10_100DPI.DECW$FONT;1             LUCIDABRIGHT_DEMI12_100DPI.DECW$FONT;1
LUCIDABRIGHT_DEMI14_100DPI.DECW$FONT;1             LUCIDABRIGHT_DEMI18_100DPI.DECW$FONT;1
LUCIDABRIGHT_DEMI19_100DPI.DECW$FONT;1             LUCIDABRIGHT_DEMI24_100DPI.DECW$FONT;1
LUCIDABRIGHT_DEMIITALIC08_100DPI.DECW$FONT;1       LUCIDABRIGHT_DEMIITALIC10_100DPI.DECW$FONT;1
LUCIDABRIGHT_DEMIITALIC12_100DPI.DECW$FONT;1       LUCIDABRIGHT_DEMIITALIC14_100DPI.DECW$FONT;1
LUCIDABRIGHT_DEMIITALIC18_100DPI.DECW$FONT;1       LUCIDABRIGHT_DEMIITALIC19_100DPI.DECW$FONT;1
LUCIDABRIGHT_DEMIITALIC24_100DPI.DECW$FONT;1       LUCIDABRIGHT_ITALIC08_100DPI.DECW$FONT;1
LUCIDABRIGHT_ITALIC10_100DPI.DECW$FONT;1           LUCIDABRIGHT_ITALIC12_100DPI.DECW$FONT;1
LUCIDABRIGHT_ITALIC14_100DPI.DECW$FONT;1           LUCIDABRIGHT_ITALIC18_100DPI.DECW$FONT;1
LUCIDABRIGHT_ITALIC19_100DPI.DECW$FONT;1           LUCIDABRIGHT_ITALIC24_100DPI.DECW$FONT;1

LUCIDATYPEWRITER_BOLDSANS08_100DPI.DECW$FONT;1     LUCIDATYPEWRITER_BOLDSANS10_100DPI.DECW$FONT;1
LUCIDATYPEWRITER_BOLDSANS12_100DPI.DECW$FONT;1     LUCIDATYPEWRITER_BOLDSANS14_100DPI.DECW$FONT;1
LUCIDATYPEWRITER_BOLDSANS18_100DPI.DECW$FONT;1     LUCIDATYPEWRITER_BOLDSANS19_100DPI.DECW$FONT;1
LUCIDATYPEWRITER_BOLDSANS24_100DPI.DECW$FONT;1     LUCIDATYPEWRITER_SANS08_100DPI.DECW$FONT;1
LUCIDATYPEWRITER_SANS10_100DPI.DECW$FONT;1         LUCIDATYPEWRITER_SANS12_100DPI.DECW$FONT;1
LUCIDATYPEWRITER_SANS14_100DPI.DECW$FONT;1         LUCIDATYPEWRITER_SANS18_100DPI.DECW$FONT;1
LUCIDATYPEWRITER_SANS19_100DPI.DECW$FONT;1         LUCIDATYPEWRITER_SANS24_100DPI.DECW$FONT;1

LUCIDA_BOLDITALICSANS08_100DPI.DECW$FONT;1         LUCIDA_BOLDITALICSANS10_100DPI.DECW$FONT;1
LUCIDA_BOLDITALICSANS12_100DPI.DECW$FONT;1         LUCIDA_BOLDITALICSANS14_100DPI.DECW$FONT;1
LUCIDA_BOLDITALICSANS18_100DPI.DECW$FONT;1         LUCIDA_BOLDITALICSANS19_100DPI.DECW$FONT;1
LUCIDA_BOLDITALICSANS24_100DPI.DECW$FONT;1         LUCIDA_BOLDSANS08_100DPI.DECW$FONT;1
LUCIDA_BOLDSANS10_100DPI.DECW$FONT;1               LUCIDA_BOLDSANS12_100DPI.DECW$FONT;1
LUCIDA_BOLDSANS14_100DPI.DECW$FONT;1               LUCIDA_BOLDSANS18_100DPI.DECW$FONT;1
LUCIDA_BOLDSANS19_100DPI.DECW$FONT;1               LUCIDA_BOLDSANS24_100DPI.DECW$FONT;1

LUCIDA_ITALICSANS08_100DPI.DECW$FONT;1             LUCIDA_ITALICSANS10_100DPI.DECW$FONT;1
LUCIDA_ITALICSANS12_100DPI.DECW$FONT;1             LUCIDA_ITALICSANS14_100DPI.DECW$FONT;1
LUCIDA_ITALICSANS18_100DPI.DECW$FONT;1             LUCIDA_ITALICSANS19_100DPI.DECW$FONT;1
LUCIDA_ITALICSANS24_100DPI.DECW$FONT;1             LUCIDA_SANS08_100DPI.DECW$FONT;1
LUCIDA_SANS10_100DPI.DECW$FONT;1                   LUCIDA_SANS12_100DPI.DECW$FONT;1
LUCIDA_SANS14_100DPI.DECW$FONT;1                   LUCIDA_SANS18_100DPI.DECW$FONT;1
LUCIDA_SANS19_100DPI.DECW$FONT;1                   LUCIDA_SANS24_100DPI.DECW$FONT;1
MENU10_100DPI.DECW$FONT;1                          MENU12_100DPI.DECW$FONT;1

NEWCENTURYSCHLBK_BOLD10_100DPI.DECW$FONT;1         NEWCENTURYSCHLBK_BOLD12_100DPI.DECW$FONT;1
NEWCENTURYSCHLBK_BOLD14_100DPI.DECW$FONT;1         NEWCENTURYSCHLBK_BOLD18_100DPI.DECW$FONT;1
NEWCENTURYSCHLBK_BOLD24_100DPI.DECW$FONT;1         NEWCENTURYSCHLBK_BOLD8_100DPI.DECW$FONT;1
NEWCENTURYSCHLBK_BOLDITALIC10_100DPI.DECW$FONT;1   NEWCENTURYSCHLBK_BOLDITALIC12_100DPI.DECW$FONT;1
NEWCENTURYSCHLBK_BOLDITALIC14_100DPI.DECW$FONT;1   NEWCENTURYSCHLBK_BOLDITALIC18_100DPI.DECW$FONT;1
NEWCENTURYSCHLBK_BOLDITALIC24_100DPI.DECW$FONT;1   NEWCENTURYSCHLBK_BOLDITALIC8_100DPI.DECW$FONT;1
NEWCENTURYSCHLBK_ITALIC10_100DPI.DECW$FONT;1       NEWCENTURYSCHLBK_ITALIC12_100DPI.DECW$FONT;1
NEWCENTURYSCHLBK_ITALIC14_100DPI.DECW$FONT;1       NEWCENTURYSCHLBK_ITALIC18_100DPI.DECW$FONT;1
NEWCENTURYSCHLBK_ITALIC24_100DPI.DECW$FONT;1       NEWCENTURYSCHLBK_ITALIC8_100DPI.DECW$FONT;1
NEWCENTURYSCHLBK_ROMAN10_100DPI.DECW$FONT;1        NEWCENTURYSCHLBK_ROMAN12_100DPI.DECW$FONT;1
NEWCENTURYSCHLBK_ROMAN14_100DPI.DECW$FONT;1        NEWCENTURYSCHLBK_ROMAN18_100DPI.DECW$FONT;1
NEWCENTURYSCHLBK_ROMAN24_100DPI.DECW$FONT;1        NEWCENTURYSCHLBK_ROMAN8_100DPI.DECW$FONT;1

PRESENT_BULLETS10_100.DECW$FONT;1                  PRESENT_BULLETS12_100.DECW$FONT;1
PRESENT_BULLETS14_100.DECW$FONT;1                  PRESENT_BULLETS18_100.DECW$FONT;1
PRESENT_BULLETS24_100.DECW$FONT;1                  PRESENT_BULLETS36_100.DECW$FONT;1
PRESENT_BULLETS48_100.DECW$FONT;1                  PRESENT_BULLETS72_100.DECW$FONT;1
PRESENT_BULLETS8_100.DECW$FONT;1                   SOUVENIR_DEMI10_100DPI.DECW$FONT;1
SOUVENIR_DEMI12_100DPI.DECW$FONT;1                 SOUVENIR_DEMI14_100DPI.DECW$FONT;1
SOUVENIR_DEMI18_100DPI.DECW$FONT;1                 SOUVENIR_DEMI24_100DPI.DECW$FONT;1
SOUVENIR_DEMI8_100DPI.DECW$FONT;1                  SOUVENIR_DEMIITALIC10_100DPI.DECW$FONT;1
SOUVENIR_DEMIITALIC12_100DPI.DECW$FONT;1           SOUVENIR_DEMIITALIC14_100DPI.DECW$FONT;1
SOUVENIR_DEMIITALIC18_100DPI.DECW$FONT;1           SOUVENIR_DEMIITALIC24_100DPI.DECW$FONT;1
SOUVENIR_DEMIITALIC8_100DPI.DECW$FONT;1            SOUVENIR_LIGHT10_100DPI.DECW$FONT;1
SOUVENIR_LIGHT12_100DPI.DECW$FONT;1                SOUVENIR_LIGHT14_100DPI.DECW$FONT;1

SOUVENIR_LIGHT18_100DPI.DECW$FONT;1                SOUVENIR_LIGHT24_100DPI.DECW$FONT;1
SOUVENIR_LIGHT8_100DPI.DECW$FONT;1                 SOUVENIR_LIGHTITALIC10_100DPI.DECW$FONT;1
SOUVENIR_LIGHTITALIC12_100DPI.DECW$FONT;1          SOUVENIR_LIGHTITALIC14_100DPI.DECW$FONT;1
SOUVENIR_LIGHTITALIC18_100DPI.DECW$FONT;1          SOUVENIR_LIGHTITALIC24_100DPI.DECW$FONT;1
SOUVENIR_LIGHTITALIC8_100DPI.DECW$FONT;1           SYMBOL10_100DPI.DECW$FONT;1
SYMBOL12_100DPI.DECW$FONT;1                        SYMBOL14_100DPI.DECW$FONT;1
SYMBOL18_100DPI.DECW$FONT;1                        SYMBOL24_100DPI.DECW$FONT;1
SYMBOL8_100DPI.DECW$FONT;1                         TERMINAL10_100DPI.DECW$FONT;1
TERMINAL14_100DPI.DECW$FONT;1                      TERMINAL18_100DPI.DECW$FONT;1
TERMINAL20_100DPI.DECW$FONT;1                      TERMINAL28_100DPI.DECW$FONT;1
TERMINAL36_100DPI.DECW$FONT;1                      TERMINAL_BOLD10_100DPI.DECW$FONT;1

TERMINAL_BOLD14_100DPI.DECW$FONT;1                 TERMINAL_BOLD18_100DPI.DECW$FONT;1
TERMINAL_BOLD20_100DPI.DECW$FONT;1                 TERMINAL_BOLD28_100DPI.DECW$FONT;1
TERMINAL_BOLD36_100DPI.DECW$FONT;1                 TERMINAL_BOLD_DBLWIDE10_100DPI.DECW$FONT;1
TERMINAL_BOLD_DBLWIDE14_100DPI.DECW$FONT;1         TERMINAL_BOLD_DBLWIDE18_100DPI.DECW$FONT;1
TERMINAL_BOLD_DBLWIDE_DECTECH10_100DPI.DECW$FONT;1 TERMINAL_BOLD_DBLWIDE_DECTECH14_100DPI.DECW$FONT;1
TERMINAL_BOLD_DBLWIDE_DECTECH18_100DPI.DECW$FONT;1 TERMINAL_BOLD_DECTECH10_100DPI.DECW$FONT;1
TERMINAL_BOLD_DECTECH14_100DPI.DECW$FONT;1         TERMINAL_BOLD_DECTECH18_100DPI.DECW$FONT;1
TERMINAL_BOLD_DECTECH20_100DPI.DECW$FONT;1         TERMINAL_BOLD_DECTECH28_100DPI.DECW$FONT;1
TERMINAL_BOLD_DECTECH36_100DPI.DECW$FONT;1         TERMINAL_BOLD_NARROW10_100DPI.DECW$FONT;1

TERMINAL_BOLD_NARROW14_100DPI.DECW$FONT;1          TERMINAL_BOLD_NARROW18_100DPI.DECW$FONT;1
TERMINAL_BOLD_NARROW20_100DPI.DECW$FONT;1          TERMINAL_BOLD_NARROW28_100DPI.DECW$FONT;1
TERMINAL_BOLD_NARROW36_100DPI.DECW$FONT;1          TERMINAL_BOLD_NARROW_DECTECH10_100DPI.DECW$FONT;1
TERMINAL_BOLD_NARROW_DECTECH14_100DPI.DECW$FONT;1  TERMINAL_BOLD_NARROW_DECTECH18_100DPI.DECW$FONT;1
TERMINAL_BOLD_NARROW_DECTECH20_100DPI.DECW$FONT;1  TERMINAL_BOLD_NARROW_DECTECH28_100DPI.DECW$FONT;1
TERMINAL_BOLD_NARROW_DECTECH36_100DPI.DECW$FONT;1  TERMINAL_BOLD_WIDE10_100DPI.DECW$FONT;1
TERMINAL_BOLD_WIDE14_100DPI.DECW$FONT;1            TERMINAL_BOLD_WIDE18_100DPI.DECW$FONT;1
TERMINAL_BOLD_WIDE_DECTECH10_100DPI.DECW$FONT;1    TERMINAL_BOLD_WIDE_DECTECH14_100DPI.DECW$FONT;1
TERMINAL_BOLD_WIDE_DECTECH18_100DPI.DECW$FONT;1    TERMINAL_DBLWIDE10_100DPI.DECW$FONT;1

TERMINAL_DBLWIDE14_100DPI.DECW$FONT;1              TERMINAL_DBLWIDE18_100DPI.DECW$FONT;1
TERMINAL_DBLWIDE_DECTECH10_100DPI.DECW$FONT;1      TERMINAL_DBLWIDE_DECTECH14_100DPI.DECW$FONT;1
TERMINAL_DBLWIDE_DECTECH18_100DPI.DECW$FONT;1      TERMINAL_DECTECH10_100DPI.DECW$FONT;1
TERMINAL_DECTECH14_100DPI.DECW$FONT;1              TERMINAL_DECTECH18_100DPI.DECW$FONT;1
TERMINAL_DECTECH20_100DPI.DECW$FONT;1              TERMINAL_DECTECH28_100DPI.DECW$FONT;1
TERMINAL_DECTECH36_100DPI.DECW$FONT;1              TERMINAL_GS10_100DPI.DECW$FONT;1
TERMINAL_GS14_100DPI.DECW$FONT;1                   TERMINAL_NARROW10_100DPI.DECW$FONT;1

TERMINAL_NARROW14_100DPI.DECW$FONT;1               TERMINAL_NARROW18_100DPI.DECW$FONT;1
TERMINAL_NARROW20_100DPI.DECW$FONT;1               TERMINAL_NARROW28_100DPI.DECW$FONT;1
TERMINAL_NARROW36_100DPI.DECW$FONT;1               TERMINAL_NARROW_DECTECH10_100DPI.DECW$FONT;1
TERMINAL_NARROW_DECTECH14_100DPI.DECW$FONT;1       TERMINAL_NARROW_DECTECH18_100DPI.DECW$FONT;1
TERMINAL_NARROW_DECTECH20_100DPI.DECW$FONT;1       TERMINAL_NARROW_DECTECH28_100DPI.DECW$FONT;1
TERMINAL_NARROW_DECTECH36_100DPI.DECW$FONT;1       TERMINAL_WIDE10_100DPI.DECW$FONT;1
TERMINAL_WIDE14_100DPI.DECW$FONT;1                 TERMINAL_WIDE18_100DPI.DECW$FONT;1
TERMINAL_WIDE_DECTECH10_100DPI.DECW$FONT;1         TERMINAL_WIDE_DECTECH14_100DPI.DECW$FONT;1
TERMINAL_WIDE_DECTECH18_100DPI.DECW$FONT;1         TIMES_BOLD10_100DPI.DECW$FONT;1

TIMES_BOLD12_100DPI.DECW$FONT;1                    TIMES_BOLD14_100DPI.DECW$FONT;1
TIMES_BOLD18_100DPI.DECW$FONT;1                    TIMES_BOLD24_100DPI.DECW$FONT;1
TIMES_BOLD8_100DPI.DECW$FONT;1                     TIMES_BOLDITALIC10_100DPI.DECW$FONT;1

TIMES_BOLDITALIC12_100DPI.DECW$FONT;1              TIMES_BOLDITALIC14_100DPI.DECW$FONT;1
TIMES_BOLDITALIC18_100DPI.DECW$FONT;1              TIMES_BOLDITALIC24_100DPI.DECW$FONT;1
TIMES_BOLDITALIC8_100DPI.DECW$FONT;1               TIMES_ITALIC10_100DPI.DECW$FONT;1
TIMES_ITALIC12_100DPI.DECW$FONT;1                  TIMES_ITALIC14_100DPI.DECW$FONT;1
TIMES_ITALIC18_100DPI.DECW$FONT;1                  TIMES_ITALIC24_100DPI.DECW$FONT;1
TIMES_ITALIC8_100DPI.DECW$FONT;1                   TIMES_ROMAN10_100DPI.DECW$FONT;1
TIMES_ROMAN12_100DPI.DECW$FONT;1                   TIMES_ROMAN14_100DPI.DECW$FONT;1
TIMES_ROMAN18_100DPI.DECW$FONT;1                   TIMES_ROMAN24_100DPI.DECW$FONT;1
TIMES_ROMAN8_100DPI.DECW$FONT;1                    VARIABLE_100DPI.DECW$FONT;1

Total of 350 files.
Directory SYS$SYSDEVICE:[VMS$COMMON.SYSFONT.DECW.75DPI]

AVANTGARDE_BOOK10.DECW$FONT;1                      AVANTGARDE_BOOK12.DECW$FONT;1
AVANTGARDE_BOOK14.DECW$FONT;1                      AVANTGARDE_BOOK18.DECW$FONT;1
AVANTGARDE_BOOK24.DECW$FONT;1                      AVANTGARDE_BOOK8.DECW$FONT;1
AVANTGARDE_BOOKOBLIQUE10.DECW$FONT;1               AVANTGARDE_BOOKOBLIQUE12.DECW$FONT;1
AVANTGARDE_BOOKOBLIQUE14.DECW$FONT;1               AVANTGARDE_BOOKOBLIQUE18.DECW$FONT;1
AVANTGARDE_BOOKOBLIQUE24.DECW$FONT;1               AVANTGARDE_BOOKOBLIQUE8.DECW$FONT;1
AVANTGARDE_DEMI10.DECW$FONT;1                      AVANTGARDE_DEMI12.DECW$FONT;1

AVANTGARDE_DEMI14.DECW$FONT;1                      AVANTGARDE_DEMI18.DECW$FONT;1
AVANTGARDE_DEMI24.DECW$FONT;1                      AVANTGARDE_DEMI8.DECW$FONT;1
AVANTGARDE_DEMIOBLIQUE10.DECW$FONT;1               AVANTGARDE_DEMIOBLIQUE12.DECW$FONT;1
AVANTGARDE_DEMIOBLIQUE14.DECW$FONT;1               AVANTGARDE_DEMIOBLIQUE18.DECW$FONT;1
AVANTGARDE_DEMIOBLIQUE24.DECW$FONT;1               AVANTGARDE_DEMIOBLIQUE8.DECW$FONT;1

COURIER10.DECW$FONT;1                              COURIER12.DECW$FONT;1
COURIER14.DECW$FONT;1                              COURIER18.DECW$FONT;1
COURIER24.DECW$FONT;1                              COURIER8.DECW$FONT;1
COURIER_BOLD10.DECW$FONT;1                         COURIER_BOLD12.DECW$FONT;1
COURIER_BOLD14.DECW$FONT;1                         COURIER_BOLD18.DECW$FONT;1
COURIER_BOLD24.DECW$FONT;1                         COURIER_BOLD8.DECW$FONT;1

COURIER_BOLDOBLIQUE10.DECW$FONT;1                  COURIER_BOLDOBLIQUE12.DECW$FONT;1
COURIER_BOLDOBLIQUE14.DECW$FONT;1                  COURIER_BOLDOBLIQUE18.DECW$FONT;1
COURIER_BOLDOBLIQUE24.DECW$FONT;1                  COURIER_BOLDOBLIQUE8.DECW$FONT;1
COURIER_OBLIQUE10.DECW$FONT;1                      COURIER_OBLIQUE12.DECW$FONT;1
COURIER_OBLIQUE14.DECW$FONT;1                      COURIER_OBLIQUE18.DECW$FONT;1
COURIER_OBLIQUE24.DECW$FONT;1                      COURIER_OBLIQUE8.DECW$FONT;1
DECW$FONT_ALIAS.DAT;1                              DECW$FONT_DIRECTORY.DAT;1
DECW$SESSION.DECW$FONT;1                           DUTCH801_DECMATH_EXTENSION10.DECW$FONT;1

DUTCH801_DECMATH_EXTENSION12.DECW$FONT;1           DUTCH801_DECMATH_EXTENSION14.DECW$FONT;1
DUTCH801_DECMATH_EXTENSION8.DECW$FONT;1            DUTCH801_DECMATH_ITALIC10.DECW$FONT;1
DUTCH801_DECMATH_ITALIC12.DECW$FONT;1              DUTCH801_DECMATH_ITALIC14.DECW$FONT;1
DUTCH801_DECMATH_ITALIC8.DECW$FONT;1               DUTCH801_DECMATH_SYMBOL10.DECW$FONT;1
DUTCH801_DECMATH_SYMBOL12.DECW$FONT;1              DUTCH801_DECMATH_SYMBOL14.DECW$FONT;1
DUTCH801_DECMATH_SYMBOL8.DECW$FONT;1               FIXED.DECW$FONT;1

HELVETICA10.DECW$FONT;1                            HELVETICA12.DECW$FONT;1
HELVETICA14.DECW$FONT;1                            HELVETICA18.DECW$FONT;1
HELVETICA24.DECW$FONT;1                            HELVETICA8.DECW$FONT;1
HELVETICA_BOLD10.DECW$FONT;1                       HELVETICA_BOLD12.DECW$FONT;1
HELVETICA_BOLD14.DECW$FONT;1                       HELVETICA_BOLD18.DECW$FONT;1
HELVETICA_BOLD24.DECW$FONT;1                       HELVETICA_BOLD8.DECW$FONT;1

HELVETICA_BOLDOBLIQUE10.DECW$FONT;1                HELVETICA_BOLDOBLIQUE12.DECW$FONT;1
HELVETICA_BOLDOBLIQUE14.DECW$FONT;1                HELVETICA_BOLDOBLIQUE18.DECW$FONT;1
HELVETICA_BOLDOBLIQUE24.DECW$FONT;1                HELVETICA_BOLDOBLIQUE8.DECW$FONT;1
HELVETICA_OBLIQUE10.DECW$FONT;1                    HELVETICA_OBLIQUE12.DECW$FONT;1
HELVETICA_OBLIQUE14.DECW$FONT;1                    HELVETICA_OBLIQUE18.DECW$FONT;1
HELVETICA_OBLIQUE24.DECW$FONT;1                    HELVETICA_OBLIQUE8.DECW$FONT;1
INTERIM_DM_EXTENSION14.DECW$FONT;1                 INTERIM_DM_ITALIC14.DECW$FONT;1

INTERIM_DM_SYMBOL14.DECW$FONT;1                    LUBALINGRAPH_BOOK10.DECW$FONT;1
LUBALINGRAPH_BOOK12.DECW$FONT;1                    LUBALINGRAPH_BOOK14.DECW$FONT;1
LUBALINGRAPH_BOOK18.DECW$FONT;1                    LUBALINGRAPH_BOOK24.DECW$FONT;1
LUBALINGRAPH_BOOK8.DECW$FONT;1                     LUBALINGRAPH_BOOKOBLIQUE10.DECW$FONT;1
LUBALINGRAPH_BOOKOBLIQUE12.DECW$FONT;1             LUBALINGRAPH_BOOKOBLIQUE14.DECW$FONT;1
LUBALINGRAPH_BOOKOBLIQUE18.DECW$FONT;1             LUBALINGRAPH_BOOKOBLIQUE24.DECW$FONT;1

LUBALINGRAPH_BOOKOBLIQUE8.DECW$FONT;1              LUBALINGRAPH_DEMI10.DECW$FONT;1
LUBALINGRAPH_DEMI12.DECW$FONT;1                    LUBALINGRAPH_DEMI14.DECW$FONT;1
LUBALINGRAPH_DEMI18.DECW$FONT;1                    LUBALINGRAPH_DEMI24.DECW$FONT;1
LUBALINGRAPH_DEMI8.DECW$FONT;1                     LUBALINGRAPH_DEMIOBLIQUE10.DECW$FONT;1
LUBALINGRAPH_DEMIOBLIQUE12.DECW$FONT;1             LUBALINGRAPH_DEMIOBLIQUE14.DECW$FONT;1
LUBALINGRAPH_DEMIOBLIQUE18.DECW$FONT;1             LUBALINGRAPH_DEMIOBLIQUE24.DECW$FONT;1
LUBALINGRAPH_DEMIOBLIQUE8.DECW$FONT;1              LUCIDABRIGHT08.DECW$FONT;1

LUCIDABRIGHT10.DECW$FONT;1                         LUCIDABRIGHT12.DECW$FONT;1
LUCIDABRIGHT14.DECW$FONT;1                         LUCIDABRIGHT18.DECW$FONT;1
LUCIDABRIGHT19.DECW$FONT;1                         LUCIDABRIGHT24.DECW$FONT;1
LUCIDABRIGHT_DEMI08.DECW$FONT;1                    LUCIDABRIGHT_DEMI10.DECW$FONT;1
LUCIDABRIGHT_DEMI12.DECW$FONT;1                    LUCIDABRIGHT_DEMI14.DECW$FONT;1
LUCIDABRIGHT_DEMI18.DECW$FONT;1                    LUCIDABRIGHT_DEMI19.DECW$FONT;1

LUCIDABRIGHT_DEMI24.DECW$FONT;1                    LUCIDABRIGHT_DEMIITALIC08.DECW$FONT;1
LUCIDABRIGHT_DEMIITALIC10.DECW$FONT;1              LUCIDABRIGHT_DEMIITALIC12.DECW$FONT;1
LUCIDABRIGHT_DEMIITALIC14.DECW$FONT;1              LUCIDABRIGHT_DEMIITALIC18.DECW$FONT;1
LUCIDABRIGHT_DEMIITALIC19.DECW$FONT;1              LUCIDABRIGHT_DEMIITALIC24.DECW$FONT;1
LUCIDABRIGHT_ITALIC08.DECW$FONT;1                  LUCIDABRIGHT_ITALIC10.DECW$FONT;1
LUCIDABRIGHT_ITALIC12.DECW$FONT;1                  LUCIDABRIGHT_ITALIC14.DECW$FONT;1
LUCIDABRIGHT_ITALIC18.DECW$FONT;1                  LUCIDABRIGHT_ITALIC19.DECW$FONT;1
LUCIDABRIGHT_ITALIC24.DECW$FONT;1                  LUCIDATYPEWRITER_BOLDSANS08.DECW$FONT;1

LUCIDATYPEWRITER_BOLDSANS10.DECW$FONT;1            LUCIDATYPEWRITER_BOLDSANS12.DECW$FONT;1
LUCIDATYPEWRITER_BOLDSANS14.DECW$FONT;1            LUCIDATYPEWRITER_BOLDSANS18.DECW$FONT;1
LUCIDATYPEWRITER_BOLDSANS19.DECW$FONT;1            LUCIDATYPEWRITER_BOLDSANS24.DECW$FONT;1
LUCIDATYPEWRITER_SANS08.DECW$FONT;1                LUCIDATYPEWRITER_SANS10.DECW$FONT;1
LUCIDATYPEWRITER_SANS12.DECW$FONT;1                LUCIDATYPEWRITER_SANS14.DECW$FONT;1
LUCIDATYPEWRITER_SANS18.DECW$FONT;1                LUCIDATYPEWRITER_SANS19.DECW$FONT;1
LUCIDATYPEWRITER_SANS24.DECW$FONT;1                LUCIDA_BOLDITALICSANS08.DECW$FONT;1

LUCIDA_BOLDITALICSANS10.DECW$FONT;1                LUCIDA_BOLDITALICSANS12.DECW$FONT;1
LUCIDA_BOLDITALICSANS14.DECW$FONT;1                LUCIDA_BOLDITALICSANS18.DECW$FONT;1
LUCIDA_BOLDITALICSANS19.DECW$FONT;1                LUCIDA_BOLDITALICSANS24.DECW$FONT;1
LUCIDA_BOLDSANS08.DECW$FONT;1                      LUCIDA_BOLDSANS10.DECW$FONT;1
LUCIDA_BOLDSANS12.DECW$FONT;1                      LUCIDA_BOLDSANS14.DECW$FONT;1
LUCIDA_BOLDSANS18.DECW$FONT;1                      LUCIDA_BOLDSANS19.DECW$FONT;1

LUCIDA_BOLDSANS24.DECW$FONT;1                      LUCIDA_ITALICSANS08.DECW$FONT;1
LUCIDA_ITALICSANS10.DECW$FONT;1                    LUCIDA_ITALICSANS12.DECW$FONT;1
LUCIDA_ITALICSANS14.DECW$FONT;1                    LUCIDA_ITALICSANS18.DECW$FONT;1
LUCIDA_ITALICSANS19.DECW$FONT;1                    LUCIDA_ITALICSANS24.DECW$FONT;1
LUCIDA_SANS08.DECW$FONT;1                          LUCIDA_SANS10.DECW$FONT;1
LUCIDA_SANS12.DECW$FONT;1                          LUCIDA_SANS14.DECW$FONT;1
LUCIDA_SANS18.DECW$FONT;1                          LUCIDA_SANS19.DECW$FONT;1
LUCIDA_SANS24.DECW$FONT;1                          MENU10.DECW$FONT;1
MENU12.DECW$FONT;1                                 NEWCENTURYSCHLBK_BOLD10.DECW$FONT;1

NEWCENTURYSCHLBK_BOLD12.DECW$FONT;1                NEWCENTURYSCHLBK_BOLD14.DECW$FONT;1
NEWCENTURYSCHLBK_BOLD18.DECW$FONT;1                NEWCENTURYSCHLBK_BOLD24.DECW$FONT;1
NEWCENTURYSCHLBK_BOLD8.DECW$FONT;1                 NEWCENTURYSCHLBK_BOLDITALIC10.DECW$FONT;1
NEWCENTURYSCHLBK_BOLDITALIC12.DECW$FONT;1          NEWCENTURYSCHLBK_BOLDITALIC14.DECW$FONT;1
NEWCENTURYSCHLBK_BOLDITALIC18.DECW$FONT;1          NEWCENTURYSCHLBK_BOLDITALIC24.DECW$FONT;1
NEWCENTURYSCHLBK_BOLDITALIC8.DECW$FONT;1           NEWCENTURYSCHLBK_ITALIC10.DECW$FONT;1

NEWCENTURYSCHLBK_ITALIC12.DECW$FONT;1              NEWCENTURYSCHLBK_ITALIC14.DECW$FONT;1
NEWCENTURYSCHLBK_ITALIC18.DECW$FONT;1              NEWCENTURYSCHLBK_ITALIC24.DECW$FONT;1
NEWCENTURYSCHLBK_ITALIC8.DECW$FONT;1               NEWCENTURYSCHLBK_ROMAN10.DECW$FONT;1
NEWCENTURYSCHLBK_ROMAN12.DECW$FONT;1               NEWCENTURYSCHLBK_ROMAN14.DECW$FONT;1
NEWCENTURYSCHLBK_ROMAN18.DECW$FONT;1               NEWCENTURYSCHLBK_ROMAN24.DECW$FONT;1
NEWCENTURYSCHLBK_ROMAN8.DECW$FONT;1                PRESENT_BULLETS10_75.DECW$FONT;1

PRESENT_BULLETS12_75.DECW$FONT;1                   PRESENT_BULLETS14_75.DECW$FONT;1
PRESENT_BULLETS18_75.DECW$FONT;1                   PRESENT_BULLETS24_75.DECW$FONT;1
PRESENT_BULLETS36_75.DECW$FONT;1                   PRESENT_BULLETS48_75.DECW$FONT;1
PRESENT_BULLETS72_75.DECW$FONT;1                   PRESENT_BULLETS8_75.DECW$FONT;1
SOUVENIR_DEMI10.DECW$FONT;1                        SOUVENIR_DEMI12.DECW$FONT;1
SOUVENIR_DEMI14.DECW$FONT;1                        SOUVENIR_DEMI18.DECW$FONT;1

SOUVENIR_DEMI24.DECW$FONT;1                        SOUVENIR_DEMI8.DECW$FONT;1
SOUVENIR_DEMIITALIC10.DECW$FONT;1                  SOUVENIR_DEMIITALIC12.DECW$FONT;1
SOUVENIR_DEMIITALIC14.DECW$FONT;1                  SOUVENIR_DEMIITALIC18.DECW$FONT;1
SOUVENIR_DEMIITALIC24.DECW$FONT;1                  SOUVENIR_DEMIITALIC8.DECW$FONT;1
SOUVENIR_LIGHT10.DECW$FONT;1                       SOUVENIR_LIGHT12.DECW$FONT;1
SOUVENIR_LIGHT14.DECW$FONT;1                       SOUVENIR_LIGHT18.DECW$FONT;1

SOUVENIR_LIGHT24.DECW$FONT;1                       SOUVENIR_LIGHT8.DECW$FONT;1
SOUVENIR_LIGHTITALIC10.DECW$FONT;1                 SOUVENIR_LIGHTITALIC12.DECW$FONT;1
SOUVENIR_LIGHTITALIC14.DECW$FONT;1                 SOUVENIR_LIGHTITALIC18.DECW$FONT;1
SOUVENIR_LIGHTITALIC24.DECW$FONT;1                 SOUVENIR_LIGHTITALIC8.DECW$FONT;1
SYMBOL10.DECW$FONT;1                               SYMBOL12.DECW$FONT;1
SYMBOL14.DECW$FONT;1                               SYMBOL18.DECW$FONT;1
SYMBOL24.DECW$FONT;1                               SYMBOL8.DECW$FONT;1

TERMINAL14.DECW$FONT;1                             TERMINAL18.DECW$FONT;1
TERMINAL28.DECW$FONT;1                             TERMINAL36.DECW$FONT;1
TERMINAL_BOLD14.DECW$FONT;1                        TERMINAL_BOLD18.DECW$FONT;1
TERMINAL_BOLD28.DECW$FONT;1                        TERMINAL_BOLD36.DECW$FONT;1
TERMINAL_BOLD_DBLWIDE14.DECW$FONT;1                TERMINAL_BOLD_DBLWIDE18.DECW$FONT;1
TERMINAL_BOLD_DBLWIDE_DECTECH14.DECW$FONT;1        TERMINAL_BOLD_DBLWIDE_DECTECH18.DECW$FONT;1
TERMINAL_BOLD_DECTECH14.DECW$FONT;1                TERMINAL_BOLD_DECTECH18.DECW$FONT;1
TERMINAL_BOLD_DECTECH28.DECW$FONT;1                TERMINAL_BOLD_DECTECH36.DECW$FONT;1

TERMINAL_BOLD_NARROW14.DECW$FONT;1                 TERMINAL_BOLD_NARROW18.DECW$FONT;1
TERMINAL_BOLD_NARROW28.DECW$FONT;1                 TERMINAL_BOLD_NARROW36.DECW$FONT;1
TERMINAL_BOLD_NARROW_DECTECH14.DECW$FONT;1         TERMINAL_BOLD_NARROW_DECTECH18.DECW$FONT;1
TERMINAL_BOLD_NARROW_DECTECH28.DECW$FONT;1         TERMINAL_BOLD_NARROW_DECTECH36.DECW$FONT;1
TERMINAL_BOLD_WIDE14.DECW$FONT;1                   TERMINAL_BOLD_WIDE18.DECW$FONT;1
TERMINAL_BOLD_WIDE_DECTECH14.DECW$FONT;1           TERMINAL_BOLD_WIDE_DECTECH18.DECW$FONT;1

TERMINAL_DBLWIDE14.DECW$FONT;1                     TERMINAL_DBLWIDE18.DECW$FONT;1
TERMINAL_DBLWIDE_DECTECH14.DECW$FONT;1             TERMINAL_DBLWIDE_DECTECH18.DECW$FONT;1
TERMINAL_DECTECH14.DECW$FONT;1                     TERMINAL_DECTECH18.DECW$FONT;1
TERMINAL_DECTECH28.DECW$FONT;1                     TERMINAL_DECTECH36.DECW$FONT;1
TERMINAL_GS14.DECW$FONT;1                          TERMINAL_GS18.DECW$FONT;1
TERMINAL_NARROW14.DECW$FONT;1                      TERMINAL_NARROW18.DECW$FONT;1
TERMINAL_NARROW28.DECW$FONT;1                      TERMINAL_NARROW36.DECW$FONT;1
TERMINAL_NARROW_DECTECH14.DECW$FONT;1              TERMINAL_NARROW_DECTECH18.DECW$FONT;1

TERMINAL_NARROW_DECTECH28.DECW$FONT;1              TERMINAL_NARROW_DECTECH36.DECW$FONT;1
TERMINAL_WIDE14.DECW$FONT;1                        TERMINAL_WIDE18.DECW$FONT;1
TERMINAL_WIDE_DECTECH14.DECW$FONT;1                TERMINAL_WIDE_DECTECH18.DECW$FONT;1
TIMES_BOLD10.DECW$FONT;1                           TIMES_BOLD12.DECW$FONT;1
TIMES_BOLD14.DECW$FONT;1                           TIMES_BOLD18.DECW$FONT;1
TIMES_BOLD24.DECW$FONT;1                           TIMES_BOLD8.DECW$FONT;1
TIMES_BOLDITALIC10.DECW$FONT;1                     TIMES_BOLDITALIC12.DECW$FONT;1

TIMES_BOLDITALIC14.DECW$FONT;1                     TIMES_BOLDITALIC18.DECW$FONT;1
TIMES_BOLDITALIC24.DECW$FONT;1                     TIMES_BOLDITALIC8.DECW$FONT;1
TIMES_ITALIC10.DECW$FONT;1                         TIMES_ITALIC12.DECW$FONT;1
TIMES_ITALIC14.DECW$FONT;1                         TIMES_ITALIC18.DECW$FONT;1
TIMES_ITALIC24.DECW$FONT;1                         TIMES_ITALIC8.DECW$FONT;1
TIMES_ROMAN10.DECW$FONT;1                          TIMES_ROMAN12.DECW$FONT;1
TIMES_ROMAN14.DECW$FONT;1                          TIMES_ROMAN18.DECW$FONT;1
TIMES_ROMAN24.DECW$FONT;1                          TIMES_ROMAN8.DECW$FONT;1
VARIABLE.DECW$FONT;1

Total of 325 files.
Directory SYS$SYSDEVICE:[VMS$COMMON.SYSFONT.DECW.COMMON]

10X20.DECW$FONT;1                                  12X24.DECW$FONT;1
5X8.DECW$FONT;1                                    6X10.DECW$FONT;1
6X12.DECW$FONT;1                                   6X13.DECW$FONT;1
6X13B.DECW$FONT;1                                  6X9.DECW$FONT;1
7X13.DECW$FONT;1                                   7X13B.DECW$FONT;1
7X14.DECW$FONT;1                                   8X13.DECW$FONT;1

8X13B.DECW$FONT;1                                  8X16.DECW$FONT;1
9X15.DECW$FONT;1                                   9X15B.DECW$FONT;1
DECW$FONT_ALIAS_COMMON.DAT;1                       DECW$FONT_DIRECTORY_COMMON.DAT;1
OLGL10.DECW$FONT;1                                 OLGL12.DECW$FONT;1
OLGL14.DECW$FONT;1                                 OLGL19.DECW$FONT;1
VT33018.DECW$FONT;1                                VT33036.DECW$FONT;1

VT330_BOLD18.DECW$FONT;1                           VT330_BOLD36.DECW$FONT;1
VT330_BOLD_DBLWIDE18.DECW$FONT;1                   VT330_BOLD_DBLWIDE_DECTECH18.DECW$FONT;1
VT330_BOLD_DECTECH18.DECW$FONT;1                   VT330_BOLD_DECTECH36.DECW$FONT;1
VT330_BOLD_NARROW18.DECW$FONT;1                    VT330_BOLD_NARROW36.DECW$FONT;1
VT330_BOLD_NARROW_DECTECH18.DECW$FONT;1            VT330_BOLD_NARROW_DECTECH36.DECW$FONT;1
VT330_BOLD_WIDE18.DECW$FONT;1                      VT330_BOLD_WIDE_DECTECH18.DECW$FONT;1
VT330_DBLWIDE18.DECW$FONT;1                        VT330_DBLWIDE_DECTECH18.DECW$FONT;1
VT330_DECTECH18.DECW$FONT;1                        VT330_DECTECH36.DECW$FONT;1
VT330_NARROW18.DECW$FONT;1                         VT330_NARROW36.DECW$FONT;1
VT330_NARROW_DECTECH18.DECW$FONT;1                 VT330_NARROW_DECTECH36.DECW$FONT;1
VT330_WIDE18.DECW$FONT;1                           VT330_WIDE_DECTECH18.DECW$FONT;1

Total of 46 files.

Directory SYS$SYSDEVICE:[VMS$COMMON.SYSFONT.DECW.CURSOR16]

CURSOR.DECW$FONT;1                                 DECW$CURSOR.DECW$FONT;1
DECW$FONT_DIRECTORY_CURSOR16.DAT;1                 OLCURSOR.DECW$FONT;1

Total of 4 files.

Directory SYS$SYSDEVICE:[VMS$COMMON.SYSFONT.DECW.CURSOR32]

DECW$C32X32.DECW$FONT;1                            DECW$FONT_DIRECTORY_CURSOR32.DAT;1

Total of 2 files.

Directory SYS$SYSDEVICE:[VMS$COMMON.SYSFONT.PS_FONT_METRICS]

SYSTEM.DIR;1                                       USER.DIR;1

Total of 2 files.

Directory SYS$SYSDEVICE:[VMS$COMMON.SYSFONT.PS_FONT_METRICS.SYSTEM]

AVANTGARDE_BOOK.AFM;1                              AVANTGARDE_BOOKOBLIQUE.AFM;1
AVANTGARDE_BOOKOBLIQUE_ISOLATIN1.AFM;1             AVANTGARDE_BOOK_ISOLATIN1.AFM;1
AVANTGARDE_DEMI.AFM;1                              AVANTGARDE_DEMIOBLIQUE.AFM;1
AVANTGARDE_DEMIOBLIQUE_ISOLATIN1.AFM;1             AVANTGARDE_DEMI_ISOLATIN1.AFM;1

COURIER.AFM;1                                      COURIER_BOLD.AFM;1
COURIER_BOLDOBLIQUE.AFM;1                          COURIER_BOLDOBLIQUE_ISOLATIN1.AFM;1
COURIER_BOLD_ISOLATIN1.AFM;1                       COURIER_ISOLATIN1.AFM;1
COURIER_OBLIQUE.AFM;1                              COURIER_OBLIQUE_ISOLATIN1.AFM;1
HELVETICA.AFM;1                                    HELVETICA_BOLD.AFM;1
HELVETICA_BOLDOBLIQUE.AFM;1                        HELVETICA_BOLDOBLIQUE_ISOLATIN1.AFM;1
HELVETICA_BOLD_ISOLATIN1.AFM;1                     HELVETICA_ISOLATIN1.AFM;1
HELVETICA_OBLIQUE.AFM;1                            HELVETICA_OBLIQUE_ISOLATIN1.AFM;1

LUBALINGRAPH_BOOK.AFM;1                            LUBALINGRAPH_BOOKOBLIQUE.AFM;1
LUBALINGRAPH_BOOKOBLIQUE_ISOLATIN1.AFM;1           LUBALINGRAPH_BOOK_ISOLATIN1.AFM;1
LUBALINGRAPH_DEMI.AFM;1                            LUBALINGRAPH_DEMIOBLIQUE.AFM;1
LUBALINGRAPH_DEMIOBLIQUE_ISOLATIN1.AFM;1           LUBALINGRAPH_DEMI_ISOLATIN1.AFM;1
NEWCENTURYSCHLBK_BOLD.AFM;1                        NEWCENTURYSCHLBK_BOLDITALIC.AFM;1
NEWCENTURYSCHLBK_BOLDITALIC_ISOLATIN1.AFM;1        NEWCENTURYSCHLBK_BOLD_ISOLATIN1.AFM;1
NEWCENTURYSCHLBK_ITALIC.AFM;1                      NEWCENTURYSCHLBK_ITALIC_ISOLATIN1.AFM;1
NEWCENTURYSCHLBK_ROMAN.AFM;1                       NEWCENTURYSCHLBK_ROMAN_ISOLATIN1.AFM;1

PRESENT_BULLETS.AFM;1                              PRESENT_BULLETS.PS;1
SOUVENIR_DEMI.AFM;1                                SOUVENIR_DEMIITALIC.AFM;1
SOUVENIR_DEMIITALIC_ISOLATIN1.AFM;1                SOUVENIR_DEMI_ISOLATIN1.AFM;1
SOUVENIR_LIGHT.AFM;1                               SOUVENIR_LIGHTITALIC.AFM;1
SOUVENIR_LIGHTITALIC_ISOLATIN1.AFM;1               SOUVENIR_LIGHT_ISOLATIN1.AFM;1
SYMBOL.AFM;1                                       TIMES_BOLD.AFM;1
TIMES_BOLDITALIC.AFM;1                             TIMES_BOLDITALIC_ISOLATIN1.AFM;1
TIMES_BOLD_ISOLATIN1.AFM;1                         TIMES_ITALIC.AFM;1
TIMES_ITALIC_ISOLATIN1.AFM;1                       TIMES_ROMAN.AFM;1
TIMES_ROMAN_ISOLATIN1.AFM;1

Total of 59 files.

Directory SYS$SYSDEVICE:[VMS$COMMON.SYSFONT.VWS]

100DPI.DIR;1                                       75DPI.DIR;1
USER_100DPI.DIR;1                                  USER_75DPI.DIR;1

Total of 4 files.

Directory SYS$SYSDEVICE:[VMS$COMMON.SYSFONT.XDPS]

FONT_MAP.DIR;1                                     OUTLINE.DIR;1
USER_OUTLINE.DIR;1

Total of 3 files.

Directory SYS$SYSDEVICE:[VMS$COMMON.SYSFONT.XDPS.FONT_MAP]

XDPS$FNMAP.DAT;1                                   XDPS$GLYPHATTR.DAT;1
XDPS$NISOGLYPHNAME.DAT;1

Total of 3 files.

Directory SYS$SYSDEVICE:[VMS$COMMON.SYSFONT.XDPS.OUTLINE]

AVANTGARDE-BOOK.XDPS$OUTLINE;1                     AVANTGARDE-BOOKOBLIQUE.XDPS$OUTLINE;1
AVANTGARDE-DEMI.XDPS$OUTLINE;1                     AVANTGARDE-DEMIOBLIQUE.XDPS$OUTLINE;1
COURIER-BOLD.XDPS$OUTLINE;1                        COURIER-BOLDOBLIQUE.XDPS$OUTLINE;1
COURIER-OBLIQUE.XDPS$OUTLINE;1                     COURIER.XDPS$OUTLINE;1

HELVETICA-BOLD.XDPS$OUTLINE;1                      HELVETICA-BOLDOBLIQUE.XDPS$OUTLINE;1
HELVETICA-OBLIQUE.XDPS$OUTLINE;1                   HELVETICA.XDPS$OUTLINE;1
LUBALINGRAPH-BOOK.XDPS$OUTLINE;1                   LUBALINGRAPH-BOOKOBLIQUE.XDPS$OUTLINE;1
LUBALINGRAPH-DEMI.XDPS$OUTLINE;1                   LUBALINGRAPH-DEMIOBLIQUE.XDPS$OUTLINE;1
NEWCENTURYSCHLBK-BOLD.XDPS$OUTLINE;1               NEWCENTURYSCHLBK-BOLDITALIC.XDPS$OUTLINE;1
NEWCENTURYSCHLBK-ITALIC.XDPS$OUTLINE;1             NEWCENTURYSCHLBK-ROMAN.XDPS$OUTLINE;1
SOUVENIR-DEMI.XDPS$OUTLINE;1                       SOUVENIR-DEMIITALIC.XDPS$OUTLINE;1
SOUVENIR-LIGHT.XDPS$OUTLINE;1                      SOUVENIR-LIGHTITALIC.XDPS$OUTLINE;1
SYMBOL.XDPS$OUTLINE;1                              TIMES-BOLD.XDPS$OUTLINE;1
TIMES-BOLDITALIC.XDPS$OUTLINE;1                    TIMES-ITALIC.XDPS$OUTLINE;1
TIMES-ROMAN.XDPS$OUTLINE;1

Total of 29 files.
Directory SYS$SYSDEVICE:[VMS$COMMON.SYSHLP]

ACLEDT.HLB;1                                       ANALAUDIT$HELP.HLB;1
ANLRMSHLP.HLB;1                                    CLUE.HLB;1
DBG$HELP.HLB;1                                     DBG$HELP.PS;1
DBG$HELP.TXT;1                                     DBG$UIHELP.HLB;1
DISKQUOTA.HLB;1                                    DTEHELP.HLB;1

DTSDTR.HLB;1                                       EDFHLP.HLB;1
EDTHELP.HLB;1                                      EDTVT100.DOC;1
EDTVT52.DOC;1                                      ESS$LADCP.HLB;1
ESS$LASTCPHELP.HLB;1                               EVE$HELP.HLB;1
EVE$KEYHELP.HLB;1                                  EXAMPLES.DIR;1
EXCHNGHLP.HLB;1                                    HELPLIB.HLB;1

INSTALHLP.HLB;1                                    LATCP$HELP.HLB;1
LMCP$HLB.HLB;1                                     MACRO$DWCI.HLB;1
MAILHELP.HLB;1                                     MNRHELP.HLB;1
MSGHLP$LIBRARY.MSGHLP$DATA;1                       NCPHELP.HLB;1
OPENVMSDOC_SURVEY.TXT;1                            PATCHHELP.HLB;1
PCSI$DCLHELP.HLP;1                                 PCSI$MUIHELP.DECW$BOOK;1
PHONEHELP.HLB;1                                    SDA.HLB;1
SHWCLHELP.HLB;1                                    SYSGEN.HLB;1
SYSMANHELP.HLB;1                                   TECO.HLB;1
TFF$TFUHELP.HLB;1                                  TPUHELP.HLB;1

UAFHELP.HLB;1                                      VMSDOC.DIR;1
WP.HLB;1                                           XA_PROFILE.PS;1
XA_PROFILE.TXT;1

Total of 47 files.

Directory SYS$SYSDEVICE:[VMS$COMMON.SYSHLP.EXAMPLES]

ADDRIVER.MAR;1                                     ADDUSER.COM;1
AUDSRV_LISTENER.B32;1                              AUDSRV_LISTENER.MAR;1
BACKUSER.COM;1                                     BIND.CLD;1
BIND_MAIN.EXE;1                                    BIND_READ_ME.TXT;1

CBDRIVER.MAR;1                                     CDROM_AUDIO.C;1
CDROM_AUDIO.EXE;1                                  CLASS.C;1
CLU_MOUNT_DISK.COM;1                               CMA_STDIO.H;1
CONNECT.COM;1                                      DAYLIGHT_SAVINGS.COM;1
DB_REQUESTER.C;1                                   DB_REQUESTER.MAR;1
DB_SERVER.C;1                                      DB_SERVER.MAR;1

DECDTM$EXAMPLE1.COM;1                              DECDTM$EXAMPLE1.FOR;1
DECDTM$EXAMPLE2.C;1                                DECDTM$EXAMPLE2.COM;1
DECW.DIR;1                                         DISKMOUNT.C;1
DISKMOUNT.H;1                                      DISKMOUNT_CHILD.C;1

DISKMOUNT_CREATE_DAT.COM;1                         DISK_DRIVER.MAR;1
DOD_ERAPAT.MAR;1                                   DOD_ERAPAT_LNK.COM;1
DRCOPY.PRM;1                                       DRCOPYBLD.COM;1
DRMAST.MAR;1                                       DRMASTER.FOR;1
DRSLAVE.FOR;1                                      DRSLV.MAR;1
DTE_DF03.MAR;1                                     DTE_DF112.MAR;1
EVE$ADVANCED.TPU;1                                 EVE$BUILD.TPU;1
EVE$CONSTANTS.TPU;1                                EVE$CONSTANTS.UIL;1

EVE$CORE.TPU;1                                     EVE$DECWINDOWS.TPU;1
EVE$EDIT.TPU;1                                     EVE$EDT.TPU;1
EVE$EXTEND.TPU;1                                   EVE$EXTRAS.TPU;1
EVE$FILE.TPU;1                                     EVE$FORMAT.TPU;1
EVE$HELP.TPU;1                                     EVE$INTERNATIONALIZATION.TPU;1
EVE$MASTER.FILE;1                                  EVE$MENUS.TPU;1

EVE$MOUSE.TPU;1                                    EVE$OPTIONS.TPU;1
EVE$PARSER.TPU;1                                   EVE$SHOW.TPU;1
EVE$SYNONYMS.TPU;1                                 EVE$TERMINALS.TPU;1
EVE$VERSION.DAT;1                                  EVE$WIDGETS_MOTIF.UIL;1
EVE$WILDCARD.TPU;1                                 EVE$WINDOWS.TPU;1
EVE$WPS.TPU;1                                      FULL_DUPLEX_TERMINAL.MAR;1
GBLSECUFO.MAR;1                                    GKTEST.C;1

HASH_PASSWORD.MAR;1                                HASH_PASSWORD_LNK.COM;1
LABCHNDEF.FOR;1                                    LABIO.OPT;1
LABIOACQ.FOR;1                                     LABIOCIN.MAR;1
LABIOCIN.OPT;1                                     LABIOCOM.FOR;1
LABIOCOMP.COM;1                                    LABIOCON.FOR;1
LABIOLINK.COM;1                                    LABIOPEAK.FOR;1
LABIOSAMP.FOR;1                                    LABIOSEC.FOR;1
LABIOSTAT.FOR;1                                    LABIOSTRT.COM;1

LABMBXDEF.FOR;1                                    LAN802.MAR;1
LANETH.MAR;1                                       LAT.C;1
LAVC$BUILD.COM;1                                   LAVC$FAILURE_ANALYSIS.MAR;1
LAVC$START_BUS.MAR;1                               LAVC$STOP_BUS.MAR;1
LBRDEMO.COM;1                                      LBRDEMO.FOR;1
LBRMAC.MAR;1                                       LOGGER.C;1
LOGGER.EXE;1                                       LOGIN.COM;1
LPATEST.FOR;1                                      LPMULT.B32;1
MAGNETIC_TAPE.MAR;1                                MGRMENU.COM;1
MONITOR.COM;1                                      MONSUM.COM;1
MSCPMOUNT.COM;1                                    PEAK.FOR;1
PKVDRIVER.MAR;1                                    PREFER.B32;1
PREFER.CLD;1                                       PREFER.MAR;1

QKDRIVER.MAR;1                                     QLDRIVER.MAR;1
QSDRIVER.MAR;1                                     READ_VERIFY.MAR;1
RECOVERY_UNIT_SERVICES_.ADA;1                      RESET_DEVICE_PROTECTION.COM;1
RESTUSER.COM;1                                     RMSJNL_EXAMPLE.C;1
RMSJNL_EXAMPLE.COB;1                               RMSJNL_EXAMPLE.COM;1
RMSJNL_EXAMPLE.EXE;1                               RMSJNL_XABTID_EXAMPLE.C;1

RUFEXAMPLE.ADA;1                                   RUFEXAMPLE.B32;1
RUFEXAMPLE.BAS;1                                   RUFEXAMPLE.C;1
RUFEXAMPLE.COB;1                                   RUFEXAMPLE.COM;1
RUFEXAMPLE.EXE;1                                   RUFEXAMPLE.FOR;1
RUFEXAMPLE.PAS;1                                   SCRFT.MAR;1
SKDRIVER.MAR;1                                     SKTEST.C;1
SUBMON.COM;1                                       SYSGTTSTR.MSG;1

TDRIVER.MAR;1                                      TESTLABIO.FOR;1
USING_BACKUP.DECW$BOOK;1                           USING_BACKUP.PS;1
USING_BACKUP.TXT;1                                 USSDISP.MAR;1
USSLNK.COM;1                                       USSTEST.MAR;1
USSTSTLNK.COM;1                                    VMEL_PIOTEST.C;1
VME_PIOTEST.C;1                                    VMS$PASSWORD_POLICY.ADA;1
VMS$PASSWORD_POLICY.B32;1                          VMS$PASSWORD_POLICY_LNK.COM;1
VMS_DEPENDABILITY_CHECKLIST.PS;1                   VMS_DEPENDABILITY_CHECKLIST.TXT;1

XADRIVER.MAR;1                                     XALINK.MAR;1
XAMESSAGE.MAR;1                                    XATEST.COM;1
XATEST.FOR;1                                       XIDRIVER.MAR;1

Total of 160 files.

Directory SYS$SYSDEVICE:[VMS$COMMON.SYSHLP.EXAMPLES.DECW]

DECW$FONT_ALIAS_CHARTER.DAT;1                      DECW$FONT_ALIAS_CHARTER_100DPI.DAT;1
DECW$FONT_ALIAS_FILENAMES.DAT;1                    DECW$FONT_ALIAS_KANJI.DAT;1
DECW$FONT_ALIAS_LUCIDA.DAT;1                       DECW$FONT_ALIAS_LUCIDA_100DPI.DAT;1
DECW$TRANSPORT_EXAMPLE.EXE;1                       DEMO_XPORT_BUILD.COM;1
FONTS.ALIAS;1                                      XPORTEXAMPLEDEF.R32;1
XPORT_EXAMPLE.B32;1                                XPORT_EXAMPLE_XFER.MAR;1

Total of 12 files.
Directory SYS$SYSDEVICE:[VMS$COMMON.SYSHLP.VMSDOC]

VMSDOC_GLOSSARY.TXT;1                              VMSDOC_MASTER_INDEX.TXT;1
VMSDOC_OVERVIEW.TXT;1

Total of 3 files.
Directory SYS$SYSDEVICE:[VMS$COMMON.SYSLIB]

ACLEDIT.TPU;1                                      ACLEDT$SECTION.TPU$SECTION;1
ACLEDTSHR.EXE;1                                    ADARTL.EXE;1
BASRTL.EXE;1                                       BASRTL2.EXE;1
BLAS1RTL.EXE;1                                     CDA$ACCESS.EXE;2
CDDSHR.EXE;1                                       CLIMAC.REQ;1

CMA$LIB_SHR.EXE;1                                  CMA$OPEN_LIB_SHR.EXE;1
CMA$OPEN_RTL.EXE;1                                 CMA$RTL.EXE;1
CMA$TIS_SHR.EXE;1                                  CMA.H;1
CMA_CONFIG.H;1                                     CMA_CRTLX.H;1
CMA_LIBRARY.H;1                                    CMA_PX.H;1
CMA_TIS.H;1                                        COBRTL.EXE;1

CONVSHR.EXE;1                                      CRFSHR.EXE;1
CXXL$011_SHR.EXE;1                                 DBG$HA.UID;1
DBG$HA_KERNEL.EXE;1                                DBG$HA_MAIN.EXE;1
DBGSSISHR.EXE;1                                    DBLRTL.EXE;1
DCLTABLES.EXE;1                                    DCXSHR.EXE;1
DEBUG.EXE;1                                        DEBUGSHR.EXE;1
DEBUGUISHR.EXE;1                                   DECC$EMPTY.EXE;1
DECC$SHR.EXE;1                                     DECCCURSE.OLB;1

DECCRTL.OLB;1                                      DECCRTLG.OLB;1
DECW$DRIVER.MLB;1                                  DECW$DWTLIBSHR.EXE;2
DECW$FONTCOMPILER.CLD;1                            DECW$PRINTWGTSHR.EXE;2
DECW$SECURITY.EXE;1                                DECW$SECURITY_VMS.EXE;1
DECW$SERVER_DDX_GA.EXE;1                           DECW$SERVER_DDX_GB.EXE;1
DECW$SERVER_DDX_GC.EXE;1                           DECW$SERVER_DDX_GE.EXE;1
DECW$SERVER_DDX_GF.EXE;1                           DECW$SERVER_DIX.EXE;1

DECW$SESSIONSHRP.EXE;1                             DECW$SVEXT_ADOBE_DPS_EXTENSION.EXE;1
DECW$SVEXT_D2DX_EXTENSIONS.EXE;1                   DECW$SVEXT_DEC_XTRAP.EXE;1
DECW$SVEXT_MULTI_BUFFERING.EXE;1                   DECW$SVEXT_X3D_PEX.EXE;1
DECW$SVEXT_X3D_PEX_GB.EXE;1                        DECW$SVEXT_X3D_PEX_GB_UCODE.EXE;1
DECW$SVEXT_X3D_PEX_GE.EXE;1                        DECW$SVEXT_X3D_PEX_STP.EXE;1
DECW$SVEXT_X3D_PEX_STP_UCODE.EXE;1                 DECW$SVEXT_X3D_PEX_VCFB.EXE;1
DECW$SVEXT_XIE.EXE;1                               DECW$TRANSPORT_COMMON.EXE;1
DECW$TRANSPORT_DECNET.EXE;1                        DECW$TRANSPORT_LAT.EXE;1

DECW$TRANSPORT_LOCAL.EXE;1                         DECW$TRANSPORT_TCPIP.EXE;1
DECW$XLIBSHR.EXE;2                                 DECW$XPORTCOM.H;1
DECW$XPORTCOM.MAR;1                                DECW$XPORTCOM.R32;1
DECW$XPORTDEF.H;1                                  DECW$XPORTDEF.MAR;1
DECW$XPORTDEF.R32;1                                DECW$XPORTMAC.R32;1
DECW$XPORTMSG.R32;1                                DELTA.EXE;1

DELTA.OBJ;1                                        DISMNTSHR.EXE;1
DNS$CLIENT.EXE;1                                   DNS$RTL.EXE;1
DNS$SHARE.EXE;1                                    DNSDEF.BAS;1
DNSDEF.FOR;1                                       DNSDEF.H;1
DNSDEF.MAR;1                                       DNSDEF.PAS;1
DNSDEF.PLI;1                                       DNSDEF.R32;1
DNSMSG.BAS;1                                       DNSMSG.FOR;1

DNSMSG.H;1                                         DNSMSG.MAR;1
DNSMSG.PAS;1                                       DNSMSG.PLI;1
DNSMSG.R32;1                                       DTE_DF03.EXE;1
DTE_DF112.EXE;1                                    DTE_DMCL.EXE;1
DTI$SHARE.EXE;1                                    DTKSHR.EXE;1
DYNSWITCH.EXE;1                                    EDTSHR.EXE;1
ENCRYPSHR.EXE;1                                    EPC$FACILITY.TLB;1

EPC$SHR.EXE;1                                      EPM$SRVSHR.EXE;1
ERFCOMMON.EXE;1                                    ERFCTLSHR.EXE;1
ERFLIB.TLB;1                                       ERFSHR.EXE;1
ERFSHR2.EXE;1                                      EVE$SECTION.TPU$SECTION;1
EVE$WIDGETS_MOTIF.UID;1                            EVE.DAT;1
EXC_HANDLING.H;1                                   FDLSHR.EXE;1
FORDEF.FOR;1                                       FORIOSDEF.FOR;1
FORRTL.EXE;1                                       FORRTL2.EXE;1
IMAGELIB.OLB;1                                     IMGDMP.EXE;1

INIT$SHR.EXE;1                                     IPC$SHARE.EXE;1
LAT$SHR.EXE;1                                      LBRSHR.EXE;1
LIB.MLB;1                                          LIB.REQ;1
LIBDEF.FOR;1                                       LIBRTL.EXE;1
LIBRTL2.EXE;1                                      LIBRTL_INSTRUMENTED.EXE;1
MAILSHR.EXE;1                                      MAILSHRP.EXE;1
MMEDEF.H;1                                         MMEMSG.H;1
MMESHR.EXE;1                                       MOUNTSHR.EXE;1

MSGHLP$ENGLISH.EXE;1                               MSGHLP$SHARE.EXE;1
MTHDEF.FOR;1                                       MTHRTL.EXE;1
NCS$LIBRARY.NLB;1                                  NCSSHR.EXE;1
NISCS_LAA.EXE;1                                    NISCS_LOAD.EXE;1
NMLSHR.EXE;1                                       PASRTL.EXE;1
PCSI$MOTIFSHR.EXE;1                                PCSI$SHR.EXE;1

PLIRTL.EXE;1                                       PPLRTL.EXE;1
PTD$SERVICES_SHR.EXE;1                             PTHREAD.H;1
PTHREAD_EXC.H;1                                    RPGRTL.EXE;1
SCNRTL.EXE;1                                       SCRSHR.EXE;1
SDATP$SHARE.EXE;1                                  SDA_EXTEND_VECTOR.EXE;1
SECURESHR.EXE;1                                    SECURESHRP.EXE;1
SIGDEF.FOR;1                                       SMBSRVSHR.EXE;1
SMGSHR.EXE;1                                       SMI$OBJSHR.EXE;1
SMI$SHR.EXE;1                                      SNAPSHOT$SHARE.EXE;1

SORTSHR.EXE;1                                      SPISHR.EXE;1
STARLET.MLB;1                                      STARLET.OLB;1
STARLET.REQ;1                                      STARLETSD.TLB;1
SUMSHR.EXE;1                                       TC$LIBRARY.OLB;1
TECOSHR.EXE;1                                      TFFSHR.EXE;1
TPAMAC.REQ;1                                       TPU$CCTSHR.EXE;1

TPU$DEBUG.TPU;1                                    TPU$MOTIFSHR.EXE;1
TPU.DAT;1                                          TPUSHR.EXE;1
TRACE.EXE;1                                        UISSHR.EXE;1
UTIL$SHARE.EXE;1                                   UVMTHRTL.EXE;1
VAXC$EMPTY.EXE;1                                   VAXC$LCL.OPT;1
VAXC2DECC.EXE;1                                    VAXCCURSE.OLB;1
VAXCG2DECC.EXE;1                                   VAXCRTL.EXE;1

VAXCRTL.OLB;1                                      VAXCRTLG.EXE;1
VAXCRTLG.OLB;1                                     VBLAS1RTL.EXE;1
VECTOR_EMULATOR.EXE;1                              VME$LIBRARY.OLB;1
VMESUPPORT.MLB;1                                   VMS$FORMAT_AUDIT_SYSTEM.EXE;1
VMS$PASSWORD_DICTIONARY.DATA;1                     VMSDEBUGCUSTUIL.UID;1
VMSDEBUGUIL.UID;1                                  VMSRTL.EXE;1
VMTHRTL.EXE;1                                      XDPS$DPSBINDINGSSHR.EXE;2
XDPS$DPSCLIENTSHR.EXE;2                            XDPS$DPSLIBSHR.EXE;2
XDPS$MASTERDPSVM.DAT;1                             XFDEF.FOR;1
XNL$SHR.EXE;2

Total of 217 files.
Directory SYS$SYSDEVICE:[VMS$COMMON.SYSMGR]

AGEN$NEW_NODE_DEFAULTS.DAT;1                       AGEN$NEW_NODE_DEFAULTS.TEMPLATE;1
AGEN$NEW_SATELLITE_DEFAULTS.DAT;1                  AGEN$NEW_SATELLITE_DEFAULTS.TEMPLATE;1
AGENPARAMS.EXE;1                                   ALFMAINT.COM;1
CLUSTER_CONFIG.COM;1                               DBLSTRTUP.COM;1
DECW$DEVICE.COM;1                                  DECW$DEVICE_GE.COM;1
DECW$DEVICE_GF.COM;1                               DECW$DEVICE_GG.COM;1

DECW$PRIVATE_SERVER_SETUP.TEMPLATE;1               DECW$RGB.DAT;1
DECW$STARTSERVER.COM;1                             DECW$STARTXTERMINAL.COM;1
DNS$CHANGE_DEF_FILE.COM;1                          DNS$CLIENT_STARTUP.COM;1
DNS$CLIENT_STOP.COM;1                              EDTINI.TEMPLATE;1
LAT$SYSTARTUP.COM;1                                LAT$SYSTARTUP.TEMPLATE;1
LIB$DT_STARTUP.COM;1                               LOADNET.COM;1
LOGIN.COM;1                                        LOGIN.TEMPLATE;1
LPA11STRT.COM;1                                    LTLOAD.COM;1

MAKEROOT.COM;1                                     NETCONFIG.COM;1
RTTLOAD.COM;1                                      SECURITY.AUDIT$JOURNAL;1
SMISERVER.COM;1                                    SNAPSHOT$CLEANUP.COM;1
SNAPSHOT$NEW_DISK.COM;1                            SNAPSHOT$SYCLEANUP.TEMPLATE;1
SNAPSHOT$SYSHUTDOWN.TEMPLATE;1                     SNAPSHOT.COM;1
STARTNET.COM;1                                     SYCONFIG.COM;1
SYCONFIG.TEMPLATE;1                                SYLOGICALS.COM;1

SYLOGICALS.TEMPLATE;1                              SYLOGIN.COM;1
SYLOGIN.TEMPLATE;1                                 SYPAGSWPFILES.COM;1
SYPAGSWPFILES.TEMPLATE;1                           SYSECURITY.COM;1
SYSECURITY.TEMPLATE;1                              SYSHUTDWN.COM;1
SYSHUTDWN.TEMPLATE;1                               SYSTARTUP_V5.COM;1
SYSTARTUP_VMS.COM;1                                SYSTARTUP_VMS.TEMPLATE;1
TFF$STARTUP.COM;1                                  UTC$CONFIGURE_TDF.COM;1
VMS$AUDIT_SERVER.DAT;1                             VMS$IMAGES_MASTER.DAT;1
VMSIMAGES.DAT;1                                    WELCOME.TEMPLATE;1
WELCOME.TXT;1

Total of 61 files.
Directory SYS$SYSDEVICE:[VMS$COMMON.SYSMSG]

ADAMSG.EXE;1                                       CLIUTLMSG.EXE;1
CXXL$MSG_SHR.EXE;1                                 DBGTBKMSG.EXE;1
DBLRTLMSG.EXE;1                                    DECW$TRANSPORTMSG.EXE;1

DNS$MSG.EXE;1                                      EPC$MSG.EXE;1
FILMNTMSG.EXE;1                                    LMCP$MSG.EXE;1
LMF_MESSAGE.EXE;1                                  NETWRKMSG.EXE;1
PASMSG.EXE;1                                       PLIMSG.EXE;1
PPLMSG.EXE;1                                       PRGDEVMSG.EXE;1
RPGMSG.EXE;1                                       SCNMSG.EXE;1
SHRIMGMSG.EXE;1                                    SORTMSG.EXE;1

SYSMGTMSG.EXE;1                                    SYSMSG.EXE;1
TECOMSG.EXE;1                                      TPUMSG.EXE;1
VAXCMSG.EXE;1                                      VMSINSTAL_LANGUAGE.COM;1
VMSLICENSE_LANGUAGE.COM;1                          VVIEFMSG.EXE;1

Total of 28 files.
Directory SYS$SYSDEVICE:[VMS$COMMON.SYSTEST]

DECDTM_IVP.EXE;1                                   TCNTRL.CLD;1
UETCDRO00.EXE;1                                    UETCLIG00.COM;1
UETCLIG00.DAT;1                                    UETCLIG00.EXE;1
UETCOMS00.EXE;1                                    UETDISK00.EXE;1

UETDMPF00.EXE;1                                    UETDNET00.COM;1
UETDNET00.DAT;1                                    UETDR1W00.EXE;1
UETDR7800.EXE;1                                    UETFORT01.DAT;1
UETFORT01.EXE;1                                    UETFORT02.EXE;1
UETFORT03.EXE;1                                    UETINIT00.EXE;1
UETINIT01.EXE;1                                    UETLOAD00.DAT;1
UETLOAD02.COM;1                                    UETLOAD03.COM;1

UETLOAD04.COM;1                                    UETLOAD05.COM;1
UETLOAD06.COM;1                                    UETLOAD07.COM;1
UETLOAD08.COM;1                                    UETLOAD09.COM;1
UETLOAD10.COM;1                                    UETLOAD11.COM;1
UETLPAK00.EXE;1                                    UETMA7800.EXE;1
UETMEMY01.EXE;1                                    UETNETS00.EXE;1
UETP.COM;1                                         UETPHAS00.EXE;1
UETRSXFOR.EXE;1                                    UETSUPDEV.DAT;1
UETTAPE00.COM;1                                    UETTAPE00.EXE;1
UETTTYS00.EXE;1                                    UETUNAS00.EXE;1
UETVECTOR.COM;1                                    UETVECTOR.EXE;1

Total of 44 files.
Directory SYS$SYSDEVICE:[VMS$COMMON.SYSUPD]

AUTOGEN.COM;1                                      BOOTUPD.COM;1
CONSCOPY.COM;1                                     CREATE_IDX.EXE;1
DECW$KITBLD.DAT;1                                  DECW$KITBLD.IDX;1
DECW$MKFONTDIR.COM;1                               DECW$OBSOLETE.DAT;1

DECW$OBSOLETE.IDX;1                                DECW$TAILOR.EXE;1
DECW$TAILOR_ON.TEMPLATE;1                          DXCOPY.COM;1
INSTALLED_PRDS.COM;1                               LIBDECOMP.COM;1
NETCONFIG_UPDATE.COM;1                             PCSI$CREATE_ACCOUNT.COM;1
PCSI$CREATE_NETWORK_OBJECT.COM;1                   PCSI$CREATE_RIGHTS_IDENTIFIER.COM;1
PCSI$DELETE_ACCOUNT.COM;1                          PCSI$DELETE_NETWORK_OBJECT.COM;1
PCSI$DELETE_RIGHTS_IDENTIFIER.COM;1                PCSI$REGISTER_PRODUCT.COM;1

REGISTER_PRIVILEGED_IMAGE.COM;1                    SETDEFBOO.COM;1
SPKITBLD.COM;1                                     STABACKIT-TABLE.DAT;1
STABACKIT.COM;1                                    SWAPFILES.COM;1
TAILOR_ON.TEMPLATE;1                               UPDATE_CONSOLE.COM;1
VMS$ROLLING_UPGRADE.COM;1                          VMS$SYSTEM_IMAGES.COM;1
VMSINSTAL.COM;1                                    VMSINSTAL_LMFGROUPS.COM;1
VMSKITBLD.COM;1                                    VMSKITBLD.DAT;1
VMSKITBLD.IDX;1                                    VMSLICENSE.COM;1
VMSTAILOR.EXE;1                                    VMSUPDATE.COM;1
VMS_VERSION_OVERRIDE.DAT;1                         VVIEF$DEINSTAL.COM;1
VVIEF$INSTAL.COM;1

Total of 43 files.
Directory SYS$SYSDEVICE:[VMS$COMMON.VUE$LIBRARY]

SYSTEM.DIR;1                                   [SYSTEM]    (RWE,RWE,RE,RE)
USER.DIR;1                                     [SYSTEM]    (RWE,RWE,RE,RE)

Total of 2 files.

Directory SYS$SYSDEVICE:[VMS$COMMON.VUE$LIBRARY.SYSTEM]

MACRO$DWCI.EXE;1                               [SYSTEM]    (RWED,RWED,RWED,RE)
MACRO$DWCI.UID;1                               [SYSTEM]    (RWED,RWED,RWED,RE)

Total of 2 files.

Grand total of 35 directories, 2055 files.
http://www.radium.NCSC.mil/tpep/epl/index.HTML
|
Software
|
Function
|
Description
|
|---|---|---|
|
DECwindows software
|
Windowing interface
|
DECwindows is a layered product. Although
DECwindows has been designed to meet the C2 requirements, it has
not been evaluated.
|
|
DECdns distributed name service
|
Client support
|
DECdns software requires server software,
which is a layered product. A cluster can make DECnet connections
independently of DECdns.
|
|
Compaq DECamds software
|
Monitoring and diagnostics
|
Compaq DECamds software is outside the
domain of the evaluated configuration.
|
|
LASTport and LASTport/DISK
protocols
|
Protocol support
|
Compaq’s Infoserver products, which
are outside the security domain of a clustered system, depend on
these protocols.
|
|
LAT protocol
|
Protocol support
|
The LAT protocol is used for connections to
DECserver terminal servers, which are outside the domain of the
evaluated configuration.
|
|
DECnet/OSI Full Names
|
Protocol support
|
Support of the use of DECnet/OSI (Phase V)
node names within the OpenVMS operating system. Use of this
feature is not in the C2 evaluated configuration.
|
|
HSM (Hierarchial Shelving
Manager)
|
Storage Support
|
File Shelving is a layered product. Use of
the File Shelving facility (HSM) is not supported in the C2
evaluated configuration.
|
|
MME (Media Management
Extension)
|
Client Support
|
Media Management Extension (MME) allows the
use of storage media programs. Use of media management is outside
of the domain of the C2 evaluated configuration.
|
|
OpenVMS Management Station
|
The OpenVMS Management Station provides
PC-based system management tools for OpenVMS. The OpenVMS
Management Station has not been validated in a C2 evaluated
configuration.
|
|
|
Access control strings
|
File access on a remote node
|
You should use proxy accounts instead of
access control strings in an evaluated
configuration.
|
|
|
| privacy and legal statement | ||
| 6346PRO.HTM | ||