Style Manager combines up to eight color sets to create a color palette. The widgets to which these color sets apply are determined by color set ID resources. A color set can be applied to all widgets, only to popup dialog boxes, or only to text widgets based on these resources.
The colors in each color set are based on the background color choice. The background color for each color set is displayed in Style Manager's Color dialog as a colored button. Depending on the setting of the Number of Colors option, two to eight buttons will be displayed. The Number of Colors option appears on Style Manager's Color menu, shown in Figure 3-2. Figures 3-2 Style Manager's Color Menu
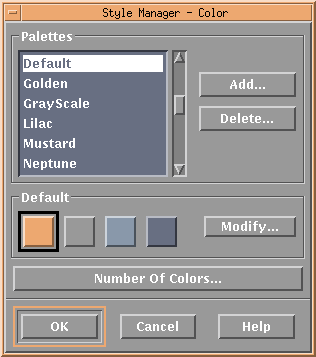
You can set the Desktop's colors by choosing from the list of color palettes and modifying the color sets displayed in the buttons with the Modify... dialog.
When you select a color button and move the sliders in the
Modify
dialog,
the application's colors displayed in that color will
change if the application supports dynamic colors.
If the color does not change when you move the sliders, you can assume
that the application's colors are not under the control
of the New Desktop but are under the control of the application. You
can change an application's color resources
to change its colors.
3.6.1 Changing the Number of Available Colors
It is possible that the colors needed by an application combined with the colors needed by the New Desktop could exceed the maximum number of colors available on the display (even if they are the same colors). If an application cannot set all the colors it needs, it can reveal the problem by:
If an application exhibits any of these symptoms, use the Number of Colors... dialog, shown in Figure 3-3, to give as many colors as possible to the application. The number of color sets used by the desktop depends on the selection in the Number of Colors... dialog. The fewer color sets used for the desktop, the more colors available for an application. The Number of Colors options are described in Table 3-6. Figures 3-3 Number of Colors Menu
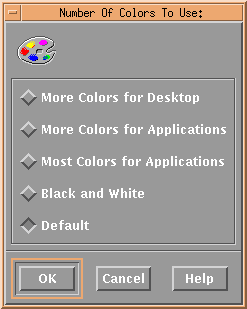
| Options | Description |
|---|---|
| More Colors for Desktop | Specifies a high color display. The color palettes use 8 color sets and have a maximum of 42 colors (including black and white). |
| More Colors for Applications | Specifies a medium color display for the desktop. The color palettes use 4 color sets and have a maximum of 22 colors (including black and white). |
| Most Colors for Applications | Specifies a low color display for the desktop. The color palettes use 2 color sets and have a maximum of 12 colors (including black and white). |
| Black and White | Specifies a black-and-white display. The color palettes use only two colors. In this nondynamic color configuration, the available palettes are BlackWhite and WhiteBlack. |
| Default | Allows the color server to select the color configuration based on the number of colors on the display. The default is usually More Colors for Applications. |
The Color Customizer example program uses a similar technique for providing a dynamic color environment. It allocates an additional set of colors for the color resources it manages, which further limits the number of colors available for applications. This can cause some undesired interactions with the dynamic color environment provided with the New Desktop.
For more information about how the New Desktop manages the colormap,
use the Man Page Viewer to view the dtsession reference page.
3.6.2 Avoiding Color Conflicts
It is usually best if applications use the default colors and allow the desktop to manage the colors consistently for all applications. However, this isn't always possible. If an application is not an OSF/Motif application running against the new version of the Motif library, it will not be able to take advantage of the new dynamic color model. Also, if color resources are explicitly defined, then shared dynamic colors will not be used. These applications should be able to coexist, but some undesired effects could occur if a palette is selected that conflicts with predefined colors in an application.
An application may exhibit "antisocial" color behavior---that is, it modifies colormap entries that it has not allocated for its own use. If these are desktop dynamic color entries, it will affect all applications. You may need to reselect the current palette in Style Manager to reset the colors properly.
Conflicting colors can make text hard to read or even invisible. They can also make it appear as if a control has disappeared from the application interface. Such effects are caused by the foreground color of an application control being set to a color similar to its background color, such as a white foreground on a white background.
Session Manager provides a number of resources that can be used to affect the foreground and background colors of the desktop. Also, many applications provide resources for setting the foreground and background colors. However, the simplest way to resolve these problems may be to select a different palette in Style Manager (or to use the Modify... dialog box to change the current palette).
To change any Session Manager resource, copy its application defaults file to the DECW$USER_DEFAULTS directory, as shown in the following example:
$ COPY CDE$SYSTEM_DEFAULTS:[APP-DEFAULTS.C]DTSESSION.DAT -
_$ DECW$USER_DEFAULTS:DTSESSION.DAT
Add or modify the resource strings in this file, exit the New Desktop, and log in again to restart Session Manager. By default, Session Manager loads the foreground and background resources each time the user logs in. This is due to the following default resource of Session Manager:
dtsession*writeXrdbColors: true
The foreground and background colors are determined dynamically from the colors in the user's selected palette. This is due to the following two default resources of Session Manager:
dtsession*dynamicColor: true
dtsession*foregroundColor: "DYNAMIC"
The *dynamicColor resource controls whether colors can be changed dynamically when you change palettes. The *foregroundColor resource controls whether the *foreground resource is set explicitly to either "BLACK" or "WHITE" or whether it is calculated based on the current palette. If "DYNAMIC" is used, the following resource controls the threshold above which the *foreground resource is set to white:
*foregroundThreshold: 70
which is specified in the file:
CDE$SYSTEM_DEFAULTS:[APP-DEFAULTS.C]DT.DAT
Changing the default value of the *foregroundThreshold resource to set the foreground color of any particular palette may cause unpredictable results in the foreground color of other palettes. The default value of 70 is used because it works correctly with the installed set of default palettes.
You can change the foreground color in an application from black or white to another color by adding a foreground resource specification to its application resource file. Since the default foreground resource specification is defined in its most general form, any application-specific foreground resource specification will override it. For example:
DECW$TERMINAL.main.terminal.foreground: goldenrod
overrides
*foreground: #FFFFFFFFFFFF (White)
In this example, the color goldenrod is applied to the foreground of
all DECterms created after
this change. The foreground of all other applications remains white.
3.7 Using the New Desktop Fonts
Fonts used by applications within the New Desktop are referenced by generic font names. These font names are not the names of actual fonts but rather are the names of font aliases. These aliases are mapped to real font names by means of font alias files. When the New Desktop login process starts, it selects the appropriate font alias files based on the current language selected and the resolution of the display. The New Desktop instructs the X server to which it is connected to reset its font path to include the new font directories. This operation is possible only if the login process is running on the same system as the X server. The login process determines whether this is the case by looking at the display node name and the current transport type.
The font alias directories are added to the font path only if the LOCAL transport (the default) is used or if a display node name of 0 is used.
For remote displays, New Desktop fonts are used only if the
New Desktop font aliases are defined for the remote display.
3.7.1 Changing Application Font Size
With Style Manager's Font option, you can select the size of fonts
used for all CDE applications. Your selection affects every CDE
application
that you start after you make the change, but it does not
affect any CDE applications that are already
running. Furthermore, the font size option does not affect
any existing DECwindows applications.
3.8 Using X Terminals and Other Remote Displays
When using
the New Desktop with remote displays such as X terminals, you need
to give special consideration to certain components, including window
managers and font aliases.
3.8.1 Selecting the New Desktop Window Manager
Most X terminals provide some local capabilities, including a local window manager that runs on the X terminal itself. The Workspace (Window) Manager provided with the New Desktop is an integral part of the New Desktop and must be used in order for the New Desktop to operate properly. Most local window managers for X terminals can yield to a remote window manager when it starts up. However, this feature is sometimes not the default option.
For example, the Digital VXT 2000 X Terminal provides the Allow Remote
Window
Manager option, but it is not the
default. To use the New Desktop Window Manager, you must enable the
Allow Remote Window
Manager option, which is under the Customize
option in the Terminal Manager... dialog box. For an equivalent option
on
other X terminals, consult your X terminal documentation.
3.8.2 Accessing Font Aliases
For X terminals and in any environment where the X server is not running on the local system, the font path is not modified to include the New Desktop font alias directories during the login process. As a result, the X server does not recognize the font names used with any of the New Desktop applications. Most applications use the same fallback font, and you will not be able to modify its size through the use of Style Manager's font option. Applications will run properly, but the size and font style of many of the applications will not be what you expect.
To avoid this problem, you need to make the New Desktop font aliases available to the X server. One way to do this is to use a font server running on a UNIX system. If the UNIX system supports the Common Desktop Environment (CDE), then the correct font aliases should be in place. If not, the font alias files can be copied from the OpenVMS Alpha system to the UNIX system. For the default C locale, the font alias files are:
CDE$SYSTEM_DEFAULTS:[CONFIG.XFONTS.C.100DPI]DECW$FONT_ALIAS.DAT
CDE$SYSTEM_DEFAULTS:[CONFIG.XFONTS.C.75DPI]DECW$FONT_ALIAS.DAT
CDE$SYSTEM_DEFAULTS:[CONFIG.XFONTS.C]DECW$FONT_ALIAS.DAT
Each of these files should be copied to appropriate font alias directories on the UNIX system and renamed to fonts.alias. See your UNIX X server and font server documentation for details on how modify font paths if necessary. Once the font server recognizes the New Desktop font aliases, add the font server to the X terminal or remote system's default font path.
For other languages, the font alias files are:
CDE$SYSTEM_DEFAULTS:[CONFIG.XFONTS.language.100DPI]DECW$FONT_ALIAS.DAT
CDE$SYSTEM_DEFAULTS:[CONFIG.XFONTS.language.75DPI]DECW$FONT_ALIAS.DAT
For non-C languages, always include the C locale font aliases after the language-specific font aliases.
At the time of this printing, Digital does not provide an OpenVMS font server. However, font servers for OpenVMS Alpha are available from other vendors.
If you do not have access to a font server, you may be able to include the font alias files directly in the font path of the X terminal or remote X server. You do this by copying the necessary font alias files to a location accessible by the remote system's X server. If the remote X server is running on an OpenVMS Alpha system, the correct locations for font alias files are:
SYS$COMMON:[SYSFONT.DECW.USER_100DPI]
SYS$COMMON:[SYSFONT.DECW.USER_75DPI]
SYS$COMMON:[SYSFONT.DECW.USER_COMMON]
After copying the font alias files, you need to reset the font path. You can do this by simply logging out of your session and then logging back in.
Digital X terminals cannot read font alias files using the OpenVMS LAT font daemon. You must use NFS or TFTP to access font alias files on an OpenVMS Alpha system.
With remote displays, the font path is not dynamically changed at
login time to include the font alias files for the selected language.
Each time you change languages, you must edit the font path of the X
terminal
or remote display.
3.9 Using Multiple Screens
The New Desktop supports a single
X display with multiple screens. This configuration is
sometimes called a dual-headed display. For information about creating
and
managing multiple screens, see Appendix B.
3.10 Managing Processes Created Within the New Desktop
The New Desktop consists of many applications. Most of these
applications are started implicitly on your behalf as
detached processes. Most process state information,
such as process logical names and global symbols, is not passed to
detached
processes. Usually only the DECW$DISPLAY and LANG logicals are passed.
You can
pass additional process logical names with a special symbol, or you can
specify that subprocesses be created instead of detached processes.
3.10.1 Passing Process Logical Names to Detached Processes
If you require that additional process logical names be passed to detached processes, you can use a special mechanism within the New Desktop. This mechanism works using the symbol CDE$DETACHED_LOGICALS, which you define in your private applications setup file, SYS$MANAGER:DECW$PRIVATE_APPS_SETUP.COM. For example, the following definition causes the logical name MYLOGICAL to be passed to all created detached processes:
$ CDE$DETACHED_LOGICALS == "MYLOGICAL"
You can specify that all processes be created as spawned subprocesses instead of detached processes by defining the symbol CDE$SPAWN_PROCESSES in SYS$MANAGER:DECW$PRIVATE_APPS_SETUP.COM. The following definition causes all processes to be created as subprocesses:
$ CDE$SPAWN_PROCESSES == "TRUE"
Certain process quotas are shared by a process and all of its
subprocesses. Specifying the creation of subprocesses may require that
you increase
some of your process quotas using the Authorize utility. In particular,
PRCLM, PGFLQUOTA, and BYTLM may need to be increased.
3.10.3 Debugging Processes
You may want to display the actual DCL commands used to invoke each process in the New Desktop for debugging purposes. By defining the following symbol, you can capture this information in your error log file:
$ CDE$LOG_PROCESSES = "TRUE"
By default, this information is not captured in your error log file.
Note that this information
may significantly increase the size of your error log file if you are
iteratively creating processes, for example, if you have selected
multiple screen savers with a short time per background.
3.10.4 Identifying Processes By Name
Both the New Desktop and the DECwindows desktop have a well-defined naming strategy for the processes they create. You can see a list of processes on your system by using either the SHOW SYSTEM command or the SHOW USERS/FULL command.
The processes created within and specific to the New Desktop are shown in Table 3-7.
| Name¹ | Purpose |
|---|---|
| DTLOGIN | Login Manager |
| DTGREET | Login user-interface application |
| DTHELLO_n | Welcome screen displayed at login |
| DTSESSION | Session Manager |
| DTWM | Workspace (Window) Manager |
| user$CDEn | Detached process created within the New Desktop |
The processes created within and specific to the DECwindows desktop are shown in Table 3-8.
| Name¹ | Purpose |
|---|---|
| DECW$LOGINOUT | Login Manager |
| WAITFORSM_n | Holds X connection during Session Manager startup |
| DECW$SESSION | Session Manager |
| DECW$MWM | Window Manager |
| VUE$user_n | Spawned process |
Some processes share the same name under both desktops, as shown in Table 3-9.
| Name¹ | Purpose |
|---|---|
| DECW$TE_n | DECterm controller |
| _FTAn | DECterm user process |
| _WSAn | Placeholder process prior to login or during restart |
| user_n | Spawned process |
For more detailed information, see the related online help and the online CDE manual Common Desktop Environment: Advanced User's and System Administrator's Guide. For instructions on how to access this manual on line or obtain a printed copy, see Table 1-2.
This chapter provides information about the following topics:
The integration of applications is not required. You can run any existing DECwindows application from the New Desktop without making any changes to it.
Minimal integration enables an application to be launched from the CDE desktop with one or more associated actions. To enable this to happen, certain application configuration files are required. You can achieve minimal integration for most applications by using the Create Action application to create the following configuration files for each application:
For some applications, you cannot complete minimal integration with
Create
Action. For example, you cannot use Create Action to create the action
for an
application if the command line requires a nonfile argument, such as a
parameter. Nor can you use Create Action for an application if the data
type
must have actions associated with it other than Open and Print. In
general, you can use Create Action to create the files you need
for minimal integration and then edit the files to supply additional
information that you cannot supply with Create Action. In some cases,
you must
create new files with your editor.
4.1.1 CDE Action Terminology
To understand the process of creating configuration files for integrating applications, it is important to understand how the following terms are used in the CDE interface and documentation:
ACTION dtmanpageview
{
LABEL           Man Page Viewer
ARG_COUNT       0
ICON            Dthover
TYPE            COMMAND
WINDOW_TYPE     NO_STDIO
EXEC_STRING     cde$system_defaults:[bin]dthelpview -man \
                -xrm "Dthelpview*manBox*columns: 100"
DESCRIPTION     The Man Page Viewer (Dtmanpageview) action \
                displays a man page in a Quick Help viewer window.
}
When creating action definition files for integrating an application, either with the Create Action application or directly with an editor, you must observe the following requirements on OpenVMS Alpha:
Create Action has the following limitations with regard to specifying arguments:
When you specify arguments, you must be sure to use the correct argument type. By default, prompted arguments (syntax: %"prompt string"%) are of type String, and explicit arguments (syntax: %Arg_n["optional prompt string"]%) are of type File. If you do not want the default argument type, you can specify a different type by using either of the following expressions:
%(File)"prompt string"%
%(String)Arg_1%
The %Args% keyword is similar to the %Arg_n% keyword except
that
the former is replaced with a list of arguments, separated by spaces,
that
is passed to the action.
Whether or not this is appropriate depends on the specific DCL command.
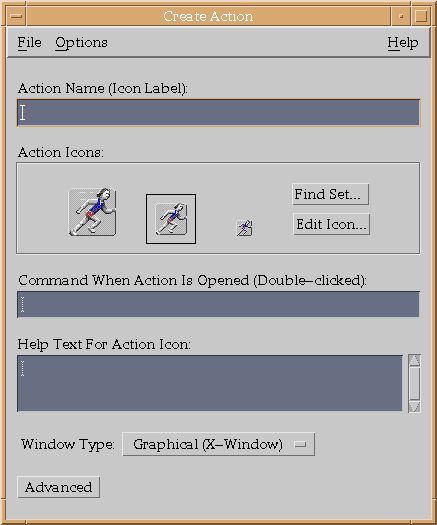
4.1.3 Create Action Overview
As described in Chapter 9 of the Common Desktop Environment: Advanced User's and System Administrator's Guide, Create Action does the following:
You can access the Create Action application from the Desktop Tools application group in Application Manager. Figure 4-1 shows the main window of the Create Action application. Figures 4-1 Create Action Main Window