DECdocument
Using Global Tags
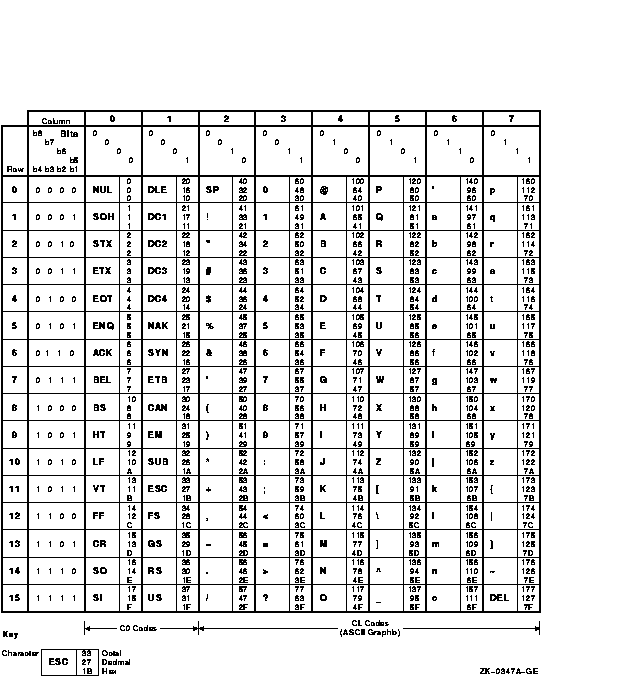
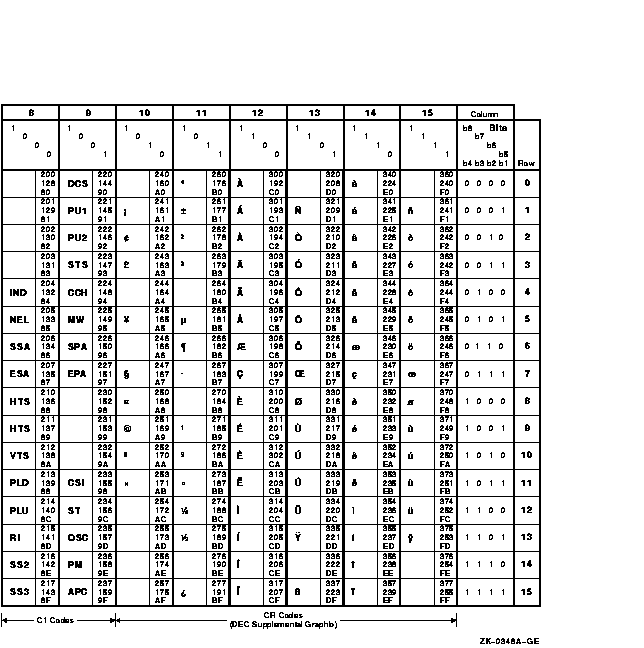
The following example shows how to code a figure that is allowed to
extend over several pages. The MULTIPAGE argument to the
<FIGURE_ATTRIBUTES> tag tells the text formatter that the figure
is more than one page. Note that the text formatter does not break a
large figure and adjust its portions on multiple pages; rather,
MULTIPAGE indicates that the text formatter outputs the text,
"Cont'd on next page", to indicate that the figure continues.
The figure that you create should fit on one page. If it does not, the
remainder of the figure does not print, but the text, "Cont'd on
next page" still appears. For Bookreader output, the words
"Cont'd on next page" do not appear.
| #2 |
<FIGURE>(Digital Multinational Character Set\char_set_fig)
<FIGURE_ATTRIBUTES>(Multipage)
<FIGURE_FILE>(LN03\character_set.SIX\27)
<FIGURE_FILE>(PS\character_set.PS\27)
<FIGURE_FILE>(BOOKREADER\character_set.BRF\54)
<FIGURE_FILE>(LN03\character_set2.SIX\27)
<FIGURE_FILE>(PS\character_set2.PS\27)
<FIGURE_FILE>(BOOKREADER\character_set2.BRF\54)
<ENDFIGURE>
|
This example produces the following output:
Figure n--n: Digital Multinational Character Set
_____________________________________________________________________
|

_____________________________________________________________________
|
Figure n--n: (continued on next page)
Figure n--n (Cont.): Digital Multinational Character
Set
_____________________________________________________________________
|

_____________________________________________________________________
|
The following example shows how to code an informal figure that appears
within text without floating, without a number, and without a caption.
| #3 |
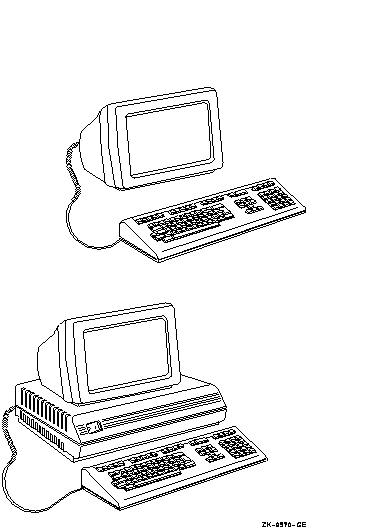
<P> A VT200 is different from a VT300 terminal.
The following figures illustrate an obvious difference in hardware between
the two types of terminals.

<FIGURE>
<FIGURE_FILE>(LN03\VT_Terminals.SIX\21)
<FIGURE_FILE>(PS\VT_Terminals.PS\21)
<FIGURE_FILE>(BOOKREADER\VT_Terminals.BRF\21)
<ENDFIGURE>
<P>
The first figure shows that ...
|
This example produces the following output:
A VT200 is different from a VT300 terminal. The following figures
illustrate an obvious difference in hardware between the two types of
terminals.

The first figure shows that ...
<FIGURE_ATTRIBUTES>
Specifies the placement of a figure on the page.
Format
<FIGURE_ATTRIBUTES>
( [\WIDE])
ARGUMENTS
FLOAT
This keyword specifies whether the location of a one-page figure is
allowed to float if there is not enough room on the current page for
the figure. FLOAT instructs the text processor to fill the current page
with the text from the source file that follows the <FIGURE> tag
sequence, and to place the figure at the top of the next page of output.
Float is the default for a figure that has a caption and does not
specify MULTIPAGE or KEEP. FLOAT has no effect for Bookreader output.
KEEP
This keyword specifies that the figure be kept with the immediately
preceding text. This is the default for a figure without a caption.
KEEP has no effect for Bookreader output.
MULTIPAGE
This keyword specifies that the figure has multiple elements, and that
each element is allowed to break at the start of a new page. This
argument is required if the figure elements require more than one page.
When a figure is continued, the figure caption and figure column heads,
if any, are automatically repeated at the beginning of each new page of
output. MULTIPAGE has no effect for Bookreader output.
WIDE
This is an optional keyword argument. It specifies that the width of
the figure exceeds the document's default width for text. You can use
WIDE with FLOAT, KEEP, or MULTIPAGE, or you can use WIDE as the only
argument. Depending on the doctype, this argument is interpreted as
follows:
- If the doctype contains a left margin area that is normally used
for headings, the figure's width spans that area as well as the normal
text area.
- If the document uses a multicolumn format, the figure suspends
multicolumn output while the figure is processed. The figure is output
across two columns and then multicolumn output is restored.
- Depending on the doctype, this argument provides a range of font
sizes and font styles for figures.
Note
If you use a <FIGURE_ATTRIBUTES> tag and specify the WIDE
argument to that tag, which makes the caption align at the leftmost
position of the image area, you still must use the WIDE argument to the
<FIGURE_FILE> tag to align the figure itself at the leftmost
position of the image area.
|
related tags
- <FIGURE>
- <FIGURE_FILE>
- <FIGURE_SPACE>
restrictions
Valid only in the context of a <FIGURE> tag.
DESCRIPTION
The <FIGURE_ATTRIBUTES> tag specifies the placement of a figure
on the page. Use the tag in the context of a formal
figure to adjust the pagination and placement of the figure.
See the <FIGURE> tag description for more information about
formal and informal figures.
If the figure is formal and you need a wide caption that extends into
the leftmost position of the image area, use the WIDE argument. You
still must use the WIDE argument to the <FIGURE_FILE> tag to
align the figure itself at the leftmost position of the image area.
A formal figure is sometimes long. If you think one of your figures
will be longer than a page, use the MULTIPAGE argument. Your figure
will then be placed on the current page and continued on following
pages, as space permits.
A multipage figure can contain one or more elements (that is, one or
more <FIGURE_FILE>, <FIGURE_SPACE>, and
<CODE_EXAMPLE> tags).
If your multipage figure (consisting of a single <CODE_EXAMPLE>)
contains no blank lines, you might want to insert <VALID_BREAK>
tags in the figure. The <VALID_BREAK> tags specify reasonable
page breaking points. See the description of the <VALID_BREAK>
tag for more information.
A one-page (or smaller) formal figure's position in the output file can
change. If the figure does not completely fit on the current page, the
entire figure is placed at the top of the next page. The text that
follows the example in the SDML file then is used to fill the current
output page. When the figure's position can change, the figure is said
to float. Formal figures that float, then, may appear out of
place. Use the <FIGURE_ATTRIBUTES>(KEEP) tag to force the figure
to be kept with the text that immediately precedes it.
Floating is the default for a formal figure that fits on one page. If
you want an informal figure to float, you must specify the FLOAT
argument if your figure fits on one page. A multipage figure never
floats.
Example
See the examples in the discussion of the <FIGURE> tag.
<FIGURE_FILE>
Includes a graphics file in your output file if the output device has
graphics capability.
Format
<FIGURE_FILE>
(target device
- \vertical size
- \FULL_PAGE
[\WIDE])
ARGUMENTS
target device
Specifies a keyword indicating the output device for the graphics file.
Keywords are provided both for devices that do (LN03, PS, and
Bookreader) and do not (LINE, MAIL, and TERMINAL) support graphics.
Each keyword allows you to insert the necessary amount of white space
for the specific output device; keywords for devices that do not
support graphics allow you to insert blank space in place of a figure.
The following table lists the output devices and expected output for
each keyword.
| Keyword |
Device |
Output |
|
BOOKREADER
|
DECwindows screen
|
The specified graphics file is output online using Bookreader.
|
|
LN03
|
LN03 Laser Printer
|
The specified sixel graphics file is output as a figure.
|
|
PS
|
PRINTSERVER 40 or
LN03R SCRIPTPRINTER
|
The specified POSTSCRIPT graphics file¹ is output as a figure.
|
LINE
MAIL
TERMINAL
|
Line Printer
|
If specified, blank space is output with the
file spec argument written in that blank space. Use only one
of these three keywords to indicate a monospaced destination.
|
¹POSTSCRIPT graphics files must conform to the Encapsulated
POSTSCRIPT File Format published by Adobe Systems, Inc.
If you specify the <FIGURE_FILE> tag for a given device and
subsequently process the file on another output device, no output will
appear in the position of the <FIGURE_FILE> tag.
file spec
Specifies the graphics file.
SPACE
This keyword lets you reserve blank space in the output file for a
figure. You can use it if you do not use the file spec
argument. Use SPACE to reserve space for art that will be pasted in at
a later date or when you expect to process a file for more than one
output device, but do not have graphics files for all devices.
vertical size
Specifies the vertical size of the printed graphic in picas (6 picas
equal an inch, and 12 points equal a pica). This argument may be a
nonnegative integer or decimal number, including zero.
FULL_PAGE
You can use FULL_PAGE if you do not use the vertical size
argument. It specifies that a full blank page be reserved for the
figure. For Bookreader output, a small amount (smaller than a printed
page or a Bookreader page) of blank space is left.
WIDE
This is an optional keyword argument. If you use it, it must come last
in the argument list. WIDE specifies that the graphic be aligned at the
leftmost position of the image area (if your doctype uses a wide left
gutter).
Note
If you use a <FIGURE_FILE> tag and specify the WIDE argument to
that tag, which makes the figure itself align at the leftmost position
of the image area, you still must use the WIDE argument to the
<FIGURE_ATTRIBUTES> tag to align the caption at the leftmost
position of the image area.
|
related tags
- <FIGURE>
- <FIGURE_ATTRIBUTES>
- <ICON>
- <ICON_FILE>
- <LINE_ART>
- <REFERENCE>
- <SET_FIGURE_FILE_SPACING_DEFAULT>
restrictions
Valid only in the context of a <FIGURE> tag.
You must use an LN03 or POSTSCRIPT laser printer to print graphics
files or use Bookreader to view graphics files online.
If you use the <FIGURE_FILE> tag in a file that you process for
multiple output devices, you must supply a tag for each device, using
the SPACE argument for devices for which you do not have graphics.
DESCRIPTION
The <FIGURE_FILE> tag includes a graphics file in your output
file if the output device has graphics capability.
To ensure that your figure is the right size for inclusion with your
output, follow this procedure:
- Create and print your graphics file full size (100 percent).
- Measure it.
- If the figure at 100 percent is the desired size and will fit on
the page, incorporate that measurement into the <FIGURE_FILE>
tag. Otherwise, use the Graphics Editor to reduce the figure to the
desired size.
- Process the SDML file that the Graphics Editor produces and print the
output. See the Graphics Editor User's Guide for Motif for information on using the Graphics Editor.
- Evaluate the result. If it is not satisfactory, change either of
the following:
- One or both keywords specified in the <FIGURE_FILE> tag to
correct the alignment, spacing, or both, for the figure
- The graphics file itself to correct the size, content, or both
Because there is an interaction between changing the contents or size
of the graphics file and specifying its placement in the
<FIGURE_FILE> tag, satisfactory results may require several loops
through the process, much like coding complicated tables. Refer to
Producing Online and Printed Documentation for information on coding tables.
If you plan to process your file for more than a single destination,
you can use multiple <FIGURE_FILE> tags to ensure that the
appropriate figure will be included for the appropriate destination; an
example of this coding is given in the following section. If you use
multiple <FIGURE_FILE> tags in this way, you should specify only
a single <FIGURE_FILE> tag for all the monospaced destination
keywords (MAIL, TERMINAL, or LINE).
Examples
The following example shows how to code a captioned, numbered figure.
The figure would appear in the table of contents.
| #1 |
<FIGURE>(The Front View)
<FIGURE_FILE>(LN03\Frontpanel.SIX\6)
<ENDFIGURE>
|
The following example shows how to code an uncaptioned, unnumbered
figure. The figure would not appear in the table of contents.
| #2 |
<FIGURE>
<FIGURE_FILE>(LN03\Example_Figure.PS\10)
<ENDFIGURE>
|
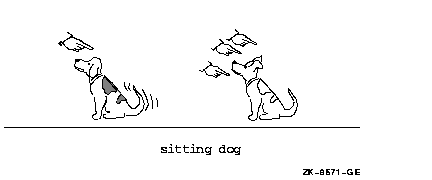
The following example shows how to use multiple <FIGURE_FILE>
tags so that your figure will process for multiple destinations. If you
process this file for a POSTSCRIPT destination, the file included is
DOG_TRAINING.PS. If you process this file for an LN03 laser printer
destination, the file included is DOG_TRAINING.SIX. If you process this
file for a line printer destination, no file is included; instead, 10
blank lines are reserved for the graphic. If you process this file for
Bookreader, the file included is DOG_TRAINING.BRF.
| #3 |
<FIGURE>
<FIGURE_FILE>(LN03\Dog_Training.SIX\10)
<FIGURE_FILE>(PS\Dog_Training.PS\10)
<FIGURE_FILE>(LINE\SPACE\10)
<FIGURE_FILE>(BOOKREADER\Dog_Training.BRF\10)
<ENDFIGURE>
|
This example produces the following output:

<FIGURE_SPACE>
Marks the space required for a figure that will be pasted in during
final production.
Format
<FIGURE_SPACE>
( [\text])
ARGUMENTS
value
Specifies the amount of vertical space to be left on the page. Specify
the value in picas, a scale used by typesetters. There are 6 picas in
an inch (and 12 points in a pica). Thus, if the figure to be pasted in
is 4 inches high, you should specify 24. If you do not specify a value,
a default value of 2 is used.
FULL_PAGE
This keyword specifies that a full blank page be reserved for the
figure if you do not use the value argument. For Bookreader
output, a small amount (smaller than a printed page or a Bookreader
page) of blank space is left.
text
This is an optional argument. It specifies the text that describes the
status of the figure, an art file number, or the words "To Be
Set." The text is output in the middle of the space left for the
figure.
related tags
- <FIGURE>
- <FIGURE_ATTRIBUTES>
- <FIGURE_FILE>
- <FIGURE_SPACE>
- <LINE_ART>
- <REFERENCE>
restrictions
Valid only in the context of a <FIGURE> tag.
The value argument must not exceed page length limitations.
DESCRIPTION
The <FIGURE_SPACE> tag marks the space required for a figure that
will be pasted in during final production.
If you specify some descriptive text in the second argument, that text
is output in the middle of the space left for the figure.
Examples
The following example shows how to leave space for a figure that is 18
picas long. Notice that 18 picas (or 3 inches or 216 points) of space
are left for the figure.
| #1 |
<FIGURE>(Illustration of a Computer Terminal\terminal_fig)
<FIGURE_SPACE>(18\An illustration of a computer terminal.)
<ENDFIGURE>
|
This example produces the following output:
Figure n--n: Illustration of a Computer Terminal
_____________________________________________________________________
|
An illustration of a computer terminal.
_____________________________________________________________________
|
The following example shows how to leave space for a figure that will
take one page.
| #2 |
<FIGURE>(Illustration of a Garage\garage_fig)
<FIGURE_SPACE>(FULL_PAGE\An illustration of a garage.)
<ENDFIGURE>
|
This example produces output like that found on the following page.
Figure n--n: Illustration of a Garage
_____________________________________________________________________
|
An illustration of a garage.
_____________________________________________________________________
|
<FILE_SPEC>
Allows you to use a file specification that contains angle brackets as
an argument to a tag without DECdocument interpreting that file
specification as a tag.
Format
<FILE_SPEC> (file specification)
ARGUMENTS
file specification
Specifies the file specification that contains angle brackets.
related tags
- <ELEMENT>
- <EXAMPLE_FILE>
- <FIGURE_FILE>
- <ICON_FILE>
- <INCLUDE>
- <INCLUDES_FILE>
- <TABLE_FILE>
DESCRIPTION
The <FILE_SPEC> tag allows you to use a file specification that
contains angle brackets as an argument to a tag that lets you include
external files without DECdocument interpreting that file
specification as a tag. A complete list of tags that let you include
external files is found in the "Related Tags" section of this
tag description.
Some keyboards do not provide square brackets, ([) and (]), so it is
common for the directory portion of a file specification to be
delimited by angle brackets. Because DECdocument would normally
interpret text within angle brackets as an SDML tag, the
<FILE_SPEC> tag converts any angle brackets in its argument into
the corresponding square brackets.
You do not have to use the <FILE_SPEC> tag to specify logical
names in a file specification whose equivalence strings contain angle
brackets.
Example
The following example shows how to use the <FILE_SPEC> tag.
|
<figure_file>(ln03\<file_spec>(mydisk:<figure>diagram.six)\20)
|
The directory name in this file specification would normally be seen as
a <FIGURE> tag, which would lead to erroneous results. Because
the file specification is used as an argument to the <FILE_SPEC>
tag, the angle brackets are converted to square brackets before the
apparent <FIGURE> tag is recognized. Thus, the example is
equivalent to the following:
<figure_file>(ln03\mydisk:[figure]diagram.six\20)
|


