This section is divided into four:
If there is no [Client ...] section, connections are
authorized from any client; so by default all client connections
are authorized. But if the server configuration file has one
or more [Client] sections, only clients defined in
those sections have access to the server. If you want to authorize
connections from a particular client or clients, change the settings
in the configuration file (using any text editor). The Client has
the same name as the address shown in the server log file.
These are the entries and values in the Client section:
which is the network address from which this client may access the local server. This value overrides the value specified in the title of the section or folder.
which is a user name allowed to access the local server. Replace n with a number from 1 to any value, in ascending and consecutive order. This entry is optional, and may be used none, one, or several times.
If you use one or more userX=name, note that only Mail Monitor, through the named users, can access the server. If you want all users to have access to the server, do not specify any user names.
When using the Client section to authorize specific systems, you should always authorize the local system itself. And if enabling specific users on the local system, you must enable the following users:
 Windows NT
 DIGITAL UNIX
 OpenVMS
 SYSTEM
 root
 NAMON$SERVER
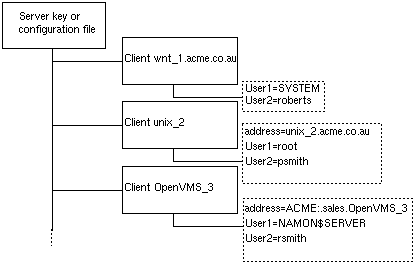
For example, the settings shown in Figure 2-1 authorize access from three clients:
[Client ...] section of the
configuration file
[Client unix_2]
section of the configuration file
[Client OpenVMS_
   3]
section of the configuration file

Note that this example does not show all the addressing
possibilities. The address of the node OpenVMS_3 ,
as a further example, could be specified as an IP address, either
in the section heading or in the address entry. The
node unix_2 could have a DECnet address (possibly in
addition to its IP address). And the Windows NT node could have the
section name [Client wnt_1] , with the address string
specified as an entry in that section.
Dealing with Problems with Authorization
If you have problems with authorization, you should look in the log
file for lines that begin `Accepting'. These log file entries give
the information that you need to specify in the address entry or
entries you have in the [Client] section, and in any
Usern entries (if you specify users by account).
To allow one server to pass information and requests to another server you must define that (remote) server in the configuration file used by the local server, as explained in this section.
To define a server that your Mail
Monitor will use, change the settings in the configuration
file (using any text editor to modify the [Server ...]
section ).
The Server section holds this value:
where you should enter the network address of the server. The address format depends on the type of transport being used.
To set up local settings for a Mail
Monitor server, change the settings in the configuration file
(using any text editor to modify the [Local] section ).
These are the entries and values defined in the Local section:
where 1 means convert the service name (for example NAM$server) to one or other of these values:
nam$server
NAM$SERVER
Setting the value to 0 prevents conversion. The default setting is designed to work in a normal configuration. Do not change the setting unless you change service or object names
which specifies the number of lines for the log that the server holds in memory. When the log reaches this size, new information is added from the start - overwriting the oldest lines. The default value is 1024 lines.
which specifies the size of the logfile that the server writes to file. When the log reaches this size, new information is added from the beginning of the file - overwriting the oldest lines. The default value is 200 Kilobytes.
which has the default value NAM$SERVER on a DECnet
service, nam$server on TCP/IP systems.
which enables or disables the internal scheduler for the server. Most entities can have a scan interval, which designates the period between scans. If the scheduler is set to 1 then the scan interval is used.
which enables (1) or disables (0) tracing of server operations.
The filename for the trace file is the same as the name of the
server log file for that platform, but with the file extension
.TMP .
You must set up an Entity name section for each scanning module that the Mail Monitor uses. Each Scanning Module Entity represents a scanning module, and you can affect the behaviour of any scanning module by managing its Entity.
These are the entries and values defined in the Entity section:
where command string is the path name of the executable image or scanning module that monitors the entity.
which should contain the full name of the entity being monitored or a meaningful description of the entity. To preserve upper case and lower case, enter the description within double quotes.
where the scan interval is the time between scheduled
scans. The scan interval is used only when the Local setting
StartScheduler setting is on. This setting
is optional, but if no interval is set the server does not start
a scan even if the scheduler is running.
where the value is the maximum time allowed for the scanning module to monitor the entity. The server stops the scanning module if the scan takes more than this maximum. In addition, when aborting a scan, the server generates a Status Record or a server log record.
The chapters in Part III specific to particular operating systems give details of all that you can set up for the different scanning modules.