Getting Started With the New Desktop
AA--QUW1A--TE
Previous page...
| Contents
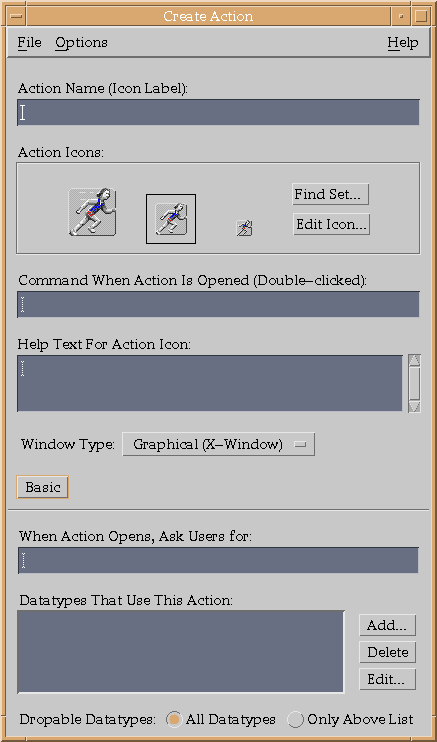
Additional fields are displayed if you select the Advanced
option, which is located in the lower left corner of the Create Action
main
window. These
additional fields
are shown in Figure 4-2.
Table 4-1 describes each field in the Create Action main
window and in the expanded (Advanced option) window.
Table 4-1 Create Action Fields
| Field Name |
Purpose |
| Initial Fields |
| Action Name (Icon Label): |
This label is displayed next to the icon for the application. |
| Action icon: |
This icon represents the application. With Find Set..., you can select an icon from the collection that is included with the New Desktop. With Edit Icon..., you can modify an existing icon or create a new one. |
| Command When Action Is Opened (Double-clicked): |
The name of the application you want to access. This name can specify one or more file arguments as operands. The arguments must be specified in the format $filename. For example: DIFF$1 $2. |
| Help Text for Action Icon: |
This help becomes the On Item help for the Action Icon. The text automatically wraps in the text field. You can explicitly add a continuation line by ending a line with a space, a backslash (\), and Return. If the backslash is not present, subsequent lines will not be displayed. |
| Window Type: |
Select the windowing support option required by the application. You have a choice of three types of windows or no window. |
| Advanced |
Select this field if your application uses data files and you want to create one or more data types for them. The Create Action window expands to display additional, advanced fields. |
| Advanced Option Fields |
| When Action Opens, Ask Users for: |
Supply a prompt if the application's command line has a required or optional file argument. Otherwise, leave it blank. |
| Datatypes That Use This Action: |
If the action can accept any data type, select All Datatypes. If you want to modify any existing data types or create new ones, select Only Above List and then select Add. (Initially, the Datatypes That Use This Action list is empty.) When you select Add, a dialog box called Add Datatypes is displayed. |
Figures 4-2 Create Action Main Window With Advanced Option Fields
4.1.5 Creating or Modifying Data Types Using Create Action
The Create Action application provides the Add Datatype dialog box for
modifying an existing data type or creating a new one.
The Add Datatype dialog box is shown in Figure 4-3,
and the fields are described in Table 4-2.
Figures 4-3 Add Datatype Dialog Box
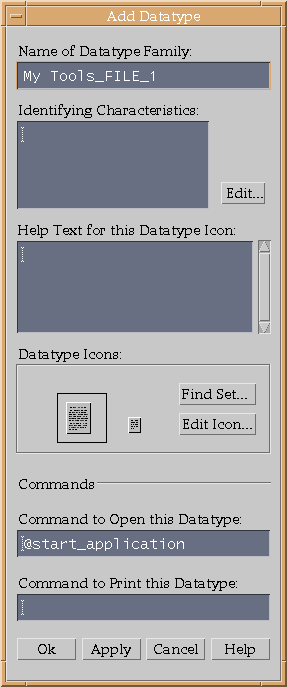
Table 4-2 Create Action: Add Datatype Dialog Box
| Field |
Purpose |
| Name of Datatype Family: |
If you want to modify an existing data type and retain the same name, leave this field blank. If you want to create a new data type, supply a name. (The name cannot include spaces. The name is not visible to application users; it is used in the actions/data types database to identify the data type definition.) |
| Identifying Characteristics: |
To display the Identifying Characteristics dialog box, click on the Edit button. |
| Help Text for this Datatype Icon: |
This help becomes the On Item help for the Action Icon. |
| Datatype Icons: |
With Find Set..., you can select an icon from the collection that is included with the New Desktop. With Edit Icon..., you can create a new icon or modify an existing one. |
| Command to Open this Datatype: |
This command is the same that you supplied for Command When Action is Opened (Double-clicked): and will appear in this field. |
| Command to Print this Datatype: |
Enter the Print Dialog command line to suit the application data type. |
After
you respond to the second prompt, Identifying Characteristics, by
clicking
on the
Edit... button, the Identifying Characteristics dialog box is
displayed, as shown
in Figure 4-4. The fields of this dialog box are
described in Table 4-3.
The characteristics are displayed in the Identifying Characteristics
field
of the Add Datatype dialog box, using the following codes:
- d --- A directory.
- r --- The file has read permission.
- w --- The file has write permission.
- ! --- Logical operator NOT.
- & --- Logical operator AND.
Figures 4-4 Identifying Characteristics Dialog Box
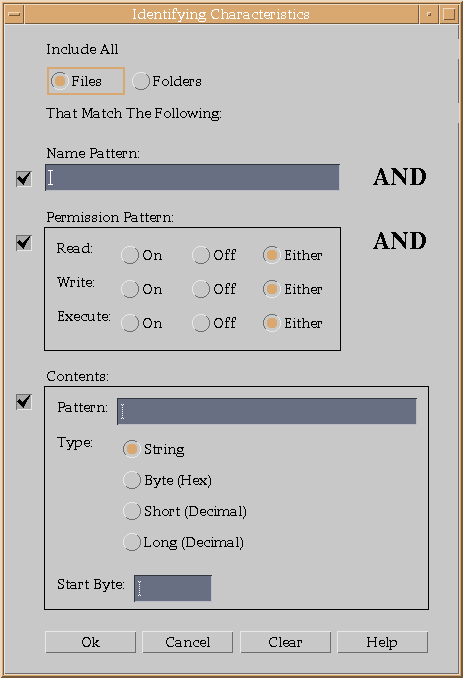
Table 4-3 Create Action: Identifying Characteristics Dialog Box
| Field |
Purpose |
| Files, Folders |
The data type applies only to files or only to folders. |
| Name Pattern: |
Data typing based on the file name. |
| Permissions Pattern: |
Read, write, execute, or delete permission. The Either option for these permissions means that the permission does not matter. The permissions testing does not recognize OpenVMS access control lists (ACLs). |
| Contents: |
A pattern to search for, the type of contents, and an optional starting point in the file. Note that this feature can carry a substantial performance penalty when changing or updating views. |
4.1.6 Editing Icons From the Create Action Application
If you invoke the Icon Editor from the Create Action application and
edit an
icon file, the edits that you make are not automatically shown in the
displayed
icon when you exit from Icon Editor. After exiting from Icon Editor,
you must
choose Find Set... and select the newly edited icon to change the
display and
associate the edited icon with the action.
If you want to edit more than one
size of the icon, make all the edits before you select Find Set. If
you do not
have a complete set of edited icons when you select Find Set..., the
missing
icons will not be displayed and you will not be able to create them
from within
the Create Action application.
4.2 Recommended Integration
Recommended integration means that an application is integrated with
other CDE
components, making it more consistent with the CDE desktop.
Recommended integration includes making the following enhancements to
your
application:
- Providing convenience functions in an
application, such as the drag-and-drop function and the save/restore
function (see Chapter 5)
- Providing for the internationalization of an application
- Displaying CDE style error messages
- Using the fonts provided with CDE (see Chapter 5)
- Incorporating CDE style help (see Chapter 5)
Recommended
integration will likely require code changes.
This section briefly describes the resources for providing user
interfaces in different languages and CDE style error messages.
Chapter 5 describes the programming resources
for providing the other enhancements.
4.2.1 Internationalization
The New Desktop provides user
interfaces in different languages. The language and other
culture-specific
attributes, such as the symbols and rules for formatting monetary
numeric
information and dates, are defined in a file called a locale.
Each locale is supported by a message catalog, which contains all the
text an
application will output for a particular
language, and by resource files. The DEC C XPG4 localization
utilities, briefly described in
Table 4-4, are used to create locale
files and message catalogs.
Users can specify the language of the user interface when they log in.
From the login display, select Options,
then select Language. The languages installed on your system, as
defined in
the locale files, are
displayed. You can then select the language for the user interface on
your
system.
The default locale is the C locale. The notation .lang is
used in file specifications in this manual to indicate the locale
variable. In
the CDE documentation, %L and <lang> are used to indicate the
locale variable.
Table 4-4 DEC C XPG4 Localization Utilities
| Utility |
Purpose |
| GENCAT |
Merges one or more message-text source files into a message catalog file. The message-text source files use a default file type of .MSG. The message catalog file uses a default file type of .CAT. The GENCAT syntax is: GENCAT[,...] |
| ICONV |
Depending on the option that you specify, ICONV either compiles conversion table files (ICONV COMPILE) or converts characters from one codeset to another (ICONV CONVERT). A conversion table file defines how characters in one codeset are converted to characters in another codeset. |
| LOCALE |
Depends on the option that you specify: - LOCALE COMPILE compiles a binary locale file.
- LOCALE LOAD loads a locale name into system memory as shared, read-only global data.
- LOCALE SHOW displays details of locales on your system.
- LOCALE UNLOAD unloads a locale name from system memory.
|
The locale files are in the directory
defined by the logical name SYS$I18N_LOCALE. For more information about
the
DEC C XPG4 localization utilities, see the OpenVMS Version 6.2 New
Features Manual or the OpenVMS Version 7.0 New Features
Manual.
4.2.2 Displaying Error Messages From Applications
New Desktop applications follow a common model for presenting error
messages and warnings. Users expect messages to be displayed in
message
footers, error dialog boxes, or warning dialog boxes, with further
explanations
in online help, when appropriate. For details about displaying error
messages
in applications and linking message dialogs to online help, see the
Common Desktop Environment: Programmer's Guide.
4.3 Optional Integration
Optional integration
enables you to leverage CDE services to perform
specialized tasks, such as providing certain graphical user interface
functions
and managing multiple workspaces. Custom widgets provide the
specialized
graphical user interface functions. The Workspace Manager API provides
the
functions for managing multiple workspaces. For more information about
these
CDE services, see Chapter 5 and
Appendix B of this guide, theCommon Desktop Environment:
Programmer's Overview, and the Common Desktop Environment:
Programmer's Guide.
4.4 Creating New Application Groups
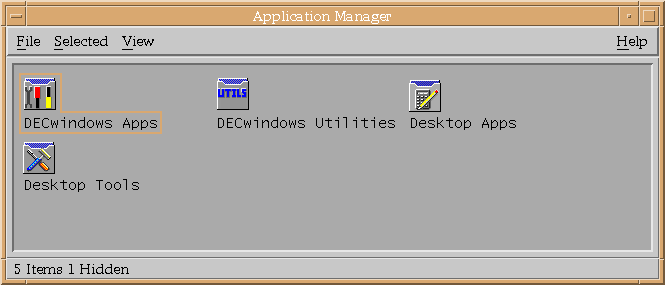
The New Desktop includes four application groups: DECwindows
Apps, DECwindows Utilities, Desktop Apps, and Desktop Tools, as shown
in Figure 4-5. Desktop Apps refers to the CDE applications and
Desktop Tools refers to the CDE tools.
Figures 4-5 Application Manager
An application group is simply a directory containing action (stub)
files. For Application Manager to recognize that a directory
is an application group, the directory must reside in one of the
application group root directories defined by the logical name
DTAPPSEARCHPATH. The directory
disk$:[user.DT.APPMANAGER] is one
of the application group root directories.
You can create additional application groups
to be managed by Application Manager in the following way:
- Create a directory with the name of a new application group, for
example,
disk$:[user.DT.APPMANAGER.MY_TOOLS].
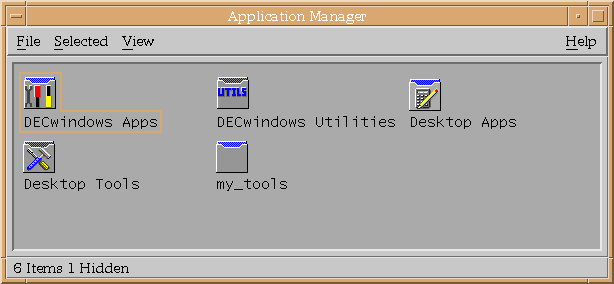
- The new application group will initially appear using the
folder icon and the default name (in lowercase, with the underscore),
as shown
in Figure 4-6. To change the folder icon and the
default name, copy the file NEWGROUP.DT_TEMPLATE
from CDE$SYSTEM_DEFAULTS:[APPCONFIG.TYPES.C]
to disk$:[user.DT.TYPES]newgroup.DT,
if one doesn't
exist already. Modify this file following the instructions contained
within
the file.
- Run the Create Action application located in the Desktop Apps
group to create:
- a. Action (stub) file, for example, SYS$LOGIN:CALCULATOR
- b. Action and data type definition file, for example,
disk$:[user.DT.TYPES]CALCULATOR.DT
You must fill in a minimum of two fields: Action Name (Icon
Label) and
Command When Action Is
Opened (Double-clicked). For this example, the action name is
CALCULATOR.DT
and
the command when action is opened is RUN
SYS$SYSTEM:DECW$CALCULATOR.
Provide an icon for your application in one of the following
ways:
- Accept the default icon (the runner) by not selecting either
Find Set...
or
Edit Icon....
- Select an icon that is included with
the New Desktop by choosing Find Set... and responding to the
prompts.
- Revise an existing icon or create a new one by choosing Edit
Icon... and
responding to the prompts.
For this example, the default icon is used.
Move the action (stub) file from SYS$LOGIN to
disk$:[user.DT.APPMANAGER.MY_TOOLS].
Enable the new application group within Create Action with the
Save option
on the File pull-down menu. Alternatively, you can exit from Create
Action
and enable the new application
group with Reload Actions. From Application Manager, select the
Desktop Tools group, then double click on Reload Actions.
Select Application Manager.
You will see
a new file folder icon labeled my_tools, as shown in
Figure 4-6. Double click
on this icon and you will see the action icon (a runner) with the name
Calculator. Double click to start
Calculator.
Repeat steps 3 through 6 for every application you want to add to
a group.
Every time you use this procedure, a new .DT file is added to your
disk$:[user.DT.TYPES] directory. You might want to
create one file, such
as MY_TOOLS.DT,
and merge all the actions into this file. A single file can simplify
the
management of an application group.
Figures 4-6 Application Manager With a New Application Group
4.5 Registering a Third-Party Application
Registering an application is the phrase used in CDE documentation for
integrating and
installing an application into the New Desktop. The files required
for integrating an application are called a registration package.
Registering
an application
is described in Chapter 4 of the Common Desktop Environment:
Advanced User's and System Administrator's Guide.
The
process on UNIX systems differs from the process on OpenVMS Alpha
systems. The
most significant difference is that the CDE application dtappintegrate
is not
included with the New Desktop. However, the rest of the process on
the New Desktop is similar.
An application is considered fully registered into the
New Desktop
when it has the following components:
- Its own application group at the top level of Application
Manager.
- An action that starts the application. The action is represented
by an icon in the application group.
- Optionally, data types for its data files.
The registration package consists of the following components:
- Files that are created for integrating an application into the
New Desktop. The number and types of files will vary, depending on the
type of application and the level of integration you choose (minimal,
recommended, or optional).
- A new directory file and associated files for a new application
group
to be placed in the CDE$USER_DEFAULTS:[APPCONFIG.APPMANAGER.C]
directory, as shown in
Figure 4-7.
The installation procedure for a registration package must perform
the following tasks:
- Test to determine that the appropriate directories are present in
the
CDE$USER_DEFAULTS:[*...] hierarchy. Files of the following file types
should
be placed in this hierarchy (see Figure 4-7):
- *.DT
- *.FP
- *.SDL
- *.HV
- *.PM
- *.BM
- Action files
- Readme files
If the directories are not present, then the
installation
procedure must create them.
- Install the files for the new application group that you created
for
one or more applications that you are installing into that group.
- Install the application integration files that you created for
each
application into the appropriate directories
in the CDE$USER_DEFAULTS hierarchy.
- Install the application executable files, shareable images, and
resource
files into their respective locations: SYS$SYSTEM, SYS$SHARE, and
CDE$USER_DEFAULTS.
Figures 4-7 CDE$USER_DEFAULTS Directory Hierarchy

After your installation has completed and the session has restarted,
you can then access the new application group and the applications in
it
with the following steps:
- Single click on the icon representing Application Manager.
- Double click on the icon representing the new application group
that
you installed. An icon for each application in the group will be
displayed.
- Double click on the application you want to start.
4.6 Porting UNIX Reference Pages to the New Desktop
If you have created reference pages (manpages) on a UNIX system that
you would
like to add to the reference pages on the New Desktop, you can do so
in the following way:
After you have copied the reference page, you can view it by selecting
the Man
Page Viewer from the Desktop Apps group of Application
Manager.
4.7 CDE Documentation for Integrating Applications
For more
detailed information about integrating applications, see the related
online help, especially the Create Action
help,
and the following CDE manuals:
- Common Desktop Environment: Programmer's Overview
- Common Desktop Environment: Advanced User's and System
Administrator's Guide.
For instructions on how to access either manual on line or
obtain printed copies,
see Table 1-2.
Chapter 5
New Desktop Programming Resources
DECwindows Motif for OpenVMS Alpha provides the same programming
resources as
DECwindows Motif for OpenVMS VAX, as well as programming
resources for the New Desktop. These include a subset
of CDE APIs and integration services and additional CDE resources.
This chapter provides information about the following
topics:
- Standards supported by the New Desktop
(Section 5.1 )
- APIs and application integration services (Section 5.2)
- Save and restore support (Section 5.3)
- Create Action application (Section 5.4)
- File type support (Section 5.5)
- CDE standard fonts (Section 5.6)
- Help programming (Section 5.7)
- Screen savers (Section 5.8)
- Header files (Section 5.9)
- CDE example programs (Section 5.10)
- CDE programming documentation (Section 5.11)
5.1 Standards Supported by the New Desktop
The New Desktop supports the following standards:
- CDE Motif 1.0 toolkit (OSF/Motif Release 1.2.5)
The New Desktop
provides run-time
support for the CDE Motif 1.0,
OSF/Motif Release 1.1.3, and XUI toolkits. DECwindows
applications
built with these toolkits will run under the New Desktop.
- X11 R5
- UIL compiler
Although the UIL compiler is supported, CDE applications do not
use it.
Therefore, no .uid files are
associated with any of the CDE applications.
- Motif Resource Manager (Mrm)
- Inter-Client Communication Conventions Manual (ICCCM)
- CDE programming libraries (see Section 5.2)
5.2 APIs and Application Integration Services
Table 5-1 lists the subset of CDE application programming
interfaces (APIs) and the CDE application integration services
available with the
New Desktop. They are in the following
shareable
libraries (pointed to by the logical SYS$LIBRARY):
- CDE$LIBDTSVC.EXE
- CDE$LIBDTHELP.EXE
- CDE$LIBDTWIDGET.EXE
The corresponding header files are also shown in
Table 5-1. For a list of all CDE API
routines, see Appendix C. Most of the CDE API routines are
supported on the New Desktop, but a small subset are not. Those not
supported are noted.
In addition to these new APIs and application integration
services, all the DECwindows Motif APIs and application integration
services
are available in the New Desktop.
Table 5-1 CDE APIs and Application Integration Services of the New Desktop
| Contents |
Description |
| CDE$LIBDTSVC.EXE |
Desktop Services |
| Drag-and-drop convenience API |
Convenience functions layered on top of the OSF/Motif R1.2 drag-and-drop services. These functions simplify the use of the OSF/Motif R1.2 drag-and-drop services, which have not changed. |
| Action invocation API |
Used to initialize and load the database of action and data type definitions, query the action database, invoke an action, and register a callback to receive action status and return arguments. |
| Session Manager API (dtsession) |
Services include save and restore. |
| Workspace Manager API (dtwm)¹ |
Gets workspace information, sets the current workspace, and so on. |
| Header files² |
Action.h, Dnd.h, Dts.h, Dt.h, Saver.h, Session.h, and Wsm.h. |
| For more information, see theCommon Desktop Environment: Programmer's Guide.|| |
| CDE$LIBDTHELP.EXE |
Help Widget Support |
| DtHelpDialog |
General help dialogs that include a menu bar, topic tree, and a help topic display area. |
| DtHelpQuickDialog |
Quick help dialogs that include a topic display area and one or more dialog buttons at the bottom. |
| Header files² |
Help.h, HelpQuickD.h, and HelpDialog.h. |
| For more information, see theCommon Desktop Environment: Help System Author's and Programmer's Guide. || |
| CDE$LIBDTWIDGET.EXE |
Custom Widgets |
| DtSpinBox |
Combines a text field and arrow buttons in a control that can increment or decrement numeric or text values. |
| DtComboBox |
Combines a text field and a list box in a control that displays one or more valid choices for the text field. |
| DtMenuButton |
Provides menu cascading functionality outside the menu bar. |
| DtEditor |
Incorporates the functionality of a simple text editor. |
| Header files² |
SpinBox.h, ComboBox.h, MenuButton.h, and Editor.h. |
| For more information, see theCommon Desktop Environment: Programmer's Guide. || |
¹Some functions are not supported.²Found in DECW$INCLUDE:.
Table 5-2 lists the CDE APIs, application
integration services, and tools that are not included in the
New Desktop.
Table 5-2 CDE APIs and Application Integration Services Not Included
| CDE Component |
Name |
| Application Builder |
dtappbuilder |
| Calendar Manager API |
libcsa |
| Messaging services (ToolTalk) |
libtt |
| Multipurpose Internet Mail Extensions (MIME) support |
libdtmail |
| Terminal emulator API |
libdtterm |
| Windowing Korn shell |
dtksh |
For examples of how these routines are used in applications, see the
example
programs, as described in Section 5.10.
5.3 Save and Restore Support
The New Desktop provides session save and restore utility functions.
If these are
integrated into your application, the application state is saved upon
exiting
Session Manager and is restored when the session is restarted.
Use the XmAddWMProtocol() function to set the WM_SAVE_YOURSELF atom on
the
WM_PROTOCOLS property for the top level of the application. You can
view
window properties by using the xprop utility program located in the
DECW$UTILS
directory.
Use the XmAddWMProtocolCallback() function to declare a callback
procedure for
when the application receives a WM_SAVE_YOURSELF client message.
Session
Manager sends a WM_SAVE_YOURSELF client message to your application,
and the
callback function is called.
The application should not interact with the user during save or
restore. For
example, a dialog box should not be displayed during save or restore.
Next page...
|
Contents


