IDENTIFICATION DIVISION.
PROGRAM-ID. REP02.
ENVIRONMENT DIVISION.
INPUT-OUTPUT SECTION.
FILE-CONTROL.
SELECT INPUT-FILE ASSIGN TO "LABELS.DAT".
SELECT REPORT-FILE ASSIGN TO "LABELS.REP".
DATA DIVISION.
FILE SECTION.
FD INPUT-FILE.
01 INPUT-RECORD.
02 INPUT-NAME PIC X(20).
02 INPUT-ADDRESS PIC X(15).
02 INPUT-CITY PIC X(10).
02 INPUT-STATE PIC XX.
02 INPUT-ZIP PIC 99999.
FD REPORT-FILE.
01 REPORT-RECORD PIC X(132).
WORKING-STORAGE SECTION.
01 LABELS-TABLE.
03 NAME-LINE.
05 LINE-1 OCCURS 4 TIMES INDEXED BY INDEX-1.
07 LABEL-NAME PIC X(20).
07 FILLER PIC X(10).
03 ADDRESS-LINE.
05 LINE-2 OCCURS 4 TIMES INDEXED BY INDEX-2.
07 LABEL-ADDRESS PIC X(15).
07 FILLER PIC X(15).
03 CSZ-LINE.
05 LINE-3 OCCURS 4 TIMES INDEXED BY INDEX-3.
07 LABEL-CITY PIC X(10).
07 FILLER PIC XXXX.
07 LABEL-STATE PIC XX.
07 FILLER PIC XXXX.
07 LABEL-ZIP PIC 99999.
07 FILLER PIC XXXXX.
01 END-OF-FILE PIC X.
PROCEDURE DIVISION.
A000-BEGIN.
OPEN INPUT INPUT-FILE
OUTPUT REPORT-FILE.
MOVE SPACES TO LABELS-TABLE.
SET INDEX-1, INDEX-2, INDEX-3 TO 1.
PERFORM A100-READ-INPUT UNTIL END-OF-FILE = "Y".
A050-WRAP-UP.
IF LABEL-NAME(1) IS NOT EQUAL TO SPACES
PERFORM A300-PRINT-FOUR-LABELS.
A050-END-OF-JOB.
CLOSE INPUT-FILE
REPORT-FILE.
DISPLAY "END OF JOB".
STOP RUN.
*
A100-READ-INPUT.
READ INPUT-FILE AT END MOVE "Y" TO END-OF-FILE.
IF END-OF-FILE = "Y" NEXT SENTENCE
ELSE PERFORM A200-GENERATE-TABLE.
*
A200-GENERATE-TABLE.
MOVE INPUT-NAME TO LABEL-NAME(INDEX-1)
MOVE INPUT-ADDRESS TO LABEL-ADDRESS(INDEX-2)
MOVE INPUT-CITY TO LABEL-CITY(INDEX-3)
MOVE INPUT-STATE TO LABEL-STATE(INDEX-3)
MOVE INPUT-ZIP TO LABEL-ZIP(INDEX-3)
IF INDEX-1 = 4 PERFORM A300-PRINT-FOUR-LABELS
ELSE SET INDEX-1, INDEX-2, INDEX-3 UP BY 1.
*
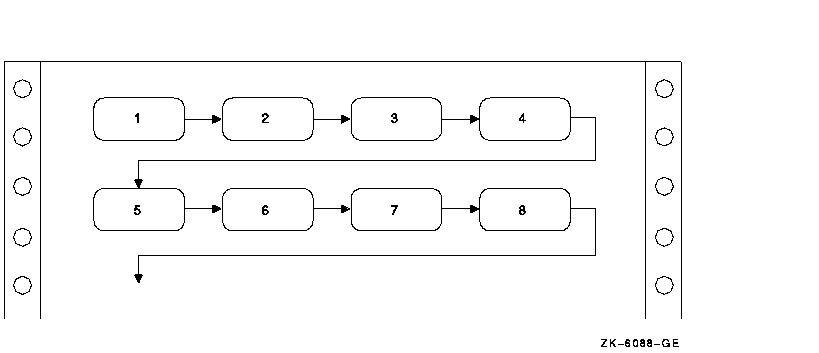
A300-PRINT-FOUR-LABELS.
WRITE REPORT-RECORD FROM NAME-LINE AFTER ADVANCING 3.
WRITE REPORT-RECORD FROM ADDRESS-LINE AFTER ADVANCING 1.
WRITE REPORT-RECORD FROM CSZ-LINE AFTER ADVANCING 1.
MOVE SPACES TO LABELS-TABLE.
SET INDEX-1, INDEX-2, INDEX-3 TO 1.
|
Figure 10-21 Printing Labels Four-Up in Sort Order
| Example 10-12 Printing Labels Four-Up in Sort Order | |||||
|---|---|---|---|---|---|
IDENTIFICATION DIVISION.
PROGRAM-ID. REP03.
ENVIRONMENT DIVISION.
INPUT-OUTPUT SECTION.
FILE-CONTROL.
SELECT INPUT-FILE ASSIGN TO "LABELS.DAT".
SELECT REPORT-FILE ASSIGN TO "LABELS.REP".
DATA DIVISION.
FILE SECTION.
FD INPUT-FILE.
01 INPUT-RECORD.
02 INPUT-NAME PIC X(20).
02 INPUT-ADDRESS PIC X(15).
02 INPUT-CITY PIC X(10).
02 INPUT-STATE PIC XX.
02 INPUT-ZIP PIC 99999.
FD REPORT-FILE.
01 REPORT-RECORD PIC X(132).
WORKING-STORAGE SECTION.
01 LABELS-TABLE.
03 FOUR-UP OCCURS 6 TIMES INDEXED BY ROW-INDEX.
04 NAME-LINE.
05 LINE-1 OCCURS 4 TIMES INDEXED BY NAME-INDEX.
07 LABEL-NAME PIC X(20).
07 FILLER PIC X(10).
04 ADDRESS-LINE.
05 LINE-2 OCCURS 4 TIMES INDEXED BY ADDRESS-INDEX.
07 LABEL-ADDRESS PIC X(15).
07 FILLER PIC X(15).
04 CSZ-LINE.
05 LINE-3 OCCURS 4 TIMES INDEXED BY CSZ-INDEX.
07 LABEL-CITY PIC X(10).
07 FILLER PIC XXXX.
07 LABEL-STATE PIC XX.
07 FILLER PIC XXXX.
07 LABEL-ZIP PIC 99999.
07 FILLER PIC XXXXX.
01 END-OF-FILE PIC X.
PROCEDURE DIVISION.
A000-BEGIN.
OPEN INPUT INPUT-FILE
OUTPUT REPORT-FILE.
MOVE SPACES TO LABELS-TABLE.
SET ROW-INDEX, NAME-INDEX, ADDRESS-INDEX, CSZ-INDEX TO 1.
PERFORM A100-READ-INPUT UNTIL END-OF-FILE = "Y".
A050-WRAP-UP.
IF LABEL-NAME(1, 1) IS NOT EQUAL TO SPACES
PERFORM A300-PRINT-PAGE-OF-LABELS VARYING ROW-INDEX
FROM 1 BY 1 UNTIL ROW-INDEX IS GREATER THAN 6.
A050-END-OF-JOB.
CLOSE INPUT-FILE
REPORT-FILE.
DISPLAY "END OF JOB".
STOP RUN.
A100-READ-INPUT.
READ INPUT-FILE AT END MOVE "Y" TO END-OF-FILE.
IF END-OF-FILE = "Y" NEXT SENTENCE
ELSE PERFORM A200-GENERATE-LABELS.
A200-GENERATE-LABELS.
MOVE INPUT-NAME TO LABEL-NAME(ROW-INDEX, NAME-INDEX)
MOVE INPUT-ADDRESS TO LABEL-ADDRESS(ROW-INDEX, ADDRESS-INDEX)
MOVE INPUT-CITY TO LABEL-CITY(ROW-INDEX, CSZ-INDEX)
MOVE INPUT-STATE TO LABEL-STATE(ROW-INDEX, CSZ-INDEX)
MOVE INPUT-ZIP TO LABEL-ZIP(ROW-INDEX, CSZ-INDEX)
IF ROW-INDEX = 6 AND NAME-INDEX = 4
PERFORM A300-PRINT-PAGE-OF-LABELS VARYING ROW-INDEX
FROM 1 BY 1 UNTIL ROW-INDEX IS GREATER THAN 6
MOVE SPACES TO LABELS-TABLE
SET ROW-INDEX, NAME-INDEX, ADDRESS-INDEX, CSZ-INDEX TO 1
ELSE
PERFORM A210-UPDATE-INDEXES.
A210-UPDATE-INDEXES.
IF ROW-INDEX = 6 SET ROW-INDEX TO 1
SET NAME-INDEX
ADDRESS-INDEX
CSZ-INDEX UP BY 1
ELSE
SET ROW-INDEX UP BY 1.
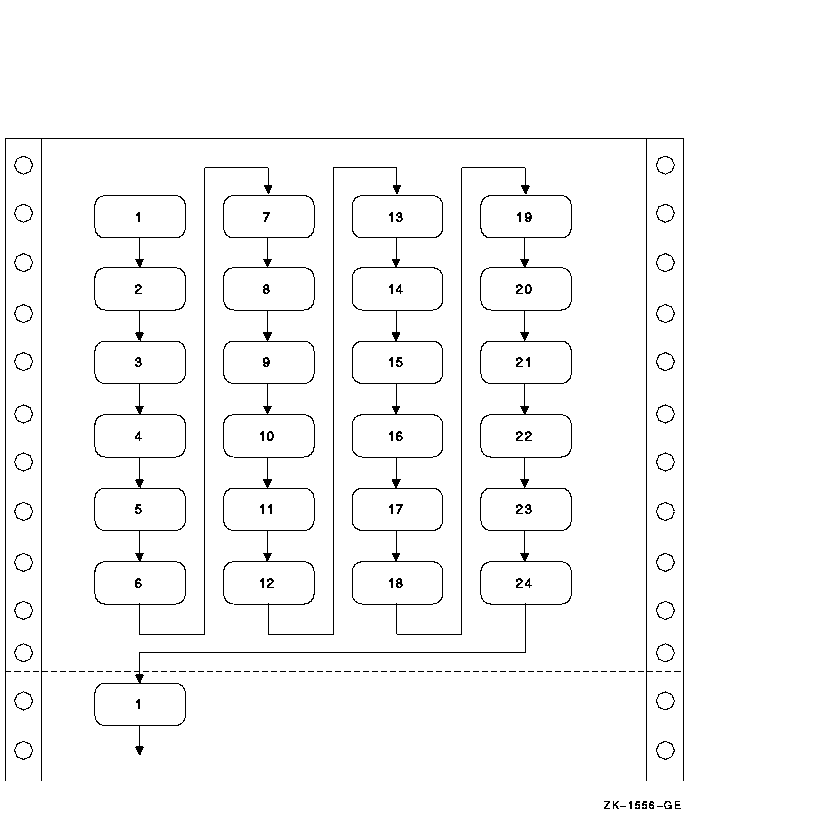
A300-PRINT-PAGE-OF-LABELS.
WRITE REPORT-RECORD FROM NAME-LINE(ROW-INDEX)
AFTER ADVANCING 3.
WRITE REPORT-RECORD FROM ADDRESS-LINE(ROW-INDEX)
AFTER ADVANCING 1.
WRITE REPORT-RECORD FROM CSZ-LINE(ROW-INDEX)
AFTER ADVANCING 1.
|
10.10.2 Group Indicating
The group indicating process greatly improves a report's readability where long sequences of entries have some element in common. You print the element once, then leave it blank for subsequent lines, as long as there is no change in that element. For example, if your sample file's sort sequence is State (major key) and City (minor key), you get sequences like those in Table 10-2.
| Without Group Indicating | With Group Indicating | ||||
|---|---|---|---|---|---|
| STATE | CITY | STORE NUMBER |
STATE | CITY | STORE NUMBER |
| Arizona | Grand Canyon | 111111 | Arizona | Grand Canyon | 111111 |
| Arizona | Grand Canyon | 123456 | 123456 | ||
| Arizona | Grand Canyon | 222222 | 222222 | ||
| Arizona | Tucson | 333333 | Arizona | Tucson | 333333 |
| Arizona | Tucson | 444444 | 444444 | ||
| Arizona | Tucson | 555555 | 555555 | ||
| Massachusetts | Maynard | 111111 | Massachusetts | Maynard | 111111 |
| Massachusetts | Maynard | 222222 | 222222 | ||
| Massachusetts | Maynard | 333333 | 333333 | ||
| Massachusetts | Maynard | 444444 | 444444 | ||
| Massachusetts | Tewksbury | 111111 | Massachusetts | Tewksbury | 111111 |
| Massachusetts | Tewksbury | 222222 | 222222 | ||
| New Hampshire | Manchester | 111111 | New Hampshire | Manchester | 111111 |
| New Hampshire | Manchester | 222222 | 222222 | ||
| New Hampshire | Merrimack | 333333 | New Hampshire | Merrimack | 333333 |
| New Hampshire | Merrimack | 444444 | 444444 | ||
| New Hampshire | Merrimack | 555555 | 555555 | ||
| New Hampshire | Nashua | 666666 | New Hampshire | Nashua | 666666 |
10.10.3 Fitting Reports on the Page
If you need more columns than physically can fit on a page, you can do the following:
- Eliminate as many unused spaces as possible between columns. Columns should not be run together; however, you can use one blank space instead of several.
- Eliminate nonessential information.
- Print two or more lines with staggered headers and columns.
- Print two reports.
10.10.4 Printing Totals Before Detail Lines
A report that must include totals at the top of the page before the detail lines has three solutions as follows:
- Store the logical print lines in a table, total the table, and then print from the table.
- Pass through the file twice. The first time, compute the totals. The second time, print the report. This method is slow and complicated if there are many subtotals.
- Write the lines into a file with a sort key containing the report, page, and line number. When your program writes the last line and computes the total, have it assign a page and line number to the total line's sort key. Use an appropriate page and line number to cause the total line to sort in front of its detail lines. After the program completes, sort the file, read it, drop the sort key, and produce the report.
10.10.5 Underlining Items in Your Reports
The examples in this section apply only to printers that support overprinting.
Sometimes you must underline a column of numbers to denote a total and also underline the total to highlight it:
1234 1122 ---- 2356 ==== |
To print a single underline, use the underscore character and suppress line spacing. For example:
WRITE PRINT-LINE FROM SINGLE-UNDERLINE-TOTAL
                 BEFORE ADVANCING 0 LINES.
|
This overprints the underscore (_) on the previous line, underlining the item: 1122. Use the equal sign (=) to simulate double underlines. Note that you must write the equal signs on the next line. For example:
WRITE PRINT-LINE FROM DOUBLE-UNDERLINE-TOTAL
                 AFTER ADVANCING 1 LINE.
|
10.10.6 Bolding Items in Your Reports
The examples in this section apply only to printers that support overprinting.
To bold an entire line in a report:
- Write the line as many times as you want, specifying the BEFORE ADVANCING 0 LINES phrase (three times is sufficient). This darkens the line but does not advance to the next line.
- Write the line one last time without the BEFORE ADVANCING phrase. This overprints the line again and advances to the next print line.
For example:
WRITE PRINT-LINE FROM TOTAL-LINE BEFORE ADVANCING 0 LINES. WRITE PRINT-LINE FROM TOTAL-LINE BEFORE ADVANCING 0 LINES. WRITE PRINT-LINE FROM TOTAL-LINE BEFORE ADVANCING 0 LINES. WRITE PRINT-LINE FROM TOTAL-LINE. |
This example produces a darker image in the report. You can use similar statements for characters and words, as well as complete lines. To bold only a word or only a character within a line, you must:
- Write the print line and specify the BEFORE ADVANCING 0 LINES phrase.
- Use reference modification to create a skeleton line containing only the items in the print line you want bolded.
- Write the skeleton line as many times as you want and specify the BEFORE ADVANCING 0 LINES phrase. This darkens the items in the skeleton line but does not advance to the next line.
- Write the skeleton line one last time without the BEFORE ADVANCING phrase. This overprints the line again and advances to the next print line.
For example:
    WRITE PRINT-LINE FROM TOTAL-LINE BEFORE ADVANCING 0 LINES.
*
* Move spaces over the items in the source print line (TOTAL-LINE)
* that are not to be bolded
*
    MOVE SPACES TO ...
    WRITE PRINT-LINE FROM TOTAL-LINE BEFORE ADVANCING 0 LINES.
    WRITE PRINT-LINE FROM TOTAL-LINE BEFORE ADVANCING 0 LINES.
    WRITE PRINT-LINE FROM TOTAL-LINE.
|
Chapter 11
Using ACCEPT and DISPLAY Statements for Input/Output and Video Forms
ACCEPT and DISPLAY statements are used to make low-volume data available to specified devices. You will find the following information useful:
- Section 11.1 describes the use of the ACCEPT and DISPLAY statements for interactive I/O.
- Section 11.2 explains how you can design an online video form similar to a printed form by using the Compaq extensions to the ACCEPT and DISPLAY statements .
- Section 11.3 describes the X/Open Screen Section features. You can use it to design video forms easily and efficiently in a single section of your COBOL program, and then accept or display a full screen of data with a single ACCEPT statement or DISPLAY statement.
11.1 Using ACCEPT and DISPLAY for I/O
The COBOL language provides two statements, ACCEPT and DISPLAY, for low-volume I/O operations. The ACCEPT and DISPLAY statements transfer data between your program and the standard input and output devices. If you do not use the FROM or UPON phrases, or an environment variable, the default device for ACCEPT is the keyboard and the default device for DISPLAY is the terminal screen.
The FROM or UPON phrases refer to mnemonic names that you can define in the Environment Division SPECIAL-NAMES paragraph. You define a mnemonic name by equating it to a COBOL implementor name; for example, the following clause equates STATUS-REPORT to the device LINE-PRINTER:
LINE-PRINTER IS STATUS-REPORT |
You can then use the mnemonic name in a DISPLAY statement:
DISPLAY "File contains " REC-COUNT UPON STATUS-REPORT. |
The COBOL implementor names in the SPECIAL-NAMES paragraph refer to special Compaq COBOL environment variables or logical names. Environment variables or logical names do not always represent physical devices.
On the Tru64 UNIX operating system, you can assign an environment variable to a file name as follows:
% setenv COBOL_LINEPRINTER status.lis <> |
On the OpenVMS Alpha operating system, you can assign a logical name to a file specification using the ASSIGN command (or the DEFINE command, with the arguments in reverse order):
$ ASSIGN [ALLSTATUS]STATUS.LIS COB$LINEPRINTER <> |
If you use an environment variable or a logical name, you must define it appropriately for the ACCEPT or DISPLAY statement to succeed.
On OpenVMS, when you run an application, if input and output are both directed to terminals, they must be directed to the same terminal. If input and output are directed to different terminals, the output terminal is used and the input terminal is ignored. <>
For more information on the logical names or environment variables and the mnemonic names, see the SPECIAL-NAMES section in the Environment Division chapter in the Compaq COBOL Reference Manual.
On OpenVMS, the ACCEPT statement transfers data from the input device to a data item. If you do not use the FROM phrase, the system uses the logical name COB$INPUT if it is defined, otherwise SYS$INPUT. If you use the FROM phrase, it uses the logical name associated with the mnemonic-name in the FROM clause. <>
On Tru64 UNIX and Windows NT, the ACCEPT statement transfers data from the input device to a data item. If you do not use the FROM phrase, the system uses the environment variable COBOL_INPUT if it is defined, or stdin (the keyboard on Windows NT systems) if COBOL_INPUT is not otherwise defined. If you use the FROM phrase, the system uses the environment variable associated with the mnemonic-name in the FROM clause. <>
The following example illustrates the FROM phrase used in conjunction with ACCEPT:
SPECIAL-NAMES.
    CARD-READER IS WHATS-THE-NAME
    .
    .
    .
PROCEDURE DIVISION.
    .
    .
    .
    ACCEPT PARAMETER-AREA FROM WHATS-THE-NAME.
|
On OpenVMS, the DISPLAY statement transfers the contents of data items and literals to the output device. If you do not use the UPON phrase, the system uses the logical name COB$OUTPUT if it is defined, or SYS$OUTPUT if it is not defined. If you use the UPON phrase, the system uses the logical name associated with the mnemonic-name in the FROM clause. <>
On Tru64 UNIX and Windows NT, the DISPLAY statement transfers the contents of data items and literals to the output device. If you do not use the UPON phrase, the system uses the environment variable COBOL_OUTPUT if it is defined, or stdout (the terminal screen on Windows NT) if it is not defined. If you use the UPON phrase, the system uses the environment variable associated with the mnemonic-name in the UPON clause.
The following example illustrates the UPON phrase used in conjunction with DISPLAY:
SPECIAL-NAMES.
    LINE-PRINTER IS ERROR-LOG
    .
    .
    .
PROCEDURE DIVISION.
    .
    .
    .
    DISPLAY ERROR-COUNT, "  phase 2 errors, ", ERROR-MSG UPON ERROR-LOG.
|
| Previous | Next | Contents | Index |