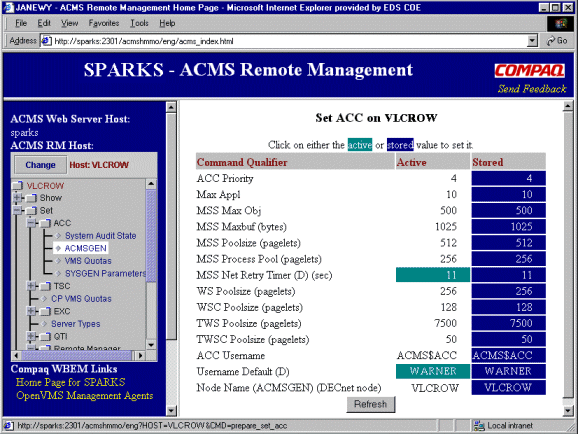
The available values are displayed in the output frame, similar to Figure 3-4. Note that any active and stored data that can be changed is displayed reverse highlight.
Figure 3-4 Set ACC
| Previous | Contents | Index |
This chapter describes how to prepare and run the ACMS Remote Manager
web agent.
3.1 Overview of the Remote Manager Web Agent
With the Remote Manager web agent, system managers can use their web browser to monitor and tune remote ACMS systems. The ACMS for OpenVMS Alpha Development and Run-time kits include the Remote Manager Hyper-Media Management Object (HMMO), which is integrated into the Compaq web-based enterprise management (WBEM) environment. Known as the Remote Manager web agent, this object functions as a Remote Manager client through the ONC RPC interface.
The Remote Manager web agent environment consists of the following host systems:
As shown in Figure 1-1, the Remote Manager web agent
(ACMS$MGMT_HMMO) relies on the WBEM management server (WBEM$SERVER) to
relay data to and from the web browser. The web agent uses its internal
web server to connect to the ACMS Remote Management page. All command
input is then relayed to Remote Manager server through the HMMO.
3.2 Remote Manager Web Agent Setup
Before you begin, you must have already installed OpenVMS Alpha Version 7.2--1 or higher on the web server system. Also, ensure that all web client systems are running one of the currently supported web browsers. See the Compaq ACMS for OpenVMS Software Product Description (SPD 25.50.xx) for a list of the currently supported web browsers.
Once the OpenVMS Alpha software is installed, perform the following steps to set up the Remote Manager web agent on the web server system:
The Remote Manager web agent software is bundled with the ACMS for OpenVMS Alpha Run-time and Development kits. To install the web agent software, choose to install the WBEM-related files component of either kit.
This section contains excerpts from an ACMS Development kit installation. Refer to the Compaq ACMS for OpenVMS Version 4.4 Installation Guide for detailed information about the entire ACMS installation procedure.
$ @SYS$UPDATE:VMSINSTAL ACMSDEVA_044 MTA0: OPTIONS N,AWD=DISK1 OpenVMS AXP Software Product Installation Procedure V7.3 It is 22-JUN-2001 at 11:00. Enter a question mark (?) at any time for help. |
* Do you want the full ACMS installation [NO]? N * Do you want to install the ACMS component software [YES]? N * Do you want to install the WBEM-related files for ACMS [YES]? Y * Do you want to update the LSE environment for ACMS [YES]? N |
CHECKING INSTALLATION PREREQUISITES
-----------------------------------

    (required and optional software checked)

    (product licenses checked)

    (disk space checked)

ACMS PREVIOUS INSTALLATION
--------------------------

    (previous installation of ACMS is compatible with current installation)

ACMS WBEM CHECK
--------------

SUMMARY OF THIS ACMS INSTALLATION
---------------------------------

    The following steps will be taken to complete this installation:

    o  WBEM environment will be updated for ACMS

    The rest of the installation will take approximately 7 minutes.

    Note that this time is heavily dependent your system load, hardware
    and kit media. The time mentioned was measured on a stand-alone DEC
    3000 (Alpha)  system with a disk-resident kit.  Your time may vary.
|
The ACMS$WBEM account used to execute ACMSMGR WBEM commands is not available. You must supply a UIC and password for this account so that it can be created. Please enter the UIC for the ACMS$WBEM account, in the form [ggggg,nnnnnn] UIC: [320,525] Please enter a password of at least 8 characters, using only the following characters: ABCDEFGHIJKLMNOPQRSTUVWXYZ0123456789$_ Password: Verification: |
******************************************************************
*                      ACMS WBEM Setup                           *
******************************************************************

     Checking for user account ACMS$WBEM

     Identifier for ACMS$MGMT_READ exists in RIGHTSLIST

     Identifier for ACMS$MGMT_WRITE exists in RIGHTSLIST

     Identifier for ACMS$MGMT_OPER exists in RIGHTSLIST

     Identifier for ACMS$MGMT_SYSUPD exists in RIGHTSLIST


    The account ACMS$WBEM exists.

The identifiers on the account ACMS$WBEM are

Identifier                         Value           Attributes
  ACMS$MGMT_READ                   %X8001012E
  ACMS$MGMT_WRITE                  %X8001012F
  ACMS$MGMT_OPER                   %X80010130
  ACMS$MGMT_SYSUPD                 %X800101DB

Do you wish to reset the account ACMS$WBEM to the default values [N] ? y
|
The ACMS WBEM setup has completed.

The following files were copied:

 To SYS$SYSROOT:[WBEM]
          ACMS$MGMT_HMMO.EXE
          RUN_ACMS_HMMO.COM
          STOP_ACMS_HMMO.COM

 To SYS$SYSROOT:[WBEM.WEB.IM.ACMSHMMO.ENG]
          ACMS.CSS
          ACMSHMMO.JS
          ACMSMENUTREE.JAR
          ACMS_BANNER.HTML
          ACMS_INDEX.HTML
          ACMS_MENU.HTML
          ACMS_OUTPUT.HTML

 To SYS$SYSROOT:[WBEM.WEB.IM.ACMSHMMO.IMAGES]
          ACMSHMMO.GIF
          COMPAQLOGO.GIF
          WEBBUM.GIF

 To SYS$COMMON:[SYSLIB]
          ACMS$TRACE_SHR.EXE

 You may wish to purge these directories.
|
Once the ACMS installation is complete, download and install the Compaq
Management Agent for OpenVMS software, as described in Section 3.2.2.
3.2.2 Install the Compaq Management Agents for OpenVMS Software
If you have not already installed the Compaq Management Agents for OpenVMS software, do so now. You can download this software from the web page listed in Section 3.1.
Follow the associated instructions to copy, unpack, and install the appropriate Compaq Management Agents for OpenVMS PCSI kit. Once the software is installed, issue the following command to start the management agent process:
$ SET DEFAULT SYS$SPECIFIC:[WBEM] $ @WBEM$RUN_WEBSERVER.COM |
Note that the WBEM server (WBEM$SERVER) is the only process started by
this procedure. None of the other Management Information Base (MIB)
processes included in the WBEM kit (such as, WBEM$CPQHOST) are used by
the Remote Manager agent. If you plan to use software on this system
that relies on the MIB processes, run the WBEM$STARTUP.COM procedure,
as described in the WBEM installation material.
3.2.3 Assign Additional Rights Identifiers
The installation procedure automatically grants the ACMS$MGMT_READ rights identifier to the ACMS$WBEM account when it is created. This enables all SHOW commands to be executed from the web agent. In order to enable all other non-read operations (such as SAVE, SET, START, STOP, RESET, ADD, and DELETE), grant one or more of the following rights identifiers to the ACMS$WBEM account:
See Section 4.4.2 for more information on the use of rights identifiers.
3.2.4 Start the Remote Manager Web Agent Process
Enter the following command to start the Remote Manager web agent process:
$ SUBMIT/NOTIFY/LOG=SYS$SYSROOT:[WBEM]/QUEUE=queue-name - _$ /USER=ACMS$WBEM SYS$SPECIFIC:[WBEM]RUN_ACMS_HMMO.COM |
where queue-name is a valid OpenVMS batch queue. If the
process is already running, this command restarts the process.
3.2.5 Enable Access to Remote Manager Hosts
In order for the Remote Manager web agent to access a Remote Manager server system, the logical ACMS$MGMT_ALLOW_PROXY_ACCESS on the host system must be set to a value of 1, which enables proxy access.
Also, an ACMS proxy entry for the ACMS$WBEM account is required. For example, the following proxy entry grants the user ACMS$WBEM access to the local host from any known system:
$ MCR ACMSUDU UDU>SHOW /PROXY *::ACMS$WBEM Remote User: *::ACMS$WBEM Local User: ACMS$WBEM |
The rights identifiers on the local ACMS$WBEM account control the level of access allowed on the host system.
Even if the Remote Manager is running on the same node as the web agent, it is still considered a remote host and the requirements above still apply. |
Use the following command to stop the web agent process:
$ @SYS$SPECIFIC:[WBEM]STOP_ACMS_HMMO.COM |
If you also want to stop the WBEM server process, enter the following command:
$ @SYS$SPECIFIC:[WBEM]WBEM$STOP_WEBSERVER.COM |
The following sections describe how to access and use the Remote
Manager web agent interface.
3.3.1 Accessing the ACMS Remote Management Web Page
From a browser on the web client system, enter the following URL to connect to the web server system:
http://server-host:2301/acmshmmo/eng/acms_index.html |
node (node name) node.company.com (URL) 165.112.94.78 (IP address) |
The ACMS Remote Management page is displayed, similar to Figure 3-1.
Figure 3-1 Remote Manager Web Agent Page
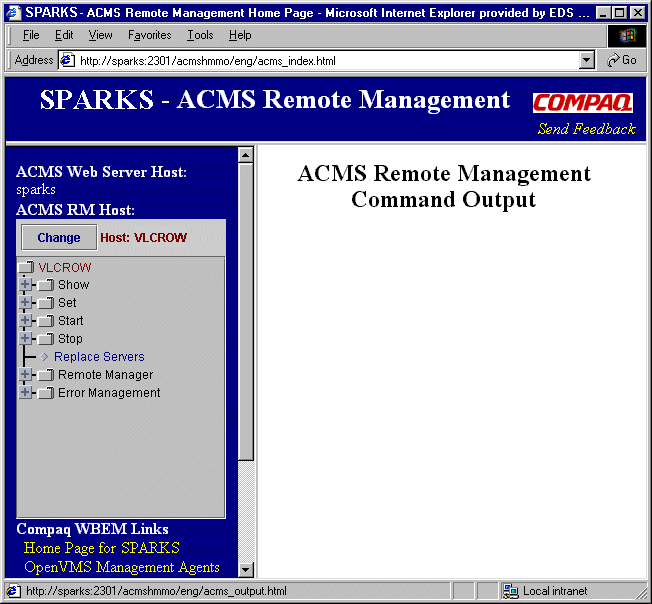
This page consists of the following frames:
The web agent uses color and font highlighting to indicate the different states and types of data displayed in the output frame. The default conventions are described in Table 3-1. Note, however, that you can change these conventions as described in the following section.
| Text appearing in... | Indicates... |
|---|---|
| White with teal or blue background | Active and stored values that can be changed. To set a value, single click on the item. (Set commands) |
| Teal italics | Dynamic configuration fields. (Show commands) |
| Gray | Inactive data; old process data that is still available will be displayed. The node name is also prefixed with an asterisk, similar to ACMSMGR displays. (Show commands) |
| Red | Warning or error messages. (All) |
| Blue | Disabled collection state. Data displayed for the related class may not be current. (Show commands) |
The Remote Management web page relies on a cascading style sheet (CSS) to manage its formatting. Based on the CSS level 2 specification (CSS2) from the World Wide Web Consortium (W3C), the ACMS.CSS file functions as a template for information displayed in the output frame.
If you are familiar with CSS files, you can customize the formatting of information in the output frame by editing the file ACMS.CSS located in SYS$SYSROOT:[WBEM.WEB.IM.ACMSHMMO.ENG].
For example, to remove the background image in the output frame, open the CSS file and search for the following statement:
BODY {background-color: white; background-image:
url(/acmshmmo/images/webbum.gif); color: black;}
|
Replace this statement with the following:
BODY {background-color: white; color: black;}
|
To learn more about CSS files or the CSS2 specification, visit the W3C web site for the latest information and resource listings:
http://www.w3.org/Style/CSS |
Each browser may interpret style sheet properties differently. Be aware that slight variations in format may occur depending upon the browser that you use. |
When you first access the ACMS Remote Management web page, the name of the web server is displayed as the Remote Manager host.
To choose a different Remote Manager host, click the Change button in the command selection frame. The Select Host popup window is displayed, similar to Figure 3-2.
Figure 3-2 Select Host
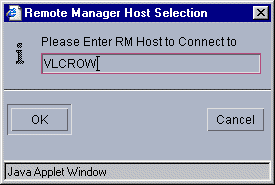
Enter the name of the Remote Manager host, and click
OK. Note that if you enter a URL or IP address, only
the short form of the name is displayed in the command selection frame.
3.4 Issuing Remote Manager Commands
The Remote Manager web agent interface provides detailed usage instructions on each page displayed within the output frame. Therefore, the following sections are only intended to provide a brief overview of issuing the most common Remote Manager commands with the web agent.
The Remote Manager web agent interface provides you with much of the same capability as ACMSMGR in managing ACMS systems. The main functional differences are that with the web agent:
You can quickly reissue any web agent command using the Refresh (or Reload) option of your browser to reload the page in the output frame. To save frequently issued commands, bookmark the page in the output frame.
For detailed information about the function of each command, see
Chapter 11.
3.4.1 Using Show Commands
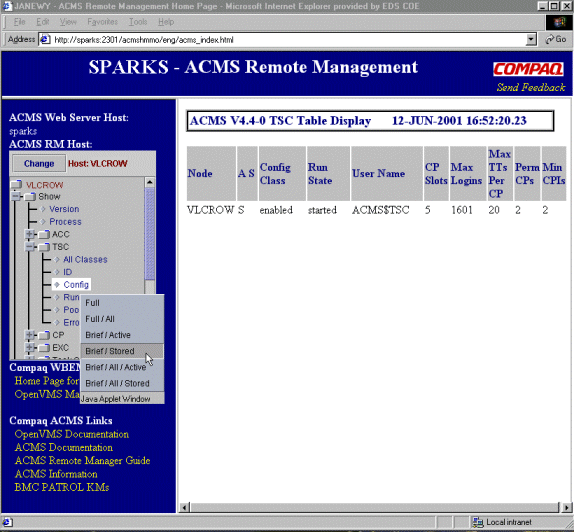
To display information about an ACMS entity or object:
Figure 3-3 Show TSC
To change information related to an ACMS entity or Remote Manager object:
Figure 3-4 Set ACC

Note that you can update the values displayed in the output frame at
any time by clicking the Refresh button.
3.4.3 Using Start and Stop Commands
To start or stop an ACMS object, such as an application (EXC):
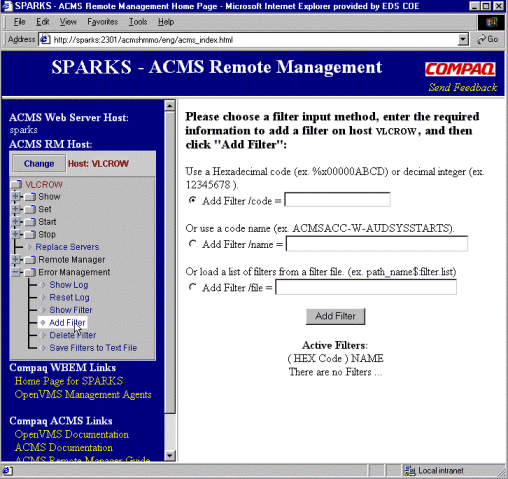
To add or delete a Remote Manager object, such as an error filter:
Figure 3-5 Add Error Filter
3.5 Troubleshooting the Remote Manager Web Agent
$ @SYS$SPECIFIC:[WBEM]WBEM$RUN_WEBSERVER.COM |
| Previous | Next | Contents | Index |