| Previous | Contents | Index |
Authorized OpenVMS users cannot sign in to ACMS until the system manager has also authorized them as ACMS users. The User Definition Utility (UDU) provides the capability to do this. Using the UDU, the system manager creates an ACMS database named ACMSUDF.DAT, located in the SYS$SYSTEM directory. When adding a user to the database, the system manager also specifies the default menu the user sees upon signing in to ACMS.
To add a new user to the ACMS database, perform the following steps:
$ UDU :== $ACMSUDU $ @LOGIN.COM $ |
$ SET DEFAULT SYS$SYSTEM $ |
$ UDU UDU> |
UDU> ADD uname /MDB=AVERTZ_DEFAULT:VR_MENU UDU> |
UDU> SHOW uname User name: UNAME DISPLAY MENU Default menu: Default MDB: AVERTZ_DEFAULT:VR_MENU . . . UDU> |
UDU> ADD SYSTEM /AGENT UDU> |
Authorized ACMS users must sign in from terminals that have been authorized for access to ACMS. With the Device Definition Utility (DDU), the system manager creates a database named ACMSDDF.DAT that contains a list of authorized ACMS devices. In the simplest case, the system manager can use one DDU definition to authorize all terminals on your system, both local and remote, to use ACMS.
To use DDU to authorize terminals for users, follow these steps:
$ DDU :== $ACMSDDU $ @LOGIN.COM $ |
$ SET DEFAULT SYS$SYSTEM $ |
$ DDU DDU> |
DDU> ADD LT DDU> |
DDU> SHOW LT Device name: LT NOT CONTROLLED No Autologin Printfile DDU> |
Both the ACMS system and the AVERTZ application must be started before users can sign in. You can also stop your ACMS system or AVERTZ application at any time. The next two sections describe how to:
Any account from which the ACMS/START and ACMS/STOP commands are issued must have OpenVMS OPER privilege to execute these commands.
To start the ACMS system (if it is currently stopped), and to start the AVERTZ application, perform the following steps:
$ ACMS/SHOW SYSTEM |
$ ACMS/START SYSTEM |
$ ACMS/START APPLICATION VR_APPL |
You can stop your application and the ACMS system with the ACMS/STOP command. Before you stop the system, however, issue the SHOW SYSTEM command to see if another person is using the ACMS system:
$ ACMS/SHOW SYSTEM |
The system displays the names of any active applications and any active users. If no other applications or users are active, issue both ACMS/STOP commands. Otherwise, issue only the STOP APPLICATION command, specifying the name of your application:
$ ACMS/STOP APPLICATION VR_APPL $ ACMS/STOP SYSTEM $ |
ACMS waits until all active tasks have finished executing before it stops the application and the system.
To understand how the AVERTZ application looks to the user, imagine the
conversation between a reservation clerk working for AVERTZ operations
in New England and a customer who needs a rental car.
16.1 Entering AVERTZ
After his morning cup of coffee, Sparky Hartshorn, a reservation clerk at AVERTZ, enters the AVERTZ application from his OpenVMS account:
$ ACMS/ENTER VR_APPL[Return]
AVERTZ displays the AVERTZ Rental Menu shown in Figure 16-1.
Figure 16-1 AVERTZ Rental Menu
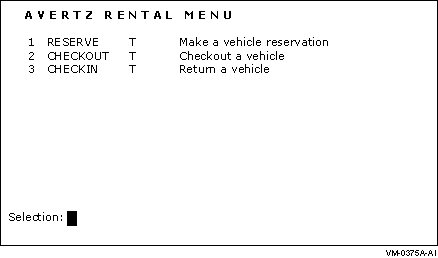
To select an option, the clerk types the option number and presses [Return]. For example, to reserve a car, the clerk types:
Selection:1[Return]
If the clerk needs online help while using AVERTZ, he can display help for any field by pressing [Help] when the cursor is on that field.
The next three sections describe a sample dialog between a customer and the clerk at AVERTZ for the following transactions:
Bertram Simpson needs a car. The following telephone conversation between Bertram and the AVERTZ clerk, on April 19, shows how the reservation option is used in a real business situation. Integrated with the conversation are the steps the clerk must take to enter the car reservation in AVERTZ:
| Clerk: | "Hello, AVERTZ Car Rental ... can I help you?" |
| Customer: | "Oh, hi. My name is Bertram Simpson and I need to rent a car for this weekend." |
| Clerk: |
"OK, Mr. Simpson. Let me just ask you a few questions."
The clerk enters the following at the AVERTZ Rental Menu:
Selection: 1 [Return]
|
Figure 16-2 Reservation Panel
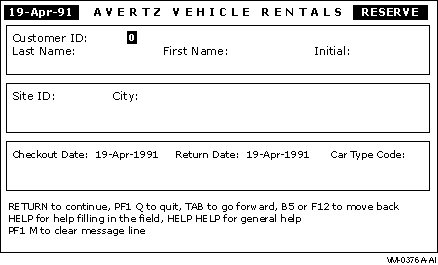
Figure 16-3 Site Selection Panel
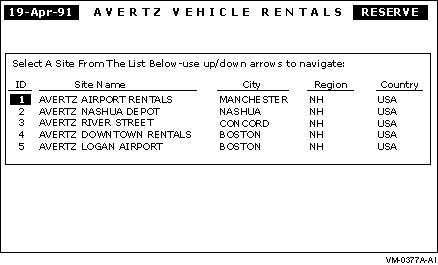
Figure 16-4 New Customer Panel
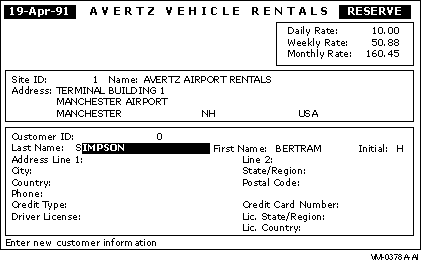
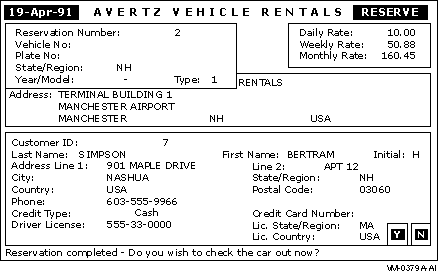
Figure 16-5 Reservation Completed Panel
| Clerk: |
"Have you rented a vehicle with us before?"
The clerk asks this question because, if Mr. Simpson is an existing customer, the clerk can enter his customer ID number instead of his name. |
||||||||||||
| Customer: | "No, I haven't." | ||||||||||||
| Clerk: | "OK, can you give me your full last name, first name, and middle initial, please?" | ||||||||||||
| Customer: | "Sure. Simpson, Bertram H." | ||||||||||||
| Clerk: |
To move to the name field and enter the customer's name, the clerk
enters the following:
[Tab]Simpson
[Tab]Bertram
[Tab]H
[Tab]
"OK, Mr. Simpson. And from what AVERTZ location would you like to pick up your vehicle?" |
||||||||||||
| Customer: | "I'm not sure. I'll be meeting a friend in Manchester, New Hampshire. Where is the closest AVERTZ location to Manchester?" | ||||||||||||
| Clerk: |
"Let me get a list of the sites."
The clerk enters the following to display a list of sites:
[PF1] [ S ]
|
||||||||||||
| Clerk: | "Sir, we have three sites in New Hampshire: one at the Manchester Airport, one at the Nashua Depot, and one in Concord. Is the Manchester Airport location OK with you?" | ||||||||||||
| Customer: | "Great, that's perfect!" | ||||||||||||
| Clerk: |
The clerk enters the following:
[Select]
Because the site selected is the first site on the list, the clerk does not need to move the cursor. If, however, the clerk did need to move the cursor, he could press the up-arrow key or the down-arrow key to select different sites. "OK. What day would you like to start your rental?" |
||||||||||||
| Customer: | "I need the car for the weekend, beginning later today." | ||||||||||||
| Clerk: | "OK, you want to pick up the car today, and return it on April 22. Correct?" | ||||||||||||
| Customer: | "Right." | ||||||||||||
| Clerk: |
The clerk enters the following:
19-APR-1991
[Tab]22-APR-1991
[Tab]
"And would you like a compact, mid-size, or full-size car, Mr. Simpson?" The clerk enters the following to display the car type codes:
[Help]
|
||||||||||||
| Customer: | "There will just be two people using the vehicle, so compact should be fine." | ||||||||||||
| Clerk: |
The clerk enters the following:
1 [Return]
|
||||||||||||
| Clerk: | If Mr. Simpson were an existing customer, the new customer panel would display information for each field, based on the data in Mr. Simpson's database record. | ||||||||||||
| "OK, Mr. Simpson. Because you are a new customer, we would like to collect a few more pieces of information about where you live and how you will pay for the vehicle. First, what is your address?" | |||||||||||||
| Customer: | "901 Maple Drive, Apartment 12, Nashua, New Hampshire." | ||||||||||||
| Clerk: | Based on the address the customer provided, the clerk completes the panel up to the Postal Code field by entering the following: | ||||||||||||
| [Tab] [Tab] [Tab]901 Maple Drive [Tab]Apt. 12 [Tab]Nashua [Tab]NH [Tab]USA [Tab] | |||||||||||||
| "And what is your zip code, sir?" | |||||||||||||
| Customer: | "03060." | ||||||||||||
| Clerk: |
The clerk enters the following:
03060 [Tab]
|
||||||||||||
| Customer: | "603-555-9966." | ||||||||||||
| Clerk: |
The clerk enters the following:
603-555-9966
[Tab]
"Will you be paying with cash or charge?" The clerk enters the following to display the credit type codes:
[Help]
|
||||||||||||
| Customer: | "Cash." | ||||||||||||
| Clerk: |
Because 0 is the code for cash, the clerk enters the following:
0
[Tab]
"Your driver's license number, please?" |
||||||||||||
| Customer: | "555-33-0000." | ||||||||||||
| Clerk: |
The clerk enters the following:
555-33-0000
[Tab]
"And that license is for the state of New Hampshire?" |
||||||||||||
| Customer: | "Actually, no. I just moved to New Hampshire a short while ago. It is a Massachusetts license." | ||||||||||||
| Clerk: |
The clerk enters the following:
MA [Tab]USA [Return]
|
||||||||||||
| Clerk: |
"Mr. Simpson, your reservation for a compact car rental from April 19,
1991, to April 22, 1991, is confirmed, with a reservation confirmation
number of 2. Please stop by our Manchester office later today to check
out the car. Thank you for calling AVERTZ! Bye ..."
Because Mr. Simpson phoned in his reservation, the clerk knows that
he is not ready to check out the car. The clerk enters the following:
[Tab] [Select]
|
||||||||||||
16.3 Customer Checks Out a Car (Beginning the Rental)
Bertram Simpson now has a reservation for a compact vehicle rental from
April 19, 1991, until April 22, 1991. He shows up at the reservations
counter at AVERTZ later in the day on April 19, after having made his
reservation earlier that day. The following dialog takes place while
Bertram Simpson checks out the car to begin the rental period:
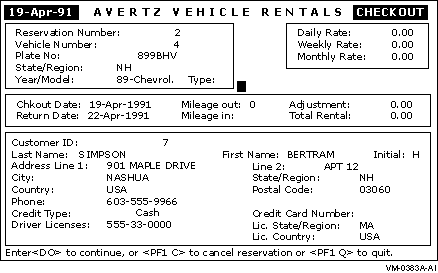
Figure 16-6 Checkout Panel
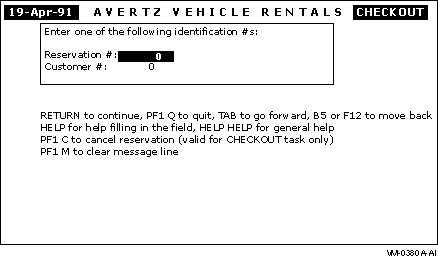
Figure 16-7 Checkout Update Panel
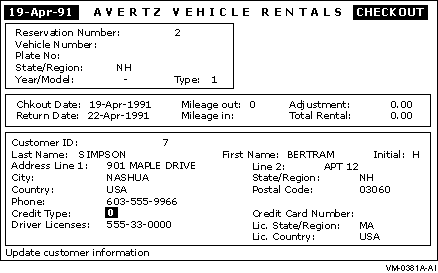
Figure 16-8 Car Selection Panel
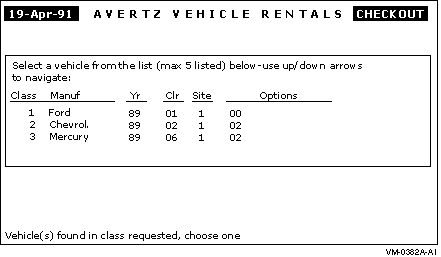
Figure 16-9 Checkout Completion Panel
| Clerk: | "Hi, can I help you?" | ||||||||||||||||
| Customer: | "Yes, my name is Bertram Simpson and I have a reservation for a compact car for today." | ||||||||||||||||
| Clerk: |
"OK, Mr. Simpson, let me call up your reservation."
The clerk enters the following at the AVERTZ Rental Menu
(Figure 16-1 shows the AVERTZ Rental Menu):
Selection: 2 [Return]
|
||||||||||||||||
| Clerk: | "OK, Mr. Simpson, could I have your reservation number?" | ||||||||||||||||
| Customer: | "Sure, I have reservation number 2." | ||||||||||||||||
| Clerk: |
"Thank you."
The clerk enters the following:
2 [Return]
|
||||||||||||||||
| Clerk: | "Are you still planning on paying with cash, Mr. Simpson?" | ||||||||||||||||
| Customer: | "Yes, I am." | ||||||||||||||||
| Clerk: |
"Great."
The clerk enters the following:
[Return]
|
||||||||||||||||
| Clerk: |
"Do you have any options that you want with your vehicle?"
The clerk uses the following table to determine what each option code means:
|
||||||||||||||||
| Customer: | "Well, I have a bit of a drive into the mountains, so if you have a car with a tape deck, that would be great." | ||||||||||||||||
| Clerk: |
The clerk presses the down-arrow key and the Select key to select the
first available vehicle with option 2.
AVERTZ now displays the checkout completion panel, as shown in Figure 16-9. |
||||||||||||||||
| Clerk: |
The clerk enters the following to complete the checkout:
[Do]
"OK, Mr. Simpson, you're all set. Here are the keys to a Chevrolet, NH license plate 899BHV. The vehicle does have a tape deck, and is located in the parking area just to the left of our front door. When you return the car, please record the odometer reading before you check the car back in. Do you have any questions?" |
||||||||||||||||
| Customer: | "No, that's great. Thank you very much." | ||||||||||||||||
| Clerk: |
"You're welcome. Have a good weekend and see you on Monday."
The clerk enters the following to return to the AVERTZ Rental Menu:
[Return]
|
| Previous | Next | Contents | Index |