![[Compaq]](../../images/compaq.gif)
![[Go to the documentation home page]](../../images/buttons/bn_site_home.gif)
![[How to order documentation]](../../images/buttons/bn_order_docs.gif)
![[Help on this site]](../../images/buttons/bn_site_help.gif)
![[How to contact us]](../../images/buttons/bn_comments.gif)
![[OpenVMS documentation]](../../images/ovmsdoc_sec_head.gif)
| Document revision date: 10 November 2000 | |
|
|
|
|
|
|
| Previous | Contents | Index |
To select files scattered throughout the file list:
To select all the files in the current directory, choose Select All from the Selected menu on the File Selection menu bar. You can then remove individual files from the selection by pointing to them, pressing and holding the Shift key, and clicking MB1. You can remove multiple files from the selection by pointing to them, pressing and holding the Shift key and MB1, and dragging the pointer over them.
To cancel your file selection, choose Select None from the Selected
menu on the File Selection menu bar.
6.2.5 Selecting File Names in Other Windows
You can also select file names that appear in other windows by either
dragging the pointer through the file name or double clicking on it.
For more information about selecting text, see Chapter 3.
6.2.6 Displaying a Partial File List
Sometimes you want to screen some files out of the full file list and display only a subset of files. Perhaps you want to display only those files with a LOG file type or whose version number is 1. By using the File Filter entry box, you can limit the list of files displayed.
To display a partial file list:
You can specify a search list in the File Filter entry
box. A search list is a logical name that has more than one equivalence
name. It provides FileView with a list of places to look for a file. If
you use a search list in the File Filter, the file list automatically
displays the directory in which the file is located.
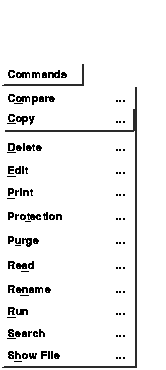
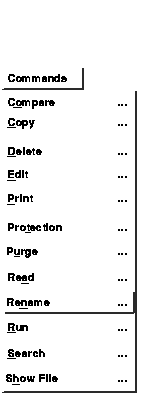
6.3 Working with Files

When you choose a command from FileView's Commands menu, you can execute the command immediately or you can choose to display a command dialog box. From a command's dialog box you can choose options to tailor the file operation. For example, you can request that the Copy command display a confirmation prompt each time you copy a file.
To execute a command without displaying a dialog box, select a file and choose the command you want to use from FileView's Commands menu.
To display a dialog box when you use a command, choose the ellipsis (...) next to the command you want to use from FileView's Commands menu. If you do not select a file, FileView automatically displays a dialog box.
The procedures in the following sections describe how to use FileView's commands by displaying command dialog boxes. |
Every FileView command dialog box contains push buttons you can use to apply and save your settings, cancel the dialog box, or display help.
| Click on | To |
|---|---|
| OK | Start a task and dismiss the dialog box. |
| Apply |
Start a task without dismissing the dialog box.
Note that when you use the Apply button, the OK, Apply, and Cancel buttons are disabled until the task completes. When the task completes, FileView reenables the OK, Apply, and Cancel buttons. You can then perform another operation of the same type from the same box. For example, you can choose Search to search repeatedly for different strings on the selected file list without choosing Search again. |
| Save | Save your new settings until you change them. |
| Cancel | Dismiss the dialog box without changing any settings. If you made any changes without applying them, clicking on the Cancel button cancels those changes. |
| Help | Display help about the command. |

To edit a file:
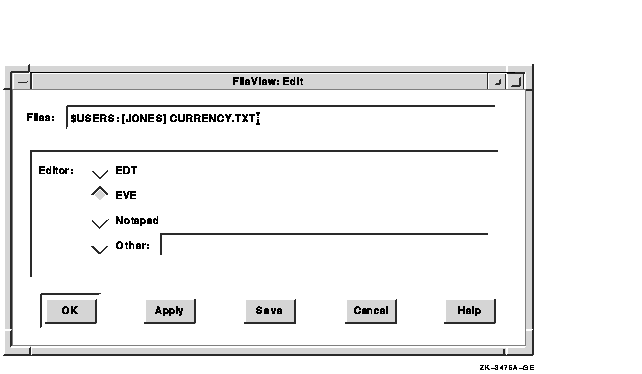
If you clicked on EVE, FileView displays another dialog box in which you can specify EVE settings. If you clicked on EDT, FileView opens a Task Output window where you can edit your file using EDT. If you clicked on Notepad, a Notepad window opens.
To view the contents of one or more files without making any changes, use the Read command:
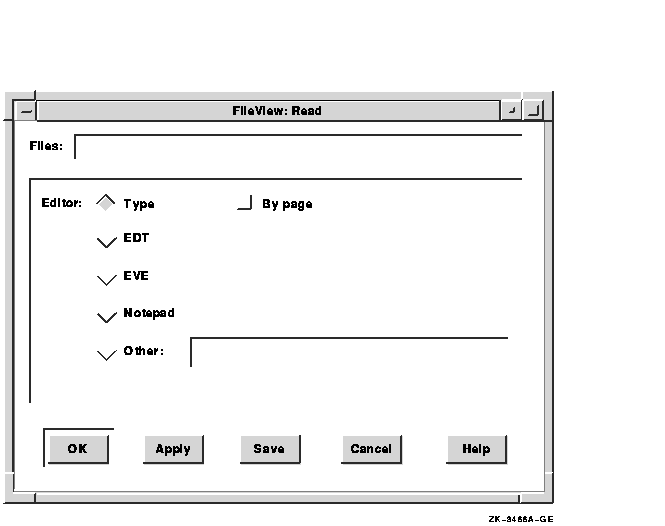
| Enable this option | To |
|---|---|
| Reader | Specify the editor you want to use to read the file. |
| By Page | Display the file one page at a time. |
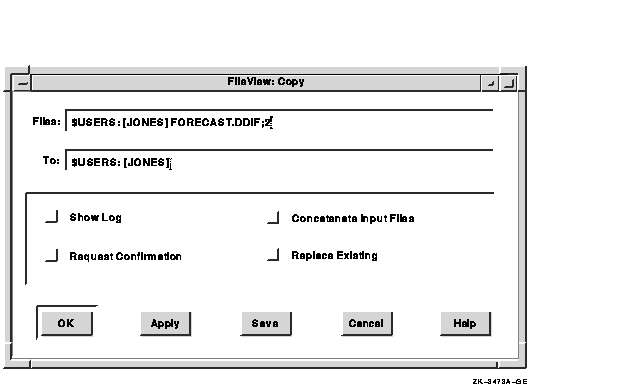
You can make a copy of a file to create a file with a new file name, concatenate two or more files into a single file, or copy a group of files to a group of new files. You can also enhance a copy operation by choosing several options from the Copy dialog box.
When you copy a file, the original file remains unchanged.
6.3.4.1 Copying One File to Another File or Directory
To copy a file to a new name or to a different subdirectory:
| Enable this option | To |
|---|---|
| Show Log | Display the name of each copied file. This check button is especially helpful for checking whether multiple input files were copied to multiple output files as you intended. |
| Request Confirmation | Display prompts asking whether to copy each selected file. |
| Concatenate Input Files | Create one output file from multiple input files if wildcard characters are not used in the output file specification. |
| Replace | Replace the file that already exists with the output file specification you entered. The copied file receives that file specification because two files cannot have exactly the same file specification; that is, at least the version number must be different. |
You can concatenate two or more files into a single file, or copy multiple input files to multiple output files. To copy a group of files at the same time, you select the files and then copy them in one operation. You can also tailor this copy operation by choosing options from the Copy dialog box.
To copy a group of files in one operation:
If you specify multiple input files in the Copy dialog box, separate them with commas. To create multiple output files, specify multiple input files and include at least one of the following:
When you create multiple output files, the corresponding field from each input file specification is used in the output file specification. If you do not specify a version number for the input and output files, the Copy command assigns a version number to the output files that is either of the following:
If you specify a version number in the output file specification, the Copy command uses that number for the output file specification. If a higher version of the output file already exists, a warning message appears in the Task Output window, but the file is still copied. If an equal version of the output file already exists, a message is issued and the file is not copied. (Click on the Replace button in the Copy dialog box to overwrite the existing file.)
The following example copies the files DIRECTIONS.TXT;1 and PROVISIONS.LIS;1 to produce two output files, HOLIDAY.TXT;1 and HOLIDAY.LIS;1:
From: $USERS:[JONES]DIRECTIONS.TXT;1,$USERS:[JONES]PROVISIONS.LIS;1 To: $USERS:[JONES]HOLIDAY.*;* |

To search one or more files for one or more text strings:

| Enable this option | To |
|---|---|
| Exact Match | Find only those strings that exactly match the string you specified. Use this option if you want the Search command to differentiate between uppercase and lowercase letters. |
| Show Log | Display the file specification of each file as it is searched. |
| Match Type | Produce output only if the line contains all the strings when you specify multiple search strings. Click on the Any String button to produce output if the line contains any of the strings. |
| Show Line Numbers | Display the line number on which the text string is located in the file being searched. |
| Show Adjacent Lines | Specify the number of lines to be displayed with the search string. By default, only the line containing the search string is displayed. |
To use wildcards in the file specifications of the files you want to search, choose the Search command without first selecting any files. In the following example, choosing the Search command and entering the file specification as shown searches all versions of all files in the current directory with the file type COM for the text string WRITE:
Files: *.COM Strings: WRITE |
You can use the Rename command to
You cannot, however, use the Rename command to change the device on
which a file is located. When you rename a file, a copy of that file no
longer exists under its original name.
6.3.6.1 Renaming a File
To change all or part of a file specification of an existing file:

| Enable this option | To |
|---|---|
| Show Log | Display the file specification of each file as it is renamed. This check button is especially helpful for verifying whether multiple input files were renamed to multiple output files as you intended. |
| Request Confirmation | Display a prompt asking whether to rename the file. |
| Replace Existing Files | Replace the file that already exists with the output file specification you entered. The renamed file is given that file specification because two files cannot have exactly the same file specification. |
If you choose the Rename command without first selecting a file, type the name of the file you want to rename in the Rename dialog box.
If FileView cannot rename the file, it displays the word Error in the Work in Progress dialog box. To open the Task Output window to see the error message, click on the Show Output button. Click on the OK button in the Task Output window when you finish viewing the message.
In the following example, choosing the Rename command and entering the file specifications in the Rename dialog box as shown changes the directory specification of DIRECTIONS.TXT from your top-level directory to the SCHEDULES subdirectory. (DIRECTIONS.TXT is moved to the SCHEDULES subdirectory.)
From: DIRECTIONS.TXT To: [.SCHEDULES] |
You can rename multiple files in one operation. The simplest way to rename multiple files is to select them in your file list and rename them as you would one file.
You can also rename multiple input files to multiple output files by specifying wildcard characters in corresponding entry boxes of the input and output file specifications. Just as when you renamed one file, you can tailor this operation by choosing options from the Rename dialog box.
If entry boxes in the output file specification are omitted or are replaced by wildcard characters, the Rename command uses the device, directory, file name, and file type of the input file specification to name the corresponding fields in the output file specification.
The version number is determined in the following ways:
To rename multiple files in one operation using wildcards:
In the following example, choosing the Rename command and entering the file specification in the Rename dialog box as shown renames all versions of all files in $USERS:[JONES] with the file type TXT to the file type OLD. The file names and version numbers are not changed.
From: *.TXT;* To: $USERS:[JONES]*.OLD;* |

To compare the contents of two files and view a listing of the lines that do not match:

| Enable this option | To |
|---|---|
| Parallel Output | List the lines with differences side by side. |
| Match Size | Specify the number of lines that should again indicate matching data after differences are found. Once the Compare command finds unmatched lines, it considers the files matching once again after it finds three sequential lines that match. Use the Match slider to override the match size of 3. |
| Maximum Differences | Terminate the compare operation after the specified number of unmatched lines is found. This number can be from 0 to 100, where 0 indicates no maximum. |
| Search Limit | Specify how many lines should be searched before a line is considered unmatched. Unless you specify otherwise, the Compare command searches to the ends of both files being compared before it lists a line as unmatched. This number can be from 0 to 100, where 0 indicates no maximum. |
If you choose the Compare command without first selecting a file, type the name of the file you want to compare with its previous version.
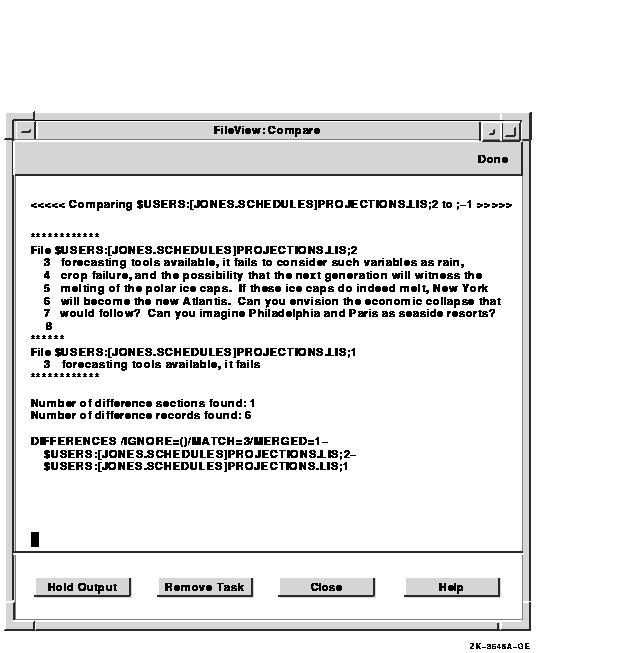
The following example shows the results of an operation in which the files PROJECTIONS.LIS;2 and PROJECTIONS.LIS;1 are compared:
In the following example, choosing the Compare command and entering the file specification in the Compare dialog box as shown compares the contents of the TRADE_BARRIERS.TXT with EMBARGOES.TXT:
Files: TRADE_BARRIERS.TXT To: EMBARGOES.TXT |
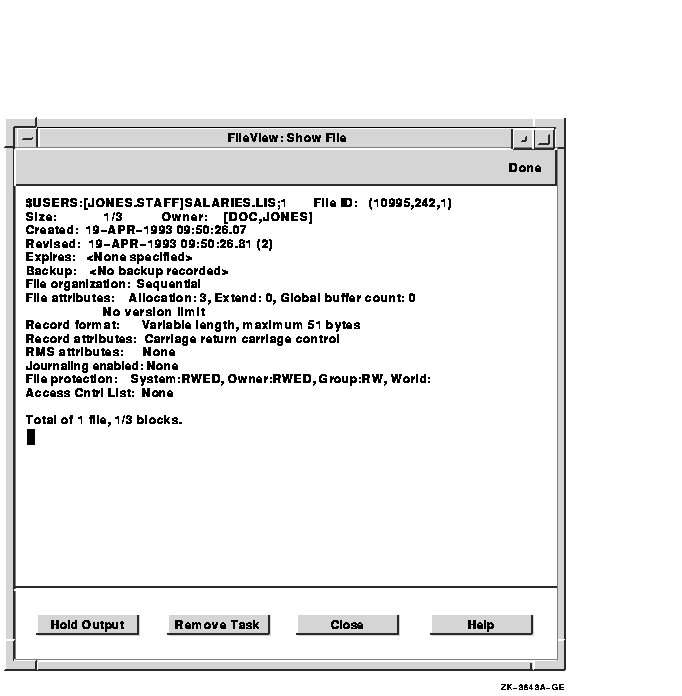
6.3.8 Displaying Information About Files

You can obtain information about a file or group of files by using the Show File command. This information can include the file's size, creation date, protection settings, and last backup date.
To obtain information about a file:
FileView displays a dialog box.
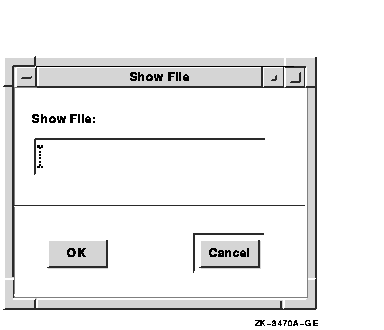
To use wildcards in the file specifications of the files you want information about, choose the Show File command without first selecting any files. In the following example, choosing the Show File command and entering the file specification as shown displays information about all files in the $USERS:[JONES] with the file type PS:
Show File: $USERS:[JONES]*.PS |
Output from the Show File command looks similar to this:
Every time you modify a file, another version of the file is added to your directory. If you find yourself with multiple versions of a file, use the Purge command to delete all older versions. Purging your directory makes room on your disk for other files.
By default, the file list displays only the highest version of each file. If you have not changed this setting, you can purge your entire directory in one operation by selecting all the files. If your file list displays all versions of your files, you must select only the highest versions of each file for purging.
To purge one or more files:
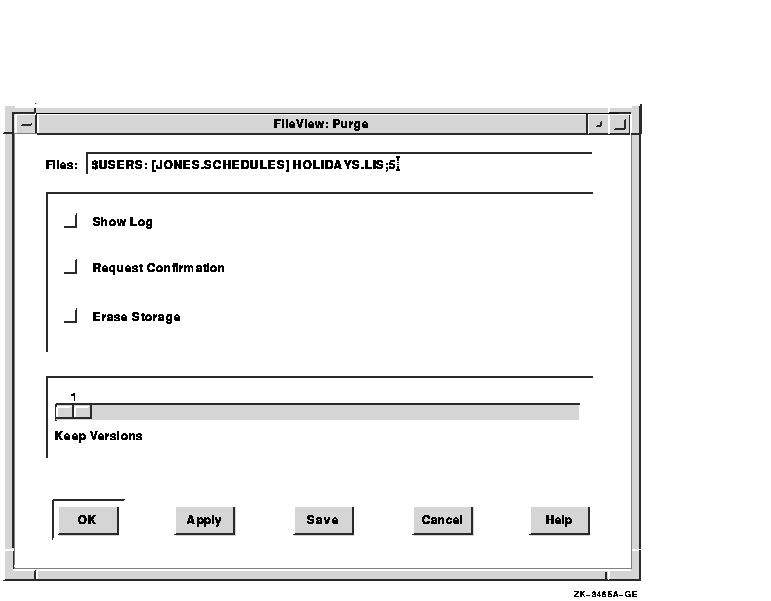
| Enable this option | To |
|---|---|
| Show Log | Display the file specifications of each file as it is deleted. |
| Request Confirmation | Display a prompt asking whether to purge the file. |
| Erase Storage | Erase the selected files from your disk so that the purged data no longer physically exists. |
| Keep Versions | Retain the specified number of versions (starting with the highest) of each file. Unless you specify otherwise, all but the latest versions of the specified files are deleted. Use the Keep Versions slider to keep more than the highest version of each file. |
If you choose the Purge command without first selecting the file, you are prompted to type the name of the file you want to purge.
To use wildcards in the file specifications of the files you want purged, choose the Purge command without first selecting any files. In the following example, choosing the Purge command and entering the file specification as shown purges all files with the letter L in their file name and a file type of COM:
Files: *L*.COM |
| Previous | Next | Contents | Index |
|
|
| privacy and legal statement | ||
| 5633PRO_004.HTML | ||

