![[Compaq]](../../images/compaq.gif)
![[Go to the documentation home page]](../../images/buttons/bn_site_home.gif)
![[How to order documentation]](../../images/buttons/bn_order_docs.gif)
![[Help on this site]](../../images/buttons/bn_site_help.gif)
![[How to contact us]](../../images/buttons/bn_comments.gif)
![[OpenVMS documentation]](../../images/ovmsdoc_sec_head.gif)
| Document revision date: 10 November 2000 | |
![[Compaq]](../../images/compaq.gif) |
![[Go to the documentation home page]](../../images/buttons/bn_site_home.gif)
![[How to order documentation]](../../images/buttons/bn_order_docs.gif)
![[Help on this site]](../../images/buttons/bn_site_help.gif)
![[How to contact us]](../../images/buttons/bn_comments.gif)
|
![[OpenVMS documentation]](../../images/ovmsdoc_sec_head.gif)
|
|
| Previous | Contents | Index |
This appendix contains tables and procedures that describe how to use a
keyboard to work with menus, windows, and dialog boxes.
A.1 Traversing Menu Bars and Pull-Down Menus
Table A-1 describes how to traverse menu bars and pull-down menus.
| To | Press | Example or Explanation |
|---|---|---|
| Move to first menu in menu bar | F10 | |
| Pull down a menu from the menu bar | Alt+ mnemonic | Pulls down the menu from the menu bar that is associated with that mnemonic. |
| Move to next menu item in a pull-down menu | <uparrow symbol> or <downarrow symbol> | Moves the location cursor up or down; it cycles (wraps) at the top and bottom. |
| Move to another pull-down menu in the menu bar | <- or -> | Moves the location cursor left or right; it cycles (wraps) at each end |
| Activate menu item | Return, Ctrl+Return, or Enter | Activates the highlighted menu item. |
| Remove menu from screen and move cursor to button used to pull down the menu | F11 (ESC) | When a menu is pulled down. |
| Move location cursor from menu bar to where it was before you started using the menu bar | F11 (ESC) | Works only with an explicit focus policy. With an implicit focus policy, the location cursor moves from the menu bar to wherever the pointer is located. |
| Dismiss all menus | F10 | If you are using an explicit focus policy, the cursor goes to where it was before you started using the menus. With an implicit focus policy, the focus moves to wherever the pointer is situated. |
Table A-2 describes how to traverse pop-up menus.
| To | Press | Example or Explanation |
|---|---|---|
| Display the pop-up menu | F4 | When the location cursor is on a control that has a pop-up menu associated with it. |
| Move to next menu item in a pop-up menu | <uparrow symbol> or <downarrow symbol> | A menu item should be highlighted as you move up or down the menu. |
| Display a submenu from a pop-up menu item | -> | Moves you to a submenu if there is one (in left-to-right environments). |
| Activate menu item | Return, Ctrl+Return, or Enter | Activates the highlighted menu item. |
| Remove menu from screen | F11 (ESC) | With explicit focus, makes a pop-up menu disappear and moves the location cursor to the control from which the menu popped up. With implicit (pointer) focus, the focus returns to wherever the pointer is situated on the screen. |
| Dismiss the menu | F4 | When you are using an explicit focus policy, the cursor goes back to where it was before the menu popped up. In implicit focus, the focus returns to wherever the pointer is located. |
Table A-3 describes how to traverse submenus.
| To | Press | Example or Explanation |
|---|---|---|
| Display a submenu |
|
Pressing any of the keys listed makes the menu appear. |
| Activate a menu item in a submenu | Return, Ctrl+Return, or Enter | |
| Move to another menu item in a submenu | <uparrow symbol> or <downarrow symbol> | These keys move up and down within the submenu; they cycle at the top or bottom. |
| Move to the pull-down menu item from which the submenu came | <- | Makes the submenu menu disappear and highlights the menu item from which the submenu menu came. |
| Select the default entry in a submenu menu | Alt+ mnemonic of the submenu item | The mnemonic you press is the one associated with the parent menu. |
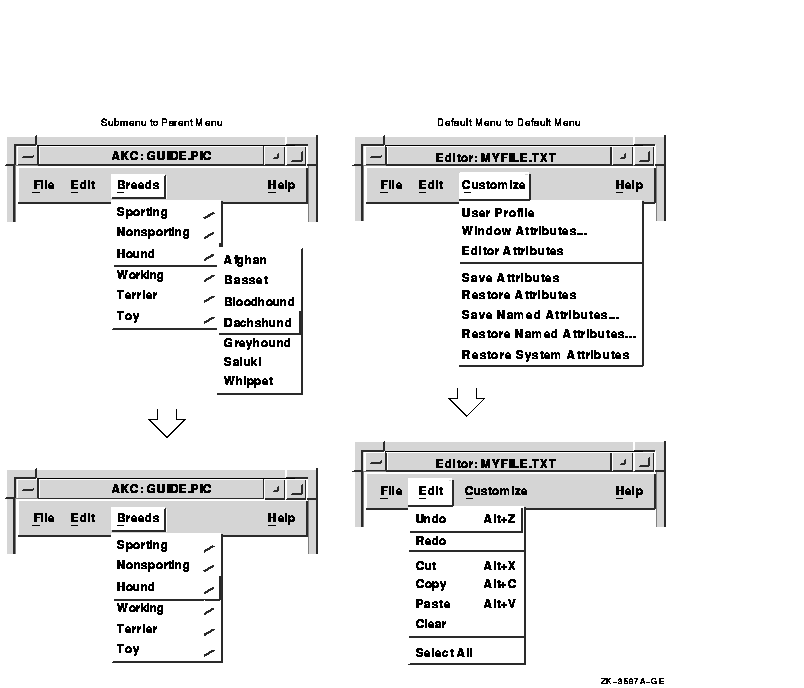
Table A-4 describes how to move to a previous menu.
| To | Press | Example or Explanation |
|---|---|---|
| Move the location cursor from any submenu item to the parent menu |
|
See Figure A-1. |
| Move the location cursor from a menu item to the default menu item in the menu just to the left of the current cursor location |
|
See Figure A-1. |
Figure A-1 Moving to a Previous Menu

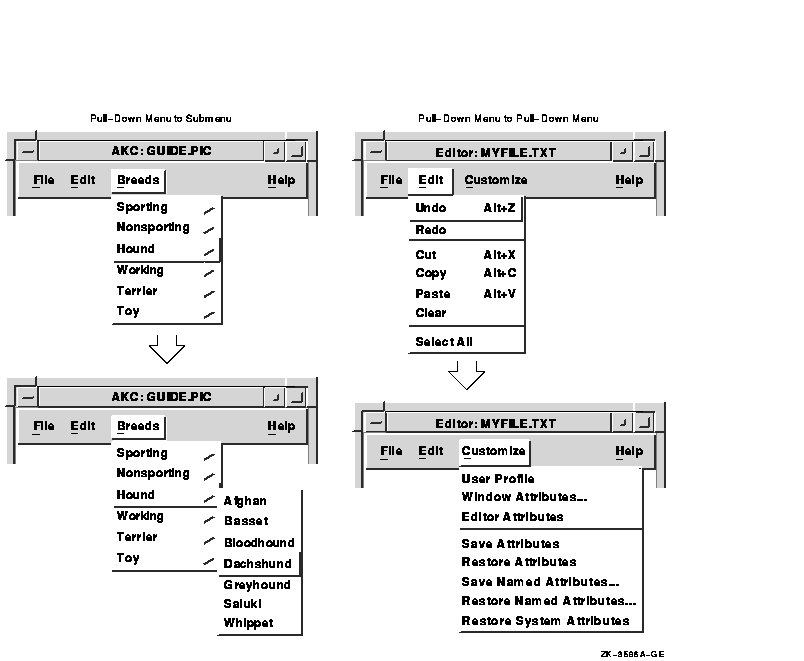
Table A-5 describes how to move to the next menu.
| To | Press | Example or Explanation |
|---|---|---|
| Move the location cursor from a menu item in a pull-down menu to the default menu item in the associated submenu |
|
See Figure A-2. |
| Move the location cursor from a menu item in a pull-down menu to the default menu item in the pull-down menu just to the right of the current location cursor |
|
See Figure A-2. |
Figure A-2 Moving to the Next Menu

The following sections describe how to use your keyboard to move
between and within windows.
A.2.1 Moving Between Windows
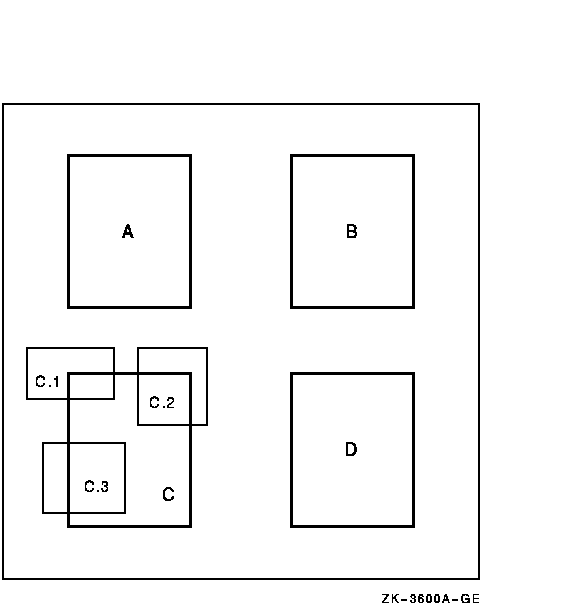
To move between groups of windows:

To move within windows:
The following table summarizes keyboard accelerators available from the Window menu.
| To | Press |
|---|---|
| Move a window | Alt+F7 |
| Size a window | Alt+F8 |
| Minimize a window | Alt+F9 |
| Restore a minimized window | Alt+F5 |
| Maximize a window | Alt+F10 |
| Lower a window to the bottom of the window stack | Alt+F3 |
| Close (not minimize) a window | Alt+F4 |
To move a window around the screen:
To size a window:
Table A-6 describes how to work with dialog boxes.
| To | Press |
|---|---|
| Move forward from tab group to tab group (field to field) | Tab or Ctrl+Tab |
| Move backward from tab group to tab group | Shift+Tab or Ctrl+Shift+Tab |
| Move from item to item within a tab group (field) | Arrow keys |
| Activate a selection in a group of radio boxes, check boxes, or list boxes, or to pop up an options menu | Select, space bar, or Ctrl+space bar |
| Activate an item in a group of push buttons | Select, space bar, Ctrl+space bar, Return |
| Activate an item in a group of push buttons | Ctrl+Return or Enter |
| Activate an item in an Options menu or the default action of the dialog box | Return, Ctrl+Return, or Enter |
| Cancel a dialog box or an Options menu | F11 (ESC) |
Table A-7 describes how to move within dialog boxes.
| To | Press | Example or Explanation |
|---|---|---|
| Move cursor from button to button | Arrow keys | Sets of check buttons, push buttons, or radio buttons are considered one tab group (a single button is not a tab group). Use the arrow keys to move the location cursor from one item to another. |
| For example, if the buttons are arranged vertically, you can press <uparrow symbol> or <- to go up, and you can press <downarrow symbol> or -> to move down. If the buttons are arranged horizontally, press <- or <uparrow symbol> to move left, and press -> or <downarrow symbol> to move right. | ||
In some cases, buttons are not arranged in a primarily vertical or
horizontal manner. Rather, they might be arranged in a box format, as
the following numbers show:
1 2 |
||
Pressing the arrows keys moves through the buttons in the following
manner (starting at 1):
|
||
| Insert one space in an entry box | Space bar | Pressing Ctrl+space bar does nothing. |
| Move to another options menu item or another list box item | <uparrow symbol> or <downarrow symbol> | |
| Move left or right one character | <- or -> | Use these arrow keys in list boxes to display more text, for example, to display the end of a long file name. |
| Move up one screen (page) | Prev Screen | |
| Move down one screen (page) | Next Screen | |
| Move left one screen | Ctrl+Prev Screen | |
| Move right one screen | Ctrl+Next Screen | |
| Go to the top of the list or file | Ctrl+Alt+ <- | |
| Go to the bottom of the list or file | Ctrl+Alt+-> | |
| Display leftmost character (go to the beginning of a line) | Alt+ <- | |
| Display rightmost character (go to the end of a line) | Alt-> | |
| Cancel | F11 (ESC) | Pressing F11 (ESC) cancels any action in the entire dialog box and makes the dialog box disappear. |
Table A-8 describes how to activate items in a tab group.
| To | Press | Example or Explanation |
|---|---|---|
| Activate check or radio buttons | Select, space bar or Ctrl+space bar | Radio buttons can be either toggled or set. |
| Activate an options menu | Select, space bar or Ctrl+space bar | You do not need to keep the key pressed to keep the menu visible. Press the key once and the menu remains. |
| Activate an options menu item | Return, Ctrl+Return, or Enter | Once you have chosen a menu item, the Options menu disappears. |
| Activate push buttons | Select, space bar, Ctrl+space bar, Return, Ctrl+Return, or Enter | Return or Ctrl+Return activate the default push button. If you have more than one tab group of push buttons, Return and Ctrl+Return activate only the default buttons, and do not activate any buttons in the other tab group. |
| Previous | Next | Contents | Index |
![[Go to the documentation home page]](../../images/buttons/bn_site_home.gif)
![[How to order documentation]](../../images/buttons/bn_order_docs.gif)
![[Help on this site]](../../images/buttons/bn_site_help.gif)
![[How to contact us]](../../images/buttons/bn_comments.gif)
|
| privacy and legal statement | ||
| 5633PRO_013.HTML | ||