![[Compaq]](../../images/compaq.gif)
![[Go to the documentation home page]](../../images/buttons/bn_site_home.gif)
![[How to order documentation]](../../images/buttons/bn_order_docs.gif)
![[Help on this site]](../../images/buttons/bn_site_help.gif)
![[How to contact us]](../../images/buttons/bn_comments.gif)
![[OpenVMS documentation]](../../images/ovmsdoc_sec_head.gif)
| Document revision date: 10 November 2000 | |
![[Compaq]](../../images/compaq.gif) |
![[Go to the documentation home page]](../../images/buttons/bn_site_home.gif)
![[How to order documentation]](../../images/buttons/bn_order_docs.gif)
![[Help on this site]](../../images/buttons/bn_site_help.gif)
![[How to contact us]](../../images/buttons/bn_comments.gif)
|
![[OpenVMS documentation]](../../images/ovmsdoc_sec_head.gif)
|
|
| Previous | Contents | Index |
Choose Printer... from the Options menu to change printer features such as the printing destination. DECterm displays a dialog box.
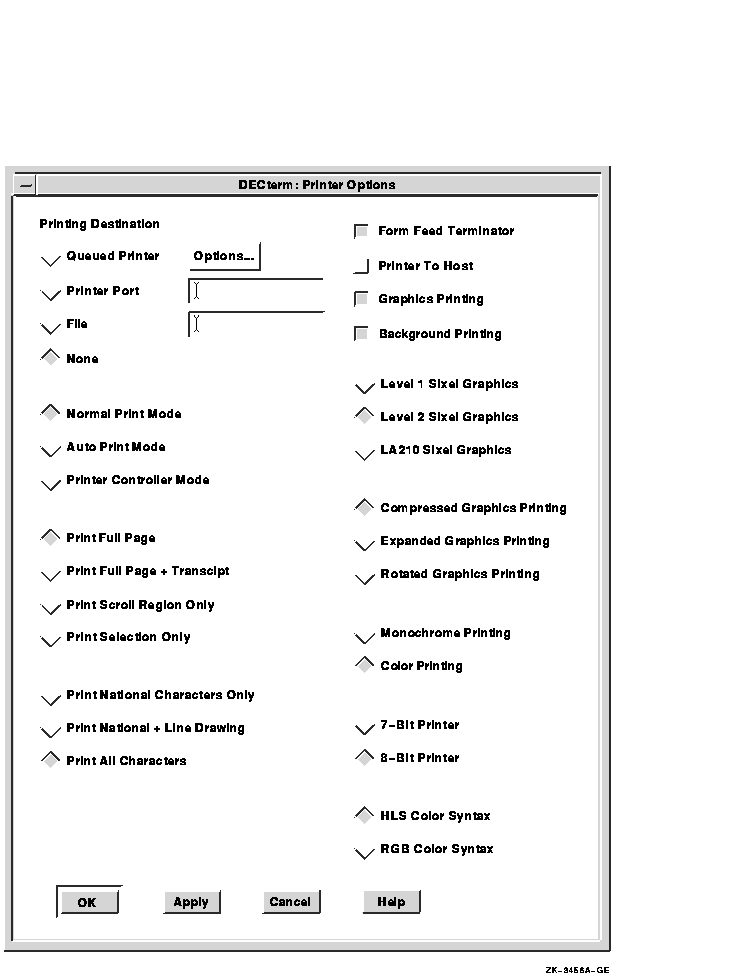
From the Printer Options dialog box, you can choose the following printing features:
Queued Printer
From the Queued Printer Options... menu, you can select the following printer options.
- The Number of Copies option prints one copy of a job. For additional copies, type the number of copies to be printed.
- The Page Range From__ To__ option prints the complete job. To print part of a job or a specific page, type the page number.
- By default, the Print Format option prints a job in text format. Choosing Line Printer or Terminal changes the print format for the specified printer.
- The Printer option lists the available print queues.
- By default, the Orientation option prints characters parallel to the short edge of the paper (portrait). Choosing the Landscape option prints characters parallel to the long edge of the paper.
- By default, the Print After option submits a print queue at a specified time.
- The Delete File When Printed option deletes files after the job is printed.
For detailed information on these options and on advanced print settings, refer to Using DECwindows Motif for OpenVMS.
Printer Port
By default, the Printer Port option specifies the local printer port. To choose another port, enter the device name in the text entry box.File
By default, information printed on the screen does not create a file. Choosing the File option saves the printed output to a file.None
By default, the None option discards the queued job.Normal Print Mode
By default, received characters are not printed. To print characters use the Print Screen key or use escape sequences.Auto Print Mode
By default, a line of information is printed if the cursor leaves that line because of a line feed, vertical tab, form feed, or autowrap.Printer Controller Mode
By default, each character is printed as it is received. If you do not choose this option, the character is displayed.Print Full Page
The information on the display is printed. The information saved in the transcript or status line is not printed.Print Full Page + Transcript
The information in the transcript, followed by the information on the display, is printed.Print Scroll Region Only
The information stored in the scrolling region of the display is printed.Print Selection Only
The information in the selected region of the display and transcript is printed.Print National Characters Only
Only national characters are printed (for example, ASCII characters). Other characters are either converted to the corresponding national characters, or the characters are not printed.Print National + Line Drawing
National characters and line drawing characters are printed (for example, special graphic characters).Print All Characters
All characters are printed, including multinational and technical characters.Form Feed Terminator
By default, a form feed is added at the end of each page. Optionally, an escape sequence can be used.Printer To Host
By default, any character that is read on the printer port is sent back to the host application. This option is available only when the print destination is a printer port device rather than a print queue or a file.Graphics Printing
By default, graphics (bitmap) and text are printed.Background Printing
By default, the graphics background color is printed. Omitting the background color saves ink and toner and increases printing speed.Level 1 Sixel Graphics
By default, a sixel introducer that omits the macro parameter is used. This option does not use the Sixel Set Attributes command to set the aspect ratio and the horizontal grid size. As a result, the sixel aspect ratio is 2 to 1 and the horizontal grid size is approximately 188 x 0.025 mm (7.5 x 0.001 inches).Level 2 Sixel Graphics
By default, a sixel aspect ratio of 1 to 1 with a variable grid size is printed using the Sixel Set Attributes command (available with Level 2 printers).LA210 Sixel Graphics
By default, a sixel introducer with a 9-macro parameter is used. The result is a sixel aspect ratio of 1.02 to 1.Compressed Graphics Printing
By default, a compressed graphics image is printed. In Portrait mode, the output fits on a 5- x 8-inch page.Expanded Graphics Printing
By default, an expanded image is printed. In Portrait mode, the image fits on a 13-inch page.Rotated Graphics Printing
By default, an expanded image, rotated 90 degrees, is printed. The output fits on a 8- x 5-inch page.Monochrome Printing
By default, the Monochrome Printing option prints in black.Color Printing
By default, the Color Printing option prints color output. DECterm includes a color map in virtual memory to allow color printing from a monochrome system.7-Bit Printer
By default, DECterm allows the use of 8-bit characters for printing. Some printers, particularly older ones, cannot interpret 8-bit characters.If your printer does not support 8-bit characters, click on 7-Bit Character. DECterm will now modify the text to be compatible with your printer.
8-Bit Printer
By default, DECterm uses 8-bit characters for printing. If your printer cannot interpret 8-bit characters, choose the 7-Bit Printer option.HLS Color Syntax
By default, the HLS Color Syntax option specifies hue, lightness, and saturation.RGB Color Syntax
By default, the RGB Color Syntax option uses a red, green, and blue format when printed.
Once you modify DECterm settings, you can save your changes. When you save your changes, DECterm uses these settings each time you create a DECterm window. If you change your mind and want to use the settings that came with your system, you can restore the system defaults.
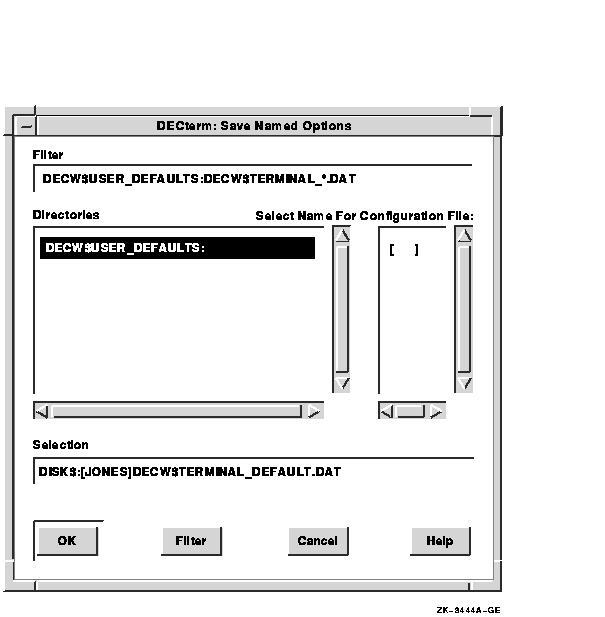

Choose the Edit menu to copy information from within or between DECterm windows.
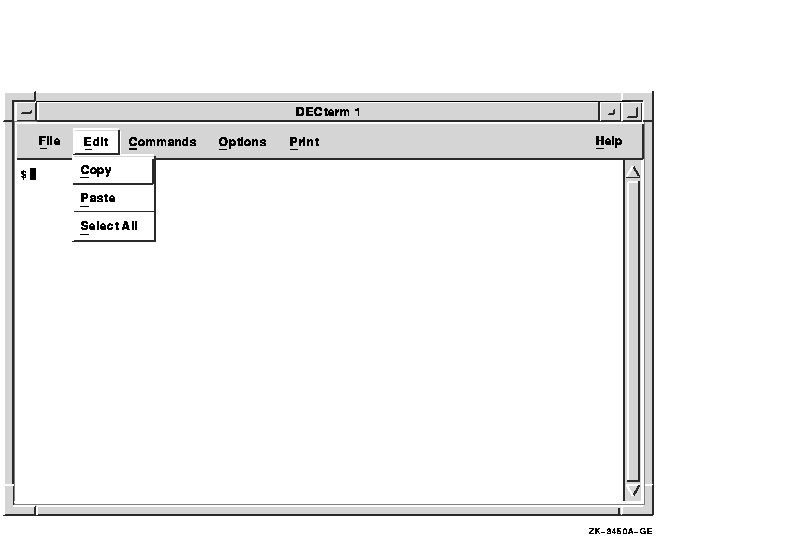
To copy information:
The selected information is copied to the new location.
You can clear and resize the DECterm window from the Commands menu.
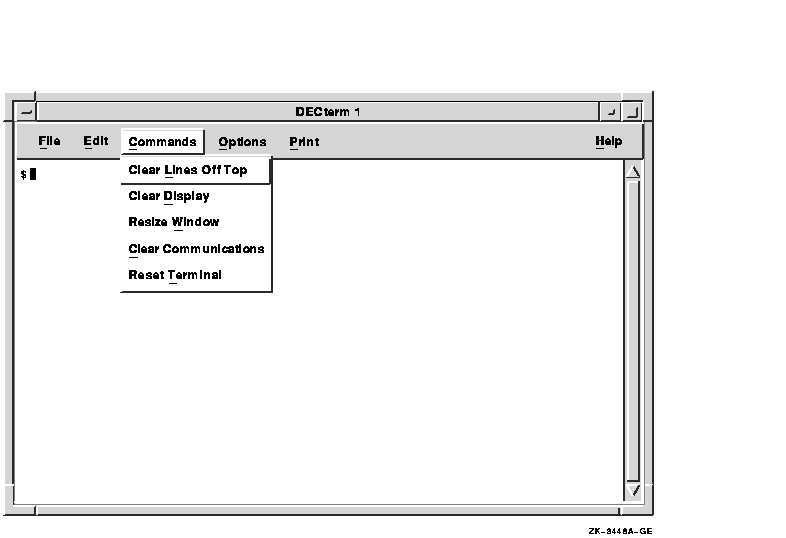
Clear Lines Off Top
You can erase information stored in the transcript by choosing the Clear Lines Off Top option. The transcript is an area of memory that contains the last saved lines of your screen display (use the Display dialog box to change the size of the transcript). You can read the information stored in the transcript by using the scroll bars. The transcript exists as long as the Record Lines Off Top option in the Window dialog box is in effect. By default, Record Lines Off Top is enabled.
Clear Display
You can clear all information displayed in a DECterm window by choosing the Clear Display menu item.Resize Window
Choose the Resize Window option to resize the window to match the size (number of rows and columns) of the DECterm display area.Clear Communications
Choose the Clear Communications option to reset the communications buffers. This causes DECterm to read data to the host system even when DECterm has received an XOFF signal.Reset Terminal
Clicking on Reset Terminal causes a Soft Terminal Reset (STR). Reset Terminal also restores the default color map. On a 4-plane system, such as the VS2000/GPX, displaying ReGIS or sixel graphics causes DECterm to create and load its own hardware color map, so that other windows do not display in their true colors when the DECterm window has input focus.To restore the default hardware color map, first erase the graphics from the window by choosing the Clear Display option from the Control menu, and then reset the terminal with the Reset Terminal menu item.
By default, DECterm emulates only two planes of graphics on a 4-plane system; therefore, DECterm usually does not create a color map.
Choose the Print menu to print information.
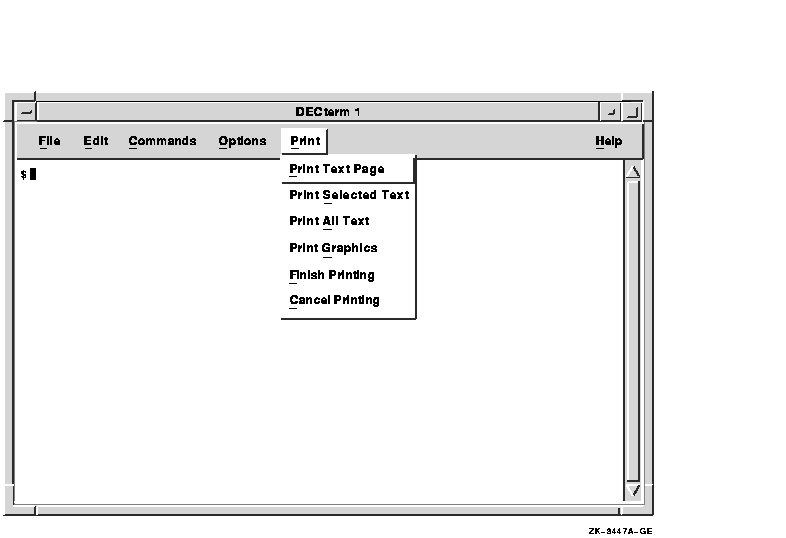
From the Printer menu, you can choose the following printing options:
Print Text Page
The Print Text Page option prints terminal lines 1 through 24 as text.Print Selected Text
The Print Selected Text option prints the selected information.Print All Text
The Print All Text option prints the information in the display and transcript as text.Print Graphics
The Print Graphics option prints the contents of the display in sixel format.Finish Printing
The Finish Printing option completes a print job depending on the print destination. If queued to a printer, the job is submitted. If submitted to a dedicated printer port, the job is canceled. If written to a file, the file is closed. This option is used with Auto Print mode or Printer Controller mode.Cancel Printing
The Cancel Printing option stops the print request.
Use compose sequences to create special characters. A compose sequence is a series of keystrokes that creates characters that do not exist as standard keys on your keyboard. You can create any character from the character set DECterm is currently using. (For more information about choosing a character set, see Choosing Options.)
For more information about composing characters, see Appendix A.
You must simultaneously press the Compose key and space bar to begin a compose sequence. |
To exit DECterm and close the DECterm window, choose Exit from the File menu or enter the DCL command LOGOUT.

LinkWorks Manager allows you to control your hyperinformation environment. With LinkWorks Manager, you can set defaults for certain hyperapplication features; create linknet lists, linknets, path lists, and paths in one or more hyperinformation linkbases; and copy objects from linkbases into your hyperinformation environment.
LinkWorks Manager, represented by the ship's wheel icon, helps you to navigate your hyperinformation environment.
This chapter assumes that you are familiar with the concepts and techniques described in the Using Hyperapplications chapter of Using DECwindows Motif for OpenVMS.
This chapter describes how to
To start LinkWorks Manager, choose LinkWorks Manager from the Session Manager's Applications menu. If you want to have LinkWorks Manager start automatically when you begin a DECwindows session, choose the Automatic Startup... item on the Session Manager's Options menu and add LinkWorks Manager to the automatic startup list.
The Environment window is the main LinkWorks Manager window. It does the following:
Before you use the Environment window, you should understand the relationship between it and the Linkbase window.
The Environment window shows the linknets and paths in your hyperinformation environment, and it groups them under the appropriate linknet lists and path lists (if you have created any such lists and included them in the environment). The Linkbase window, which you can open from the Environment window, shows the linknets, paths, linknet lists, and path lists in a specific linkbase. If you have access to multiple linkbases, you can open multiple Linkbase windows; however, you can have only one Environment window.
The following figure shows an Environment window and a Linkbase window. The windows are shown as they might appear after many objects have been created and copied, not as they appear the first time you use LinkWorks Manager. These windows are discussed in detail in later sections.

The first time the LinkWorks Setup application (separate from LinkWorks Manager) starts up, it creates your default linkbase and a default linknet called Personal Links in that linkbase, and adds the Personal Links linknet to your LinkWorks environment. You must use the LinkWorks Manager Linkbase window to create additional linknets, linknet lists, paths, or path lists, or to perform any editing operations on these objects. After you have created or modified an object in a linkbase, you must copy it into the Environment window in order to make it available in your hyperinformation environment (see Copying Objects into Your Hyperinformation Environment later in this chapter).
The left side of the Environment window lists the linknet lists, linknets, path lists, and paths in your hyperinformation environment.
The right side of this window has columns marked Active, Record, and Linkbase. You can double click to enable (represented by a check mark) or disable the Active and Record status for each object. (Double clicking is a shortcut for selecting the object and using the Control menu's Activate/Deactivate and Start/Stop Recording items.)
The Linkbase column identifies the linkbase that contains each item. You can double click on the linkbase name to display the Linkbase window, which you can use to view and edit the contents of that linkbase. (Double clicking is a shortcut for selecting the Linkbase name and then choosing the File menu's Open... item.)

The Options menu allows you to customize LinkWorks Manager, that is, to set defaults for the LinkWorks Manager startup state and for your hyperinformation environment.
The Manager... menu item displays a dialog box in which you can specify whether LinkWorks Manager should start up as a window or as an icon.

The Environment... menu item displays a dialog box in which you can display and modify the following hyperinformation environment attributes:
These defaults apply to all hyperapplications, but you can override the defaults for any specific hyperapplication by making appropriate Link menu choices and dialog box entries in that hyperapplication.
The following figure shows the Environment Options dialog box.

The Highlight Defaults buttons affect:
You can override these values for any hyperapplication by using the Turn Highlight On/Off and Highlight... menu items in the application's Link menu.
The Link Defaults entries establish defaults for each link that you make.
The Go To/Visit Defaults entries determine the defaults for Go To and Visit operations.
The Save Settings item on the Options menu saves:
The Restore Settings menu item restores the options and the window positions and sizes to what they were at the last save operation. The Restore System Settings item restores the default values for all options and the window positions and sizes.
The Linkbase window displays the contents of a specific linkbase. To display this window, use the Environment window and do one of the following:
The following figure shows the Linkbase window.

| Previous | Next | Contents | Index |
![[Go to the documentation home page]](../../images/buttons/bn_site_home.gif)
![[How to order documentation]](../../images/buttons/bn_order_docs.gif)
![[Help on this site]](../../images/buttons/bn_site_help.gif)
![[How to contact us]](../../images/buttons/bn_comments.gif)
|
| privacy and legal statement | ||
| 5634PRO_007.HTML | ||