![[Compaq]](../../images/compaq.gif)
![[Go to the documentation home page]](../../images/buttons/bn_site_home.gif)
![[How to order documentation]](../../images/buttons/bn_order_docs.gif)
![[Help on this site]](../../images/buttons/bn_site_help.gif)
![[How to contact us]](../../images/buttons/bn_comments.gif)
![[OpenVMS documentation]](../../images/ovmsdoc_sec_head.gif)
| Document revision date: 10 November 2000 | |
|
|
|
|
|
|
| Previous | Contents | Index |
To create a new linkbase, choose one of the following menu items:
The Open Linkbase... and Open in New... items open the linkbase in a new Linkbase window. The Open... item opens the linkbase in the current Linkbase window.
In the Selection entry box of the dialog box, enter a file name that does not match an existing linkbase file name. LinkWorks Manager creates the linkbase and opens it in a Linkbase window. You can then create objects in the new linkbase.
The left side of the Linkbase window lists any linknet lists, linknets, path lists, and paths in the linkbase.
The right side of the window lists the name of the linkbase in which the specific linknet list or linknet is stored. If the linknet list or linknet is stored in the linkbase you are viewing, no linkbase name appears beside it. However, if the item is merely a pointer to a linknet list or linknet in another linkbase, the name of the other linkbase is listed.
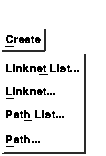
To create a linknet, linknet list, path, or path list, use the Create menu. The Create menu has an item for each object type.
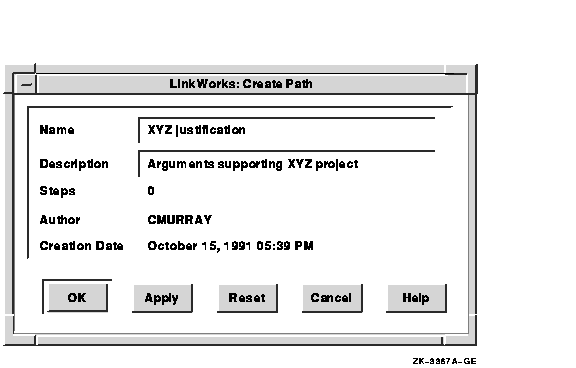
Choose the appropriate item from the menu. In the dialog box that is displayed, enter the name and (optionally) a description of the object to be created. The following figure shows entries that create a path named "XYZ justification."
You can use lists to group objects and other lists. A linknet list can include linknets and linknet lists. A path list can include paths and path lists. The following figure shows a linkbase display in which two lists (Group net list and XYZ project path list) are expanded to show the objects included in them.

In the Linkbase window, the items listed in the first (nonindented) column are objects, and any items in indented columns are pointers to objects. For example, in the preceding figure, the XYZ project linknet appears indented under the Group net list linknet list; it also appears on a separate line and not indented. A nonindented line represents the object; you select this line to perform operations on it (for example, to copy the linknet into another linknet list).
To put an object in a linknet list or path list, use either the quick-copy method (MB1 to select, MB2 to copy) or the following method:
With either method, the position of the pointer before you click MB2 or the position of the object you selected in step 3 below determines where the copied object is placed. If you select a linknet list or path list, the copied object is inserted at the end of the list. If you select a linknet or path in a list, the copied object is placed before the selected object. |

Repeat these steps for each object you want to include in a list.
Changes you make in the Linkbase window are not stored in the linkbase until you save them, close the linkbase, or exit the Linkbase window. If you create an object and plan to include it immediately in your hyperinformation environment, use the File menu's Save item before you copy the object into the Environment window (described in the next section, Copying Objects into Your Hyperinformation Environment). |
To include any linkbase objects in your hyperinformation environment, you must copy them from the Linkbase window to the Environment window. The quick-copy method is the most convenient. Follow these steps:
You can also use the Copy and Paste items on the Edit menu to perform the copy operation.
A path is a stored sequence of navigation steps (Visit and Go To operations). You can create a path and record steps in it, and afterward you can follow the path as often as you want. You can follow paths created by other users, and others can follow your paths. You must have access to another user's linkbase file to use paths or other objects in that person's linkbase.
To create a path that contains meaningful steps, you must do substantial preliminary work before you actually record the steps. You should devote the same planning and preparation to a path as you would to a paper explaining a difficult subject or an instructional manual. For a path to be useful to you and others, it must contain precisely the right steps in the right sequence, so that the "flow" is helpful to the user who follows the path.
To record steps in a path:
To follow a path:
When you are finished following a path, you can double click in the Active column of the Environment window to make the path inactive.
To exit LinkWorks Manager, choose the Exit item on the Environment window File menu.
If there are unsaved changes in any open Linkbase windows, you are asked whether you want to save the changes before exiting. Click on the appropriate button.

Mail allows you to exchange messages with other computer users. You can use Mail to send messages; read messages sent to you; and print, file, delete, reply to, and forward messages.
This chapter describes how to
To start Mail, choose Mail from the Session Manager's Applications Menu. Mail displays the main window. You can also start Mail automatically by using the Applications Definitions, Applications Menu, and AutoStart entries from the Session Manager's Customize menu. (See Using DECwindows Motif for OpenVMS for more information.)
You can choose an alternate display style for the main window. See Using Alternative Main Window Styles for more information. |
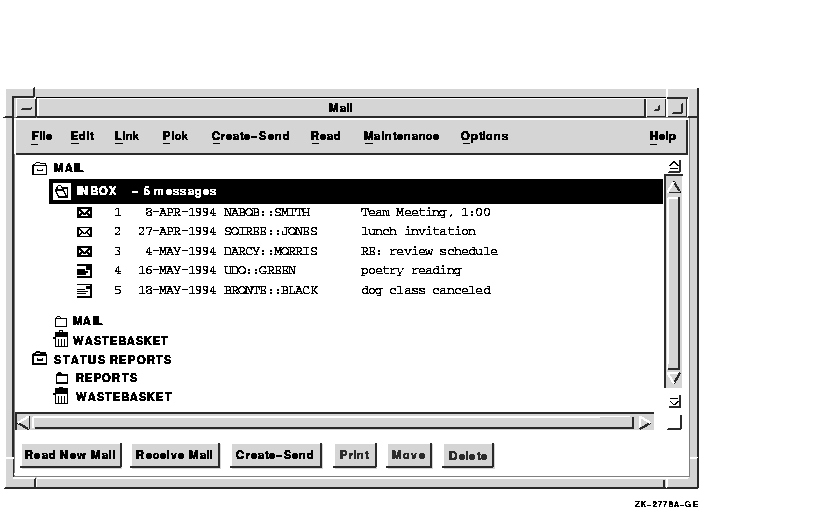
The main window lists your Mail drawers, folders, and messages. Drawers and folders help you organize your mail messages. You use Mail drawers and folders as you would use drawers and folders in your office filing cabinet. You might file all messages on a related topic in one folder and group related folders in one drawer. You can create as many drawers and folders as you need.
You can open drawers and folders to reveal their contents and close them to conceal their contents. To open a drawer or folder, double click MB1 on the drawer or folder name. To close a drawer or folder, double click MB1 on the name of an open drawer or folder.
When you enter Mail for the first time, a drawer named MAIL is automatically created and opened. The two objects in the MAIL drawer, INBOX and WASTEBASKET, appear indented below the drawer name. The INBOX folder contains messages that have been sent to you. The WASTEBASKET contains messages that you have deleted. The icon representing the WASTEBASKET is a trash container.
The INBOX folder is also automatically opened when you enter Mail, as indicated by the open folder icon in front of INBOX. If there are any messages in the INBOX folder, they are listed. Messages are chronologically arranged by date received.
Drawers, folders, and messages are identified by unique icons. These icons also indicate whether the object is open or closed.
If you have used the OpenVMS Mail utility, Mail automatically changes the names of your Mail folders to correspond to OpenVMS Mail folders. See Making Mail Perform Like the OpenVMS Mail Utility for more information. |
Near the bottom of the window is a row of push buttons. These buttons allow you to perform the functions most commonly used with messages. Many of the push buttons are disabled when you first start Mail and remain so until you select a specific message.
Pressing MB3 on an object in a Mail window displays a pop-up menu. Pop-up menus list many commonly performed tasks. The items on a pop-up menu vary according to the type of object (drawer, folder, or message) on which you are positioned, and they act on the object on which you are positioned.
Pop-up menu items and push buttons duplicate pull-down menu items. In cases where you can choose a push button, pop-up menu, or pull-down menu to perform a task, instructions in this chapter list one way to accomplish the task. You might prefer to use one of the other methods once you are familiar with Mail.
You can use certain key combinations, called accelerators, to perform common Mail tasks quickly. Accelerators act on objects in the window with input focus. For example, one way to delete the message you are reading is to pull down the Read window's Edit menu and choose Delete. Another way to delete the message you are reading is to use the accelerator for this function by pressing the Ctrl key and the D key simultaneously. Functions that have accelerators also list the accelerators next to them on the menu. See the table at the end of this chapter for a list of functions that have corresponding accelerators.
The vertical scroll bar in Mail's main window contains top and bottom stepper arrows and a navigation window, which are not present in standard DECwindows Motif scroll bars. The top and bottom stepper arrows, located at the top and bottom of the scroll bar, scroll the window to the next drawer or folder in the direction indicated. The navigation window is displayed in the upper right corner of the main window when you drag the vertical slider through the scroll region of the scroll bar. This window shows the drawer or folder that would appear at the top of the index if you released the slider.

You can create and send a mail message or an existing file to one user or many users with Mail.
To send a mail message to any user on your system or another system, click on the Create--Send button in the main window. A Create--Send window opens. You can have multiple Create--Send windows open at one time.
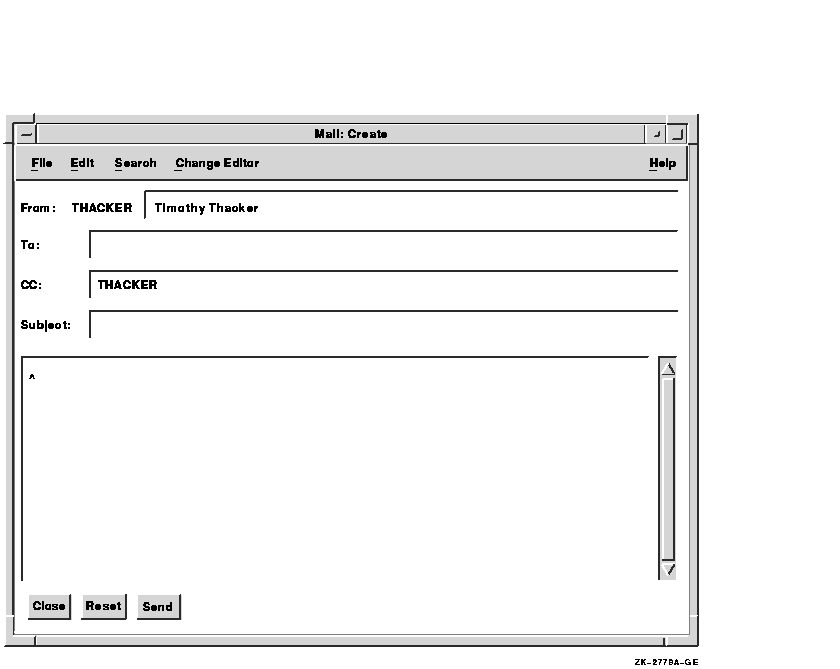
The Create--Send window is divided into an envelope area and a message area. The envelope area contains the following items:
| Field | Description |
|---|---|
| From |
Your user name.
If you specified a personal name in your mail profile, it is displayed to the right of your user name. Your mail profile, available from the main window's Options menu, allows you to customize specific features in Mail. See Customizing Your Mail Environment for more information about specifying a personal name. You can alter your personal name for the current message by entering a change in this text entry box. |
| To |
The name of the user or users receiving the message. If you are sending
mail to people on your node, specify only their user names. If you are
sending mail to people on another node, you must enter their node names
and user names using the following format:
node-name::user-name. If you are using a message router, enter
the address in the appropriate format for your router.
You can send the same message to several users by separating their user names with commas. Press the Return key if you need more space. For information about sending a message to a distribution list, see Sending a Message to a Distribution List. |
| CC |
(Optional) The name of the user or users you want to receive a
copy of the message. If you have set the Copy Self on Send option in
your mail profile, your user name is displayed.
For information about sending a copy to a distribution list, see Sending a Message to a Distribution List. |
| Subject | (Optional) The subject of the message. Press the Return key if you need more space. |
To enter text in a text entry box, point to the text entry box and click MB1. Use the Tab key to advance to the next text entry box, and use Shift+Tab to move to the previous text entry box. Use the DECwindows editing commands, described in Using DECwindows Motif for OpenVMS, to correct mistakes. When the envelope is complete, press the Tab key to move to the message area.
In the message area, enter the text of your message.
By default, you can use the DECwindows editing commands described in Using DECwindows Motif for OpenVMS to edit your message. If more than one editor is available on your system, you can use a different editor. See Changing Editors for more information.
To send the message, click on the Send button. Mail displays a message box informing you of the progress of the send operation. The Send button in the Create--Send window dims after the message has been sent successfully to all addressees. It remains dimmed until you change something in the window (for example, if you enter text in one of the fields).
Once a message has been sent, you can edit it, resend it to other users, or choose an option from the File pull-down menu. To continue to use this message, click on Acknowledged in the Send In Progress box. The dialog box disappears and the message remains in the window.
To create another message, click on the Reset button. This clears the message and envelope areas in the window and allows you to enter information for a new message.
To close the window, click on the Close button. This removes the Send In Progress box, deletes all text in the window, and closes it. You can also have Mail automatically close your Create--Send window after a successful send operation. This option is disabled by default in your Send options. See Modifying Your Send Options for more information about changing your default Send options.
If you change the header or text of a message in a Create--Send window and then close the window without sending the message, a caution dialog box is displayed. The message "Changes have been made to the Create--Send window. Do you really want to close it?" appears. To close the window, click on Yes. To keep the window open, click on No.
You can prevent this dialog box and message from appearing by changing your default Send options. See Modifying Your Send Options.
Saving a draft of a message allows you to begin composing a message now and continue working on it later. If you are creating a long mail message, you should save the message occasionally. To save a draft of a new message you are creating:

You can still send or cancel the message after you have saved it.
Saved draft messages are OpenVMS files and cannot be deleted through Mail. You can delete draft messages by choosing Delete from FileView's Files menu or in a DECterm window.
You can continue working on a draft of a message that you previously saved.
To resume work on a draft message:
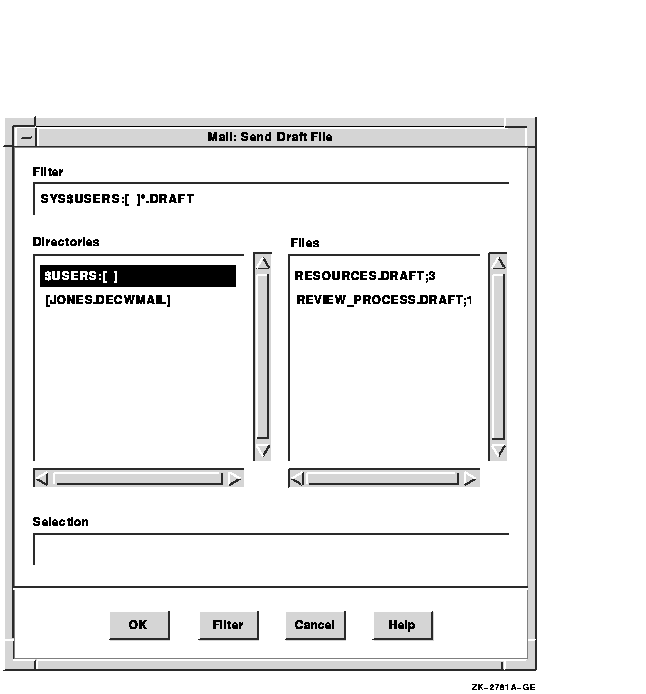
If you want to work on a draft file that is not listed, enter the name of that file in the Selection entry box and click on the OK button. Alternatively, use the File Filter entry box to list a subset of files from which you can select. For example, to list all files in another directory with the file extension DRAFT, enter the complete directory specification---[JONES.LETTERS]*.DRAFT---in the File Filter entry box and click on the Filter button. Then double click on the name of the file on which you want to continue working.
You can insert an existing file into a mail message. If the file is a text file, you can edit it. If it is a nontext file, such as a DDIF file, you cannot edit the file in Mail or add any other text to the message.
To include a file in a message:
You can send a message using the last message you sent.
To include the last sent message in a new message:
| Previous | Next | Contents | Index |
|
|
| privacy and legal statement | ||
| 5634PRO_008.HTML | ||