![[Compaq]](../../images/compaq.gif)
![[Go to the documentation home page]](../../images/buttons/bn_site_home.gif)
![[How to order documentation]](../../images/buttons/bn_order_docs.gif)
![[Help on this site]](../../images/buttons/bn_site_help.gif)
![[How to contact us]](../../images/buttons/bn_comments.gif)
![[OpenVMS documentation]](../../images/ovmsdoc_sec_head.gif)
| Document revision date: 10 November 2000 | |
|
|
|
|
|
|
| Previous | Contents | Index |
When you save a draft of a message, Mail stores the draft in your default directory. Perform the following steps to specify a different directory for storage of draft files.
The following procedures assume you are familiar with your LOGIN.COM file. If you are unfamiliar with this file, ask your system manager for more information before following these procedures. |
$ DEFINE DECW$MAIL_DRAFTS directory-spec |
You can also change the default directory for distribution lists. When you display a list of your distribution lists, Mail lists all files in your default directory with a DIS file extension. To specify a different directory to be searched for DIS files:
$ DEFINE DECW$MAIL_DISTRIBUTIONLISTS directory-spec |
The following table shows how you can use certain key combinations, called accelerators, to perform common Mail tasks quickly.
| Press | To Produce |
|---|---|
| Ctrl+M | Move... |
| Ctrl+P | |
| Ctrl+O | Open Folder |
| Ctrl+N | Open folder in new window |
| Alt+Del+ | Undo Move/Delete |
| Ctrl+D | Delete |
| Ctrl+Insert | Copy to Clipboard |
| Find | Find |
| Shift+Find | Find Next Selected |
| Ctrl+Shift+Find | Find Previous Selected |
| Ctrl+Find | Replace |
| Find | Pick from selected folder... |
| Ctrl+B | Create New Message |
| Ctrl+A | Create Reply |
| Ctrl+F | Forward With Header |
| Ctrl+R | Read new mail in default window |
| Ctrl+U | Update Folder |
| KP3 | Read Next Message |
| KP1 | Read Previous Message |
| Remove | Cut |
| Shift+Insert Here | Paste |
| Ctrl+Z | Send |
| Help | Help |
| Ctrl+Q | Close |
| Ctrl+E | Exit |
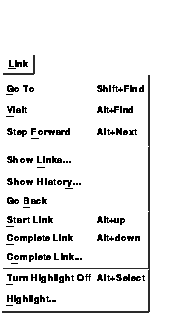
Mail is a hyperapplication. Through the Link menu, you can make and follow links between pieces of information (linkable objects). The information at the other end of any link can be another Mail object or an object accessed by any other hyperapplication. For detailed information about hyperapplications and the Link menu, see the chapter on hyperapplication features in Using DECwindows Motif for OpenVMS.
Mail's linkable objects are drawers, folders, and messages. For example, you can link messages to messages or a message to a Calendar timeslot.
If highlighting is enabled, Mail highlights linked objects by using the light bulb icon. If highlighting is not enabled and you want to see which objects have links, choose Turn Highlight On from the Link menu to enable highlighting. (To prepare for the reverse action, the menu item changes to read Turn Highlight Off.)
To exit the Mail application, choose Exit from the main window's File menu. The main window and any open Read or Create--Send windows are closed. If you have made changes in a Create--Send window and the window is still open, Mail asks whether you really want to exit. Open folders and drawers are closed. The WASTEBASKET folder is emptied unless you have disabled that option in your user profile.
If multiple main windows are open, the File menu contains the Close menu item rather than Exit. Choosing Close closes only the main window from which Close is chosen. When only one main window remains, its File menu contains the Exit menu item.
If you have made any changes to your user profile, Mail asks whether you want to save them. Click MB1 on Yes to save the changes or on No to cancel any changes you have made.
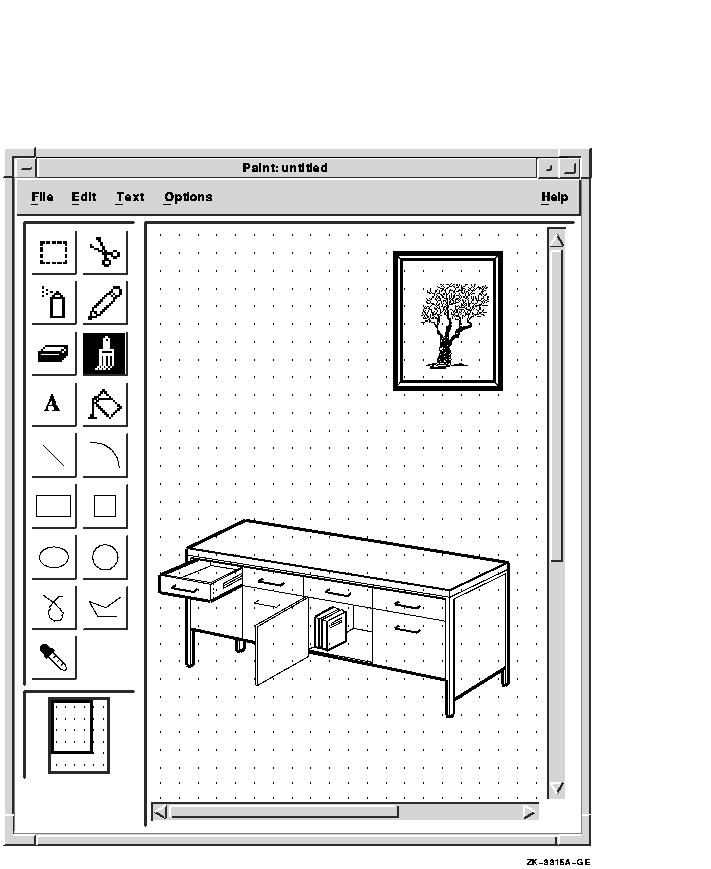
Paint is a graphics application that lets you create a simple picture, such as a sketch or an illustration, using an assortment of art tools. If you have a color monitor, you can choose colors from a color palette.
Paint can save your pictures, print them on different kinds of printers, or copy them to other applications. You can also display the pictures on your screen with the CDA Viewer application (see Chapter 5).
This chapter describes how to
To start Paint, choose Paint from the Session Manager's Applications menu.
The Paint window appears, which contains a tool palette and a work area where you draw your picture.

The Paint window frames a portion of the canvas. At the bottom of the tool palette, you see this portion of the canvas in the bolded box that is enclosed in a larger box. To display different areas of the canvas, press MB1 in the bolded box and drag until the box is in the position you want. Alternatively, you can use the horizontal and vertical scroll bars to move about the canvas.
Paint is a bitmap graphics application, which means that it treats pictures as a collection of dots called pixels. Different drawing tools, such as the Pencil, the Paintbrush, and the Text tool, edit the color of the pixels to create a pattern. Because the canvas has so many pixels in every square inch, you do not actually see patterns of dots. Instead you see a collection of lines, shapes, and text.
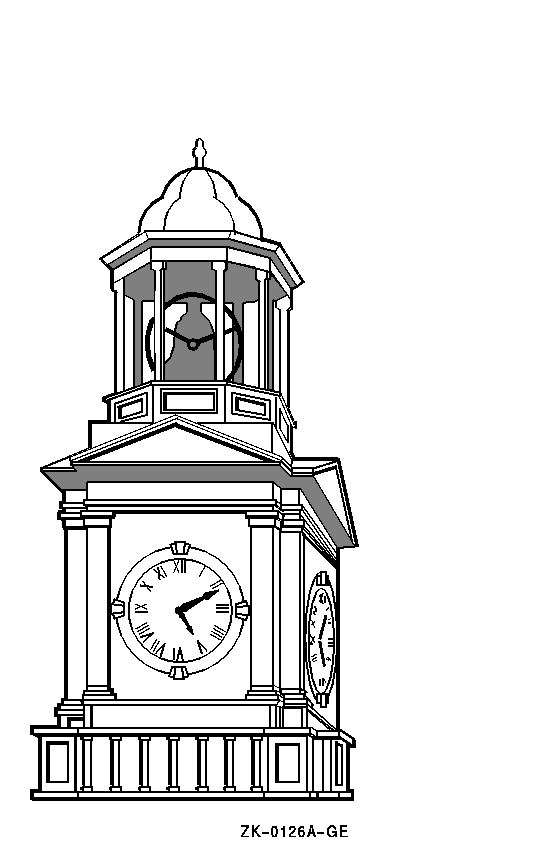
You can learn the basic steps in Paint by modifying a sample picture called the Clock Tower.
To display the Clock Tower:
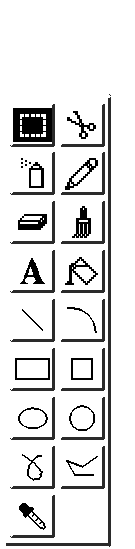
The tool palette offers a variety of art tools and basic shapes. You can work with the Pencil, the Paintbrush, the Spray Can, or the Paint Bucket. The shapes on the tool palette let you compose pictures quickly and easily.
When you first start Paint, the Paintbrush is highlighted, indicating that it is the current default. Only one tool on the tool palette is active at a time, and that tool remains active until you make another selection.
The tools are as follows, starting with the Box tool in the upper left corner of the tool palette:
| Use This Tool | To |
|---|---|
| Box | Select a rectangular area for editing. |
| Scissors | Select a shape for editing. |
| Spray Can | Apply paint in a mist. (The slower you drag the tool, the denser the coverage.) |
| Pencil | Draw a thin line. To draw at 90-degree angles, position the pointer, then shift click. |
| Eraser | Delete the image in the path of the pointer. To erase at 90-degree angles, position the pointer, then shift click. |
| Paintbrush | Paint a free stroke. To paint at 90-degree angles, position the pointer, then shift click. |
| Text | Include text that you type at the keyboard. |
| Paint Bucket | Fill a closed shape with the current fill pattern. |
| Line | Draw a straight line. To draw at 45- or 90-degree angles, position the pointer, then shift click. |
| Arc | Draw an arc. To draw a quarter of a circle, position the pointer, then shift click. |
| Rectangle | Draw a rectangle. To draw a square, position the pointer, then shift click. |
| Square | Draw a square. |
| Ellipse | Draw an oval shape. To draw a circle, position the pointer, then shift click. |
| Circle | Draw a circle. |
| Freehand Stroke | Draw a freehand line in the selected line width and pattern. |
| Polyline | Draw a multisided figure. To specify a corner, click MB1. To complete a shape, click at the starting point. To terminate the polyline, double click MB1 anywhere other than the starting point. To draw at 45- or 90-degree angles, position the pointer, then shift click. |
| Dropper | Pick up a current pixel color (for color monitors only). |
To change the time on the Clock Tower, choose the eraser and delete the
current time. To use the Eraser:

Now, using the Line tool, draw in the current time:

If you make a mistake, choose Undo Line from the Edit menu.
To create a reverse image of a picture, choose the Invert menu item from the Edit menu.
To reverse the tones of the Clock Tower, switching the foreground color
and the background color:

To save your version of the Clock Tower:

To print the Clock Tower, choose either Print or Print... from the File menu.
The first time you choose one of the Print menu items, Paint displays the Print dialog box. You can change Paint's default print formats. To see the printer options, click on Options... and change them if you want. Thereafter, the Print menu item sends the picture to the default printer, whereas Print... always displays the Print dialog box.
You can erase in several ways:
The bottom half of the tool palette contains a collection of line and shape tools that you use in a similar way.
Whenever you draw a straight line or a shape, the point where you press MB1 becomes the reference point. You can stretch and swing the line or shape from this reference point by dragging the pointer. When the shape is correct, anchor it in place by releasing MB1.
Use the Polyline tool as follows:
To use the Freehand Stroke tool, press and drag MB1, then release MB1 when you finish drawing that particular line.
To draw a rectangle:
To line up a series of shapes or draw them equidistant from each other, choose Grid On from the Options menu. A horizontal and vertical pattern of dots is superimposed on the drawing window.
The pattern of dots serves as a guide yet does not become part of your picture. One advantage to using a grid is that a grid makes geometric figures easier to draw because lines "snap into place" on the dots.
To change the size of the grid:
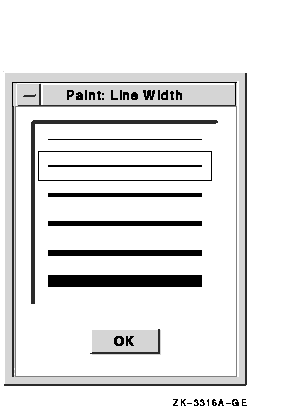
Lines drawn with the shape tools can be thick or thin. To change the current line width:
Most of the time, geometric shapes or figures are opaque; that is, you cannot see what lies behind them. Opaque figures are the default, as indicated by the shaded radio button next to the Opaque menu item on the Options menu. Choosing Transparent from the Options menu causes background images to show through foreground images. The Transparent and Opaque settings affect not only figures but images you move, as well as the output of the Spray Can, Paintbrush, and Text tools.
Lines and shapes need not be solid colors. They can be striped, speckled, woven, dotted, and so on.
The line and shape tools, the Spray Can, and the Paintbrush can paint patterned lines.
To use patterned outlines or centers:

To fill existing shapes using the Paint Bucket tool, click inside the shape you want to fill. You must enclose the shape; any opening in the border causes the paint to spill out onto the canvas. To erase the fill, choose Undo Flood from the Edit menu.
Filling works only on the visible part of the canvas. For example, if you attempt to flood the entire canvas, only the visible portion is affected.
With Paint, you can create your own patterns and store them in the pattern palette during a Paint session. You create your own pattern from any of the patterns on the palette except the solid foreground, solid background, and None patterns.
To create your own pattern:
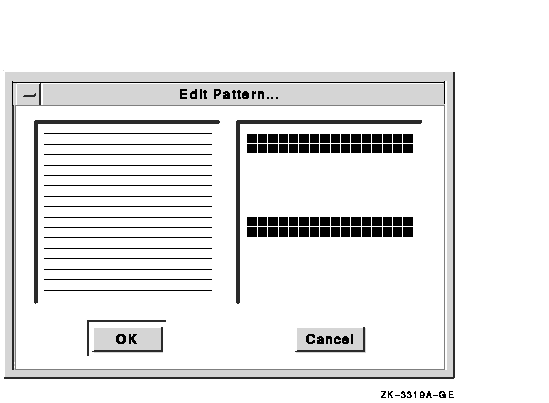
The edited pattern is available on the Patterns palette for the rest of the session, replacing the original pattern. You cannot recover the original pattern for that session.
If you have a color monitor, you can create pictures in your choice of colors.
| Previous | Next | Contents | Index |
|
|
| privacy and legal statement | ||
| 5634PRO_012.HTML | ||