![[Compaq]](../../images/compaq.gif)
![[Go to the documentation home page]](../../images/buttons/bn_site_home.gif)
![[How to order documentation]](../../images/buttons/bn_order_docs.gif)
![[Help on this site]](../../images/buttons/bn_site_help.gif)
![[How to contact us]](../../images/buttons/bn_comments.gif)
![[OpenVMS documentation]](../../images/ovmsdoc_sec_head.gif)
| Document revision date: 10 November 2000 | |
|
|
|
|
|
|
| Previous | Contents | Index |
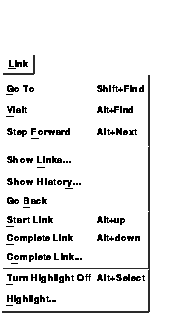
Cardfiler is a hyperapplication. Through the Link menu, you can make and follow links between pieces of information (linkable objects). The information at the other end of any link can be another Cardfiler object or an object accessed by any other hyperapplication. For detailed information about hyperapplications and the Link menu, see the chapter on hyperapplication features in Using DECwindows Motif for OpenVMS.
Cardfiler's linkable object is any card. For example, you can link one card to another. You can also link a card to a Mail message. However, you cannot link a sentence within a card to anything.
If highlighting is enabled, Cardfiler highlights linked objects by using the light bulb icon. If highlighting is not enabled and you want to see which objects have links, choose Turn Highlight On from the Link menu. (To prepare for the reverse action, the menu item changes to Turn Highlight Off.)
Whether you create a new card file or make changes to an existing card file, such as adding or deleting a card or changing any information on a card, you need to save that card file when you are finished working with it.
To save a new card file or change the name of an existing one:
To save the current card file, choose Save from the File menu in the Cardfiler window.
You can merge the contents of the current card file with another card file to create a card file that combines and sorts the contents of both files. The card file whose contents were merged with the current card file remains unchanged.
To merge the contents of the current card file with another card file:
If you change the size or screen position of Cardfiler and would like to save the new settings, choose Save Geometry from the File menu. The new settings are used in future sessions. To restore the system defaults, choose Restore System Settings from the File menu.
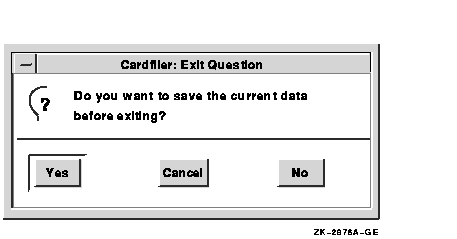
To exit Cardfiler, choose Exit from the File menu in the Cardfiler window.
If you have not saved any changes or additions to the current file, Cardfiler displays a dialog box:
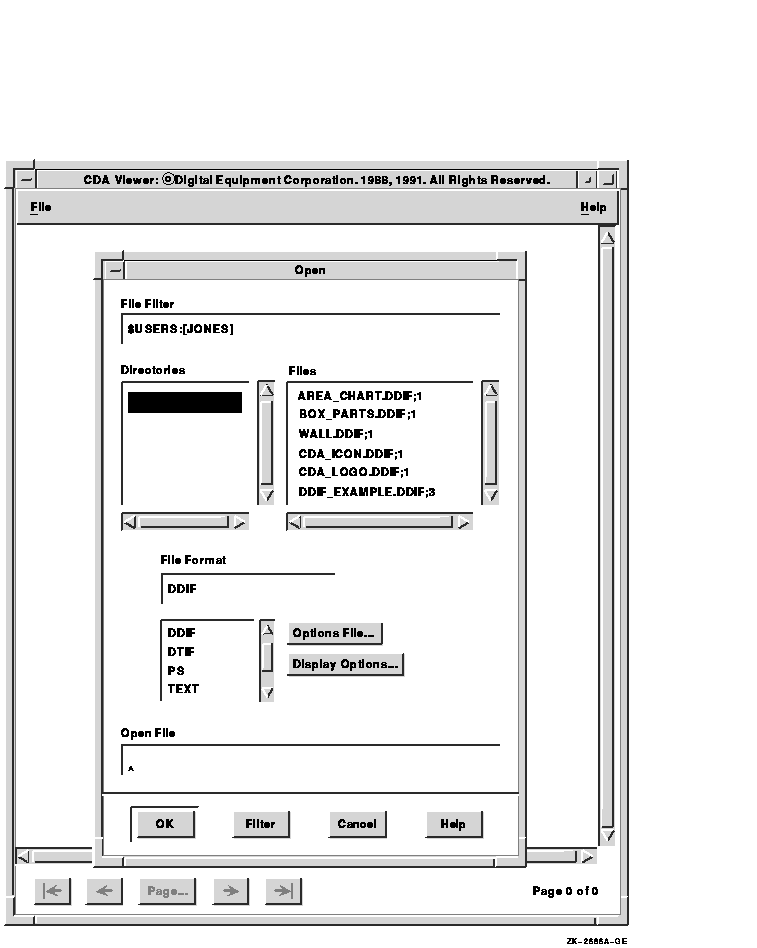
CDA Viewer displays the contents of compound documents and graphics, image, and text files on your screen. CDA Viewer works with the CDA converters. Therefore, the converters that are installed on your system determine the specific file types that you can view.
This chapter describes how to
Start CDA Viewer by either of the following methods:
$ VIEW/INTERFACE=DECWINDOWS |
The CDA Viewer window appears. A dialog box (Open) also appears, which lets you select the file to be displayed. The Open dialog box includes buttons for Options File and Paper Size, each of which activates a separate dialog box in which you can specify optional instructions about how the file should look.
The following steps form the basic procedure for viewing a file:
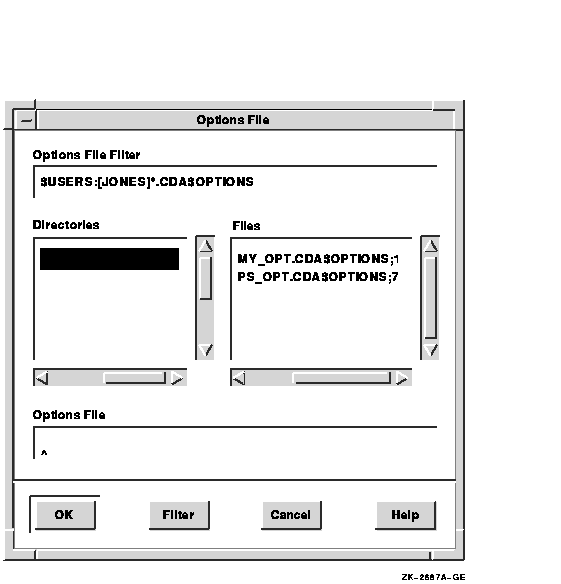
By convention, options file names include the extension CDA$OPTIONS. If your file name does not follow this convention, the file will not be listed unless you modify the Options File Filter entry box to match the actual file name and then click on the Filter button. |
Processing options, paper size values, and the Override Document Format option apply only to the next file you open. The appearance of the currently displayed document does not change. |
If the Files list does not include the file that you want to view, refer to Controlling the Files List Box in this chapter. |

If you open a DDIF document with audio content, CDA Viewer displays an audio button next to the arrow buttons at the bottom of the window.
The audio button looks like one of the following:
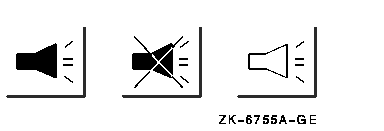
The solid audio button indicates that there is audio content on the page being displayed. When you click on this button, CDA Viewer displays one or more audio buttons on the page. These audio buttons indicate the location of the audio content on the page; click on these buttons to play back the audio content.
When you click on the solid audio button in the bottom of the window, the button changes to the button with the X through it. Click on this button to disable the display of the audio buttons on the page.
The outline audio button indicates that there is audio content in the document, but there is none on the page being displayed.
Special hardware is required to enable the playback of audio content. If your computer does not have this hardware, you will not hear any sound when you click on the audio buttons in the document. |
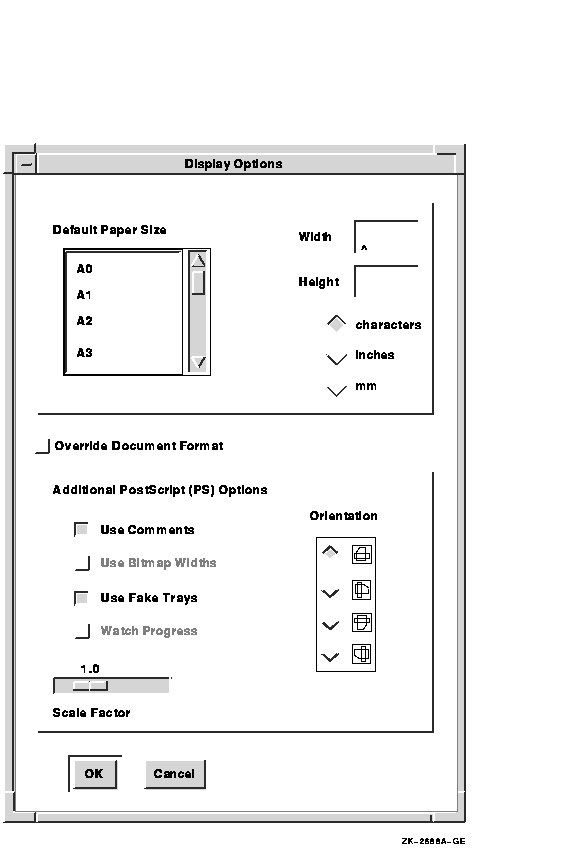
1 The characters unit corresponds to the size of a character in the 12-point Courier font, which is CDA Viewer's default font and which is also similar to the standard font used by most printers. In 12-point Courier, and in the character unit as interpreted by CDA Viewer, there are 10 columns per inch (0.1 inch per character horizontally) and 6 rows per inch (0.167 inch per character vertically). |
The following options appear in the Display Options dialog box and are valid for POSTSCRIPT files only:
Choosing from the Files list box is often the simplest way to specify the file that you want to view, and the file selection window is designed to make it as easy as possible to do so. However, in some cases you might need to do one of two things:
To choose the file from a list (rather than enter the specification directly), you must modify the filter mask if either of the following conditions is true:
If you change the node specification, be sure to check the directory specification. The filter mask must not refer to a directory that is not valid on the specified node. |
After modifying the filter mask, click on Filter (or press Return). If you changed the node specification, double click on the correct directory name. Then select the desired file.
The file format you specify depends on the application (or the conversion) that produced the file you want to view.
The following table summarizes the file formats supported by CDA converters on all systems running DECwindows Motif software. Your system might also support converters for additional formats. All formats that are supported on your system are listed in the Open dialog box.
| Keyword | Description | Default File Extension |
|---|---|---|
| DDIF | DIGITAL Document Interchange Format files created by and for applications such as DECwrite and DECchart | DDIF |
| DTIF | DIGITAL Table Interchange Format files created by and for applications such as DECdecision | DTIF |
| PS | POSTSCRIPT files to be printed on supported output devices | PS |
| TEXT | Text files that can be edited with a text editor | TXT |
You can view POSTSCRIPT files only if the Display POSTSCRIPT Extension is installed on your server. If the server does not have this software, the PS (POSTSCRIPT) choice does not appear in the Open dialog box. |
Most formats have an associated default file extension. The preceding table includes the default file extension for each supported format. The default extension for the format that you select automatically appears in the filter mask, which determines which files are listed. For example, if you specify the TEXT format, the filter mask ends in TXT, and the Files list box shows files with that extension.
Not all file names have the default extension for their format. You must specify the actual format of the input file, regardless of its extension.
You can create an options file prior to starting the CDA Viewer application. An options file is a text file with a default file extension of CDA$OPTIONS.
The options file contains all the processing options for your input file format. Processing options help ensure minimal format and content changes while CDA Viewer processes your input file for display.
An options file is not required. Default processing options are applied automatically when you open a file for display. However, you might require an options file if you need to use a setting other than the default.
Use the following guidelines to create an options file:
You can create an options file containing processing options that apply to any CDA supported tabular file format for which there is an input converter. Data tables and spreadsheets are examples of tabular file formats.
Precede each of these processing options with the DTIF_TO_DDIF format name. DTIF (Digital Table Interchange Format) is a standard format for the storage and interchange of data table and spreadsheet files.
The following list describes the DTIF_TO_DDIF processing options.
COLUMN_TITLE
Displays the column titles as contained in the column attributes that are centered at the top of the column.CURRENT_DATE
Displays the current date and time in the bottom left corner of the page. The value is formatted according to the document's specification for a default date and time.DOCUMENT_DATE
Displays the document date and time as contained in the document header in the top left corner of the page. The value is formatted according to the document's specification for a default date and time.DOCUMENT_TITLE
Displays the document title or titles as contained in the document header that is centered at the top of the page, one string per line.PAGE_NUMBER
Displays the current page number in the top right corner of the page.PAPER_SIZE
Sets the paper size. Valid values are as follows:
Value Size A0 841 x 1189 mm (33.13 x 46.85 in) A1 594 x 841 mm (23.40 x 33.13 in) A2 420 x 594 mm (16.55 x 23.40 in) A3 297 x 420 mm (11.70 x 16.55 in) A4 210 x 297 mm (8.27 x 11.70 in) A5 148 x 210 mm (5.83 x 8.27 in) B4 250 x 353 mm (9.84 x 13.90 in) B5 176 x 250 mm (6.93 x 9.84 in) C4 229 x 324 mm (9.01 x 12.76 in) C5 162 x 229 mm (6.38 x 9.02 in) DL 110 x 220 mm (4.33 x 8.66 in) 10x13_ENVELOPE 13 x 254 mm (15.600 x 10 in) 9x12_ENVELOPE 12 x 229 mm (14.400 x 9 in) BUSINESS_ENVELOPE 9.5 x 105 mm (11.400 x 4.13 in) EXECUTIVE 10 x 191 mm (12.000 x 7.5 in) A 8.5 x 11 in B 11 x 17 in C 17 x 22 in D 22 x 34 in E 34 x 44 in LEDGER 11 x 17 in LEGAL 8.5 x 14 in LETTER 8.5 x 11 in LP 13.7 x 11 in VT 8 x 5 in The A paper size (8.5 x 11 inches) is the default.
PAPER_HEIGHT
Selects a paper height, in combination with the DTIF_TO_DDIF PAPER_WIDTH processing option, other than one of the predefined values provided. The default paper height is 11 inches.PAPER_WIDTH
Selects a paper width, in combination with the DTIF_TO_DDIF PAPER_HEIGHT processing option, other than one of the predefined sizes provided. The default paper width is 8.5 inches.PAPER_TOP_MARGIN
Selects the width of the margin provided at the top of the page. The default value is 0.25 inches.PAPER_BOTTOM_MARGIN
Selects the width of the margin provided at the bottom of the page. The default value is 0.25 inches.PAPER_LEFT_MARGIN
Selects the width of the margin provided on the left side of the page. The default value is 0.25 inches.PAPER_RIGHT_MARGIN
Selects the width of the margin provided on the right side of the page. The default value is 0.25 inches.
PAPER_ORIENTATION
Selects the paper orientation to be used in the output file. The valid values for the orientation argument are as follows:
Keyword Meaning PORTRAIT The page is oriented so that the larger dimension is the vertical axis. LANDSCAPE The page is oriented so that the larger dimension is the horizontal axis. The default is PORTRAIT.
| Previous | Next | Contents | Index |
|
|
| privacy and legal statement | ||
| 5634PRO_004.HTML | ||