![[Compaq]](../../images/compaq.gif)
![[Go to the documentation home page]](../../images/buttons/bn_site_home.gif)
![[How to order documentation]](../../images/buttons/bn_order_docs.gif)
![[Help on this site]](../../images/buttons/bn_site_help.gif)
![[How to contact us]](../../images/buttons/bn_comments.gif)
![[OpenVMS documentation]](../../images/ovmsdoc_sec_head.gif)
| Document revision date: 10 November 2000 | |
|
|
|
|
|
|
| Previous | Contents | Index |
You can customize the day display by choosing Day View... from the Options menu.
The Day View dialog box is displayed.
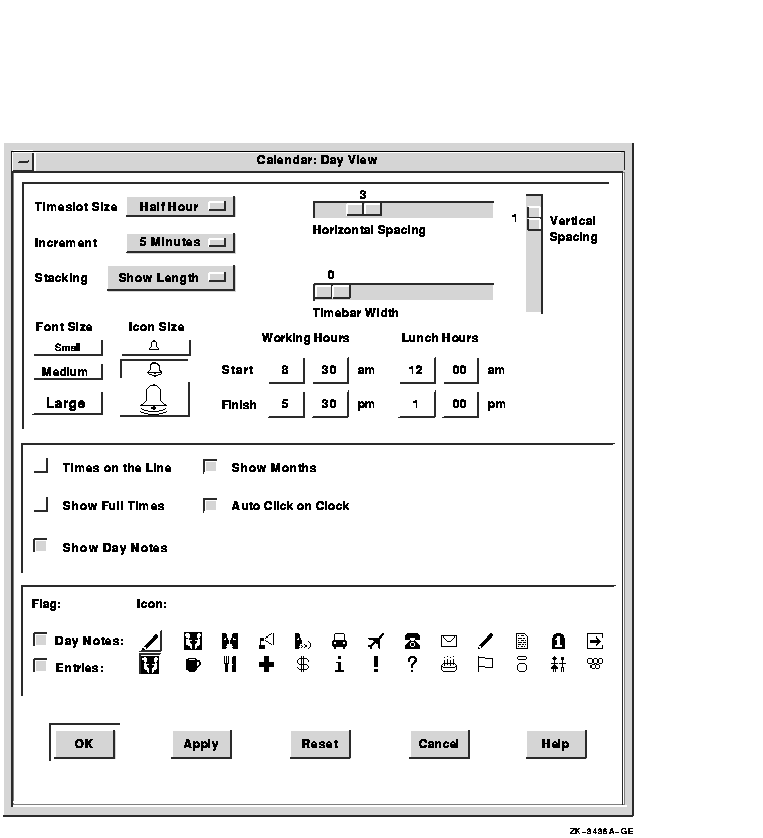
From the Day View dialog box, you can modify any of the following day display features:
Timeslot Size
Use the Timeslot Size Options menu to specify the interval for each timeslot.Increment
In each timeslot, the resize knob lets you create a Calendar entry that is larger or smaller than the timeslot size.Use the Increment Options menu to specify the time that each incremental resizing movement adds to or subtracts from the time for the entry.
The Increment value is always less than the timeslot size. For example, if your timeslot size is 30 minutes, the Hour option on the Increment Options menu is dimmed because you can only resize the entry in increments less than or equal to the timeslot itself. The Increment value also always divides evenly into the Timeslot Size value.
Stacking
Use the Stacking Options menu to control the display of overlapping timeslot entries:
- Show Length --- the left side of each entry is always visible.
- Show Text --- the first line of each entry is visible.
By default, overlapping entries are stacked so that you always see the left side of each entry. This is the effect of the Show Length option on the Stacking Options menu.
To view a hidden or overlapped entry, click on its icon; the entry moves to the top of the stack.
Calendar does not save any changes you make to the stacking order for a given set of entries.
Horizontal Spacing
The Horizontal Spacing option lets you adjust the width of the timeslots.To modify the timeslot width, press and drag MB1 on the slider; the greater the number, the greater the width.
Vertical Spacing
The Vertical Spacing option lets you set the height of a timeslot entry. The larger the number, the more readable the text. If you select a smaller number, more timeslots are displayed in the same space.To modify the timeslot height, press and drag MB1 to select the desired value. The available values are simply relative values.
Timebar Width
The Timebar Width option controls the thickness of the two timebars. Timebars are vertical columns on the sides of the timeslot area. One timebar represents just the times visible in the window; the other timebar represents a 24-hour period. Working hours, nonworking hours, and times with entries are distinguished visually.The greater the number, the thicker the timebar. If you select zero (0), the timebars do not appear.
To modify the timebar width, press MB1 on the slider and drag to the number you want.
Font Size
You can select small, medium, or large font for Calendar timeslot entries. Your choice affects the size of the time values, text, and timeslot boxes, as well as the number of timeslots what will fit within the timeslot area of the day view.Icon Size
You can select small, medium, or large for the size of icons that appear in the handles of Calendar entries.Working Hours
You can click on the hour and minute buttons as often as needed to specify standard working hours.In the timebars (vertical columns on the sides of the timeslot area), working and nonworking hours are represented in visually distinct ways.
Note that you can make any entries in any timeslot, whether or not it is during standard working hours.
Lunch Hours
You can click on the hour and minute buttons as often as needed to specify a standard lunch period.In the timebars (vertical columns on the sides of the timeslot area), the lunch period is represented in the same way as nonworking hours.
Note that you can make any entries in any timeslot, whether or not it is during the standard lunch period.
Times on the Line
If you disable the Times on the Line setting, the starting time of a timeslot is centered between the top and bottom lines of the timeslot. If you disable the setting, the starting time of a timeslot is centered in the top line of the timeslot.Show Full Times
By default, timeslots that are not on the full hour display as the number of minutes after the full hour. For example, the timeslot for 2:00 is displayed as 2:00, but the timeslot for 2:30 is displayed as 30.To cause Calendar to display the hour as well as the minutes for a timeslot that does not occur at the full hour, enable the Show Full Times setting. This action causes 2:30 to be displayed as 2:30.
Show Day Notes
Normally, the day note entry box appears below the date in the day display.To remove the day note entry box, disable the Show Day Notes setting. If you disable day notes, existing day notes are not deleted; they just do not appear.
Show Months
By default, Calendar displays the current month and the next month at the top of a day display. You can disable this option by clicking on the Show Months setting.Auto Click on Clock
You control autoscrolling (automatic scrolling of timeslots as the day progresses) by clicking on the clock when you display the day view. Enabling the autoclick option causes autoscrolling to start when you open the day display (as if you had clicked on the clock to start autoscrolling).If you disable Auto Click on Clock, autoscrolling is not in effect when you first bring up the day display, and you must click on the clock manually to start autoscrolling.
Flag
When you enable the Flag option, days that contain day notes or timeslot entries are "flagged." Flagging means that the font of the specified day number changes in the month view to highlight that day. On color workstations, the color of the flagged day number also changes.When you disable Flag, day numbers appear in the same font, regardless of whether they contain day notes or entries.
Icon (day note and timeslot entry)
Directly under the word Icon are two buttons: the top button is the default icon for day notes; the bottom button is the default icon for timeslot entries.To change the default icon for these types of entries, follow these steps for each one:
- Click on the appropriate button under the word Icon.
- Click on the icon that you want to be the default for that type of entry. The icon can be any of those displayed, regardless of where it appears.
You can also associate multiple icons with a particular entry by using the Entry Editor. For more information, see Creating a Timeslot Entry.
You can customize the Calendar icon by choosing Icon Box... from the Options menu.
The Icon dialog box is displayed.
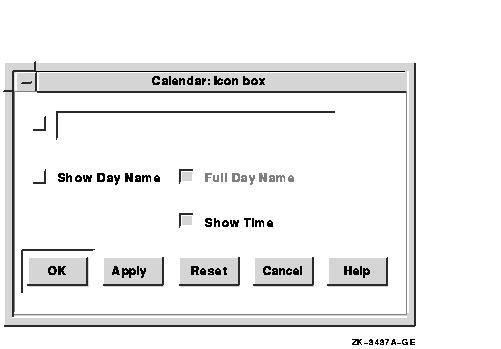
From this dialog box, you can modify any of the following Calendar icon options:
Text entry box
The text entry box lets you specify text to appear along with the day name in the icon.The check button to the left of the text entry box enables or disables the display of the text.
Show Day Name
Use the Show Day Name option to enable or disable the display of the name of the day of the week in the icon.Full Day Name
Use the Full Day Name option to control whether the name of the day is in abbreviated or full form.Show Time
Use the Show Time option to control whether or not the time appears in the icon.
To save your customized settings, choose Save Settings from the Options menu. Your new settings are used whenever you start a Calendar session. The sizes and placements of all your displays are also saved.
To restore your settings to the currently saved defaults, choose Restore Settings from the Options menu.
To restore your settings to the system defaults, choose Restore System Settings from the Options menu.
This section contains information and suggestions to help you integrate your use of Calendar with other applications and commands.
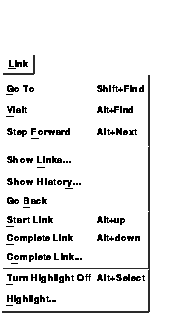
Calendar is a hyperapplication. Through the Link menu, you can make and follow links between pieces of information (linkable objects). The information at the other end of any link can be another Calendar object or an object accessed by any other hyperapplication. For detailed information about hyperapplications and the Link menu, see the chapter on hyperapplication features in Using DECwindows Motif for OpenVMS.
Calendar's linkable objects are:
For example, you can link a timeslot entry to another timeslot entry, or to a Bookreader topic, or to a Cardfiler card. However, you cannot link a portion of text within an entry to something else.
Timeslot entries that are linked can be highlighted. If highlighting is enabled, Calendar highlights linked entries by including a light bulb icon in the entry handle. If highlighting is not enabled and you want to see which entries have links, choose Turn Highlight On from the Link menu. (To prepare for the reverse action, the menu item changes to Turn Highlight Off.)
You can send and receive calendar entries through electronic mail. To do so, you must display both the Calendar entry (or just the correct day view if you are receiving the entry) and a Create--Send window in DECwindows Mail.
To send an entry through electronic mail, open a Create--Send window in Mail. Select the entry from Calendar, then use MB2 to perform a quick-copy operation on the entry into the Mail window.
To receive an entry through electronic mail:
You can also use the Copy and Paste items on the Edit menu to copy information from calendar entries to mail messages and vice versa.

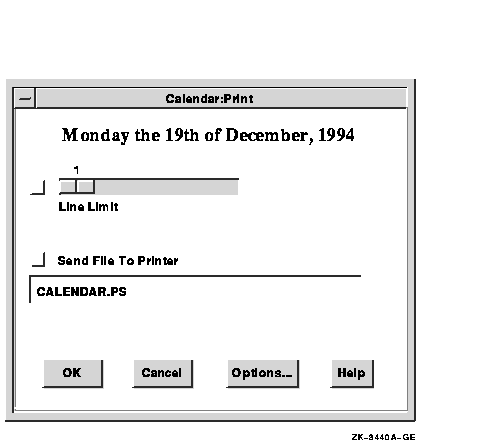
You can copy a timeslot entry or all of the entries in a day or a week to a printable file.
To print a part of a Calendar display:
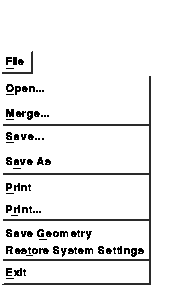
To exit Calendar and close all open calendars, choose Exit from the File menu.
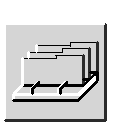
Cardfiler lets you create an electronic box of index cards. This electronic file box is called a card file. Card files contain cards, which can hold any kind of information you like, such as names, addresses, and telephone numbers. For example, you could have a card file called Food that is filled with cards containing recipes and names of restaurants.
By organizing your cards into card files, you can keep one group of cards separate from another group; for example, you can separate your business cards from your personal cards.
This chapter describes how to
To start Cardfiler, choose Cardfiler from the Session Manager's Applications menu.
The Cardfiler window appears. Initially, the card file is empty, but it fills up with index topics as you add cards.

You can create a card file first and then add cards to it, or you can create cards and then save them into a card file. For example, you could create a card file called Clients, and then fill it with cards that contain the names and telephone numbers of your clients.
To create a new card file or open an existing card file:

If you try to open a new card file without first saving changes you made to the current file, a dialog box appears and asks whether you want to save your changes. To save your changes, click on Yes. To discard your changes, click on No.
Cards contain units of information, such as a person's name and telephone number, and are organized in card files.
You can create a series of cards and save them in a card file, or you can open a card file and then add cards to it. As you add cards, they are sorted alphabetically according to the topic you choose. Most likely, this topic will be the name of something, such as a person or business. By displaying the topic of each card, the card file window lists the contents of the card file.
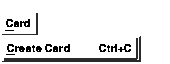
To create a card:
You can open another card in the card file without closing the current card. When you choose Create Card... from the Card menu in the Cardfiler window, Cardfiler automatically saves any changes you made to the current card and returns it to the card file before it opens a new card in the file.
If you create a series of cards before you create a card file, you can save them in a new card file.
To save existing cards in a new card file:

Although you can look at only one card at a time, you can switch easily from one card to another by selecting a card from the card file window. When your card file contains too many cards to list in a window, you can use the scroll bar to move through the file. You can also search the contents of a card file for a given text string.
To display the contents of an exiting card, double click on the card's index topic.
The card's topic becomes shaded and the contents of the card appear in the card window.
As you accumulate cards, the cards cannot be listed all at once in the card file window. To scroll through the list of cards in your file, press and hold MB1 on the stepper arrow.
You can search a card file for any text string. The text can be a word, a number, or any other characters that you can type on your keyboard. Because Cardfiler treats spaces as text, you can search for two or more words.
Cardfiler searches either the index topics or the contents of the index cards.
To search the index topics in a card file for specific text:
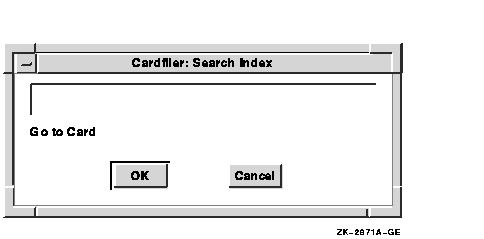
Cardfiler searches the topics of all cards in the file and displays the first card in your file whose index contains the text string.
You can continue to search for a text string by choosing Find Next from the Search menu in the Cardfiler window. Cardfiler continues to search the card file for the text and displays each card that contains that text.
To search the contents of each card in the card file for specific text:

Cardfiler searches all cards in the file and displays the first card that contains the text string.
You can continue to search for a text string by choosing Find Next from the Search menu in the cardfile window. Cardfiler continues to search the card file for the text and displays each card that contains that text.

Cardfiler editing commands let you copy, delete, and rearrange text on a card. If you decide you do not want to save your edits, Cardfiler restores the card to its original state.
You can change the topic of a card by modifying its index topic.
To modify a card's index topic:
The card is renamed and remains displayed. If you want to close the card, choose Close from the card's File menu.
When you create a new card, the text cursor appears in the upper left corner of the card's work area. When you open an existing card, the text cursor remains where it was when you last edited the card.
If you are creating a new card and want to move the text cursor, use the Return key, or place the pointer where you want the text cursor and click MB1. You can use this method to move the text cursor on an existing card, or you can use the arrow keys to move the text cursor anywhere in the existing text (except to the index topic).
To delete, move, or copy text, you must first select that text.
To select text in a card:

To delete small amounts of text on your card, use the Delete key (<X|). If you selected text for deletion, press any key to delete the highlighted text.
Because Cardfiler saves the last text you selected and deleted, you can move or copy text from one location on a card to another or between cards.
To move or copy text within a card:
To move or copy text from one card to another:
You can add images (graphics) to cards, such as those images you create with Paint, Print Screen, and VAXimage Services. Cardfiler places an image at the top of a card, keeping the picture's original size, and relocates text to the remaining space.
To add an image that has been saved as a file:
To copy part or all of an image directly from the Paint application:
You can also copy images from a card to Paint and between cards by selecting the image, copying it to the clipboard, and pasting it in the new location.
To delete an image from the card:
| Previous | Next | Contents | Index |
|
|
| privacy and legal statement | ||
| 5634PRO_003.HTML | ||