![[Compaq]](../../images/compaq.gif)
![[Go to the documentation home page]](../../images/buttons/bn_site_home.gif)
![[How to order documentation]](../../images/buttons/bn_order_docs.gif)
![[Help on this site]](../../images/buttons/bn_site_help.gif)
![[How to contact us]](../../images/buttons/bn_comments.gif)
![[OpenVMS documentation]](../../images/ovmsdoc_sec_head.gif)
| Document revision date: 10 November 2000 | |
|
|
|
|
|
|
| Previous | Contents | Index |

Calendar combines the functions of a desktop calendar and an appointment book to help you keep track of your meetings and plan your time. Calendar lets you look at the display for a full year or month and also to review your scheduled appointments a day at a time.
You can create several different calendars to use for specific purposes. For example, you can create one calendar to keep track of your personal engagements and another calendar to schedule conference room reservations.
This chapter describes how to
To start Calendar, choose Calendar from the Session Manager's Applications menu.
By default, the month display appears on your screen.
 The month display shows the current month and year, with the days of
the month arranged in weekly rows. The current day has a box
surrounding it.
The month display shows the current month and year, with the days of
the month arranged in weekly rows. The current day has a box
surrounding it.

Calendar has three main displays: month, day, and year. You can use the following techniques to move among and within displays:
The day display shows the timeslots for that day. You can type entries, such as appointments, directly into the timeslots; or you can use the entry editor to type longer entries and specify other options, such as alarms to remind yourself of appointments.
To record a short entry directly into a timeslot:
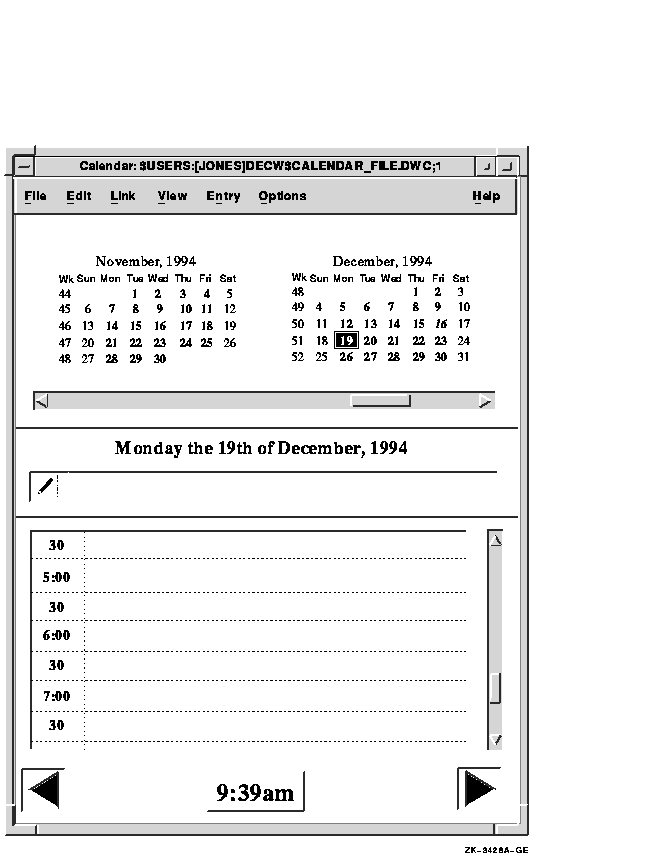
When a day has at least one entry in it, its day number changes from a normal font (nn) to an italic font (nn) wherever it is displayed. On a color workstation, the day number for days with entries appears in blue. You can then distinguish between days containing appointments and free days in the month and year displays.
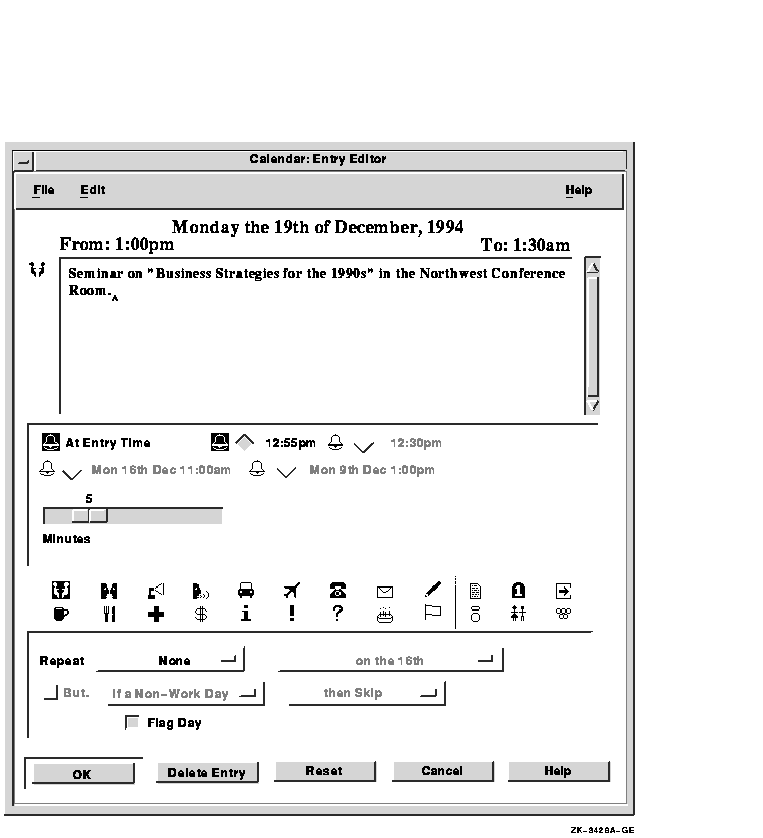
To create a long entry or to specify options for the entry, use the timeslot entry editor:
If you exit the editor without entering any text, or if you delete all the text describing a previous entry, the timeslot remains unscheduled.
To enlarge or reduce a timeslot:
If you reduce the size of a timeslot, some text may no longer fit in the display, but it is not lost. The text reappears when you expand the timeslot again.
By default, when you type an appointment entry in the Entry Editor, alarms sound and a message is displayed 5 minutes before the appointment and at the time of the appointment. You can disable these options by clicking on them.
You can set alarms to sound at any combination of the following times:
To set one or more alarms:
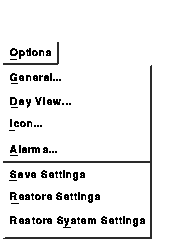
You can also modify the default intervals for all alarms by choosing Alarms... from the Options menu and making the desired changes in the Alarms dialog box.
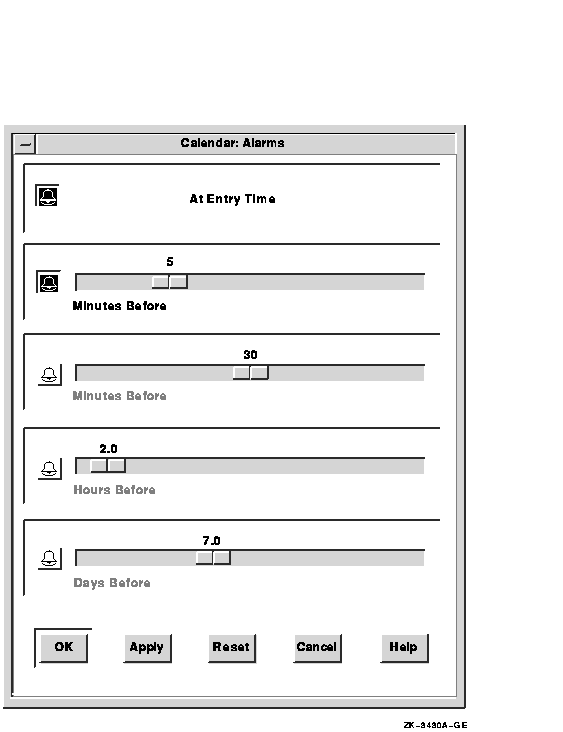
By clicking on the appropriate bell and moving the slider in the slider bar, you can set alarms up to 14 days in advance and adjust the number of minutes and hours the alarms sound before an entry. If you change the defaults, you can save them for future Calendar sessions by choosing Save Settings from the Options menu. Choosing Restore Settings causes Calendar to revert to the previous settings; choosing Use Defaults causes Calendar to revert to the system defaults.
You can also set alarms to ring at any of the following times by displaying the Repeat Options menu in the Entry Editor dialog box and choosing the desired option from the following list:
Daily
Weekly
Every two weeks
Every four weeks
Monthly
Every two months
Every three months
Every four months
Every six months
Annually
Once you choose an option, you can specify when you want the alarm to sound:
If you change or delete an entry that is repeated, a dialog box is displayed asking whether you want to make the change or deletion in just this instance, from this point on, or every time, including past instances.
To delete an entry from the calendar:
You can copy or move the entire contents of an entry, or just a piece of text, to another timeslot. If you select the handle, any alarms or repeat intervals associated with the entry move along with the text to the new timeslot. If you select the text, only the text moves; neither the default alarms nor any repetition intervals transfer.
To move or copy an entry:
To move an entry to a different timeslot on the same day, a quick method is to press MB2 on the entry's handle or text and drag until you reach the desired new timeslot.
To create an entry in a timeslot that is partially or completely occupied by an existing entry, click MB1 or press and drag MB1 to the start time. Calendar opens a new entry for you at the specified time. You can overlap as many entries as you like.
By default, overlapping entries are stacked so that the left side of each entry is always visible. To change the stacking so that you see the first line of each entry, choose Day View... from the Options menu. When the Day View dialog box appears, choose Show Text from the Stacking menu. To view a hidden or overlapped entry, click on its icon; the entry moves to the top of the stack.

The clock at the bottom of the day display provides a digital display of the current time.
When you click MB1 on the clock, the day display returns to the current day if you have been displaying a different day. Clicking on the clock also causes the timeslots that are visible in the day display to adjust so that the first timeslot contains the time in the current increment that directly precedes the actual time.
For example, if you set the timeslots in the day display at half-hour intervals and you click on the clock at 10:57, the day display adjusts so that the first timeslot contains the time 10:30.
This adjustment is continuous; as a timeslot passes, it scrolls off the top of the display. This scrolling is convenient if you reduce the size of the day display significantly; only the most immediate timeslots remain in view.
To stop the automatic scrolling, move the timeslot by any other method, such as adjusting the scroll bar.
If you are making an entry in a timeslot when it is about to scroll, the entry does not disappear. The scroll mechanism waits until the next interval is over, then the mechanism catches up.
The Show AM/PM customizing option (choose General... from the Options menu) allows you to choose between a 12-hour and a 24-hour time display.
You can enter information in a day note that is specific to a particular day but is not tied to a particular time. For example, you can use day notes to identify birthdays and other days of personal interest.
To enter a brief day note, click on the day note indicator (on the left side of the box below the date in the day display). Enter the text for your day note. To complete the entry, click again on the day note indicator.
To enter a longer day note, double click on the day note indicator to display the entry editor. You can then enter text, modify an existing entry, or adjust the alarm settings and repeat intervals.

You can mark days of particular importance, such as major project milestones, holidays, or birthdays. Marking a day alters the display font of its number in the month and year displays so that you can distinguish the day from other days in the various Calendar displays.
To mark a day:
| Choose | To Produce |
|---|---|
| Default | The font a day had before it was marked with the Work Day or Non-Work Day menu item. |
| Work Day |
Bold font.
Once you choose the Work Day menu item, the marked days continue to display as Work even if you change the setting for that day of the week to Non-Work in the dialog box of the General... menu item on the Options menu. |
| Non-Work Day |
Standard Calendar font.
Once you choose the Non-Work Day menu item, the marked days continue to display as Non-Work even if you change the setting for that day of the week to Work in the dialog box of the General... menu item on the Options menu. |
| Normal | The font in which a day appeared before you marked it with the Special menu item. |
| Special | Bold, larger font; on color workstations, displayed in red. |
You can create, open, save, print, and delete calendars. You can create different calendars to use for specific purposes. For example, you could designate one calendar for business appointments and another for social engagements.
You can use the Open... menu item to open a calendar even if you do not have privileges to modify it. This feature lets you use a calendar to share information.
For example, a group secretary can create a calendar for events of groupwide interest, so that everyone on a team can see when group activities occur. Only one person at a time can write in this calendar, and you cannot read the calendar while it is being modified. If no one is modifying the file, an unlimited number of people can read it simultaneously. For more information about making a calendar accessible to a group of people, see your system manager.
To create a new calendar:
By default, the new calendar is presented in a month display containing the current day.
You can change the calendar file name later if necessary (see Renaming a Calendar).
To open an existing calendar, follow the steps in the preceding section (Creating a New Calendar), but specify the name of an existing Calendar file in the file selection dialog box.
If you specify the name of a calendar that you are not allowed to read, the Open operation fails and a message box is displayed explaining the cause of the failure.
To rename the current calendar, choose Name As... from the File menu. A dialog box is displayed.

In the text entry box, enter the new calendar name and click on OK. (On OpenVMS systems, Calendar uses DWC as the default file type.) You can rename only those calendars in which you are allowed to write.
If you have opened a calendar in a new window (Open in New... from the File menu), you can close it without exiting Calendar by choosing Close from the File menu.
If you have not opened the current calendar in a new window, the Close menu item is dimmed.
To delete a calendar, choose Delete... from the File menu. Calendar displays a warning box that asks whether you really want to delete the calendar. If you do not have sufficient privileges to delete the specified calendar, an error message is displayed.
You can specify many options to customize the appearance and behavior of Calendar displays. These options fall into four categories:
You can change these options by choosing menu items from the Options menu. The following sections describe the options. For information about the alarm option, see Setting Alarms.
The defaults for many options vary depending on the country for which Calendar is designed. For example, in the American version the default time display is 12-hour (AM and PM) and the default first day of the week is Sunday. However, in some other versions the defaults include 24-hour time display and Monday as the first day of the week. |
To customize general features of Calendar, choose General... from the Options menu.
A dialog box is displayed.
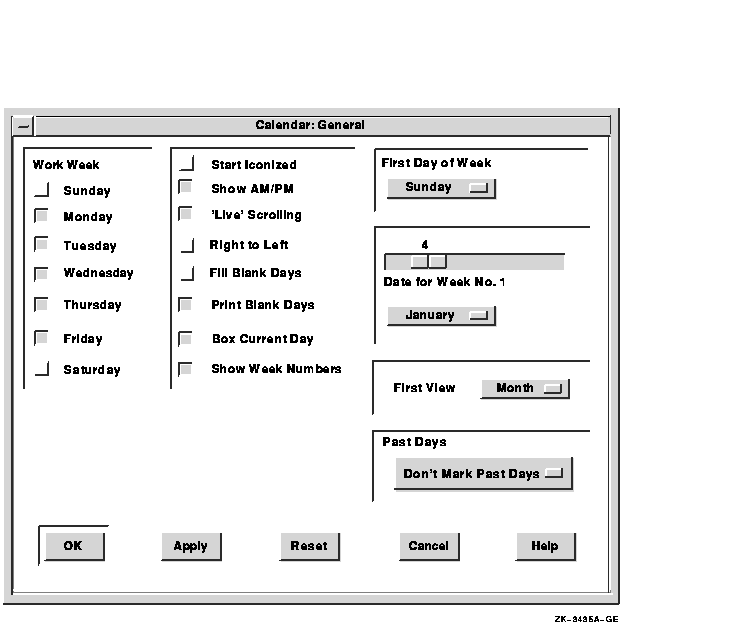
From this dialog box, you can modify any of the following Calendar options.
Work Week
Use the Work Week settings to identify the standard work days in your work week.The check buttons identify work days and nonwork days. The settings affect the behavior of certain alarm repetition options (for example, repeat monthly, but if a nonwork day, move the alarm forward to the next work day).
Start Iconized
If you want Calendar to appear as an icon when it starts, click on the Start Iconized check button.Show AM/PM
In its day display, Calendar has either a 12-hour time system, using AM and PM to differentiate morning and afternoon/evening timeslots, or a 24-hour time system, in which 1:00 PM becomes 13:00, 2:00 PM becomes 14:00, and so on.For a 12-hour display, enable the Show AM/PM check button; for a 24-hour display, disable the button.
'Live' Scrolling
Normally, when you move the slider on the scroll bars in the day, month, and year displays, the displays do not move until after you have moved the slider. When you enable the 'Live' Scrolling check button, the displays change dynamically when you move the slider.Right to Left
If you enable the Right to Left check button, the time and day note indicators and the entry handles appear on the right side of the day view, and the vertical scroll bar appears on the left side of all displays.Fill Blank Days
If you enable the Fill Blank Days check button, any days at the top and bottom of the month display that are not in the current month appear in the display. If you disable the check button, these days do not appear.For example, assume that March 1 is a Friday and March 31 is a Sunday. If you enable Fill Blank Days, February 24--28 and April 1--6 also appear (that is, if Sunday is the first day of the week). If you disable Fill Blank Days, the days from February and April are blank in the March display.
Print Blank Days
If you enable the Show Week Numbers setting, you can select a week number and then choose Print... from the File menu to print Calendar entries for that week.If you enable Print Blank Days, all days in the selected week print, whether or not you have entries in them.
If you disable Print Blank Days, days with no entries do not print.
Box Current Day
If you enable the Box Current Day setting, Calendar puts a box around the current day number.Show Week Numbers
If you enable the Show Week Numbers setting, the leftmost column in every month display lists the number of each week in the year.The date for week 1 is controlled by a separate option in this dialog box.
First Day of Week
To designate the first day of the week in month displays, display the Options menu and choose the correct day.Date for Week No. 1
This option lets you specify the first week of the year. Its effect is visible if you enable the showing of week numbers,Use the Date for Week No. 1 option menu to choose the desired month and use the slider to choose the desired day in that month. For example, if your fiscal year starts the first week of July and you want to designate that week as the first week of the year, choose July from the list of months and choose a day number from the first week. Note, however, that if you want to increase the probability that the date always falls in the first full week of the month, you should choose day 6.
First View
Use the First View Options menu to specify whether the day, month, or year display appears when you start Calendar.Past Days
Use the Past Days Options menu to determine whether or not past days are marked and, if so, how:
- Don't Mark Past Days --- no marking
- Strike Out Past Days --- marked with a slash
- Cross Out Past Days --- marked with X
| Previous | Next | Contents | Index |
|
|
| privacy and legal statement | ||
| 5634PRO_002.HTML | ||