


Common Desktop Environment: Advanced User's and System Administrator's Guide
13 Advanced Front Panel
Customization
Contents of Chapter:
- Front Panel Configuration Files
-
- Default Front Panel Configuration File
-
- Search Path for Front Panel Configuration Files
-
- How the Front Panel Is Assembled: Precedence Rules
-
- Dynamically Created Front Panel Files
-
- Administering User Interface Customizations
-
 To Prevent Personal Customizations
-
- To Restore a Deleted Control or Subpanel
-
- Organization of the Front Panel Definition
-
- Front Panel Components
-
- General Syntax of the Front Panel Definition
-
- Modifying the Main Panel
-
- To Add a Control to the Main Panel
-
- To Remove a Control
-
- To Modify a Control
-
- To Interchange the Position of Controls
-
- To Replace a Front Panel Control
-
- Specifying the Icon Used by a Control
-
- Creating and Modifying Subpanels
-
- To Create a New System-Wide Subpanel
-
- Customizing the Built-in Subpanels
-
- To Modify General Properties of a Built-In Subpanel
-
- To Add a System-Wide Control to a Built-In Subpanel
-
- To Remove a Control from a Built-In Subpanel
-
- To Remove the Install Icon Control
-
- To Change the Auto-Close Behavior of Subpanels
-
- Defining Front Panel Controls
-
- Front Panel Control Definitions
-
- Control Types
-
- To Create a New Control
-
- To Create a Client Window Control
-
- To Animate a Control
-
- Customizing the Workspace Switch
-
- To Change the Default Number of Workspaces
-
- To Change the Number of Switch Rows
-
- To Change or Add Controls in the Workspace Switch
-
- General Front Panel Configuration
-
- General Steps
-
- To Change the Default Front Panel Location
-
- To Label Controls in the Main Panel
-
- To Change the Click Behavior of Controls
-
- To Create an Entirely New Front Panel
-
- Example of Creating a Personal Front Panel with Three Rows
-
Users can customize the Front Panel using its pop-up menus and the Install Icon controls in the subpanels.
This chapter covers customizing the Front Panel by creating and editing configuration files.
See Also
- For reference information on Front Panel controls and configuration, see the dtfpfile(4X) man page.
- For reference information about the Workspace Manager, see the dtwm(1) and dtwmrc(4) man pages.
The Front Panel is defined in a database of configuration files.
The configuration files provide a way to customize the Front Panel. Certain modifications can only be done by editing a configuration file, including:
- Adding a new control position to the Main Panel.
- Adding special types of controls, such as client windows.
- Changing certain default behaviors--for example, whether the Front Panel controls respond to a single- or double-click.
To provide maximum flexibility in configuring the panel, these files can be personal, system-wide, or located on other systems.
The Front Panel is created and managed by the Workspace Manager.
Default Front Panel Configuration File
The default Front Panel is defined in the Front Panel configuration file /usr/dt/appconfig/types/language/dtwm.fp.
This file should not be altered.
Search Path for Front Panel Configuration Files
The Front Panel definition can be distributed among any number of files located locally or on remote systems.
Files used to define the Front Panel must meet these requirements:
- The file name must end in .fp; for example, mail.fp.
- The file must be located along the actions database search path.
The default actions database search path includes these directories, searched in the following order:
- HomeDirectory/.dt/types
- Personal customizations
- /etc/dt/appconfig/types/language
- System-wide customizations
- /usr/dt/appconfig/types/language
- Built-in panel and controls
An additional directory, HomeDirectory/.dt/types/fp_dynamic, is used for personal customizations made with the user interface. Do not use this directory for manual customizations.
The actions database search path may include additional directories added to configure the system for networking. In particular, additional remote locations are added when the system is configured to access an application server. For more information, see "Database (Action/Data Types) Search Path".
How the Front Panel Is Assembled: Precedence Rules
The Front Panel is assembled from all the configuration files located on the actions database search path.
Where there is a conflict between components of the definition, precedence rules determine which definition is used. Two components are in conflict with one another when they:
- Have the same control name, CONTAINER_NAME, and CONTAINER_TYPE.
- Or, they compete for the same position (by having different names but the same CONTAINER_NAME, CONTAINER_TYPE, and POSITION_HINTS).
The Front Panel uses these precedence rules:
- If components have the same control name and container name and type, the component read first is used.
For example, if both a system-wide and built-in control contain these fields but are otherwise different:
CONTROL TextEditor
{
   CONTAINER_TYPE    BOX
   CONTAINER_NAME    Top
   ...
}
then the system-wide control has precedence.
- If two components complete for the same position, they are placed in the order in which they are read.
For example, if a user creates a new personal control for the Main Panel (CONTAINER_TYPE BOX and CONTAINER_NAME Top) and assigns it POSITION_HINTS 5, the personal control will bump the built-in control and all other controls with higher position numbers one position to the right.
Note: When you are modifying a control by creating a new system-wide or personal version of it, the new control definition must specify the same control name, CONTAINER_NAME, and CONTAINER_TYPE. Otherwise, the new control will appear in addition to the existing control.
When the user customizes the Front Panel using the Install Icon control and pop-up menus, files are written to the directory HomeDirectory/.dt/types/fp_dynamic.
The Front Panel creates an additional file, HomeDirectory/.dt/sessions/dtwmfp.session, that is used to save and restore the state of the customized Front Panel for each session.
Users can use the controls' pop-up menus and Install Icon controls to extensively customize the Front Panel.
This section describes how to:
- Prevent certain personal customizations. For example, you may want to make it impossible for a user to delete a control.
- Undo personal customizations. For example, a user might request that you restore a single control accidentally deleted.
To Prevent Personal Customizations
- If the control is a built-in control, copy its definition from /usr/dt/appconfig/types/language/dtwm.fp to /etc/dt/appconfig/types/language/name.fp.
- Add the following line to the control definition:
LOCKED True
To Restore a Deleted Control or Subpanel
The Restore Front Panel action in the Desktop_Tools application group removes all Front Panel customizations made with the user interface. Users can use this action to remove all their personal customizations made with the Front Panel's pop-up menus.
Use the following procedure to restore an individual control.
 In the HomeDirectory/.dt/types/fp_dynamic directory, remove the file that was created when the user deleted the control. The control will have the same name as the original control that was deleted.
For example, if the user deleted the Icon Editor control, a file in the fp_dynamic directory will contain:
CONTROL IconEditor
{
   ...
   DELETE   True
}
When the user deletes a subpanel, a separate dynamic file is created for the subpanel and for each control in the subpanel.
The Front Panel is built by assembling definitions for its components. Each of these components has required syntax that defines where the component is placed in the Front Panel, what the component looks like, and how it behaves.
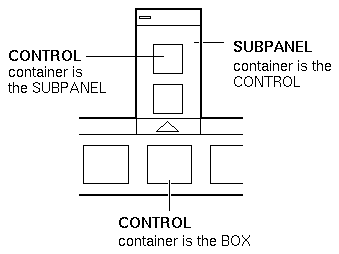
Front Panel Components
Figure 13-1 Front Panel components

The Front Panel is assembled from the outside in:
- The PANEL is the top-level container, or parent, for the entire Front Panel.
- The PANEL is a container for one or more BOXes.
- A BOX is a container for one or more CONTROLs.
There are two special types of containers:
- A SUBPANEL is associated with a particular control (the control is the container for the subpanel). Subpanels "slide up" from the control with which they are associated.
- The SWITCH contains the buttons for changing workspaces plus additional controls.
General Syntax of the Front Panel Definition
Each component in the Front Panel is defined separately using the syntax:
COMPONENT name
{
  KEYWORD       value
  KEYWORD       value
  ...
}
Some keywords are required, others are optional. For more information, see the dtfpfile(4X) man page.
The PANEL is the top-level component. Its definition includes:
- The Front Panel name
- Fields describing the general appearance and behavior of the entire Front Panel
PANEL front_panel_name
{
   KEYWORD      value
   KEYWORD      value
   ...
}
The front_panel_name is a unique name for the Front Panel. The default name is "FrontPanel."
A BOX definition describes:
- The BOX name
- Which PANEL the box is in (CONTAINER_NAME)
- The position of the box in the PANEL (POSITION_HINTS)
- Fields describing appearance and behavior that apply to the entire box
BOX box_name
{
   CONTAINER_NAME   front_panel_name
   POSITION_HINTS   position
   KEYWORD          value
   KEYWORD          value
   ...
}
A CONTROL definition describes:
- The CONTROL name
- Whether the control is in a box, subpanel, or switch (CONTAINER_TYPE)
- Which box, subpanel, or switch the control is in (CONTAINER_NAME)
- The position of the CONTROL in the BOX (POSITION_HINTS).
- Fields describing appearance and behavior of the control
CONTROL control_name
{
   CONTAINER_TYPE   BOX or SUBPANEL or SWITCH
   CONTAINER_NAME   box_name or subpanel_name or switch_name
   TYPE             control_type
   POSITION_HINTS   position
   KEYWORD          value
   KEYWORD          value
   ...
}
A SUBPANEL definition describes:
- The SUBPANEL name
- The name of the control to which the subpanel is attached (CONTAINER_NAME)
- Fields describing appearance and behavior specific to the subpanel
SUBPANEL subpanel_name
{
   CONTAINER_NAME   control_name
   KEYWORD          value
   KEYWORD          value
   ...
}
The SWITCH definition describes:
- The SWITCH name
- Which BOX the SWITCH is in (CONTAINER_NAME)
- The position of the SWITCH within the BOX (POSITION_HINTS)
- Fields describing the appearance and behavior of the SWITCH
SWITCH switch_name
{
   CONTAINER_NAME   box_name
   POSITION_HINTS   position
   KEYWORD          value
   KEYWORD          value
   ...
}
The Main Panel is the Front Panel window, excluding the subpanels.
Figure 13-2 Main Panel containers

Modifications you can make include:
- Adding or removing controls
- Interchanging the positions of controls
To Add a Control to the Main Panel
- Create a Front Panel configuration file:
- System-wide:
/etc/dt/appconfig/types/language/*.fp
- Personal: HomeDirectory/.dt/types/*.fp
- Define the control in the file.
Use the CONTAINER_NAME and CONTAINER_TYPE fields to specify the container for the control:
CONTAINER_NAME  Top
CONTAINER_TYPE  BOX
Use POSITION_HINTS to specify the left-to-right placement of the control. Since customizations have precedence over built-in controls, the new control will "bump" the existing control with that position one position to the right.
- Save the configuration file.
- Create an icon for the Front Panel control.
See "Specifying the Icon Used by a Control".
- Choose Restart Workspace Manager from the Workspace menu.
For example, the following control definition placed in the file /etc/dt/appconfig/types/language/audio.fp inserts an audio application control between the Clock and Calendar controls.
CONTROL AudioApplication
{
 TYPE             icon
 CONTAINER_NAME   Top
 CONTAINER_TYPE   BOX
 ICON             AudioApp
 POSITION_HINTS   2
 PUSH_ACTION      StartAudioApplication
 PUSH_RECALL      true
}
- Create a Front Panel configuration file:
- System-wide:
/etc/dt/appconfig/types/language/name.fp
- Personal: HomeDirectory/.dt/types/name.fp
- Copy the definition of the control you want to delete to the new file.
If the control is built-in, its definition is in /usr/dt/appconfig/types/language/dtwm.fp.
You do not need to copy the entire definition. However, the portion you copy must include the fields CONTAINER_NAME and CONTAINER_TYPE.
- Add the DELETE field to the definition:
DELETE True
- Save the configuration file
- Choose Restart Workspace Manager from the Workspace menu.
For example, the following control definition placed in the file /etc/dt/appconfig/types/language/TrashCan.fp removes the Trash Can control from the Front Panel.
CONTROL Trash
{
 CONTAINER_NAME  Top
 CONTAINER_TYPE  BOX
 DELETE          True
}
To Modify a Control
Use this procedure when you need to modify a control definition--for example, to change its icon image.
- Copy the entire control definition from /usr/dt/appconfig/types/language/dtwm.fp to:
- System-wide:
/etc/dt/appconfig/types/language/name.fp
- Personal: HomeDirectory/.dt/types/name.fp.
- Edit the field you want to change. You can also add additional fields.
- Save the file
- Choose Restart Workspace Manager from the Workspace menu.
To Interchange the Position of Controls
- Copy the control definitions for the controls whose positions you want to change from /usr/dt/appconfig/types/language/dtwm.fp to:
- System-wide:
/etc/dt/appconfig/types/language/name.fp
- Personal: HomeDirectory/.dt/types/name.fp.
You must copy the entire control definition for each control to be moved.
- Interchange the values of the POSITION_HINTS fields of the control definitions.
- Save the file
- Choose Restart Workspace Manager from the Workspace menu.
For example, the following definitions placed in a file /etc/dt/appconfig/types/C/MailHelp.fp interchange the positions of the Mail and Help Manager controls and lock these controls against personal changes.
CONTROL Mail
{
   POSITION_HINTS   12
   LOCKED           True
   ... the rest of the control definition
}

CONTROL Help
{
   POSITION_HINTS   5
   LOCKED           True
   ... the rest of the control definition
}
To Replace a Front Panel Control
Create another control definition with the same:
For example, the following two controls are defined in two different configuration files. The controls have the same control name and container name and are therefore considered the same control.
The personal control has precedence, so the control will be located at position 6.
The control definition's ICON field defines the icon image used for the control.
The value of the ICON field can be:
- A base file name.
The base file name is the name of the file containing the icon image minus the file-name suffixes for size (m and t) and image type (bm and pm). For example, if files are named MyGame.l.pm and MyGame.m.pm, use MyGame.
If you use the base file name, the icon files must be placed in a directory on the icon search path:
- Personal icons: HomeDirectory/.dt/icons
- System-wide icons: /etc/dt/appconfig/icons/language
- An absolute path to the icon file, including the full file name.
You should use the absolute path only if the icon file is not located on the icon search path.
The size icon you need depends on the location of the control:
- Location
- Size
- Main Panel
- 48 by 48 pixels (name.l.pm or name.l.bm)
- Subpanel
- 24 by 24 pixels (name.s.pm or name.s.bm)
Place the icon file in one of these locations:
- Personal icons: HomeDirectory/.dt/icons
- System-wide icons: /etc/dt/appconfig/icons/language
Users can create and modify subpanels using the Front Panel pop-up menus.
This section discusses how to provide system-wide customization, which requires you to modify the Front Panel configuration files.
A subpanel is "attached" to a control in the Main Panel.
Figure 13-3 A subpanel's container is the control to which it is attached
The attachment is done in the subpanel definition. The CONTAINER_NAME field specifies the control to which the subpanel is attached:
CONTROL control_name
{
   ...
}

SUBPANEL subpanel_name
{
   CONTAINER_NAME    control_name
   ...
}
To Create a New System-Wide Subpanel
- Locate the control_name of the control in the Main Panel to which you want to attach the subpanel.
If the control is one of the built-in controls, its definition is in /usr/dt/appconfig/types/language/dtwm.fp.
- Create a new file /etc/dt/appconfig/types/language/*.fp.
- Define the subpanel:
SUBPANEL subpanel_name
{
   CONTAINER_NAME   control_name
   TITLE            value
   KEYWORD          value
   ...
}
- Save the new configuration file.
- Choose Restart Workspace Manager from the Workspace menu.
Customizing the Built-in Subpanels
You can modify general properties (such as the title) and the contents of the built-in subpanels.
To Modify General Properties of a Built-In Subpanel
- Create a new Front Panel configuration file:
- System-wide:
/etc/dt/appconfig/types/language/name.fp
- Personal: HomeDirectory/.dt/types/name.fp.
- Copy the entire default SUBPANEL definition from /usr/dt/appconfig/types/language/dtwm.fp to the new file:
SUBPANEL   subpanel_name
{
  ...
}
- Modify the subpanel definition.
- Save the new configuration file.
- Choose Restart Workspace Manager from the Workspace menu.
For example, the following definition, placed in the file /users/janice/.dt/types/PerApps.fp, changes the name of the Personal Applications subpanel:
SUBPANEL PersAppsSubpanel
{
   CONTAINER_NAME   TextEditor
   TITLE            Janice's Applications
}
To Add a System-Wide Control to a Built-In Subpanel
- Create a Front Panel configuration file
/etc/dt/appconfig/types/language/name.fp.
- Define the system-wide control in the file.
Use the CONTAINER_NAME and CONTAINER_TYPE fields to specify the container for the control:
CONTROL control_name
{
   CONTAINER_NAME   subpanel_name
   CONTAINER_TYPE   SUBPANEL
   ...
}
See "Defining Front Panel Controls".
- Save the configuration file.
- Choose Restart Workspace Manager from the Workspace menu.
For example, the following control defined in a new file /etc/dt/appconfig/types/language/DigitalClock.fp adds the DigitalClock (in the Desktop_Tools application group) to the Personal Applications subpanel for all users.
CONTROL DigitalClockControl
{
   TYPE             icon
   CONTAINER_NAME   PerAppsSubpanel
   CONTAINER_TYPE   SUBPANEL
   ICON             Dtdgclk
   PUSH_ACTION      DigitalClock
   PUSH_RECALL      True
}
To Remove a Control from a Built-In Subpanel
Use the same procedure as for removing a Main Panel control. See "To Remove a Control".
Add the following field to the subpanel definition:
CONTROL_INSTALL False
To Change the Auto-Close Behavior of Subpanels
The default behavior of subpanels is to close when the user chooses a control, unless the user has moved the subpanel from its original position.
The Front Panel can be configured to keep subpanels open until the user explicitly closes them.
- Create a new Front Panel configuration file in:
- System-wide:
/etc/dt/appconfig/types/language/*.fp
- Personal: HomeDirectory/.dt/types/*.fp
- Copy the default PANEL definition from /usr/dt/appconfig/types/language/dtwm.fp to the new file:
PANEL FrontPanel
{
  ...
}
- Add the following field to the PANEL definition:
SUBPANEL_UNPOST False
- Save the new configuration file.
- Choose Restart Workspace Manager from the Workspace menu.
The user can create personal controls by dropping icons on the Install Icon controls.
While this provides easy customizability, the functionality it provides is a subset of the capabilities of Front Panel controls. For example, a control created using the Install Icon control cannot:
- Provide animation
- Display a client window
- Change appearance when an event occurs (for example, upon receiving new mail)
This section describes how to manually create Front Panel controls.
For reference information on the syntax of Front Panel controls, see the dtfpfile(4X) man page.
Front Panel Control Definitions
The structure of a Front Panel control definition is:
CONTROL control_name
{
  TYPE            control_type
  CONTAINER_NAME  value
  CONTAINER_TYPE  value
  other fields defining appearance and behavior
}
The TYPE field in the control definition specifies the basic behavior of the control.
- Control TYPE
- Control Behavior
- icon(Default). The control will run a specified action when the user clicks the control or drops a file on it.
- blankPlaceholder used to adjust spacing of controls.
- busyBusy light. The control blinks (toggles images) when an action is invoked
- clientA client window in the Front Panel.
- clock
- Clock.
- dateDisplays the current date.
- fileRepresents a file. Choosing the control runs the default action for the file.
This section describes the general steps for defining a control and describes how to create various types of controls.
- If the control will have a PUSH_ACTION and/or DROP_ACTION, create the action definitions. These are the actions that run when the user clicks the control or drops a file on it.
- Create the icon image files for the control.
For information about icon sizes, names, and locations, see "Icon Image Files".
- Create a new Front Panel configuration file in:
- System-wide:
/etc/dt/appconfig/types/language/*.fp
- Personal: HomeDirectory/.dt/types/*.fp
- Add the control definition to the file.
- Save the file.
- Choose Restart Workspace Manager from the Workspace menu.
Creating a Control that Runs an Action When Clicked
Use these fields to define the control's behavior:
- TYPE: Set to icon
- PUSH_ACTION: Specifies the name of the action to be run
For example, the following control, which will be put in the Personal Applications subpanel, runs a game the user has acquired:
CONTROL Ball
{
   TYPE             icon
   CONTAINER_NAME   PersAppsSubpanel
   CONTAINER_TYPE   SUBPANEL
   ICON             ball
   PUSH_ACTION      RunBallGame
   HELP_STRING      "Choose this control to play Ball."
}
The following control will be located in the upper left corner of the switch. It starts an action named CutDisp.
CONTROL StartCutDisp
{
  TYPE              icon
  CONTAINER_NAME    Switch
  CONTAINER_TYPE    SWITCH
  POSITION_HINTS    first
  ICON              cutdisp
  HELP_STRING       "Choose this control to run cutdisp."
  PUSH_ACTION       CutDisp
}
Use these fields to define the control's behavior:
- TYPE: Set to file
- FILE_NAME: Specifies the path of the file to be opened
- PUSH_ACTION: Set to Open
There must be an Open action defined for the data type of the file.
For example, the following control will be located on the far right side of the Main Panel. It starts Text Editor with the data file /users/ellen/PhoneList.txt. The Open action for *.txt files is part of the default action database.
CONTROL EditPhoneList
{
   TYPE             file
   FILE_NAME        /users/ellen/PhoneList.txt
   CONTAINER_NAME   Top
   CONTAINER_TYPE   BOX
   POSITION_HINTS   last
   ICON             PhoneBook
   HELP_STRING      "This control displays Ellen's phone list."
   PUSH_ACTION      Open
}
Creating a Control that Behaves as a Drop Zone
Use the DROP_ACTION field to specify the action that runs when the user drops a file on the control. The action must be capable of accepting a file argument.
Frequently, a control definition includes both a PUSH_ACTION and DROP_ACTION field. You can use the same action for the push and drop action.
For example, the following control, located in the Personal Applications subpanel, runs the X client xwud, which takes a file argument.
CONTROL Run_xwud
{
   CONTAINER_NAME   PerAppsSubpanel
   CONTAINER_TYPE   SUBPANEL
   POSITION_HINTS   2
   ICON             XwudImage
   PUSH_ACTION      RunXwud
   DROP_ACTION      RunXwud
}
Creating a Control that Monitors a File
Use these fields to define the control's behavior:
- TYPE: Specify one of the following values:
- icon
- Use this type if you want to specify a PUSH_ACTION and/or DROP_ACTION for the control.
- file
- Use this type if you want the control, when chosen, to behave like the file when the file's icon is double-clicked in File Manager.
- ICON and ALTERNATE_ICON:Describe the images used to indicate the non-changed and changed state of the monitored file.
- MONITOR_TYPE: Describes the conditions causing the image to change. Use one of the following values:
- mail
- The control will change appearance when information is added to the file.
- file
- The control will change when the specified file becomes non-empty.
- FILE_NAME: Specifies the file to be monitored.
For example, the following control looks for the presence of a file named meetings that you expect to be transferred to your system using anonymous ftp. The control is placed at the top of the Personal Applications subpanel.
CONTROL MonitorCalendar
{
   TYPE             file
   CONTAINER_NAME   PersonalApps
   CONTAINER_TYPE   SUBPANEL
   POSITION_HINTS   first
   FILE_NAME        /users/ftp/meetings
   MONITOR_TYPE     file
   ICON             meetingsno
   ALTERNATE_ICON   meetingsyes
}
Creating a One-Instance (Toggle) Control
A one-instance control checks to see whether the process started by the PUSH_ACTION is already running. If the process is not running, the PUSH_ACTION is run. If the process is already running, the window is moved to the top of the window stack in the current workspace.
Use these fields to define the control's behavior:
For example, the following control runs one instance of an application whose action is named MyEditor.
CONTROL MyEditor
{
   TYPE             icon
   CONTAINER_NAME   Top
   CONTAINER_TYPE   BOX
   POSITION_HINTS   15
   PUSH_RECALL      True
   CLIENT_NAME      BestEditor
   PUSH_ACTION      StartMyEditor
   ICON             MyEd
}
To Create a Client Window Control
A client window control is an application window embedded in the Front Panel. For example, you can put a system load meter in the Front Panel by creating an xload client window control.
- Define the control.
Use these fields to define the control's behavior:
- TYPE: Set to client.
- CLIENT_NAME: Specifies the client to be started.
The value of CLIENT_NAME must match the first string (res_name) in the WM_CLASS properly on the application's top-level window. For more information, see the xprop(1) man page.
- CLIENT_GEOMETRY: Specifies the size, in pixels, needed for the client's Front Panel window.
The xwininfo(1) man page describes how to find out the size of a window in pixels.
- Choose Restart Workspace Manager from the Workspace menu.
- Start the client from a terminal emulator command line.
For example, the following control displays a 30 X 20 pixel load meter.
CONTROL LoadMeter
{
   TYPE             client
   CONTAINER_NAME   Top
   CONTAINER_TYPE   BOX
   CLIENT_NAME      xload
   CLIENT_GEOMETRY  30x20
}
If the client is not saved and restored between sessions, you may want to configure the control to start the client when the user clicks it. For example, you can configure the LoadMeter control to start xload by adding the following line to the definition:
PUSH_ACTION StartXload
and creating the action:
ACTION StartXload
{
   WINDOW_TYPE      NO_STDIO
   EXEC_STRING      /usr/contrib/bin/X11/xload
}
To Animate a Control
You can attach an animation sequence to be used when the user chooses the control or drops an object on it.
In order to have an animation sequence, a control must:
- Be type icon
- Have a PUSH_ACTION or DROP_ACTION
- Specify the animation sequence using the ANIMATION component:
ANIMATION animation_name
{
   icon_image       [delay]
   icon_image       [delay]
   ...
}
where delay is the time delay between animation icons, in milliseconds.
- Add the PUSH_ANIMATION and/or DROP_ANIMATION fields to the control definition. The value is the name of the ANIMATION sequence.
For example, the following lines animate a control that starts the BestEditor application. The time delay between icons is 300 milliseconds. The example assumes you've created icon files frame1, frame2, etc.
CONTROL BestEditor
{
   ...
   PUSH_ANIMATION    BestEdAnimation
   ...
}

ANIMATION BestEdAnimation
{
   frame1           300
   frame2
   ...
}
Providing On Item Help for Front Panel Controls
There are two ways to provide help for a control:
- Providing a help sting in the control definition.
The help string is displayed in the help viewer when the user invokes on-item help for the control. The help string cannot include formatting (such as headings) or links.
To provide a help string, specify the help string in the control definition:
HELP_STRING help_string
- Specifying a help topic in a registered help volume.
A help topic is information authored using the full capabilities of the help system. Authoring a help topic requires you to use the desktop Help Developer's Kit.
To provide a help topic, specify the help volume and topic ID in the control definition:
HELP_VOLUME    help_volume_name
HELP_TOPIC     topic_id
There are several ways to customize the workspace switch:
- Changing the number of workspaces
- Changing the layout of the switch
- Changing the controls in the switch
To Change the Default Number of Workspaces
Modify the following Workspace Manager resource:
Dtwm*workspaceCount: n
For more information, see "To Change the Number of Workspaces on a System-Wide Basis".
To Change the Number of Switch Rows
Modify the NUMBER_OF_ROWS field in the SWITCH definition.
For example, the following definition defines a three-row switch.
SWITCH Switch
{
   CONTAINER_NAME    box_name
   NUMBER_OF_ROWS    3
   ...
}
To Change or Add Controls in the Workspace Switch
- Create a Front Panel configuration file with the control definition.
- Create the icon for the control. The recommended size is 16 by 16 pixels.
For example, the following control puts a Terminal control in the switch.
CONTROL SwitchTerminal
{
TYPE icon
CONTAINER_NAME    Switch
CONTAINER_TYPE    SWITCH
POSITION_HINTS 3
ICON Fpterm
LABEL Terminal
PUSH_ACTION Dtterm
HELP_TOPIC FPOnItemTerm
HELP_VOLUME FPanel
}
The control uses a built-in icon and the same help topic used by the Terminal control in the Personal Applications subpanel.
Front Panel's PANEL syntax allows you to:
- Change the location of the Front Panel
- Change the window decoration
- Set general appearance and behavior of controls
The default PANEL description is in /usr/dt/appconfig/types/language/dtwm.fp.
For additional information, see the dtfpfile(4X) man page.
General Steps
- Create a new Front Panel configuration file in
/etc/dt/appconfig/types/language or HomeDirectory/.dt/types.
- Copy the default PANEL description from
/usr/dt/appconfig/types/language/dtwm.fp to the new file.
- Edit the PANEL description.
The new PANEL description has precedence over the default one.
To Change the Default Front Panel Location
Use the PANEL_GEOMETRY field in the PANEL definition to specify the location.
For example, the following panel is in the upper right corner.
PANEL SpecialFrontPanel
{
  PANEL_GEOMETRY    -1+1
  ...
}
To Label Controls in the Main Panel
- Add the following line to the PANEL definition:
DISPLAY_CONTROL_LABELS True
- Add a LABEL field to each control.
The control_name is used if no LABEL is specified.
To Change the Click Behavior of Controls
Use the CONTROL_BEHAVIOR field in the PANEL definition to specify how the user runs a control's PUSH_ACTION. Values for the field are:
- single_clickThe user clicks the control to run the PUSH_ACTION
- double_clickThe user double-clicks the control to run the PUSH_ACTION
To Create an Entirely New Front Panel
Creating a new Front Panel may be preferable when you want to make extensive changes.
To avoid conflict with the built-in Front Panel components, an entirely new Front Panel should use new names for the PANEL and other containers.
- Create the PANEL component for the new Front Panel. Give it a unique name:
PANEL front_panel_name
{
   ...
}
- Create the new boxes and controls, using the new container names.
If you want to use existing components, you must copy their definitions and change the CONTAINER_NAME value.
- Choose Restart Workspace Manager from the Workspace menu.
Example of Creating a Personal Front Panel with Three Rows
The following example changes the default Front Panel so that its controls are organized into three rows.
- Copy /usr/dt/appconfig/types/language/dtwm.fp to HomeDirectory/.dt.types/MyFrontPanel.fp. Give the file write permission.
This is the file you will edit to provide the new Front Panel.
- Change the name of the Front Panel:
PANEL NewFrontPanel
- Change the name of the box named Top and edit its container name:
BOX NewFrontPanelTop
{
  CONTAINER_NAME    NewFrontPanel
  POSITION_HINTS    first
  ...
}
- Add box definitions for the middle and bottom rows:
BOX NewFrontPanelMiddle
{
  CONTAINER_NAME    NewFrontPanel
  POSITION_HINTS    second
}

BOX NewFrontPanelBottom
{
  CONTAINER_NAME    NewFrontPanel
  POSITION_HINTS    second
}
- Change the CONTAINER_NAME of the following controls to NewFrontPanelTop:
- Clock
- Date
- Home
- TextEditor
- Mail
- Change the CONTAINER_NAME of the following controls to NewFrontPanelBottom:
- Printer
- Style
- Applications
- Help
- Trash
- Change the CONTAINER_NAME of the switch to NewFrontPanelMiddle.
- Set the resource:
Dtwm*frontPanel*name: NewFrontPanel
- Choose Restart Workspace Manager from the Workspace menu.
Generated with CERN WebMaker