Contains COM for OpenVMS, OpenVMS Registry, and OpenVMS Events information
This document contains information about COM for OpenVMS, the OpenVMS Registry, and OpenVMS Events logging. It also includes information about OpenVMS and Windows NT authentication and interoperation.
Revision/Update Information: This manual supersedes the OpenVMS Connectivity Developer Guide, Version 1.1-B.
Software Version: COM Version 1.2 for OpenVMS
Operating System:
OpenVMS Alpha Version 7.2-1 or higher
Microsoft Windows NT 4.0 SP5 or higher
Compaq Computer Corporation
Houston, Texas
© 2002 Compaq Information Technologies Group, L.P.
COMPAQ, the Compaq logo, Alpha, OpenVMS, Tru64, VAX, VMS, and the DIGITAL logo are trademarks of Compaq Information Technologies Group, L.P., in the U.S. and/or other countries.
Microsoft, MS-DOS, Visual C++, Windows, and Windows NT are trademarks of Microsoft Corporation in the U.S. and/or other countries.
Motif, OSF/1, and UNIX are trademarks of The Open Group in the U.S. and/or other countries.
Sample COM code that appears in this document is from Dale Rogerson's book, Inside COM (Microsoft Press, 1997), and is used with the publisher's permission.
This product includes software licensed from Microsoft Corporation.
Copyright © Microsoft Corporation, 1991-1998. All rights reserved.
This product includes software licensed from Bristol Technology, Inc.
Copyright © Bristol Technology, Inc, 1990-1998. All rights
reserved.
All other product names mentioned herein may be trademarks of their respective companies.
Confidential computer software. Valid license from Compaq required for possession, use, or copying. Consistent with FAR 12.211 and 12.212, Commercial Computer Software, Computer Software Documentation, and Technical Data for Commercial Items are licensed to the U.S. Government under vendor's standard commercial license.
Compaq shall not be liable for technical or editorial errors or omissions contained herein. The information in this document is provided "as is" without warranty of any kind and is subject to change without notice. The warranties for Compaq products are set forth in the express limited warranty statements accompanying such products. Nothing herein should be construed as constituting an additional warranty.
The Compaq OpenVMS documentation set is available on CD-ROM.
ZK6539
| Contents | Index |
This document is designed primarily for developers who want to use OpenVMS infrastructure to develop applications that move easily between the OpenVMS and Windows NT environments. These developers include the following:
This document is not intended as an introduction to COM or the registry. It assumes that readers are already familiar with object-oriented (OO) concepts and COM development techniques, as well as how the registry works on a Windows NT system. The document does provide pointers to online information about COM and the registry and recommends other books about COM, OO development, and the registry.
This document contains all the information you need to develop COM for OpenVMS applications and use the OpenVMS Registry. The document is divided into the following sections:
Win32® API calls shown in example code throughout this document and included on the COM for OpenVMS kit are provided for documentation purposes only.
COM for OpenVMS includes only those Win32 APIs that the COM for OpenVMS software requires. These COM APIs are listed in Appendix F, Lists of Differences, APIs, and Interfaces.
Win32 API calls that are not listed in Appendix F but that appear in examples in this document and in code samples on the COM for OpenVMS kit are provided by software vendors other than Compaq. If you want to use any Win32 APIs on OpenVMS other than those listed in Appendix F, you must purchase those interfaces from an independent software vendor such as Bristol Technologies ( www.bristol.com ).
For additional information about Compaq OpenVMS products and services, access the Compaq website at the following location:
http://www.openvms.compaq.com/ |
Compaq welcomes your comments on this manual. Please send comments to either of the following addresses:
| Internet | openvmsdoc@compaq.com |
|
Compaq Computer Corporation
OSSG Documentation Group, ZKO3-4/U08 110 Spit Brook Rd. Nashua, NH 03062-2698 |
Visit the following World Wide Web address for information about how to order additional documentation:
http://www.openvms.compaq.com/ |
The following conventions are used in this manual:
| Ctrl/ x | A sequence such as Ctrl/ x indicates that you must hold down the key labeled Ctrl while you press another key or a pointing device button. |
| PF1 x | A sequence such as PF1 x indicates that you must first press and release the key labeled PF1 and then press and release another key or a pointing device button. |
| [Return] |
In examples, a key name enclosed in a box indicates that you press a
key on the keyboard. (In text, a key name is not enclosed in a box.)
In the HTML version of this document, this convention appears as brackets, rather than a box. |
| ... |
A horizontal ellipsis in examples indicates one of the following
possibilities:
|
|
.
. . |
A vertical ellipsis indicates the omission of items from a code example or command format; the items are omitted because they are not important to the topic being discussed. |
| ( ) | In command format descriptions, parentheses indicate that you must enclose choices in parentheses if you specify more than one. |
| [ ] | In command format descriptions, brackets indicate optional choices. You can choose one or more items or no items. Do not type the brackets on the command line. However, you must include the brackets in the syntax for OpenVMS directory specifications and for a substring specification in an assignment statement. |
| | | In command format descriptions, vertical bars separate choices within brackets or braces. Within brackets, the choices are optional; within braces, at least one choice is required. Do not type the vertical bars on the command line. |
| { } | In command format descriptions, braces indicate required choices; you must choose at least one of the items listed. Do not type the braces on the command line. |
| bold text | This typeface represents the introduction of a new term. It also represents the name of an argument, an attribute, or a reason. |
| italic text | Italic text indicates important information, complete titles of manuals, or variables. Variables include information that varies in system output (Internal error number), in command lines (/PRODUCER= name), and in command parameters in text (where dd represents the predefined code for the device type). |
| UPPERCASE TEXT | Uppercase text indicates a command, the name of a routine, the name of a file, or the abbreviation for a system privilege. |
| Monospace text |
Monospace type indicates code examples and interactive screen displays.
In the C programming language, monospace type in text identifies the following elements: keywords, the names of independently compiled external functions and files, syntax summaries, and references to variables or identifiers introduced in an example. |
| - | A hyphen at the end of a command format description, command line, or code line indicates that the command or statement continues on the following line. |
| numbers | All numbers in text are assumed to be decimal unless otherwise noted. Nondecimal radixes---binary, octal, or hexadecimal---are explicitly indicated. |
The release notes in this chapter apply to COM Version 1.2 for OpenVMS.
1.1 COM for OpenVMS Versions
This section describes the versions of COM for OpenVMS.
| Area | Unauthenticated COM (V1.0, V1.1-B, V1.2) | Authenticated COM (V1.1, V1.1-A, V1.1-B, V1.2) |
|---|---|---|
| Client requests | Authenticated on Windows NT; not authenticated on requests to OpenVMS. | Authenticated on Windows NT and OpenVMS. |
| Security | Servers can run with the client's identity on Windows NT and with a prespecified OpenVMS identity on OpenVMS. | Servers can run with the client's identity on Windows NT and on OpenVMS. |
| Security | Per-method security is allowed on Windows NT, but only processwide security is allowed on OpenVMS. | Per-method security is allowed on Windows NT and on OpenVMS. |
| Outbound COM requests | Authenticated on Windows NT only. | Authenticated on Windows NT and OpenVMS. |
| Registry access |
On Windows NT: controlled by NT credentials.
On OpenVMS: relies on OpenVMS security controls such as privileges or rights identifiers. |
On Windows NT: controlled by NT credentials.
On OpenVMS: controlled either by Windows NT credentials or by OpenVMS security controls. |
| Event logging | Windows NT only. | Windows NT and OpenVMS. |
If you are upgrading from an earlier version of COM for OpenVMS to Version 1.2, follow the upgrade instructions in Section 4.3. In addition:
If you have previously installed COM Version 1.2 Field Test 1 (released June 2001) and are upgrading to COM Version 1.2 Field Test 2 (released February 2002), during the installation you will see a warning from the PCSI Utility. The warning is as follows:
%PCSI-W-VERLOW, you have selected a lower version of an installed product -PCSI-W-VERINS, the installation of product DEC AXPVMS DCOM H1.2 -PCSI-W-VERREM, will remove current product DEC AXPVMS DCOM V1.2 Do you want to continue? [YES] |
Press return or enter YES to continue the installation.
This warning occurs because the Version 1.2 Field Test 2 kit is named H1.2, which PCSI considers a lower version than the Version 1.2 Field Test 1 kit, named V1.2.
COM for OpenVMS Field Test 1 and the final customer release of COM for OpenVMS Version 1.2 are both referred to as V1.2. |
If you are upgrading from COM Version 1.1-A for OpenVMS or COM Version 1.1-B for OpenVMS, you do not need to repopulate the OpenVMS Registry. |
You must repopulate the OpenVMS Registry to include security settings. Use the DCOM$SETUP command to display the OpenVMS COM Tools menu, and choose option 3.
When you populate the OpenVMS Registry for COM Version 1.2 for OpenVMS, the system prompts you to confirm the repopulation. You must answer YES each time. For example:
        [ Starting to Populate the COM for OpenVMS Registry ]

         Populating the Registry for OpenVMS may take up to 15 minutes
         depending on your system.

Enter Y[ES] to continue: YES

         The COM for OpenVMS Registry has already been loaded. This
         action will overwrite the current COM for OpenVMS values
         and data.

Enter Y[ES] to continue: YES
|
Repopulating the OpenVMS Registry does not affect the registration of existing COM applications. |
In previous versions of COM for OpenVMS, DEC C Version 5.6 or higher was required software for COM for OpenVMS application development. As of COM Version 1.2 for OpenVMS, this prerequisite has been removed. (You can still build your applications using DEC C Version 6.0 or higher; however, the C compiler is not required software.)
You can now build all applications using DEC C++ Version 6.0 or higher. (You need Compaq C++ Version 6.2-016 or higher to build ATL applications.)
See Section 7.2 for more information on building applications using
the MIDL compiler.
1.2.4 Previously Registered Applications That Use Logical Names for the Local Server Path
If you previously registered any COM application using a logical name for the local server path, you must modify (reregister) the application using the actual name for the local server path.
For example, if you used the REGISTER_SIMPLE.COM command procedure to register the "Simple" application under COM Version 1.0 for OpenVMS, you must reregister the "Simple" application using the new REGISTER_SIMPLE.COM command procedure.
Compaq updated the registration command files as of COM Version 1.1-A for OpenVMS.
The system stores the COM application local server path in the OpenVMS Registry as a value data as follows:
"HKEY_CLASSES_ROOT\CLSID\{GUID}\LOCALSERVER32"
|
Use the following REG$CP command to modify the local server path:
  $ MCR REG$CP CREATE VALUE HKEY_CLASSES_ROOT\CLSID\{GUID}\Localserver32 -
  _$ /TYPE=SZ/DATA=device:[directory]image-name.EXE
|
A GUID is the COM application CLSID. For more information on
Localserver32 and CLSID, see Section 7.5.
1.2.5 Changes to the Examples
In COM Version 1.1-A for OpenVMS, the names of the server images in the
Dispatch_Sample1 example changed. If you previously built and
registered this application and you want to build the new version, you
must reregister the server after it has been built.
1.3 Windows 2000 Interoperability with COM Version 1.2
This section describes issues or problems you might encounter when
running Windows 2000 with COM Version 1.2.
1.3.1 NTARPC-E-CALL_FAILED_DNE (800706BF) Using IStream
When running in an authenticated mode, a Windows 2000 client that is passing a buffer greater than 512 bytes and is using the IStream interface might return the following error:
800706BF error, NTARPC-E-CALL_FAILED_DNE - The remote procedure call failed and did not execute |
As a temporary workaround, use the IUnknown interface or reduce the
size of the buffer.
1.3.2 'Invoke call failed' or NTARPC-E-BAD_STUB_DATA Using Automation
When using automation in an authenticated or an unauthenticated mode, a call from a Windows 2000 client to an OpenVMS server might result in an 'Invoke call failed' error or an NTARPC-E-BAD_STUB_DATA error with certain datatypes.
This occurs because of a problem in the Windows operating system.
Contact Microsoft to obtain the fix for this issue. (Request the hot
fix associated with Knowledge Base article Q316406.)
1.3.3 ERROR_ACCESS_DENIED (C0000005 or 80070005)
COM for OpenVMS in an authenticated mode might report intermittent
C0000005
or
80070005
errors when running an OpenVMS client to a Windows 2000 server. This
problem is currently being investigated. Contact customer support to
obtain any available updates.
1.3.4 NetBEUI as Listed Protocol in DCOMCNFG
If you have NetBEUI listed as a default protocol in DCOMCNFG, you might
see various errors when running sample programs between OpenVMS and
Windows 2000. To correct these problems, remove NetBEUI from the list
of default protocols and reboot your Windows system.
1.3.5 Windows 2000 Clients Inactive for an Extended Period of Time - Reports 'Automation error'
In an authenticated mode, if you are running Windows 2000 clients for an extended amount of time with OpenVMS servers, you may see errors. The error messages indicate an automation error has occurred and return the following error:
800706BF - NTARPC-E-CALL_FAILED_DNE |
This occurs because of a problem in the SSPI (security) layer that
blocks communication between the client and server, mistakenly running
down the server process. Contact your support center for an SSPI update
and an updated DCE$LIB_SHR.EXE.
1.3.6 OpenVMS Client Hangs When Trying to Invoke a Server if Machine Name Cannot Be Resolved
When running remotely, your OpenVMS client application and DCOM$RPCSS can hang indefinitely. This can occur because the OpenVMS system cannot resolve the system name into a TCP/IP address. This is caused by a problem in the RPC runtime. Contact your support center for an update to DCE$LIB_SHR.EXE.
If this situation occurs, restart DCOM$RPCSS. To prevent this problem
from occurring, verify that you have an entry for the remote system in
the local IP database on OpenVMS.
1.4 Problems Fixed in the Current Release
The following notes describe problems that have been fixed in COM
Version 1.2 for OpenVMS.
1.4.1 Windows 2000 Interoperation Requires Compaq DCE Version 3.0 for OpenVMS
As part of our interoperability testing, Compaq has identified a problem in the authentication layer that prevents authenticated COM requests between an OpenVMS COM client application and a Windows 2000 COM server application. In this case, the system returns an 80070005 (E_ACCESSDENIED) error from a call to CoCreateInstanceEx in the COM client application. The problem does not occur with requests between Windows 2000 COM client applications and OpenVMS COM server applications.
The solution to this problem is to install the Compaq DCE Version 3.0 for OpenVMS kit. (COM needs only the RPC run time, but to get the RPC run time you must install the DCE kit.)
This problem occurs only on OpenVMS Version 7.2-1. The DCE for OpenVMS
Version 3.0 RPC run time ships with the OpenVMS operating system
beginning with OpenVMS Version 7.3. Once you upgrade to OpenVMS Version
7.3, you no longer need to install the DCE kit.
1.4.2 Memory Leak Seen in DCE/RPC Process When Running Between Windows Client and OpenVMS Server in Unauthenticated Mode
If you are running in unauthenticated mode between a Windows client and
a COM for OpenVMS server application, you might see a memory leak in
the DCE/RPC layer. This memory leak can cause the DCE process to hang
over a period of time, which will prevent COM applications from
running. A new DCE$LIB_SHR.EXE file that corrects this problem will be
available on the next DCE TIMA kit from your Compaq Support Center.
1.4.3 Excessive Messages in DCOM$RPCSS.OUT
Because of interoperability problems with Windows 2000, you may have seen some additional messages in your DCOM$RPCSS.OUT file with earlier versions of COM for OpenVMS.
If you are running in an authenticated mode, the following message is displayed:
RPC_CN_AUTH_VFY_CLIENT_REQ on server failed |
If you are running in an unauthenticated mode, the following message is displayed:
RPC_CN_AUTH_CREATE_INFO failed |
These messages have been fixed in an update to DCE$LIB_SHR.EXE. Contact
your support center to obtain the update.
1.4.4 Marshaling an Interface with More Than 32 Methods
In previous versions of COM for OpenVMS, the MIDL compiler generated
server proxy code that only allowed the first 32 methods in an
interface to be marshaled correctly. This limitation has been
corrected. This problem did not occur if the interface used the
Automation marshaler.
1.4.5 Trusted-Domain Authentication Feature Requires ECO
Compaq has discovered a number of problems associated with COM
applications running between systems in different domains with trusts
established between the domains in Advanced Server Version 7.2A. Some
of these problems can be corrected by installing the latest Advanced
Server for OpenVMS Version 7.2A ECO kit or Advanced Server for OpenVMS
Version 7.3. Other problems that may still occur are listed in the
following sections. If you experience these problems, please contact
your Compaq Support Center for additional information.
1.4.6 DCERPC-E-UNKNOWNREJECT Failure (EE128302)
OpenVMS COM clients sometimes report this error when communicating with
NT COM components. This is due to a problem in the RPC run time. A fix
for this problem is available from Compaq Support Centers. Contact your
Support Center and ask for the update to DCE$LIB_SHR.EXE.
1.4.7 DCERPC-E-WHOAREYOUFAILED Failure (EE1282FA)
OpenVMS COM clients sometimes report this error when communicating with
NT COM components. This is due to a problem in the RPC run time. A fix
for this problem is available from Compaq Support Centers. Contact your
Support Center and ask for the update to DCE$LIB_SHR.EXE.
1.4.8 NTARPC-E-PROTOCOL_ERROR Failure (800706C0)
OpenVMS COM clients sometimes report this error when communicating with
NT COM components. This is due to a problem in the RPC run time. A fix
for this problem is available from Compaq Support Centers. Contact your
Support Center and ask for the update to DCE$LIB_SHR.EXE.
1.4.9 Cached IID Value Not Equal to Registry Value Failure
Compaq's testing has shown that OpenVMS processes that run more than
2000 iterations of a COM for OpenVMS application may receive this
error. The error is caused by a bug in the Registry client that returns
a failure status after a process has made over 16,000 OpenKey requests.
A fix for this problem is available from Compaq Support Centers.
Contact your Support Center and ask for the update to SYS$NTA.EXE.
1.4.10 IGNORE_EXTAUTH Support
Support for the IGNORE_EXTAUTH flag in the SECURITY_POLICY SYSGEN
parameter is now available in a patch kit from Compaq Support Centers.
Contact your Support Center and ask for the update to
VMS$VMS_ACMESHR.EXE.
1.5 Known Problems (without Fixes) in the Current Release
The following notes describe the known problems associated with COM
Version 1.2 for OpenVMS. These problems currently do not have fixes.
1.5.1 Kernel Threads and Upcalls Not Supported
COM for OpenVMS applications cannot be built with kernel threads or
upcalls enabled. This support will be available in a future release.
1.5.2 Errors Seen Between OpenVMS Systems Running COM Version 1.2 Under Heavy Load
Testing by Compaq has uncovered the errors E-OUTOFMEMORY (8007000E),
DCERPC-E-WHOAREYOUFAILED (EE1282FA) and CO_E_SERVER_EXEC_FAILURE
(80080005) between OpenVMS systems running heavy load tests with COM
Version 1.2 for OpenVMS. This problem was not seen when the tests were
run locally or between Windows NT/Windows 2000 and OpenVMS systems.
1.6 Limitations and Restrictions
The following sections contain general release note information.
1.6.1 DCOM$RPCSS May Stall on Cluster Restart (PPL-W-SYSERROR)
If a system running DCOM$RPCSS in a cluster crashes and restarts, the DCOM$RPCSS process may hang during startup. In this condition, the process name remains DCOM$STARTUP-** and the SYS$STARTUP:DCOM$RPCSS.OUT file contains the following error message:
%PPL-W-SYSERROR, system service error -SYSTEM-W-VALNOTVALID, value block is not valid |
To recover from this condition, stop COM for OpenVMS on each node in the cluster using the following command:
$ @SYS$STARTUP:DCOM$SHUTDOWN |
Then restart COM for OpenVMS on each node in the cluster using the following command:
$ @SYS$STARTUP:DCOM$STARTUP |
The following release notes pertain to MIDL.
1.6.2.1 MIDL -w Switch
The MIDL compiler allows you to specify either
-w
or
-warn
to throttle the level of warnings generated by the compiler. The MIDL
compiler for OpenVMS supports only the
-w
switch.
1.6.2.2 SAFEARRAY Limitation
Because the COM for OpenVMS MIDL compiler is based on Microsoft's MIDL
compiler V3.00.44, COM for OpenVMS supports the use of SAFEARRAYs only
inside a LIBRARY block in an .IDL file. Microsoft's MIDL compiler
V3.00.44 has the same limitation.
1.6.3 DCOM$CNFG Limitations and Restrictions
The following release note pertains to
DCOM$CNFG
when run in a cluster.
1.6.3.1 DCOM$CNFG Utility and Disabling Applications: Possible Unintended Side Effects
The COM for OpenVMS DCOM$CNFG utility includes several options that allow a developer to modify application properties (for example, changing the location of the computer on which an application can run). If you select one of these options, you are modifying an OpenVMS Registry entry.
Because the OpenVMS Registry supports a single database in a cluster, modifying one of these options affects all nodes in the cluster that are running COM for OpenVMS.
For example, if you use the
System-wide Default Properties
submenu option 1 to disable COM for OpenVMS, you effectively disable
COM for OpenVMS on the entire cluster. In the same way, if you use the
Application Location
submenu option 1 to prevent an application from running on this
computer, you effectively prevent the application from running on any
computer in the cluster.
1.6.4 Other Limitations and Restrictions
The following are additional limitations with COM for OpenVMS.
1.6.4.1 Windows XP Not Supported
Compaq has not tested COM Version 1.2 with Windows XP. Therefore,
Windows XP is not supported in COM Version 1.2 for OpenVMS. Full
support for Windows XP will be available in a future release.
1.6.4.2 COM Version 1.0 for OpenVMS and COM Version 1.2 for OpenVMS Not Supported in the Same Cluster
When you install and configure COM Version 1.2 for OpenVMS on any node
in a cluster, you make clusterwide modifications to the OpenVMS Registry
that prevent COM Version 1.0 for OpenVMS from running on any other node
in the same cluster.
1.6.4.3 Threading Model Supported by COM for OpenVMS
COM Version 1.2 for OpenVMS supports only the multithreaded apartment (MTA, also known as free threads) model for application servers. The MTA model allows a component to have more than one thread. However, you must ensure that your code is thread safe.
The threading model initialization call is as follows:
CoInitializeEx( NULL, COINIT_MULTITHREADED ) |
Because
CoInitialize()
implies the single-threaded apartment (STA) model, you cannot use it in
place of
CoInitializeEx()
in a server application.
1.6.4.4 Enhanced NTLM in Windows NT SP4 and Later Versions Not Supported
In Windows NT SP4, Microsoft introduced enhanced NTLM support. COM Version 1.2 for OpenVMS does not support enhanced NTLM.
If you want to use COM Version 1.2 for OpenVMS with SP4 or later, you must be sure that enhanced NTLM is disabled.
Compaq's ongoing testing has identified the following limitation with
SP4 or later and enhanced NTLM disabled: authentication requests fail
if you use passwords that are longer than 12 characters.
1.6.4.5 Specifying Activation Security in CoCreateInstanceEx
The pServerInfo parameter of the CoCreateInstanceEx API allows you to specify a user name and password that will be used for authentication on the remote server system. The user name and password are part of the COAUTHIDENTITY structure inside the COAUTHINFO structure, which is inside the COSERVERINFO structure that is passed as the pServerInfo parameter to CoCreateInstanceEx .
The current NTLM security implementation on OpenVMS does not support
this feature for COM client applications on OpenVMS. This feature is
supported for COM clients on Windows NT communicating with COM servers
on OpenVMS.
1.6.4.6 RPC Communication Failures Caused by Advanced Server
In a cross-domain environment, under some load situations, COM applications may report errors that are a side effect of the Compaq Advanced Server for OpenVMS having lost a connection between domain controllers. The Compaq Advanced Server for OpenVMS reports this error as follows:
NET5719: No domain controller for the domain 'xxxxx' is available. |
A series of these events over a limited time interval may lead to COM applications reporting RPC communications failures (%x8007071c). In this situation, a stop and start of DCOM$RPCSS may be required to clear the error.
See Section 5.4.6 for more information. If the NET5719 events persist,
contact your Compaq Support Center.
1.6.4.7 Specific Error Messages
The following sections list and describe specific COM for OpenVMS error
messages.
1.6.4.7.1 RPC Cannot Support Failure (800706E4)
If you attempt to use the single-threaded apartment (STA) model, some COM APIs may display the following return status code:
(800706E4) |
This model is not supported in COM Version 1.2 for OpenVMS. For more information, see Section 1.6.4.3.
The information in the following sections applies to this release.
2.1.1 No Key Change Notifications When a Key's Attributes are Modified
When you specify the REG$M_CHANGEATTRIBUTES value for the REG$_NOTIFYFILTER item code, the system should notify you of any changes to that OpenVMS Registry key. However, when you modify the attributes of a OpenVMS Registry key, the system fails to notify the processes that have requested notifications.
To correct this problem, specify a different value for the
REG$_NOTIFYFILTER
item code: use either
REG$M_CHANGENAME
or
REG$M_CHANGELASTSET
.
2.1.2 Database Searches Limited
The REG$CP server management utility SEARCH command and calls to the $REGISTRY system service using the REG$FC_SEARCH_TREE_DATA , REG$FC_SEARCH_TREE_KEY , or REG$FC_SEARCH_TREE_VALUE function codes may result in more data being returned to the client than the communications buffers on the client node can handle. These functions are limited to paths that are no more that 16 levels deep and return data of no more than 4 KB.
To avoid this problem, limit the search depth by specifying an exact path---that is, avoid searching the entire database when the database is large.
This restriction will be lifted in a future release.
2.1.3 Key Access Policy
When a user requests access to an OpenVMS Registry key or value, the
OpenVMS Registry validates the specified key path by checking the first
key and the last key of the key path.
2.1.4 OpenVMS Registry Maximum Data Size Restrictions
The maximum size of any single block of data that can be sent to the OpenVMS Registry server for storage in the OpenVMS Registry database is limited to no more than 7880 bytes. If you exceed this limit, the system displays the following error:
REG-F_NORESPONSE, registry server failed to respond within allotted time period |
This limit is imposed by the communication protocol between the OpenVMS Registry server and the OpenVMS Registry client which limits the transfer to 8 K bytes.
This restriction will be lifted in a future release.
2.1.5 REG$_EXQUOTA Errors
If you set the OpenVMS Registry File Quota to be less than the current size of the OpenVMS Registry database, the system displays the following error for all OpenVMS Registry operations:
REG-E-EXQUOTA, registry file quota or page file quota exceeded |
You will not see this error message on a single delete operation that brings the size of the OpenVMS Registry database file within quota limits. |
As a workaround, you can raise the File Quota temporarily above the current size of the OpenVMS Registry database file, then perform delete operations to bring the OpenVMS Registry database file size within the desired File Quota limit. (For information about changing these quotas, see Section 12.6.3.)
To determine the approximate number of bytes applied towards the two OpenVMS Registry File Quotas, multiply the size of the SYS$REGISTRY:REGISTRY$LOCAL_MACHINE.REG and SYS$REGISTRY:REGISTRY$USERS.REG files by 512. The result of this calculation gives you the approximate number of bytes applied towards quota for each file. For information about how to set OpenVMS Registry file quotas, see Section 2.1.6.
This restriction will be lifted in a future release.
2.1.6 OpenVMS Registry Maximum Database Size Restrictions
The maximum amount of data that can be stored in the OpenVMS Registry database is limited to approximately 1.7 MB. If you exceed this limit, the system displays the following error:
REG-F-DBACCESS, cannot access registry database object |
This is a fatal error and prevents further access to the OpenVMS Registry database.
To prevent the REG-F-DBACCESS error, Compaq recommends that you establish quotas to limit the database size so that the OpenVMS Registry can never reach 1.7 MB.
You can establish quotas using either of the following procedures:
$ mcr reg$cp modify value/name="Default File Quota"/type=dword - _$ /data=%D1700000 "hkey_local_machine\system\registry\File Quotas" |
If you have previously set File Quota values, use the MODIFY command in place of the CREATE command in the following examples. |
$ mcr reg$cp create value/name=REGISTRY$LOCAL_MACHINE/type=dword - _$ /data=%D1700000 "hkey_local_machine\system\registry\File Quotas" $ mcr reg$cp create value/name=REGISTRY$USERS/type=dword - _$ /data=%D1700000 "hkey_local_machine\system\registry\File Quotas" |
You must specify a value for the /DATA qualifier that is between 32,000 and 2,000,000 (0x7D00 and 0x1E8480 hexadecimal).
If you set a value below 32,000, the system will ignore the value and instead use the Default File Quota value of 10,000,000. This Default File Quota value is too high.
If you set a value above 2,000,000, the system generates a REG-F-DBACCESS error when the OpenVMS Registry database size exceeds that value.
A fix for this problem is available from the Compaq Support Centers. Contact your Support Center and ask for the update to REGISTRY$SERVER.EXE.
Component Object Model (COM) is a technology from Microsoft that lets developers create distributed network objects. First introduced by Microsoft in its Windows 3.x product, COM was initially called Object Linking and Embedding (OLE). COM provides a widely available, powerful mechanism for customers to adopt and adapt to a new style multivendor distributed computing, while minimizing new software investment.
Digital Equipment Corporation (now Compaq Computer Corporation) and Microsoft jointly developed the COM specification. First released as NetOLE (Network OLE) and then renamed DCOM (Distributed COM), the COM specification now includes network functionality. That is, COM now supports distributed network objects.
COM is an object-based programming model designed to promote software interoperability. COM allows two or more applications (or components) to cooperate with one another easily, even if the objects are written by different vendors at different times and in different programming languages, or if they are running on different machines with different operating systems. To support its interoperability features, COM defines and implements mechanisms that allow applications to connect to each other as software objects.
COM implementations are available on Windows NT, Windows 95, Windows
98, OpenVMS, and Compaq Tru64tm UNIX, as well as
other UNIX platforms.
3.1.1 Suggested Reading
The following resources can provide you with more information on COM and related topics:
www.microsoft.com/com |
COM for OpenVMS is Compaq's implementation of Microsoft's Windows NT 4.0 Service Pack 5 (SP5) Component Object Model (COM) software on the OpenVMS Alpha operating system.
In support of COM for OpenVMS, Compaq ported Windows NT infrastructure to OpenVMS, including a registry, event logger, NTLM security, and Win32 APIs. COM for OpenVMS is layered on The Open Group's Distributed Computing Environment (DCE) RPC. COM for OpenVMS supports communication among objects on different computers on a local area network (LAN), a wide area network (WAN), or the Internet. COM for OpenVMS is important to the Affinity for OpenVMS program because it delivers a key piece of connectivity with Windows NT.
Figure 3-1 shows the OpenVMS infrastructure.
Figure 3-1 OpenVMS Infrastructure and COM for OpenVMS
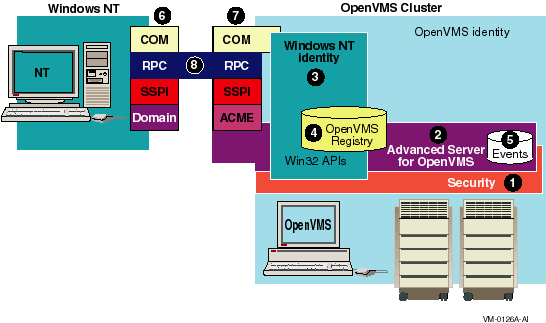
In Figure 3-1 the key pieces of the OpenVMS infrastructure are as follows:
Windows NT system
The smaller box on the left side of Figure 3-1 represents the Windows NT system.
OpenVMS Cluster/OpenVMS identity
The large box on the right side of Figure 3-1 represents the OpenVMS system. Within and around this box you can see several other boxes labeled with numbers. The following list describes these numbered items:
For developers, the COM for OpenVMS developer's kit provides a Microsoft Interface Definition Language (MIDL) compiler and C-style header files for application development. For more information about the OpenVMS MIDL compiler, see Section F.1.4.1.
OpenVMS now includes a function to get Windows NT credentials. For more information about getting Windows NT credentials through NTA$LOGON, see Section 5.1 and Chapter 8.
COM for OpenVMS also provides a free run-time environment on OpenVMS Alpha for the deployment of COM for OpenVMS client and server applications.
You can find a complete description of Microsoft's COM, including protocol specifications and programming documentation, at the Microsoft COM website at the following location:
www.microsoft.com/com |
The COM for OpenVMS implementation is a subset of the full Microsoft COM implementation. For a complete list of the COM for OpenVMS APIs, supported interfaces, and implementation differences, see Appendix F.
While general interest in COM continues to grow, COM remains a
sophisticated technology. It is not aimed at the naive user, but rather
at skilled programmers, such as independent software vendors (ISVs) and
large management information system (MIS) shops.
3.2.1 How COM for OpenVMS Uses the OpenVMS Registry
COM for OpenVMS requires the OpenVMS Registry. Like its registry database counterpart on Windows NT systems, the OpenVMS Registry stores information about COM applications---specifically those COM applications running on OpenVMS. These COM for OpenVMS applications use the OpenVMS Registry to store CLSIDs (class IDs), startup information, security settings, and so on in the OpenVMS Registry database. COM for OpenVMS uses the Win32 APIs implemented on OpenVMS to read and write this information to the OpenVMS Registry.
COM for OpenVMS requires access to the OpenVMS Registry database. If COM
for OpenVMS cannot access the OpenVMS Registry, COM for OpenVMS will not
start. For more information about the OpenVMS Registry, see Chapter 12.
3.3 Using COM for OpenVMS
You can use COM for OpenVMS to do the following:
The following sections discuss new application development and encapsulation in more detail.
An example of a COM application to encapsulate an existing OpenVMS
application is included with this release. The example can be found in
DCOM$EXAMPLES:[WRAPPER]. A README file describes the example and how to
build it.
3.3.1 Developing New Applications
Your organization might use COM for OpenVMS to develop new applications under the following circumstances:
The advantages of using COM for OpenVMS include:
See Chapter 7 and Appendix C for examples of developing COM for
OpenVMS applications.
3.3.2 Encapsulating Existing Applications
If you have monolithic applications written in procedural languages (such as Fortran and COBOL) with character-cell interfaces, you can put a COM "wrapper" or jacket around these applications to allow them either to run on new platforms or to remain on OpenVMS and run in a client/server environment.
The risk associated with completely reengineering some older applications is high. Many applications are large, complex, poorly documented, and not well understood by their current maintainers. Encapsulating a legacy application can be less risky than reengineering and can be the first step in a rewrite. Over time, pieces of the legacy application can be rewritten, while the older version of the application remains stable and available. Encapsulation also allows developers to reuse code, saving time and resources.
Disadvantages to encapsulation include more complex maintenance efforts and the inability to make changes to the underlying code. If the legacy application was unstable or hard to maintain, the encapsulated application will not be any better, and might be made worse because of the wrapper.
There are several layers of a traditional procedural application that you can encapsulate: the user interface (UI), the database, and the data manipulation routines.
Encapsulating an OpenVMS application using COM for OpenVMS means that you write a COM for OpenVMS server that talks to the application being encapsulated. The COM for OpenVMS server passes arguments to the application in the order and format that the application expects. The COM for OpenVMS server then intercepts the output from the application and directs it to the display device, user interface, or other routines.
This chapter provides a list of the contents of the COM for OpenVMS
kit, a list of prerequisite software, and preinstallation requirements.
It also describes how to install COM for OpenVMS and includes
postinstallation instructions.
4.1 Contents of the COM Version 1.2 for OpenVMS Kit
COM Version 1.2 for OpenVMS contains the following:
The following software is required:
| Software | Global pages | Global sections | Disk blocks |
|---|---|---|---|
| COM for OpenVMS | 11,000 | 27 | 57000 |
| RPC Runtime | 3,300 | 14 | N/A |
For Advanced Server requirements: See the Compaq Advanced Server for OpenVMS Server Installation and Configuration Guide.
For TCP/IP requirements: See the Compaq TCP/IP Services for OpenVMS Installation and Configuration document.
You must install DECwindows Motif for OpenVMS on any system running COM for OpenVMS. If you already have DECwindows Motif installed on your system, you do not need to do anything else. If you do not have DECwindows Motif installed on your system, you can find the installation kit for DECwindows Motif on the OpenVMS CD-ROM in the [KITS.DWMOTIFxxx_KIT] directory, where xxx is a DECwindows Motif version, such as 125 or 126.
If you are installing DECwindows Motif to meet the COM for OpenVMS requirements only, you do not need the DW-MOTIF license. |
The following sections describe COM Version 1.2 for OpenVMS installation and upgrade options.
If you want to run COM Version 1.2 for OpenVMS in unauthenticated mode, see Section E.1. |
| If you want to do this | Read this section |
|---|---|
| Install COM for OpenVMS on an OpenVMS standalone system for the first time. | Section 4.4 |
| Install COM for OpenVMS on an OpenVMS Cluster system for the first time. | Section 4.6 |
| Upgrade from earlier versions of COM for OpenVMS on an OpenVMS standalone system. | Section 4.5 |
| Upgrade from earlier versions of COM for OpenVMS on an OpenVMS Cluster system. | Section 4.7 |
Use the following procedure:
$ DEFINE/SYSTEM SYS$REGISTRY directory-specification |
You do not need DCE to run COM for OpenVMS, but if your environment uses DCE, Compaq recommends that you start DCE now. |
$ @SYS$STARTUP:NTA$STARTUP_NT_ACME |
$ @SYS$STARTUP:DCE$RPC_STARTUP.COM |
$ DEFINE DCOM$TO_BE_STARTED TRUE |
Before you start, Compaq recommends that you disable any Compaq Advanced Server for OpenVMS, OpenVMS Registry, and layered product automatic startups so that these products do not start until you have upgraded COM for OpenVMS and its associated components. Use the following procedure:
If COM for OpenVMS is currently running, shut down COM for OpenVMS first, Compaq Advanced Server for OpenVMS (if running), and then the OpenVMS Registry. |
Use the following procedure:
You do not need DCE to run COM for OpenVMS, but if your environment uses DCE, Compaq recommends that you start DCE now. |
$ @SYS$STARTUP:NTA$STARTUP_NT_ACME |
$ @SYS$STARTUP:DCE$RPC_STARTUP.COM |
$ DEFINE DCOM$TO_BE_STARTED TRUE |
This cluster installation procedure assumes you are installing COM for OpenVMS on a single system disk. |
Use the following procedure:
You must install Compaq Advanced Server for OpenVMS on at least one Alpha node in the cluster. On the other nodes, you can either install Compaq Advanced Server for OpenVMS or select External Authentication images (only) . |
$ DEFINE/SYSTEM REG$TO_BE_STARTED FALSE |
You do not need DCE to run COM for OpenVMS, but if your environment uses DCE, Compaq recommends that you start DCE now. |
$ @SYS$STARTUP:NTA$STARTUP_NT_ACME |
$ @SYS$STARTUP:DCE$RPC_STARTUP.COM |
$ DEFINE DCOM$TO_BE_STARTED TRUE |
This cluster upgrade procedure assumes you are installing COM for OpenVMS on a single system disk. |
Before you start, Compaq recommends that you disable any Compaq Advanced Server for OpenVMS and layered products automatic startups so these products do not start until you have upgraded COM for OpenVMS and its associated components. Use the following procedure:
If COM for OpenVMS is currently running, shut down COM for OpenVMS first, Compaq Advanced Server for OpenVMS (if running), and then the OpenVMS Registry on all nodes in the cluster. |
Use the following procedure:
You must install Compaq Advanced Server for OpenVMS on at least one Alpha node in the cluster. On the other nodes, you can either install Compaq Advanced Server for OpenVMS or select External Authentication images (only) . |
$ DEFINE/SYSTEM SYS$REGISTRY cluster-visible-directory-specification |
$ DEFINE/SYSTEM REG$TO_BE_STARTED FALSE |
$ @SYS$STARTUP:NTA$STARTUP_NT_ACME |
$ @SYS$STARTUP:DCE$RPC_STARTUP.COM |
$ DEFINE DCOM$TO_BE_STARTED TRUE |
COM for OpenVMS relies on a number of interrelated servers (processes) and operating system images. In most cases, the servers start automatically when you restart the system. (Automatic startup requires that you have installed and configured each component and have made appropriate changes to the SYLOGICALS.COM file.) For more information about starting and configuring the servers, see Section 4.3.
Figure 4-1 shows the relationships and dependencies of the processes and operating system layers.
Figure 4-1 Interrelationships Among Processes and Layers
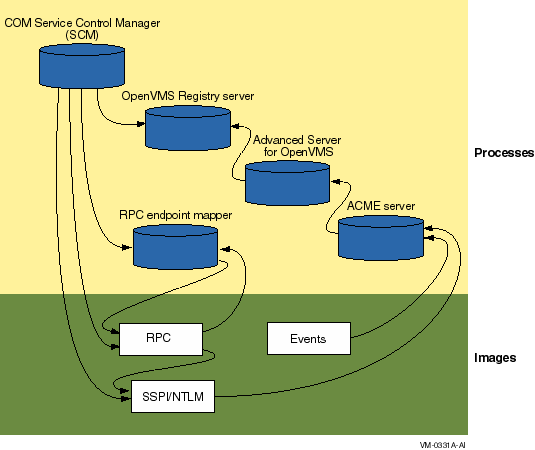
Table 4-1 lists the process names and maps each name to its corresponding server.
| Process name | Server name | For more information |
|---|---|---|
| DCOM$RPCSS | COM for OpenVMS Service Control Manager (SCM) | Section 4.8.1 |
| REGISTRY_SERVER | OpenVMS Registry server | Section 4.8.2 |
| PWRK xxx | Compaq Advanced Server for OpenVMS server (multiple processes) | Section 4.8.3 |
| ACME_SERVER | ACME server | Section 4.8.4 |
| DCE$RPCD | RPC endpoint mapper | Section 4.8.5 |
The following sections list and describe the servers and the layers.
| Next | Contents | Index |