IDENTIFICATION DIVISION.
PROGRAM-ID.  SPECIAL.
ENVIRONMENT DIVISION.
CONFIGURATION SECTION.
SPECIAL-NAMES.
    SYMBOLIC CHARACTERS
        CR-VAL  CSI-VAL  Ctrl-Z-VAL  SS3-VAL  TAB-VAL  ESC
    ARE 14      156      27          144       10      28.
DATA DIVISION.
WORKING-STORAGE SECTION.
*
*      The code returned will be the same regardless of
*      terminal type.
*
01 CONTROL-KEY.
   02  FIRST-CHAR-CONTROL-KEY  PIC X.
        88 CR             VALUE CR-VAL.
        88 CSI            VALUE CSI-VAL.
        88 Ctrl-Z         VALUE Ctrl-Z-VAL.
        88 SS3            VALUE SS3-VAL.
        88 TAB            VALUE TAB-VAL.
   02  REMAINING-CHAR-CONTROL-KEY PIC XXXX.
        88 UP-ARROW       VALUE "A".
        88 DOWN-ARROW     VALUE "B".
        88 RIGHT-ARROW    VALUE "C".
        88 LEFT-ARROW     VALUE "D".
        88 PF1            VALUE "P".
        88 PF2            VALUE "Q".
        88 PF3            VALUE "R".
        88 PF4            VALUE "S".
        88 AUX0           VALUE "p".
        88 AUX1           VALUE "q".
        88 AUX2           VALUE "r".
        88 AUX3           VALUE "s".
        88 AUX4           VALUE "t".
        88 AUX5           VALUE "u".
        88 AUX6           VALUE "v".
        88 AUX7           VALUE "w".
        88 AUX8           VALUE "x".
        88 AUX9           VALUE "y".
        88 AUXMINUS       VALUE "m".
        88 AUXCOMMA       VALUE "l".
        88 AUXPERIOD      VALUE "n".
        88 AUXENTER       VALUE "M".

PROCEDURE DIVISION.
P0.
*
* DISPLAY ESC "=" puts you in alternate keypad mode
*
    DISPLAY ESC "=".
    DISPLAY " "  ERASE SCREEN.
P1.

    DISPLAY "Press a directional arrow, PF, Return, Tab,  "
             LINE 3 COLUMN 4.
    DISPLAY "or auxiliary keypad key (Ctrl/Z stops loop)"
             LINE 4 COLUMN 4.

    ACCEPT CONTROL KEY IN CONTROL-KEY AT END GO TO P2.
    IF CR DISPLAY "RETURN" LINE 10 COLUMN 5 ERASE LINE GO TO P1.
    IF TAB DISPLAY "\TAB" LINE 10 COLUMN 5 ERASE LINE GO TO P1.
    IF PF1 DISPLAY "PF1" LINE 10 COLUMN 5 ERASE LINE GO TO P1.
    IF PF2 DISPLAY "PF2" LINE 10 COLUMN 5 ERASE LINE GO TO P1.
    IF PF3 DISPLAY "PF3" LINE 10 COLUMN 5 ERASE LINE GO TO P1.
    IF PF4 DISPLAY "PF4" LINE 10 COLUMN 5 ERASE LINE GO TO P1.
    IF UP-ARROW DISPLAY "UP-ARROW" LINE 10 COLUMN 5 ERASE LINE
       GO TO P1.
    IF DOWN-ARROW DISPLAY "DOWN-ARROW" LINE 10 COLUMN 5
       ERASE LINE GO TO P1.
    IF LEFT-ARROW DISPLAY "LEFT-ARROW" LINE 10 COLUMN 5
       ERASE LINE GO TO P1.
    IF RIGHT-ARROW DISPLAY "RIGHT-ARROW" LINE 10 COLUMN 5
       ERASE LINE GO TO P1.
    IF AUX0 DISPLAY "AUXILIARY KEYPAD 0" LINE 10 COLUMN 5
       ERASE LINE GO TO P1.
    IF AUX1 DISPLAY "AUXILIARY KEYPAD 1" LINE 10 COLUMN 5
       ERASE LINE GO TO P1.
    IF AUX2 DISPLAY "AUXILIARY KEYPAD 2" LINE 10 COLUMN 5
       ERASE LINE GO TO P1.
    IF AUX3 DISPLAY "AUXILIARY KEYPAD 3" LINE 10 COLUMN 5
       ERASE LINE GO TO P1.
    IF AUX4 DISPLAY "AUXILIARY KEYPAD 4" LINE 10 COLUMN 5
       ERASE LINE GO TO P1.
    IF AUX5 DISPLAY "AUXILIARY KEYPAD 5" LINE 10 COLUMN 5
       ERASE LINE GO TO P1.
    IF AUX6 DISPLAY "AUXILIARY KEYPAD 6" LINE 10 COLUMN 5
       ERASE LINE GO TO P1.
    IF AUX7 DISPLAY "AUXILIARY KEYPAD 7" LINE 10 COLUMN 5
       ERASE LINE GO TO P1.
    IF AUX8 DISPLAY "AUXILIARY KEYPAD 8" LINE 10 COLUMN 5
       ERASE LINE GO TO P1.
    IF AUX9 DISPLAY "AUXILIARY KEYPAD 9" LINE 10 COLUMN 5
       ERASE LINE GO TO P1.
    IF AUXMINUS DISPLAY "AUXILIARY KEYPAD -" LINE 10 COLUMN 5
       ERASE LINE GO TO P1.
    IF AUXCOMMA DISPLAY "AUXILIARY KEYPAD ," LINE 10 COLUMN 5
       ERASE LINE GO TO P1.
    IF AUXPERIOD DISPLAY "AUXILIARY KEYPAD ." LINE 10 COLUMN 5
       ERASE LINE GO TO P1.
    IF AUXENTER DISPLAY "AUXILIARY KEYPAD ENTER" LINE 10 COLUMN 5
       ERASE LINE GO TO P1.

    DISPLAY "Not an allowable control key -"
             "press the Return key to continue"

            LINE 10 COLUMN 5
            WITH BELL ERASE LINE.
    ACCEPT CONTROL-KEY.
    GO TO P1.
P2.
    DISPLAY "Press the Return key to end this job"
            LINE 11 COLUMN 5 ERASE LINE.
    ACCEPT CONTROL KEY IN CONTROL-KEY LINE 12 COLUMN 5 ERASE LINE.
    IF NOT CR GO TO P0
       ELSE
          DISPLAY "END OF JOB" LINE 13 COLUMN 35
                   BOLD BLINKING REVERSED BELL
                   ERASE SCREEN.
P3.
* DISPLAY ESC ">" WITH NO puts you out of alternate keypad mode
*
     DISPLAY ESC ">" WITH NO.
     STOP RUN.
|
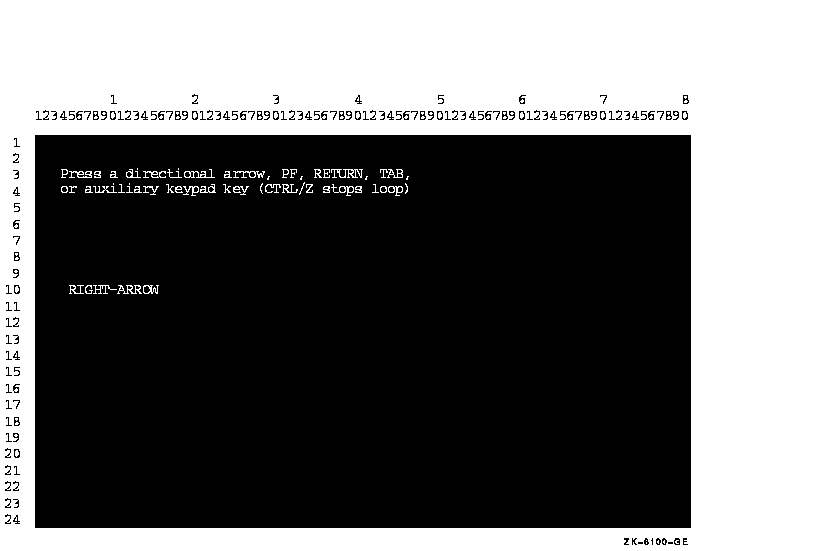
Figure 11-12 shows a sample run of the program in Example 11-10 using the right arrow terminal key.
To expand upon Example 11-10, you can, for example, accept data in addition to specifying the CONTROL KEY phrase. This enables you to accept data and determine what to do next based on the data. You can use the CONTROL KEY phrase to move the cursor around on the screen or take a specific course of action.
Figure 11-12 Screen Display of Program SPECIAL

11.2.7 Using the EDITING Phrase
Specifying the EDITING phrase of the ACCEPT statement enables field editing. Table 11-3 briefly describes the keys that the EDITING phrase enables. Refer to the ACCEPT section of the Compaq COBOL Reference Manual for a complete list of field editing keys.
| Key | Function | Description |
|---|---|---|
| Left arrow | Move-left | Moves the cursor one space to the left. If the cursor is at the first character position of the field, the terminal bell rings. |
| Right arrow | Move-right | Moves the cursor one space to the right. If the cursor is one space beyond the rightmost character position of the field, the terminal bell rings. |
| F12 (BS) | Beginning-of-field | Positions the cursor to the first character position of the field. |
| Ctrl/E | End-of-field | Moves the cursor one position beyond the rightmost character position in the field. |
| Ctrl/U | Erase-field | Erases the entire field and moves the cursor to the first character position of the field. |
| F14 | Switch-mode | Switches the editing mode between insert and overstrike. |
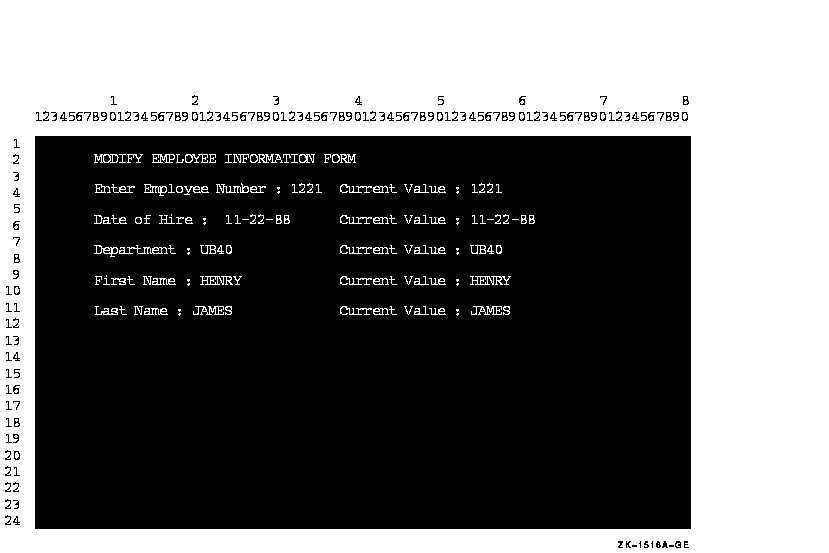
Example 11-11 shows the sample code that produces the form in Figure 11-13. (The Current Value field is provided for example purposes only.)
| Example 11-11 EDITING Phrase Sample Code |
|---|
   .
   .
   .
PROCEDURE DIVISION.
A1000-BEGIN.
    OPEN I-O EMP-FILE.
   .
   .
   .
B1000-MODIFY.
    DISPLAY "MODIFY EMPLOYEE INFORMATION FORM"  ERASE SCREEN
                                        AT LINE 2       COLUMN 8.
    DISPLAY "Enter Employee Number : "  AT LINE PLUS 2  COLUMN 8.

    ACCEPT EMP-KEY
        FROM LINE 4 COLUMN 32
        PROTECTED WITH EDITING REVERSED
        DEFAULT IS CURRENT
        AT END
          STOP RUN.
   .
   .
   .
B2000-DISPLAY.

    MOVE EMP-REC TO OUT-REC.

    DISPLAY "Date of Hire : "           AT LINE PLUS 2  COLUMN 8.
    DISPLAY MON-IN                      AT              COLUMN 24.
    DISPLAY "-"                         AT              COLUMN 26.
    DISPLAY DAY-IN                      AT              COLUMN 27.
    DISPLAY "-"                         AT              COLUMN 29.
    DISPLAY YR-IN                       AT              COLUMN 30.
    DISPLAY "Current Value :"           AT COLUMN 38.
    DISPLAY MON-NUM                     AT              COLUMN 54.
    DISPLAY "-"                         AT              COLUMN 56.
    DISPLAY DAY-NUM                     AT              COLUMN 57.
    DISPLAY "-"                         AT              COLUMN 59.
    DISPLAY YR-NUM                      AT              COLUMN 60.

    DISPLAY "Department :"              AT LINE PLUS 2  COLUMN 8.
    DISPLAY DEPT-IN                     AT              COLUMN 21.
    DISPLAY "Current Value :"  AT  COLUMN 38.
    DISPLAY DEPT-NUM                    AT              COLUMN PLUS.


    DISPLAY "First Name :"              AT LINE PLUS 2  COLUMN 8.
    DISPLAY F-NAME-IN                   AT              COLUMN 21.
    DISPLAY "Current Value :"  AT              COLUMN 38.
    DISPLAY F-NAME                      AT              COLUMN PLUS.

    DISPLAY "Last Name :"               AT LINE PLUS 2  COLUMN 8.
    DISPLAY L-NAME-IN                   AT              COLUMN 20.
    DISPLAY "Current Value :"  AT              COLUMN 38.
    DISPLAY L-NAME                      AT              COLUMN PLUS.

    ACCEPT MON-NUM
        FROM LINE 6 COLUMN 24
        PROTECTED WITH EDITING REVERSED
        DEFAULT IS CURRENT
        AT END
          STOP RUN.

    DISPLAY MON-NUM                    AT LINE 6       COLUMN 54.

    ACCEPT DAY-NUM
        FROM LINE 6 COLUMN 27
        PROTECTED WITH EDITING REVERSED
        DEFAULT IS CURRENT
        AT END
          STOP RUN.

    DISPLAY DAY-NUM                    AT LINE 6       COLUMN 57.

    ACCEPT YR-NUM
        FROM LINE 6 COLUMN 30
        PROTECTED WITH EDITING REVERSED
        DEFAULT IS CURRENT
        AT END
          STOP RUN.

    DISPLAY YR-NUM                     AT LINE 6       COLUMN 60.

    ACCEPT DEPT-NUM
        FROM LINE 8 COLUMN 21
        PROTECTED WITH EDITING REVERSED
        DEFAULT IS CURRENT
        AT END
          STOP RUN.

    DISPLAY DEPT-NUM                   AT LINE 8       COLUMN 54.

    ACCEPT F-NAME
        FROM LINE 10 COLUMN 21
        PROTECTED WITH EDITING REVERSED
        DEFAULT IS CURRENT
        AT END

          STOP RUN.

    DISPLAY F-NAME                     AT LINE 10      COLUMN 54.

    ACCEPT L-NAME
        FROM LINE 12 COLUMN 20
        PROTECTED WITH EDITING REVERSED
        DEFAULT IS CURRENT
        AT END
          STOP RUN.

    DISPLAY L-NAME                     AT LINE 12      COLUMN 54.
   .
   .
   .
|
Figure 11-13 Form with ACCEPT WITH EDITING Phrase

Because the ACCEPT statements in Example 11-11 contain EDITING phrases, a person using the form in Figure 11-13 can use any of the keys listed in Table 11-3 for field editing purposes to make corrections or modifications.
| Previous | Next | Contents | Index |

