DECdocument
Using Doctypes and Related Tags
Volume 1
Chapter 4
Using the HELP Doctype
The HELP doctype lets you create VMS Help files from DECdocument
source files. It works with files created explicitly to be used as
source material for Help, and also with the files used to create
printed books or Bookreader documents.
4.1 Creating a HELP File
You create a Help file by coding an SDML file and then processing that
file with DECdocument, using the following command:
$ DOCUMENT filename[.SDML] HELP HLP
|
Notice the destination HLP in this command line. Your output in this
case is not a printed document, but a file with the extension .HLP.
This VMS Help file is used by the VMS Help Librarian to create the Help
information that ultimately is read online.
Using the DOCUMENT command for the HELP doctype is similar to using it
for other doctypes. The command accepts many of the same qualifiers and
parameters. However, with the HELP doctype, the command ignores the
/CONTENTS and /INDEX qualifiers. If you use a symbol for DOCUMENT that
involves these qualifiers, you may receive a message to the effect that
they are being ignored. However, DECdocument still processes the file.
You cannot nest Help tags in the SDML file.
In general, you should keep the text in your Help files simple. Lists
or other unusual formatting within headings may cause unpredictable
output. If you think this may apply to your file, proofread the Help
file before patching it into the system.
4.1.1 How HELP Interprets Reference Sections
In addition to processing standard text, HELP interprets reference
sections (Command, Routine, Statement, and Tag) and generates the
appropriate Help output where possible:
- The <STATEMENT> and <ROUTINE> tags are translated into
level-1 Help by default.
- The <COMMAND> and <SUBCOMMAND> tags are translated into
multiple-level Help, starting with level 1. A command name will not
generate a Help topic if it has been previously defined in the same
document. This check is sensitive to the current Help level, which is
set by default or by the use of the <SET_HELP_LEVEL> tag.
- Commands with permanently attached qualifiers, such as DEFINE/KEY,
are translated into multiple-level Help, starting with level 1. Thus,
using DEFINE/KEY specifies DEFINE at level 1 and /KEY at level 2.
- The Description, Qualifier, Parameter, Arguments, and other
sections for each reference item are translated into appropriate,
related, lower-level Help. For example, if processing the
<COMMAND> tag results in two levels of help, then the related
parameters are assigned to level 3. (The Format section is treated as
part of the text and has no effect on Help levels.)
- Parameters and qualifiers within definition lists are translated
into unnumbered Help at the appropriate level.
You can always modify a Help level using the <SET_HELP_LEVEL> tag.
4.1.2 How HELP Interprets the Input File
The HELP doctype is based on the SOFTWARE doctype. Any file that
processes correctly through the SOFTWARE doctype family should process
correctly for HELP.
Just as the command you use to create a Help file ignores certain
arguments and qualifiers, the HELP doctype ignores certain material
within a source file. The following tags (and all material within them)
are automatically ignored for Help output:
- <CONTENTS_FILE>
- <FOOTNOTE>
- <FOOTREF>
- <FRONTMATTER>-<ENDFRONT_MATTER>
- <INDEX_FILE>
- <PART_PAGE>-<ENDPART_PAGE>
Any of these tags within an area of a file specified for Help generates
an informational INVINHELP (INValid IN HELP) message. Avoid these
messages by conditionalizing your files according to Section 4.1.3.
Ordinarily, you may use the following tags to affect formatting of your
text and examples, figures, and tables:
- <EXAMPLE_ATTRIBUTES>
- <EXAMPLE_SPACE>
- <FIGURE_ATTRIBUTES>
- <FIGURE_SPACE>
- <TABLE_ATTRIBUTES>
Avoid including these tags in material you want in Help. Otherwise,
unexpected spacing may appear in the final Help material.
For the remaining portions of the source file, the HELP doctype
processes the text as usual. Text is indented and headings (such as
<HEAD1> and <HEAD2>) are generated as Help levels, numbered
1, 2, and so on.
Note
When DECdocument processes for Help and encounters a cross-reference,
it ignores symbols and outputs only the text of the reference.
For example, a reference to the symbol overview_sec results in See
Overview Section, not See 2.1.1 Overview Section.
|
4.1.3 How to Selectively Include and Exclude Text for Help Output
Under normal circumstances, DECdocument processes everything in your
input file. In some cases, you may want to use text in printed
documentation but exclude it from the Help files, or you may want to do
the opposite. There are two sets of tags defined for
HELP---<BOOK_ONLY> and <HELP_ONLY>---that allow you to
exclude or include input text from Help output.
The <HELP_ONLY> and <ENDHELP_ONLY> tags identify text that
is to be included in Help output only.
The <BOOK_ONLY> and <ENDBOOK_ONLY> tags identify text that
is to be included in printed documentation only.
4.1.4 How to Handle Special Cases
In some cases, you will not want multiple-level Help. To keep all Help
output on a single level, use the <KEEP_HELP_LEVEL> tag.
For example, if you had a command called KUNG FOO and you did not want
a Help file that had KUNG at level 1 and FOO at level 2, you could use
the <KEEP_HELP_LEVEL> tag as follows:
<keep_help_level>
<command>(KUNG FOO)
<endkeep_help_level>
|
The HELP doctype produces the following output:
Note the underscore character (_) inserted between the two parts of the
command. The <KEEP_HELP_LEVEL> concatenates all elements of the
argument and places the result at level 1.
4.2 How to Read the Help File Online
Frequently, the headings for manuals are long and will create extremely
long Help topic strings. The default topic size for VMS Help is 15
characters. If you have Help topics of 15 characters or more and you
are making a Help library, you must use the KEYSIZE clause to the
/CREATE qualifier. For example, use a command like the following:
$ LIBRARY/HELP/CREATE=KEYSIZE=n file file
|
In this example, n is the number of characters in the longest heading.
You may want to set this number quite high. Otherwise, you will have to
count the number of characters in all topics.
The output from this command is an .HLB file. To read this .HLB file
online, use the following command:
$ HELP/LIBRARY=DEVICE:[DIRECTORY]file.HLB
|
To get more information on creating Help files, on formatting Help
files, on retrieving Help text, and on Help libraries, see these topics
in the VMS Librarian Utility Manual.
4.3 HELP Doctype Tag Reference
This part of this chapter provides reference information on all the
tags specific to the HELP doctype.
<BOOK_ONLY>
Identifies text that you want to include only in printed or online
output and not in Help output.
Syntax
<BOOK_ONLY>
ARGUMENTS
None.
related tags
- <HELP_ONLY>
- <SET_HELP_LEVEL>
required terminator
<ENDBOOK_ONLY>
DESCRIPTION
The <BOOK_ONLY> tag identifies text that you want to include only
in printed or online output and not in Help output.
Example
This example shows how to code a file so that the text between the
<BOOK_ONLY> and <ENDBOOK_ONLY> tags is included only in
printed or online documentation and not in the Help (.HLP) file.
|
<BOOK_ONLY>
<P>When RSX...
<ENDBOOK_ONLY>

<P>When the operating system...

<BOOK_ONLY>
<P>When RSTS...
<ENDBOOK_ONLY>
|
In this case, the paragraphs that begin with "When RSX" and
"When RSTS" would not be included in the .HLP file. Only the
following paragraph would appear in the .HLP file:
When the operating system...
<HELP_ONLY>
Identifies text that you want to include only in Help output and not in
printed or online output.
Syntax
<HELP_ONLY>
ARGUMENTS
None.
related tags
- <BOOK_ONLY>
- <SET_HELP_LEVEL>
required terminator
<ENDHELP_ONLY>
DESCRIPTION
The <HELP_ONLY> tag identifies text that you want to include only
in Help output and not in printed or online output.
Example
This example shows how to code a file so that the text between the
<HELP_ONLY> and <ENDHELP_ONLY> tags is included only in the
Help (.HLP) file and not in printed or online output.
|
<HELP_ONLY>
<P>When RSX...
<ENDHELP_ONLY>

<P>When the operating system...

<HELP_ONLY>
<P>When RSTS...
<ENDHELP_ONLY>
|
In this case, the paragraphs that begin with "When RSX" and
"When RSTS" would be included only in the .HLP file. The
following paragraph would appear only in the printed or online output:
When the operating system...
<KEEP_HELP_LEVEL>
Allows you to override the default multi-level Help output and keep the
Help output at a single level. This tag affects only the
<COMMAND> and <SUBCOMMAND> tags.
Syntax
<KEEP_HELP_LEVEL>
ARGUMENTS
None.
related tags
- <BOOK_ONLY>
- <HELP_ONLY>
- <SET_HELP_LEVEL>
required terminator
<ENDKEEP_HELP_LEVEL>
DESCRIPTION
The <KEEP_HELP_LEVEL> tag allows you to override the default
multi-level Help output and keep the Help output at a single level.
This tag affects only the <COMMAND> and <SUBCOMMAND> tags.
Remember that each word in a command is a different Help level, by
default. The <KEEP_HELP_LEVEL> tag concatenates all elements of
its argument and places the entire argument at a single level. For
example, if you have a command called SET TERMINAL and you do not want
a Help file with SET at level-1 and TERMINAL at level-2, which is the
default, but want both SET and TERMINAL at level-1, use the
<KEEP_HELP_LEVEL> and <ENDKEEP_HELP_LEVEL> tags to enclose
the command.
Example
This example shows how to use the <KEEP_HELP_LEVEL> and
<ENDKEEP_HELP_LEVEL> tags to cause the enclosed command to be
output as level-1 in the Help (.HLP) file.
|
<COMMAND_SECTION>
<KEEP_HELP_LEVEL>
<COMMAND>(SET TERMINAL)
<ENDKEEP_HELP_LEVEL>
   .
   .
   .
<COMMAND>(SET QUEUE)
   .
   .
   .
<COMMAND>(SET PASSWORD)
   .
   .
   .
<ENDCOMMAND_SECTION>
|
This example produces the following levels in the .HLP file:
1 SET_TERMINAL
1 SET
2 QUEUE
2 PASSWORD
|
<SET_HELP_LEVEL>
Allows you to alter the default Help levels in your Help files.
Syntax
<SET_HELP_LEVEL> [(number)]
ARGUMENTS
number
This is an optional argument. It specifies a positive or negative
number that is added to or subtracted from the default value to
determine a new Help level. Note that this number is not the Help level
number, but a value to be applied to the default Help level.
To reset the default Help levels, specify zero (0) as the
number argument or do not use an argument. For example, both
the <SET_HELP_LEVEL> and <SET_HELP_LEVEL>(0) tags reset the
default Help levels.
related tags
- <BOOK_ONLY>
- <HELP_ONLY>
- <KEEP_HELP_LEVEL>
DESCRIPTION
The <SET_HELP_LEVEL> tag allows you to alter the default Help
levels in your Help files. Remember that each word in the command is a
different Help level, by default. This tag changes all the default Help
levels until you explicitly reset them using the tag again without an
argument, or with the zero (0) argument.
For example, by default <HEAD1>, <STATEMENT>, and
<COMMAND> tags produce level-1 Help topics. You may want,
however, your level-1 "Command" topic to be a level-2 topic,
and the "Format", "Qualifier", and
"Description" sections, which are normally level-2 topics, to
be level-3 topics. In this case, use the <SET_HELP_LEVEL>(1) tag
before the Help level you want to alter. Using the argument 1
adds one level to the default level-1, thus adding one level to each
subsequent Help level.
If you use a negative number argument, that number of levels
is subtracted from the default Help level. For example, if you want
your level-2 "Description" section to be a level-1, use the
<SET_HELP_LEVEL>(-1) tag before the <DESCRIPTION> tag. If
you want your level-3 "Example" section to be a level-1, use
the <SET_HELP_LEVEL>(-2) tag before the <EXAMPLE> tag.
When you want to reset the default Help levels, use the
<SET_HELP_LEVEL> tag with or without the zero (0) argument.
Example
This example shows how to use the <SET_HELP_LEVEL> tag to alter
the default Help levels. One Help level is added to the commands
following the <SET_HELP_LEVEL> tag. You reset the default Help
levels with another <SET_HELP_LEVEL> tag, with the zero (0)
argument or without an argument.
|
<COMMAND_SECTION>
<COMMAND>(SET TERMINAL)
   .
   .
   .
<SET_HELP_LEVEL>(1)
<COMMAND>(SET QUEUE)
   .
   .
   .
<SET_HELP_LEVEL>(0)
<COMMAND>(SET PASSWORD)
   .
   .
   .
<ENDCOMMAND_SECTION>
|
This example produces the following levels in the .HLP file:
1 SET
2 TERMINAL
2 SET
3 QUEUE
2 PASSWORD
|
Chapter 5
Using the LETTER Doctype
The LETTER doctype has one design, shown in Figure 5-1. It
lets you create various types of correspondence such as business
letters, personal letters, and memos in an 8 1
2 x 11 -inch
format. Process files under this doctype using the LETTER doctype
keyword on the DOCUMENT command line.
Figure 5-1 LETTER Doctype Design
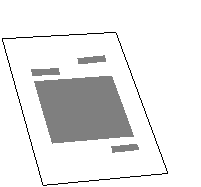
Table 5-1 lists the page layout of the LETTER doctype design.
Table 5-1 Page Layout of the LETTER Doctype Design
| Page Layout Characteristics |
|
Running heads
|
None
|
|
Running feet
|
Page number, centered, not on first page
|
|
Page numbering
|
Sequential
|
|
Trim size
|
8 1/2 x 11 inches
|
|
Right margin
|
Unjustified (Ragged right)
|
| Text Element Characteristics |
|
Headings
|
Unnumbered
|
|
Paragraphs
|
Flush left, no indent
|
|
Figures, tables, and examples
|
Numbered sequentially
|
The LETTER doctype does not support the full set of DECdocument global
tags. The following tags are not available in the LETTER doctype:
- <APPENDIX>
- <CHAPTER>
- <FRONT_MATTER>
- <HEAD1> through <HEAD6>
- <PART_PAGE>
Even though the LETTER doctype does not support the global numbered
heading tags (<HEAD1>, <HEAD2>, and so on), it does support
the global unnumbered heads (<SUBHEAD1> and <SUBHEAD2>).
See the Using Global TagsUsing Global Tags for more information on
global tags.
The LETTER doctype-specific tags let you label and format the text
elements of letters and memos. In general, you use the LETTER doctype
tags with the prefix MEMO_ (for example, the <MEMO_TO> tag) to
create memos; you use the other tags in this doctype to create letters
or headings in either memos or letters. Use the LETTER doctype tags in
whatever order you choose. No one tag is restricted to either a memo or
a letter format.
Table 5-2 summarizes the tags available in the LETTER doctype.
Section 5.2 contains the reference information on the tags listed in
this table.
Table 5-2 Tags Available in the LETTER Doctype
| Tag Name |
Description |
|
<CC>
|
Labels the name of one person who is to receive a copy of the memo or
letter. This tag places the heading cc: on the left margin, and then
places the name of the person to the right of this heading on the same
line.
|
|
<CCLIST>
|
Begins a list of one or more persons' names who are to receive a copy
of the memo or letter. This tag places the heading cc: on the left
margin. Use the <CC> tag to label each of the names in the list
in the context of the <CCLIST> tag.
|
|
<CLOSING>
|
Labels the closing text of a letter and formats the closing text at the
right margin, flush left. This text aligns with the output of the
<FROM_ADDRESS> tag. This text is typically a closing line such as
Yours Truly, followed by the name of the sender.
|
|
<DISTLIST>
|
Begins a list of people to whom the memo or letter is to be
distributed. This list formats on the left margin beneath a heading of
Distribution:.
|
|
<FROM_ADDRESS>
|
Identifies the name and address of the sender of a letter and formats
that information at the right margin, flush left. This text aligns with
the output of the <CLOSING> tag.
|
|
<MEMO_DATE>
|
Labels the date of a memo and formats that date near the left margin,
flush left. This tag places the heading Date: on the left margin.
|
|
<MEMO_FROM>
|
Identifies the name and address of the sender of a memo and formats
that information near the left margin, flush left. This tag places the
heading From: on the left margin.
|
|
<MEMO_HEADER>
|
Centers the heading Interoffice Memorandum on the current line of the
output page.
|
|
<MEMO_LINE>
|
Lets you specify your own information and headings in a format similar
to the format used by the <MEMO_TO> or <MEMO_FROM> tags.
This tag places your heading on the left margin and then places the
first line of information text to the right of that heading on the same
line; an additional line of information can be formatted under the
first.
|
|
<MEMO_TO>
|
Identifies the name and address of the sender of a memo and formats
that information left near the left margin, flush left. This tag places
the heading To: on the left margin.
|
|
<SALUTATION>
|
Labels the greeting portion of a letter and formats that greeting on
the left margin.
|
|
<SUBJECT>
|
Labels the subject of a memo or letter and formats that information
Near the left margin, flush left. This tag places the heading Subject:
on the left margin. The subject text formats on the same line and to
the right of the heading.
|
|
<TO_ADDRESS>
|
Identifies the name and address of the receiver of a letter and formats
that information on the left margin, flush left.
|