Digital DCE for OpenVMS VAX and OpenVMS
Alpha
Product Guide
Chapter 9
Intercell Naming
This chapter provides tips for choosing a cell name and for managing
cell names in the Domain Name System (DNS) and in X.500. Additional
details can be found in the chapter about global and cell
considerations in the OSF DCE Administration Guide ---
Introduction.
The following are simple guidelines for naming cells:
- Do not configure a cell with the same name as another cell on the
same network.
- Choose your cell name carefully.
The last item is especially important, because the naming formats for
DNS and X.500 are incompatible, and DCE does not currently support
changing the name of a cell. Therefore, you must understand which
method you are using for intercell communications before you name the
cell.
9.1 Intercell Naming with DNS
Names in DNS are associated with one or more data structures called
resource records. The resource records define cells and are stored in a
data file, called /etc/namedb/hosts.db. The data file is used
by the BIND name daemon (named). To create a cell entry, you
must edit the data file and create two or more (if replicas) resource
records for each CDS server that maintains a replica of the cell
namespace root. Do not configure a cell with the same name as another
cell on the same network.
9.2 Intercell Naming Example --- DNS
The following examples show the steps you should take to set up
intercell naming between two cells called
laser_cell.zko.dec.com and ruby_cell.zko.dec.com. (A
summary of this process is provided at the end of this chapter.) The
two cells belong to the same BIND domain zko.dec.com. Host
laser.zko.dec.com is the master CDS server for the
laser_cell.zko.dec.com cell. Host ruby.zko.dec.com is
the master CDS server for the ruby_cell.zko.dec.com cell.
The BIND server must be authoritative for the domains of both the cell
name and the hostnames. The BIND master server requires the following
entries in its /etc/namedb/hosts.db file:
laser.zko.dec.com. IN A 25.0.0.127
laser_cell.zko.dec.com. IN MX 1 laser.zko.dec.com.
laser_cell.zko.dec.com. IN TXT "1
130f1c81-4876-11cc-931d-08002b33f531
Master /.../laser_cell.zko.dec.com/laser_ch
124ded80-4876-11cc-931d-08002b33f531
laser.zko.dec.com"
ruby.zko.dec.com. IN A 25.0.0.149
ruby_cell.zko.dec.com. IN MX 1 ruby.zko.dec.com.
ruby_cell.zko.dec.com. IN TXT "1
c8f5f807-487c-11cc-b499-08002b32b0ee
Master /.../ruby_cell.zko.dec.com/ruby_ch
c84946a6-487c-11cc-b499-08002b32b0ee
ruby.zko.dec.com"
|
Note
The TXT records must span only one line. You need to do
whatever is required with your text editor of choice to ensure this.
Widening your window helps. You should also ensure that the quotes are
placed correctly, and that the hostname is at the end of the record.
|
The information to the right of the TXT column in the Hesiod Text Entry
(that is, 1 130f1c81-48...) comes directly from the cdscp show cell
/.:/ as dns command. For example, to obtain the information that
goes in the laser.zko.dec.com text record (TXT), you would go
to a host in the laser cell, and enter the cdscp show cell
/.:/ as dns command. Then, when the system displays the requested
information, you would cut and paste this information into the record.
This method ensures that you do not have any typing errors. If the cell
contains one or more replicas, add the additional text record(s) in the
same manner. Make sure cell names and hostname text in the record are
identical for Master and Read-Only TXT record(s). Only the
clearinghouse (x_cell/x_ch) and UUID values change.
On UNIX master bind server systems, ensure that the records that you
have entered are valid by issuing a kill -1 named-process-id
command. For OpenVMS systems, see the TCP/IP product-specific
implementation documentation for equivalent functionality. This causes
the named daemon to read in the new hosts.db file.
Your host must access the bind server for the intercell information. To
accomplish this, set name service parameters for your particular
TCP/IP. This causes cell names to be sent to and resolved by the bind
server and not your "localhost". Check the TCP/IP product specific
documentation for instructions on setting the name service as well as
invoking the nslookup command to obtain the host address:
laser.zko.dec.com> nslookup
|
Default Server:  localhost
Address:  127.0.0.1, 25.0.0.32
|
Next, enter the names of the cells, as shown:
> set type=any
> ruby_cell.zko.dec.com
|
Server:  localhost
Address:  127.0.0.1
|
ruby_cell.zko.dec.com     text = "1 c8f5f807-487c-11cc-b499-08002b32b0ee
Master /.../ruby_cell.zko.dec.com/ruby_cell.zko.dec.com/ruby_ch
c84946a6-487c-11cc-b499-08002b32b0ee
ruby.zko.dec.com"
ruby_cell.zko.dec.com     preference = 1, mail exchanger = ruby.zko.dec.com
ruby.zko.dec.com inet address = 25.00.127
|
View the information and ensure that it is complete and correct.
Now that you have set up BIND, you must use the Security Service
rgy_edit cell command to create a cross-cell authentication
account in the local and foreign cells. This account allows local
principals to access objects in the foreign cell as authenticated users
and vice versa.
In the laser_cell.zko.dec.com cell, you must use the
rgy_edit cell command to create an account for
/.../ruby_cell.zko.dec.com. Refer to the Security Service
commands in the OSF DCE Administration Reference for details
on the cell command. After adding the account for
/.../ruby_cell.zko.dec.com in the
laser_cell.zko.dec.com cell, you should have an account entry
that looks like the following:
krbtgt/ruby.zko.dec.com [none none]:*:101:12::/::
|
Note that the cell name is stripped of the path qualifier and is
prefixed with krbtgt. The resulting name is used as the
primary name for the cross-cell authentication account. You should now
also have a principal entry that looks like the following:
krbtgt/ruby.zko.dec.com 101
|
If a cell is reconfigured, changing its namespace and clearinghouse
UUIDs, the krbtgt principal created by the cell command must
be deleted using rgy_edit in the foreign cell. Note that for
Digital DCE for OpenVMS VAX and OpenVMS Alpha Version 1.5, the
krbtgt principal must be deleted on both cells before the cell
command is reexecuted between two cells. To test for proper
configuration, show the cell information for the foreign cell. For
example, in the laser_cell.zko.dec.com cell, use the cdscp
show cell command to show information about the
ruby_cell.zko.dec.com cell. To do this at a laser
cell host, execute the following command:
cdscp> show cell /.../ruby_cell.zko.dec.com
|
To perform a similar operation from a ruby_cell cell host,
execute the following command:
cdscp> show cell /.../laser_cell.zko.dec.com
|
9.3 Intercell Naming with X.500
The DCE configuration program automatically creates an entry in the
X.500 namespace for the cell when it is configured if the following
conditions are true:
- The parent entry is already in existence.
- The cell name entry is not already being used.
9.4 Intercell Naming Example --- X.500
The following examples show the steps you should take to set up
intercell naming between two cells called
/c=us/o=digital/ou=lasercell and
/c=us/o=digital/ou=rubycell. (A summary of this process is
provided at the end of this chapter.) The two cells belong to the same
X.500 namespace /c=us/o=digital. Host laser is the CDS master
server for the /c=us/o=digital/ou=lasercell cell. Host ruby is
the CDS master server for the /c=us/o=digital/ou=rubycell cell.
Note
X.500 cell names can contain spaces or hyphens if they are enclosed in
double quotes, but underscores are never allowed, even if they are
enclosed in double quotes. For example, the X.500 cell names
/c=us/o=digital/ou="excess cell" and
/c=us/o=digital/ou="excess-cell are allowed, but
/c=us/o=digital/ou=excess_cell and
/c=us/o=digital/ou="excess_cell are not allowed.
|
Answer "Yes" to the question "Do you want to register the DCE cell in
X.500" during configuration of the cell. This puts the required DCE CDS
information into the X.500 namespace for later use by GDA. This
operation requires an X.500 DUA on the host system. Refer to DEC
X.500 Directory Service --- Management for more information about
installing and configuring X.500.
Execute an intercell command similar to the following command to show
the root of the new cell and to see if everything works:
cdscp> show cell /.../c=us/o=digital/ou=rubycell
|
Enter the preceding command from an unauthenticated, nonprivileged
account.
Now that you have configured and set up X.500, you must use the
Security Service rgy_edit cell command to create a cross-cell
authentication account in the local and foreign cells. This account
allows local principals to access objects in the foreign cell as
authenticated users and vice versa.
In the /c=us/o=digital/ou=lasercell cell, you must use the
rgy_edit cell command to create an account for
/.../c=us/o=digital/ou=rubycell. (Refer to the Security
Service commands in the OSF DCE Administration Reference for
details about the cell command.) After adding the account for
/.../c=us/o=digital/ou=rubycell in the
/c=us/o=digital/ou=lasercell cell, you should have an account
entry that looks similar to the following:
krbtgt/c=us/o=digital/ou=rubycell [none none]:*:101:12::::
|
Note that the cell name is stripped of the path qualifier and is
prefixed with krbtgt. The resulting name is used as the
primary name for the cross-cell authentication account. You should now
also have a principal entry that looks like the following:
krbtgt/c=us/o=digital/ou=rubycell 101
|
If a cell is reconfigured, changing its namespace and clearinghouse
UUIDs, the krbtgt principal created by the cell command must
be deleted using rgy_edit in the foreign cell. Note that for
Digital DCE for OpenVMS VAX and OpenVMS Alpha Version 1.5, the
krbtgt principal must be deleted on both cells before the cell
command is reexecuted between two cells. To test for proper
configuration, show the cell information for the foreign cell. For
example, in the /c=us/o=digital/ou=lasercell cell, use the
cdscp show cell command to show information about the
/c=us/o=digital/ou=rubycell cell. To do this at a laser cell
host, execute the following command:
cdscp> show cell /.../c=us/o=digital/ou=rubycell
|
To perform a similar operation from a
/c=us/o=digital/ou=rubycell cell host, execute the following
command:
cdscp> show cell /.../c=us/o=digital/ou=lasercell
|
9.5 Summary
The following steps summarize the intercell naming process. Refer to
the chapter on managing intercell naming in the OSF DCE
Administration Guide --- Core Components for more information.
9.5.1 DNS Bind
For DNS bind:
- Execute a cdscp show cell /.:/ as dns command.
- Edit the hosts.db file and add the cell name.
- Execute the kill -1 named-process-id command on UNIX
systems to instruct the server to reread the database records. On an
OpenVMS system acting as the DNS Master Bind Server, see the TCP/IP
specific information for database update and nslookup
instructions.
- Perform an nslookup operation to verify that the cell
information can be read. All three records (A, MX, and TXT) are
returned.
- Execute an intercell command similar to the following command to
show the root of the new cell and to see if everything works:
cdscp> show cell /.../ruby_cell.zko.dec.com
|
Enter the preceding command from an unauthenticated, nonprivileged
account.
- Run dce_login, and log in as cell_admin.
- Run rgy_edit, and execute a cell command similar to the
following:
rgy_edit> cell /.../laser_cell.zko.dec.com
Enter group name of the local account for the foreign cell: none
Enter group name of the foreign account for the local cell: none
Enter org name of the local account for the foreign cell: none
Enter org name of the foreign account for the local cell: none
Enter your password:
Enter account id to log into foreign cell with: cell_admin
Enter password for foreign account:
Enter expiration date [yy/mm/dd or 'none']: (none) none
|
9.5.2 X.500
For X.500:
- Answer "Yes" to the configuration question "Do you want to register
the DCE cell in X.500".
- Execute an intercell command similar to the following command to
show the root of the new cell and to see if everything works:
cdscp> show cell /.../c=us/o=digital/ou=rubycell
|
Enter the preceding command from an unauthenticated, nonprivileged
account.
- Run dce_login, and log in as cell_admin.
- Run rgy_edit, and execute a cell command similar to the
following:
rgy_edit> cell /.../c=us/o=digital/ou=lasercell
Enter group name of the local account for the foreign cell: none
Enter group name of the foreign account for the local cell: none
Enter org name of the local account for the foreign cell: none
Enter org name of the foreign account for the local cell: none
Enter your password:
Enter account id to log into foreign cell with: cell_admin
Enter password for foreign account:
Enter expiration date [yy/mm/dd or 'none']: (none) none
|
Chapter 10
Enhanced Browser
The Browser is a Motif-based tool for viewing the CDS namespace. The
Browser can display an overall directory structure as well as show the
contents of directories, enabling you to monitor growth in the size and
number of directories in your namespace. You can customize the Browser
so that it displays only a specific class of object names. The Digital
DCE Enhanced Browser contains some additional functions beyond those
documented in the OSF DCE documentation.
10.1 Displaying the Namespace
When you start the Browser, an icon representing the root directory is
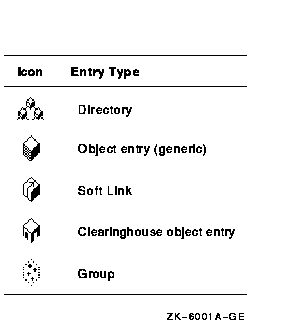
the first item to appear in the window. Directories, soft links, and
object entries all have distinct icons associated with them. Most
object entries have unique icons based on their class; the class
indicates the type of resource that the entry represents (for example,
clearinghouse object entries). When the Browser does not recognize the
class of an entry, it displays a generic icon. Figure 10-1 shows the
Enhanced Browser icons and what they represent.
Figure 10-1 Enhanced Browser Icons
10.2 Filtering the Namespace Display
Using the Filters menu, you can selectively display object entries of a
particular class. With the Enhanced Browser, you can choose from either
the RPC_Class or CDS_Clearinghouse object classes. For example, if you
are interested in seeing the entries for clearinghouse objects only,
choose the class CDS_Clearinghouse from the Filters menu. If you are
interested in seeing object entries used in the name service interface
(NSI), choose RPC_Class. You can filter only one object class at a time.
Setting a filter does not affect the current display, but when you next
expand a directory, you see only object entries whose class matches the
filter. Note that soft links and directories still appear because only
object entries can be filtered out. To reset the filter to view all
object entries, choose the asterisk(*) from the Filters menu.
For a full description of the Browser, see the CDS section in the
OSF DCE Administration Guide --- Core Components.
Chapter 11
Using the CDS Subtree Commands to Restructure CDS Directories
Occasionally, you may want to combine or rearrange various directories,
or subtrees of directories, within your Cell Directory Namespace (CDS)
namespace.
For example, suppose the engineering group in your organization
/.:/eng is combined with the research and development group
/.:/rnd, and that the two groups will begin to share a common
set of applications and other network resources. You can reflect this
organizational change in your namespace hierarchy by merging the
contents of these directories.
Similarly, if the engineering group becomes subordinate to the research
and development group, you can reflect this change by creating an empty
directory named /.:/rnd/eng and then merging the contents of
the /.:/eng directory into /.:/rnd/eng, effectively
appending /.:/eng below /.:/rnd.
11.1 Overview of the Merge Procedure
To merge or append CDS directories, follow these steps (for command
descriptions and syntax, see the Digital DCE for OpenVMS VAX and
OpenVMS Alpha Reference Guide):
- At your system prompt, enter cdscp to invoke the CDS
control program.
Note
You can enter CDS control program commands directly from your system
prompt by typing cdscp before the command.
|
- Use the dump subtree command to create an interim file
containing the information that you intend to merge or append.
- Merge the interim file that you created in step 2 with another
existing directory. You use the merge file command to combine
the directory information in an interim file with another directory or
to append the information below an existing bottom-level directory.
The master replica of a directory that you dump and then merge with
another directory is stored in the clearinghouse that stores the master
replica of the directory with which (or below which) you merge the
dumped directory. For example, if you dump the /.:/eng
directory to the interim file and then merge the interim file with the
/.:/rnd directory, the master replica of the /.:/eng
directory is stored in the clearinghouse that stores the master replica
of the /.:/rnd directory.
- Delete the source directory or subtree (and its contents) that you
merged in step 3 from its old location in the hierarchy and replace the
deleted directory information with a single soft link of the same name
to redirect lookups of the information at its new location.
If you
prefer to preserve the directories in the source subtree for future
use, you can use the replace subtree command to perform this
step. The replace subtree command deletes only a directory's
contents and creates individual soft links for each name in the source
directory. These soft links redirect lookups of these names to their
new locations.
Note
The presence of clearinghouse object entries, duplicate names, or
unreachable names in a merged directory requires special handling. The
basic merge and append operations described in the following section
assume that no duplicate names exist in the source and target subtrees,
and that the clearinghouses that store the master replicas of all
affected directories are enabled and reachable at the time the
operations are initiated.
|
11.2 Basic Merge and Append Operations
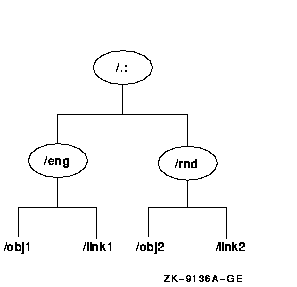
The following merge and append operations are based on a sample
namespace (shown in Figure 11-1) that consists of two directories
under the root: /.:/eng and /.:/rnd. The source
directory (/.:/eng) contains two entries:
/.:/eng/obj1 and /.:/eng/link1. The target directory
(/.:/rnd) also contains two entries: /.:/rnd/obj2 and
/.:/rnd/link2.
Figure 11-1 Example Namespace Hierarchy
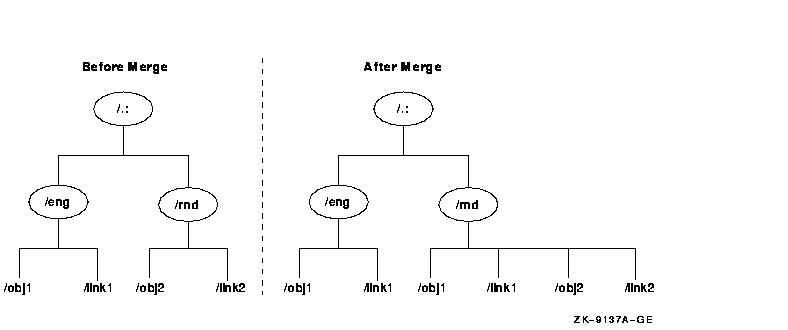
11.2.1 Performing a Basic Merge Operation
The following procedure merges the source directory /.:/eng
into the target directory /.:/rnd. Step 3 of the procedure
deletes the merged /.:/eng directory from its original
location and replaces it with a soft link to redirect lookups of
/.:/eng to the /.:/rnd directory.
- The following dump subtree command creates an interim file
named eng.dat that contains the /.:/eng directory and
its contents, /.:/eng/obj1 and /.:/eng/link1.
cdscp> dump subtree /.:/eng into file eng.dat
|
Note
The .dat extension of the interim file eng.dat is
added to the file name only to avoid confusion in the following example
commands. File extensions are not required in the names of interim
files.
|
The dump subtree command can take some time to execute,
especially if you are dumping large subtrees that contain many names.
The clearinghouses that store the master replicas of the directories in
the subtree that you specify must all be enabled and reachable when you
enter the command. Otherwise, the command fails and an error message is
displayed that explains the reasons for the failure. The interim file
will contain only the directory information that was successfully
dumped before the error occurred.
- The following merge file command merges the interim file
you created in step 1 (eng.dat) with the /.:/rnd
directory. The failures to file argument copies to a failures
file (failures.dat) any names that cannot be created in the
target subtree. This example assumes that all affected names were
successfully merged. See Section 11.3 for more information on using the
failures file.
cdscp>
 merge file eng.dat into subtree /.:/rnd failures to file failures.dat
|
- After the merge operation, the /.:/eng directory (and its
contents) still exists at the source location. The following commands
delete the /.:/eng directory from its original location and
then create a soft link named /.:/eng in place of the deleted
directory. This soft link redirects lookups of /obj1 and
/link1 to their new locations in the /.:/rnd
directory.
cdscp> delete subtree /.:/eng
|
cdscp> create link /.:/eng CDS_LinkTarget /.:/rnd
|
Figure 11-2 shows the structure of the example namespace before
and after this merge operation.
Figure 11-2 Example Namespace Before and After the Merge
Operation