![[Compaq]](../../images/compaq.gif)
![[Go to the documentation home page]](../../images/buttons/bn_site_home.gif)
![[How to order documentation]](../../images/buttons/bn_order_docs.gif)
![[Help on this site]](../../images/buttons/bn_site_help.gif)
![[How to contact us]](../../images/buttons/bn_comments.gif)
![[OpenVMS documentation]](../../images/ovmsdoc_sec_head.gif)
| Document revision date: 19 July 1999 | |
|
|
|
|
|
|
| Previous | Contents | Index |
OpenVMS Alpha signals a PGFIPLHI bugcheck when a page fault occurs while the interrupt priority level (IPL) is greater than 2 (IPL$_ASTDEL). When OpenVMS Alpha fails because of an illegal page fault, it displays the following message on the console terminal:
PGFIPLHI, Page fault with IPL too high |
When an illegal page fault occurs, the stack appears as pictured in Figure 2-5.
Figure 2-5 Stack Following an Illegal Page-Fault Error
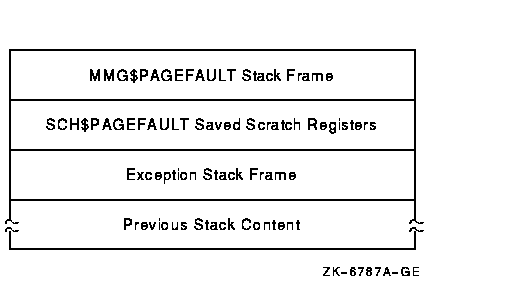
The stack contents are as follows:
| MMG$PAGEFAULT Stack Frame | Stack frame built at entry to MMG$PAGEFAULT, the page fault exception service routine. The frame includes the contents of the following registers at the time of the page fault: R3, R8, R11 to R15, R29 (frame pointer) |
| SCH$PAGEFAULT Saved Scratch Registers | Contents of the following registers at the time of the page fault: R0, R1, R16 to R28 |
| Exception Stack Frame | Exception stack frame (see Figure 2-4) |
| Previous Stack Content | Contents of the stack prior to the illegal page-fault error |
When you analyze a dump caused by a PGFIPLHI bugcheck, the SHOW STACK
command identifies the exception stack frame using the symbols shown in
Table 2-8. The SHOW CRASH or CLUE CRASH command displays the
instruction that caused the page fault and the instructions around it.
2.8 Inducing a System Failure
If the operating system is not performing well and you want to create a dump you can examine, you must induce a system failure. Occasionally, a device driver or other user-written, kernel-mode code can cause the system to execute a loop of code at a high priority, interfering with normal system operation. This loop can occur even though you have set a breakpoint in the code if the loop is encountered before the breakpoint. To gain control of the system in such circumstances, you must cause the system to fail and then reboot it.
If the system has suspended all noticeable activity and is hung, see the examples of causing system failures in Section 2.8.2.
If you are generating a system failure in response to a system hang, be
sure to record the PC and PS as well as the contents of the integer
registers at the time of the system halt.
2.8.1 Meeting Crash Dump Requirements
The following requirements must be met before the operating system can write a complete crash dump:
This section tells you how to enter the XDelta utility (XDELTA) to force a system failure.
Before you can use XDelta, it must be loaded at system startup. To load XDelta during system bootstrap, you must set bit 1 in the boot flags. See the OpenVMS Alpha Version 7.1 Upgrade and Installation Manual for information about booting with the XDelta utility.
Put the system in console mode by pressing Ctrl/P or the Halt push button. Enter the following commands at the console prompt to enter XDelta:
>>> DEPOSIT SIRR E >>> CONTINUE |
Once you have entered XDelta, use any valid XDelta commands to examine register or memory locations, step through code, or force a system failure (by entering ;C under XDelta). See the OpenVMS Delta/XDelta Debugger Manual for more information about using XDelta.
If you did not load XDelta, you can force a system crash by entering console commands that make the system incur an exception at high IPL. At the console prompt, enter commands to set the program counter (PC) to an invalid address and the PS to kernel mode at IPL 31 before continuing. This results in a forced INVEXCEPTN-type bugcheck. Some Compaq computers employ the console command CRASH (which will force a system failure) while other systems require that you manually enter the commands.
Enter the following commands at the console prompt to force a system failure:
>>> DEPOSIT PC FFFFFFFFFFFFFF00 >>> DEPOSIT PS 1F00 >>> CONTINUE |
For more information, refer to the hardware manuals that accompanied your computer.
This chapter describes the format, usage, and qualifiers of the System
Dump Analyzer (SDA) utility.
3.1 ANALYZE Usage Summary
The System Dump Analyzer (SDA) utility helps determine the causes of system failures. This utility is also useful for examining the running system.
ANALYZE {/CRASH_DUMP [/RELEASE] [/OVERRIDE] filespec|/SYSTEM} [/SYMBOL = system-symbols-table]
filespec
Name of the file that contains the dump you want to analyze. At least one field of the filespec is required, and it can be any field. The default filespec is the highest version of SYSDUMP.DMP in your default directory.
By default, the System Dump Analyzer is automatically invoked when you reboot the system after a system failure.To analyze a system dump interactively, invoke SDA by issuing the following command:
If you do not specify filespec, SDA prompts you for it.
$ ANALYZE/CRASH_DUMP filespecTo analyze a crash dump, your process must have the privileges necessary for reading the dump file. This usually requires system privilege (SYSPRV), but your system manager can, if necessary, allow less privileged processes to read the dump files. Your process needs change-mode-to-kernel (CMKRNL) privilege to release page file dump blocks, whether you use the /RELEASE qualifier or the SDA COPY command.
Invoke SDA to analyze a running system by issuing the following command:
To examine a running system, your process must have change-mode-to-kernel (CMKRNL) privilege. You cannot specify filespec when using the /SYSTEM qualifier.
$ANALYZE/SYSTEMTo send all output from SDA to a file, use the SDA command SET OUTPUT, specifying the name of the output file. The file produced is 132 columns wide and is formatted for output to a printer. To later redirect the output to your terminal, use the following command:
SDA> SET OUTPUT SYS$OUTPUTTo send a copy of all the commands you type and all the output those commands produce to a file, use the SDA command SET LOG, specifying the name of the log file. The file produced is 132 columns wide and is formatted for output to a printer.
To exit from SDA, use the EXIT command. Note that the EXIT command also causes SDA to exit from display mode. Thus, if SDA is in display mode, you must use the EXIT command twice: once to exit from display mode, and a second time to exit from SDA.
The following qualifiers described in this section determine whether the object of an SDA session is a crash dump or a running system. They also help create the environment of an SDA session.
Invokes SDA to analyze the specified dump file.
/CRASH_DUMP filespec
filespec
Name of the crash dump file to be analyzed. The default file specification is:SYS$DISK and [default-dir] represent the disk and directory specified in your last SET DEFAULT command. If you do not specify filespec, SDA prompts you for it.
- SYS$DISK:[default-dir]SYSDUMP.DMP
See Chapter 2, Section 2.3 for additional information on crash dump analysis. You cannot specify the /SYSTEM qualifier when you include the /CRASH_DUMP qualifier in the ANALYZE command.
| #1 |
|---|
$ ANALYZE/CRASH_DUMP SYS$SYSTEM:SYSDUMP.DMP
$ ANALYZE/CRASH SYS$SYSTEM
|
These commands invoke SDA to analyze the crash dump stored in SYS$SYSTEM:SYSDUMP.DMP.
| #2 |
|---|
$ ANALYZE/CRASH SYS$SYSTEM:PAGEFILE.SYS
|
This command invokes SDA to analyze a crash dump stored in the system page file.
Invokes SDA when used with the /CRASH_DUMP qualifier to analyze the specified dump file when a corruption or other problem prevents normal invocation of SDA with ANALYZE/CRASH_DUMP command.
/CRASH_DUMP/OVERRIDE filespec
filespec
Name of the crash dump file to be analyzed. The default file specification is:SYS$DISK and [default-dir] represent the disk and directory specified in your last SET DEFAULT command. If you do not specify filespec, SDA prompts you for it.
- SYS$DISK:[default-dir]SYSDUMP.DMP
See Chapter 2, Section 2.3 for additional information on crash dump analysis. Note that when SDA is invoked with /OVERRIDE that not all the commands in Chapter 2, Section 2.3 can be used. Commands that can be used are as follows:
- Output control commands such as SET OUTPUT and SET LOG
- Dump file related commands such as SHOW DUMP and CLUE ERRLOG
Commands that cannot be used are as follows:
- Commands that access memory addresses within the dump file such as EXAMINE and SHOW SUMMARY
- You cannot specify the /RELEASE qualifier when you include the /OVERRIDE qualifier in the ANALYZE/CRASH_DUMP command.
| #1 |
|---|
$ ANALYZE/CRASH_DUMP/OVERRIDE SYS$SYSTEM:SYSDUMP.DMP
$ ANALYZE/CRASH SYS$SYSTEM
|
These commands invoke SDA to analyze the crash dump stored in SYS$SYSTEM:SYSDUMP.DMP.
Invokes SDA to release those blocks in the specified system page file occupied by a crash dump.Requires CMKRNL (change-mode-to-kernel) privilege.
/RELEASE filespec
filespec
Name of the system page file (SYS$SYSTEM:PAGEFILE.SYS). Because the default file specification is SYS$DISK:[default-dir]SYSDUMP.DMP, you must identify the page file explicitly. SYS$DISK and [default-dir] represent the disk and directory specified in your last DCL command SET DEFAULT. If you do not specify filespec, SDA prompts you for it.
Use the /RELEASE qualifier to release from the system page file those blocks occupied by a crash dump. When invoked with the /RELEASE qualifier, SDA immediately deletes the dump from the page file and allows no opportunity to analyze its contents.When you specify the /RELEASE qualifier in the ANALYZE command, do the following:
- Use the /CRASH_DUMP qualifier.
- Include the name of the system page file (SYS$SYSTEM:PAGEFILE.SYS) as the filespec.
If you do not specify the system page file or the specified page file does not contain a dump, SDA generates the following messages:
%SDA-E-BLKSNRLSD, no dump blocks in page file to release, or not page file
%SDA-E-NOTPAGFIL, specified file is not the page file
You cannot specify the /OVERRIDE qualifier when you include the /RELEASE qualifier in the ANALYZE/CRASH_DUMP command.
$ ANALYZE/CRASH_DUMP/RELEASE SYS$SYSTEM:PAGEFILE.SYS
$ ANALYZE/CRASH/RELEASE PAGEFILE.SYS
|
These commands invoke SDA to release to the page file those blocks in SYS$SYSTEM:PAGEFILE.SYS occupied by a crash dump.
Specifies an alternate system symbol table for SDA to use.
/SYMBOL =system-symbol-table
File specification of the OpenVMS Alpha SDA system symbol table required by SDA to analyze a system dump. The specified system-symbol-table must contain those symbols required by SDA to find certain locations in the executive image.
If you do not specify the /SYMBOL qualifier, SDA uses SDA$READ_DIR:SYS$BASE_IMAGE.EXE to load system symbols into the SDA symbol table. When you specify the /SYMBOL qualifier, SDA assumes the default disk and directory to be SYS$DISK: that is, the disk and directory specified in your last DCL command SET DEFAULT. If you specify a file for this parameter that is not a system symbol table, SDA exits with a fatal error.
The /SYMBOL qualifier allows you to specify a system symbol table to load into the SDA symbol table. You can use the /SYMBOL qualifier whether you are analyzing a system dump or a running system.The /SYMBOL qualifier can be used with the /CRASH_DUMP and /SYSTEM qualifiers. It is ignored when /OVERRIDE or /RELEASE is specified.
$ ANALYZE/CRASH_DUMP/SYMBOL=SDA$READ_DIR:SYS$BASE_IMAGE.EXE SYS$SYSTEM
|
This command invokes SDA to analyze the crash dump stored in SYS$SYSTEM:SYSDUMP.DMP, using the base image in SDA$READ_DIR.
Invokes SDA to analyze a running system.Requires CMKRNL (change-mode-to-kernel) privilege.
/SYSTEM
None.
See Chapter 2, Section 2.4 to use SDA to analyze a running system.You cannot specify the /CRASH_DUMP, /OVERRIDE, or /RELEASE qualifiers when you include the /SYSTEM qualifier in the ANALYZE command.
$ ANALYZE/SYSTEM
|
This command invokes SDA to analyze the running system.
This chapter describes the SDA commands that can be used to analyze a system dump or a running system. SDA CLUE extension commands, which can summarize information provided by certain SDA commands and provide additional detail for some SDA commands, are described in Chapter 5.
The SDA commands are as follow:
Causes SDA to execute SDA commands contained in a file. Use this command to execute a set of frequently used SDA commands.
@filespec
filespec
Name of a file that contains the SDA commands to be executed. The default file type is .COM.
SDA> @USUAL
|
The Execute command executes the following commands, as contained in a file named USUAL.COM:
SET OUTPUT LASTCRASH.LIS
SHOW CRASH
SHOW PROCESS
SHOW STACK
SHOW SUMMARY
This command procedure first makes the file LASTCRASH.LIS the destination for output generated by subsequent SDA commands. Next, the command procedure sends to the file information about the system failure and its context, a description of the process executing at the time of the process, the contents of the stack on which the failure occurred, and a list of the processes active on the CPU that failed.
An EXIT command within a command procedure terminates the procedure at that point, as would an end-of-file.
Command procedures cannot be nested.
Switches control of your terminal from your current process to another process in your job (for example, one created with the SDA SPAWN command).
ATTACH [/PARENT] process-name
process-name
Name of the process to which you want to transfer control.
/PARENT
Transfers control of the terminal to the current process parent process. When you specify this qualifier, you cannot specify the process-name parameter.
| #1 |
|---|
SDA> ATTACH/PARENT
|
This ATTACH command attaches the terminal to the parent process of the current process.
| #2 |
|---|
SDA> ATTACH DUMPER
|
This ATTACH command attaches the terminal to a process named DUMPER in the same job as the current process.
Copies the contents of the dump file to another file.
COPY [/qualifier...] output-filespec
output-filespec
Name of the device, directory, and file to which SDA copies the dump file. The default file specification is:
- SYS$DISK:[default-dir]filename.DMP
SYS$DISK and [default-dir] represent the disk and directory specified in your last DCL command SET DEFAULT. You must specify a file name.
/COMPRESS
Causes SDA to compress dump data as it is writing a copy. If the dump being analyzed is already compressed, then SDA does a normal COPY, issuing an informational message indicating that it is ignoring the /COMPRESS request./DECOMPRESS
Causes SDA to decompress dump data as it is writing a copy. If the dump being analyzed is already decompressed, then SDA does a normal COPY, issuing an informational message indicating that it is ignoring the /DECOMPRESS request.
Each time the system fails, it copies the contents of memory and the hardware context of the current process (as directed by the DUMPSTYLE parameter) into the file SYS$SYSTEM:SYSDUMP.DMP (or the page file), overwriting its contents. Each time the system is shut down normally, it overwrites the dump file with error log messages that have not yet been written to the error log file. If you do not save this crash dump elsewhere, it will be overwritten the next time that the system fails or is shut down.The COPY command allows you to preserve a crash dump by copying its contents to another file. It is generally useful to invoke SDA during system initialization (from within SYS$MANAGER:SYSTARTUP_VMS.COM) to execute the COPY command. This ensures that a copy of the dump file is made only after the system has failed.
The COPY command does not affect the contents of the file containing the dump being analyzed.
If you are using the page file (SYS$SYSTEM:PAGEFILE.SYS) as the dump file instead of SYSDUMP.DMP, use the COPY command to explicitly release the blocks of the page file that contain the dump, thus making them available for page. Although the copy operation succeeds, the release operation requires that your process have change-mode-to-kernel (CMKRNL) privilege. Once the dump pages have been released from the page file, the dump information in these pages may be lost. Perform subsequent analysis upon the copy of the dump created by the COPY command.
If you press Ctrl/T while using the COPY command, the system displays how much of the file has been copied.
SDA> COPY SYS$CRASH:SAVEDUMP
|
The COPY command copies the dump file into the file SYS$CRASH:SAVEDUMP.DMP.
| Previous | Next | Contents | Index |
|
|
| privacy and legal statement | ||
| 6549PRO_004.HTML | ||