![[Compaq]](../../images/compaq.gif)
![[Go to the documentation home page]](../../images/buttons/bn_site_home.gif)
![[How to order documentation]](../../images/buttons/bn_order_docs.gif)
![[Help on this site]](../../images/buttons/bn_site_help.gif)
![[How to contact us]](../../images/buttons/bn_comments.gif)
![[OpenVMS documentation]](../../images/ovmsdoc_sec_head.gif)
| Document revision date: 19 July 1999 | |
|
|
|
|
|
|
| Previous | Contents | Index |
When a process no longer needs a lock on a resource, you can dequeue the lock by using the Dequeue Lock Request (SYS$DEQ) system service. Dequeuing locks means that the specified lock request is removed from the queue it is in. Locks are dequeued from any queue: Granted, Waiting, or Conversion (see Section 17.2.6). When the last lock on a resource is dequeued, the lock management services delete the name of the resource from its data structures.
The four arguments to the SYS$DEQ macro (lkid, valblk, acmode, and flags) are optional. The lkid argument allows the process to specify a particular lock to be dequeued, using the lock identification returned in the lock status block.
The valblk argument contains the address of a 16-byte lock value block. If the lock being dequeued is in protected write or exclusive mode, the contents of the lock value block are stored in the lock value block associated with the resource. If the lock being dequeued is in any other mode, the lock value block is not used. The lock value block can be used only if a particular lock is being dequeued.
Three flags are available:
The following is an example of dequeuing locks:
#include <stdio.h>
#include <descrip.h>
#include <lckdef.h>

/* Declare a lock status block */

struct lock_blk {
                unsigned short lkstat ,reserved;
                unsigned int lock_id;
}lksb;

   .
   .
   .
        void read_updates();
        unsigned int status, lkmode=LCK$K_CRMODE, lkid;
        $DESCRIPTOR(resnam,"STRUCTURE_1"); /* resource */

/* Queue a request for concurrent read mode lock */
        status = SYS$ENQW(0,          /* efn - event flag */
                        lkmode,       /* lkmode - lock mode */
                        &lksb,        /* lksb - lock status block */
                        0,            /* flags */
                        &resnam,      /* resnam - name of resource */
                        0,            /* parid - lock id of parent */
                        &read_updates,/* astadr - AST routine */
                        0, 0, 0, 0);
        if((status & 1) != 1)
                LIB$SIGNAL(status);

   .
   .
   .
        lkid = lksb.lock_id;
        status = SYS$DEQ( lkid,        /* lkid - id of lock to be dequeued */
                       0, 0, 0);
        if((status & 1) != 1)
                LIB$SIGNAL(status);

}
|
User-mode locks are automatically dequeued when the image exits.
17.6 Local Buffer Caching with the Lock Management Services
The lock management services provide methods for applications to
perform local buffer caching (also called distributed
buffer management). Local buffer caching allows a number of processes
to maintain copies of data (disk blocks, for example) in buffers local
to each process and to be notified when the buffers contain invalid
data because of modifications by another process. In applications where
modifications are infrequent, substantial I/O can be saved by
maintaining local copies of buffers. Either the lock value block or
blocking ASTs (or both) can be used to perform buffer caching.
17.6.1 Using the Lock Value Block
To support local buffer caching using the lock value block, each process maintaining a cache of buffers maintains a null mode lock on a resource that represents the current contents of each buffer. (For this discussion, assume that the buffers contain disk blocks.) The value block associated with each resource is used to contain a disk block "version number." The first time a lock is obtained on a particular disk block, the current version number of that disk block is returned in the lock value block of the process. If the contents of the buffer are cached, this version number is saved along with the buffer. To reuse the contents of the buffer, the null lock must be converted to protected read mode or exclusive mode, depending on whether the buffer is to be read or written. This conversion returns the latest version number of the disk block. The version number of the disk block is compared with the saved version number. If they are equal, the cached copy is valid. If they are not equal, a fresh copy of the disk block must be read from disk.
Whenever a procedure modifies a buffer, it writes the modified buffer
to disk and then increments the version number before to converting the
corresponding lock to null mode. In this way, the next process that
attempts to use its local copy of the same buffer finds a version
number mismatch and must read the latest copy from disk rather than use
its cached (now invalid) buffer.
17.6.2 Using Blocking ASTs
Blocking ASTs are used to notify processes with granted locks that another process with an incompatible lock mode has been queued to access the same resource.
Blocking ASTs can be used to support local buffer caching in two ways.
One technique involves deferred buffer writes; the other technique is
an alternative method of local buffer caching without using value
blocks.
17.6.2.1 Deferring Buffer Writes
When local buffer caching is being performed, a modified buffer must be
written to disk before the exclusive mode lock can be released. If a
large number of modifications are expected (particularly over a short
period of time), you can reduce disk I/O by maintaining the exclusive
mode lock for the entire time that the modifications are being made and
by writing the buffer once. However, this prevents other processes from
using the same disk block during this interval. This problem can be
avoided if the process holding the exclusive mode lock has a blocking
AST. The AST notifies the process if another process needs to use the
same disk block. The holder of the exclusive mode lock can then write
the buffer to disk and convert its lock to null mode (thereby allowing
the other process to access the disk block). However, if no other
process needs the same disk block, the first process can modify it many
times but write it only once.
17.6.2.2 Buffer Caching
To perform local buffer caching using blocking ASTs, processes do not
convert their locks to null mode from protected read or exclusive mode
when finished with the buffer. Instead, they receive blocking ASTs
whenever another process attempts to lock the same resource in an
incompatible mode. With this technique, processes are notified that
their cached buffers are invalid as soon as a writer needs the buffer,
rather than the next time the process tries to use the buffer.
17.6.3 Choosing a Buffer-Caching Technique
The choice between using version numbers or blocking ASTs to perform local buffer caching depends on the characteristics of the application. An application that uses version numbers performs more lock conversions, whereas one that uses blocking ASTs delivers more ASTs. Note that these techniques are compatible; some processes can use one technique, and other processes can use the other at the same time. Generally, blocking ASTs are preferable in a low-contention environment, whereas version numbers are preferable in a high-contention environment. You can even invent combined or adaptive strategies.
In a combined strategy, the applications use specific techniques. If a process is expected to reuse the contents of a buffer in a short amount of time, the application uses blocking ASTs; if there is no reason to expect a quick reuse, the application uses version numbers.
In an adaptive strategy, an application makes evaluations based on the rate of blocking ASTs and conversions. If blocking ASTs arrive frequently, the application changes to using version numbers; if many conversions take place and the same cached copy remains valid, the application changes to using blocking ASTs.
For example, suppose one process continually displays the state of a database, while another occasionally updates it. If version numbers are used, the displaying process must always make sure that its copy of the database is valid (by performing a lock conversion); if blocking ASTs are used, the display process is informed every time the database is updated. On the other hand, if updates occur frequently, the use of version numbers is preferable to continually delivering blocking ASTs.
17.7 Example of Using Lock Management Services
The following program segment requests a null lock for the resource named TERMINAL. After the lock is granted, the program requests that the lock be converted to an exclusive lock. Note that, after SYS$ENQW returns, the program checks both the status of the system service and the condition value returned in the lock status block to ensure that the request completed successfully.
| #1 |
|---|
! Define lock modes
INCLUDE '($LCKDEF)'
! Define lock status block
INTEGER*2 LOCK_STATUS,
2         NULL
INTEGER LOCK_ID
COMMON /LOCK_BLOCK/ LOCK_STATUS,
2                   NULL,
2                   LOCK_ID
              .
              .
              .
! Request a null lock
STATUS = SYS$ENQW (,
2                  %VAL(LCK$K_NLMODE),
2                  LOCK_STATUS,
2                  ,
2                  'TERMINAL',
2                  ,,,,,)
IF (.NOT. STATUS) CALL LIB$SIGNAL (%VAL(STATUS))
IF (.NOT. LOCK_STATUS) CALL LIB$SIGNAL (%VAL(LOCK_STATUS))

! Convert the lock to an exclusive lock
STATUS = SYS$ENQW (,
2                  %VAL(LCK$K_EXMODE),
2                  LOCK_STATUS,
2                  %VAL(LCK$M_CONVERT),
2                  'TERMINAL',
2                  ,,,,,)
IF (.NOT. STATUS) CALL LIB$SIGNAL (%VAL(STATUS))
IF (.NOT. LOCK_STATUS) CALL LIB$SIGNAL (%VAL(LOCK_STATUS))
|
To share a terminal between a parent process and a subprocess, each process requests a null lock on a shared resource name. Then, each time one of the processes wants to perform terminal I/O, it requests an exclusive lock, performs the I/O, and requests a null lock.
Because the lock manager is effective only between cooperating programs, the program that created the subprocess should not exit until the subprocess has exited. To ensure that the parent does not exit before the subprocess, specify an event flag to be set when the subprocess exits (the num argument of LIB$SPAWN). Before exiting from the parent program, use SYS$WAITFR to ensure that the event flag has been set. (You can suppress the logout message from the subprocess by using the SYS$DELPRC system service to delete the subprocess instead of allowing the subprocess to exit.)
After the parent process exits, a created process cannot synchronize access to the terminal and should use the SYS$BRKTHRU system service to write to the terminal.
This chapter describes the system declaration mechanism, including LIB$INITIALIZE, which performs calls to any initialization routine declared for the image by the user. However, use of LIB$INITIALIZE is discouraged and should be used only when no other method is suitable. This chapter contains the following sections:
Section 18.1 describes the steps to perform image initialization.
Section 18.2 describes the argument list that is passed from the command interpreter, the debugger, or LIB$INITIALIZE to the main program.
Section 18.3 describes how a library or user program can declare an initialization routine.
Section 18.4 describes how the LIB$INITIALIZE dispatcher calls the initialization routine in a list.
Section 18.5 describes the options available to an initialization routine.
Section 18.6 illustrates with a code example several functions of an
initialization routine on both VAX and Alpha systems.
18.1 Initializing an Image
In most cases, both user and library routines are self-initializing. This means that they can process information with no special action required by the calling program. Initialization is automatic in two situations:
Any special initialization, such as a call to other routines or to system services, can be performed on the first call before the main program is initialized. For example, you can establish a new environment to alter the way errors are handled or the way messages are printed.
Such special initialization is required only rarely; however, when it is required, the caller of the routine does not need to make an explicit initialization call. The run-time library provides a system declaration mechanism that performs all such initialization calls before the main program is called. Thus, special initialization is invisible to later callers of the routine.
On VAX systems, before the main program or main routine is called, a number of system initialization routines are called as specified by a 1-, 2-, or 3-longword initialization list set up by the linker.
On Alpha systems, before the main program or main routine is called, a number of system initialization routines are called as specified by a 1-, 2-, or 3-quadword initialization list set up by the linker.
On VAX systems, the initialization list consists of the following (in order):
On Alpha systems, the initialization list consists of the following (in order):
The following initialization steps take place:
Main programs should not call the SYS$EXIT system service directly. If they do, other programs cannot call them as routines. |
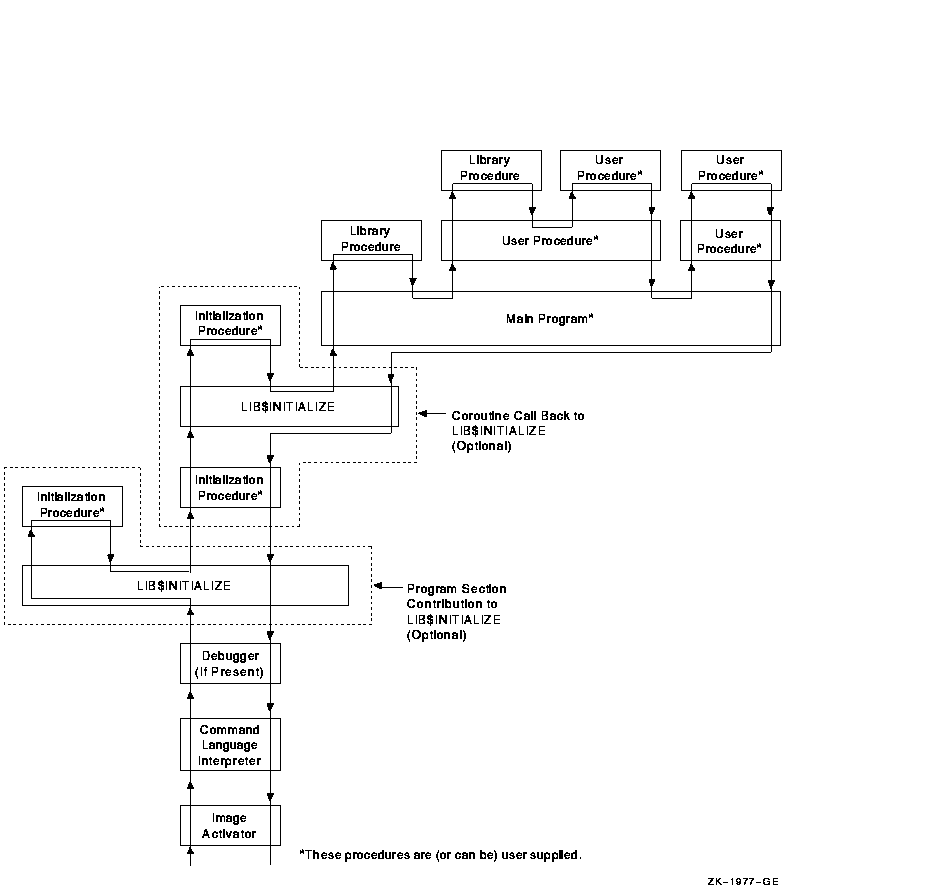
Figure 18-1 and Figure 18-2 illustrate the sequence of calls and returns in a typical image initialization. Each box is a routine activation as represented on the image stack. The top of the stack is at the top of the figure. Each upward arrow represents the result of a call instruction that creates a routine activation on the stack to which control is being transferred. Each downward arrow represents the result of a RET (return) instruction. A RET instruction removes the routine activation from the stack and causes control to be transferred downward to the next box.
A user program can alter the image initialization sequence by making a program section (PSECT) contribution to PSECT LIB$INITIALIZE and by declaring EXTERNAL LIB$INITIALIZE. This adds the optional initialization steps shown in Figure 18-1 and Figure 18-2 labeled "Program Section Contribution to LIB$INITIALIZE." (A program section is a portion of a program with a given protection and set of storage management attributes. Program sections that have the same attributes are gathered together by the linker to form an image section.) If the initialization routine also performs a coroutine call back to LIB$INITIALIZE, the optional steps labeled "Coroutine Call Back to LIB$INITIALIZE" in Figure 18-1 and Figure 18-2 are added to the image initialization sequence.
On VAX systems, Figure 18-1 shows the call instruction calling the debugger, if present, and the debugger then directly calling LIB$INITIALIZE and the main program.
Figure 18-1 Sequence of Events During Image Initialization on VAX Systems
On Alpha systems, Figure 18-2 shows the call instruction calling the debugger, if present, to set a breakpoint at the main program's entry point.
Figure 18-2 Sequence of Events During Image Initialization on Alpha Systems

The following argument list is passed from the CLI, the debugger, or LIB$INITIALIZE to the main program. This argument list is the same for each routine activation.
(start ,cli-coroutine [,image-info]) |
The start argument is the address of the entry in the initialization vector that is used to perform the call.
The cli-coroutine argument is the address of a CLI coroutine to obtain command arguments. For more information, see the OpenVMS Utility Routines Manual.
The image-info argument is useful image information, such as the program name.
The debugger or LIB$INITIALIZE, or both, can call the next routine in the initialization chain using the following coding sequence:
. . . ADDL #4, 4(AP) ; Step to next initialization list entry MOVL @4(AP), R0 ; R0 = next address to call CALLG (AP), (R0) ; Call next initialization routine . . . |
This coding sequence modifies the contents of an argument list entry.
Thus, the sequence does not follow the OpenVMS calling standard.
However, the argument list can be expanded in the future without
requiring any change either to the debugger or to LIB$INITIALIZE.
18.3 Declaring Initialization Routines
Any library or user program module can declare an initialization routine. This routine is called when the image is started. The declaration is made by making a contribution to the LIB$INITIALIZE program section, which contains a list of routine entry point addresses to be called before the main program or main routine is called.
The following VAX MACRO example declares an initialization routine by placing the routine entry address INIT_PROC in the list:
.EXTRN LIB$INITIALIZE         ; Cause library initialization
                              ; Dispatcher to be loaded

.PSECT LIB$INITIALIZE, NOPIC, USR, CON, REL, GBL, NOSHR, NOEXE, RD, NOWRT, LONG

.LONG INIT_PROC               ; Contribute entry point address of
                              ; initialization routine.
.PSECT ...
|
The .EXTRN declaration links the initialization routine dispatcher,
LIB$INITIALIZE, into your program's image. The reference contains a
definition of the special global symbol LIB$INITIALIZE, which is the
routine entry point address of the dispatcher. The linker stores the
value of this special global symbol in the initialization list along
with the starting address of the debugger and the main program. The GBL
specification ensures that the PSECT LIB$INITIALIZE contribution is not
affected by any clustering performed by the linker.
18.4 Dispatching to Initialization Routines
The LIB$INITIALIZE dispatcher calls each initialization routine in the list with the following argument list:
CALL init-proc (init-coroutine ,cli-coroutine [, image-info]) |
The init-coroutine argument is the address of a library coroutine to be called to effect a coroutine linkage with LIB$INITIALIZE.
The cli-coroutine is the address of a CLI coroutine used to obtain command arguments.
The image-info argument is useful image information,
such as the program name.
18.5 Initialization Routine Options
An initialization routine can be used to do the following:
| Previous | Next | Contents | Index |
|
|
| privacy and legal statement | ||
| 5841PRO_052.HTML | ||