![[Compaq]](../../images/compaq.gif)
![[Go to the documentation home page]](../../images/buttons/bn_site_home.gif)
![[How to order documentation]](../../images/buttons/bn_order_docs.gif)
![[Help on this site]](../../images/buttons/bn_site_help.gif)
![[How to contact us]](../../images/buttons/bn_comments.gif)
![[OpenVMS documentation]](../../images/ovmsdoc_sec_head.gif)
| Document revision date: 19 July 1999 | |
|
|
|
|
|
|
| Previous | Contents | Index |
Proxy logins let you access files across a network without specifying a user name or password in an access control string. Thus, proxy logins have the following security benefits:
Before you can initiate a proxy login, the system or security administrator at the remote node must create a proxy account for you. Proxy accounts, like regular accounts, are created with the Authorize utility (AUTHORIZE). They are usually nonprivileged accounts. Security administrators can allow you access to one default proxy account and up to 15 other proxy accounts. While proxy logins require more setup effort on the part of system managers, they provide more secure network access and eliminate the need for users to enter access control strings.
The following examples illustrate the differences between a normal network login request and a proxy login request. For each example, the following conditions exist:
The following diagram illustrates these conditions:
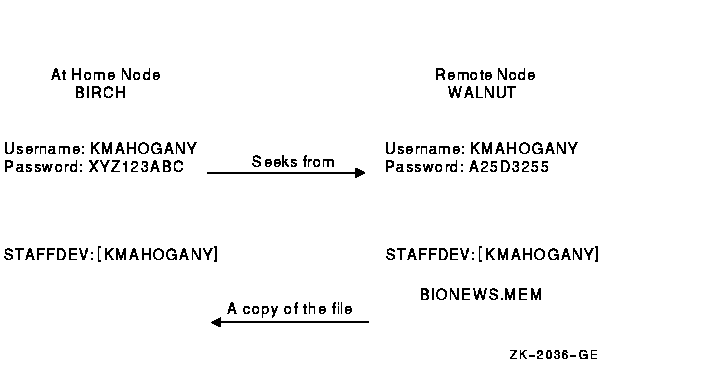
The user KMAHOGANY could use an access control string to copy the file BIONEWS.MEM, as follows:
$ COPY WALNUT"KMAHOGANY A25D3255"::BIONEWS.MEM BIONEWS.MEM |
Notice that the password A25D3255 echoes. Anyone who observes the screen can see it. In contrast, if KMAHOGANY has proxy access from node BIRCH to the account on node WALNUT, the command for copying the file BIONEWS.MEM is as follows:
$ COPY WALNUT::BIONEWS.MEM BIONEWS.MEM |
KMAHOGANY does not need to specify a password in an access control string. Instead, the system performs a proxy login from the account on node BIRCH into the account on node WALNUT. There is no exchange of passwords.
Using a General Access Proxy Account
Your security administrator can also authorize groups of users from foreign nodes to share in the use of a general access proxy account. For example, the security administrator at node WALNUT can create a general access account with the following conditions:
If the security administrator grants BIRCH::KMAHOGANY proxy access to the GENACCESS account, the user KMAHOGANY can copy the file BIONEWS.MEM by entering the following command:
$ COPY WALNUT::[KMAHOGANY]BIONEWS.MEM BIONEWS.MEM |
Note that KMAHOGANY must specify the directory [KMAHOGANY] because the file BIONEWS.MEM is not in the default device and directory for the GENACCESS account (STAFFDEV:[BIOSTAFF]). In addition, the protection for the file BIONEWS.MEM must permit access to the GENACCESS account. Otherwise, the command fails.
When You Need to Specify the Name of a Proxy Account
If you have access to more than one proxy account on a given node and you do not want to use the default proxy account, specify the name of the proxy account. For example, to use a proxy account called PROXY2 instead of the GENACCESS account (the default), KMAHOGANY enters the following command:
$ COPY WALNUT"PROXY2"::[KMAHOGANY]BIONEWS.MEM BIONEWS.MEM |
This command uses the PROXY2 account to copy the file BIONEWS.MEM from
the [KMAHOGANY] directory on node WALNUT.
3.10 Auditing Access to Your Account and Files
Although it is the security administrator's job to monitor the system for possible intrusions, you can help the security administrator to audit access to your account and files.
This section describes how to monitor your last login time for possible
intrusions. It also describes how to work with your security
administrator to enable certain types of auditing.
3.10.1 Observing Your Last Login Time
The operating system maintains information in your UAF record about the last time you logged in to your account. Your security administrator decides whether the system should display this information at login time. Sites with medium to high security requirements frequently display this information and ask users to check it for unusual or unexplained successful logins and unexplained failed logins.
If there is a report of an interactive or a noninteractive login at a time when you were not logged in, report it promptly to your security administrator. Also change your password. The security administrator can investigate further by using accounting files and audit logs.
If you receive a login failure message and cannot account for the failure, it is likely that someone has been trying to access your account unsuccessfully. Check your password to ensure that it adheres to all recommendations for password security described in Section 3.8. If not, change your password immediately.
If you expect to see a login failure message and it does not appear or
if the count of failures is too low, change your password. Report
either of these indications of login failure problems to your security
administrator.
3.10.2 Adding Access Control Entries to Sensitive Files
If you have key files that may have been accessed improperly, you may want to develop a strategy with your security administrator to audit access to the files.
Once you review the situation and ensure that you have done everything possible to protect your files with standard protection codes and general ACLs (described in Chapter 4), you may conclude that security auditing is required.
To specify security auditing, you can add special access control entries (ACEs) to files you own or to which you have control access. Keep in mind, however, that the audit log file is a systemwide mechanism, so Compaq recommends that a site security administrator control the use of file auditing. Although you can add auditing ACEs to files over which you have control, the security administrator has to enable auditing of files on a system level.
For example, if user RWOODS and his security administrator agree that they must know when a highly confidential file, CONFIDREVIEW.MEM, is being accessed, RWOODS can add an entry to the existing ACL for the file CONFIDREVIEW.MEM, as follows:
$ SET SECURITY/ACL=(AUDIT=SECURITY,ACCESS=READ+WRITE- _$ +DELETE+CONTROL+FAILURE+SUCCESS) CONFIDREVIEW.MEM |
After RWOODS adds the security-auditing entry, the security administrator enables file-access auditing so that access attempts are recorded. See Section 3.10.3.1 for more information on file-access auditing.
An access violation of one file frequently indicates access problems
with other files. Therefore, the security administrator may need to
monitor access to all key files having security-auditing ACEs. When
undesired access is gained to key files, the security administrator
must take immediate action.
3.10.3 Asking Your Security Administrator to Enable Auditing
A security administrator can direct the operating system to send an
audit message to the system security audit log file or an alarm to
terminals enabled as security operator terminals whenever
security-relevant events occur. For example, the security administrator
might identify one or more files for which write access is prohibited.
An audit message can be sent to indicate attempted access to these
files.
3.10.3.1 Auditing File Access
If you suspect intrusion attempts to your account, the security administrator may temporarily enable auditing for all file access. The security administrator can also enable auditing to monitor read access to your files to catch file browsers.
For example, assume you decide to audit the file CONFIDREVIEW.MEM, which has a security-auditing ACE (see Section 3.10.2). If user ABADGUY accesses CONFIDREVIEW.MEM and has delete access, the following audit record is written to the system security audit log file:
%%%%%%%%%%% OPCOM 7-DEC-1993 07:21:11.10 %%%%%%%%%%% Message from user AUDIT$SERVER on BOSTON Security audit (SECURITY) on BOSTON, system id: 19424 Auditable event: Attempted file access Event time: 7-DEC-1993 07:21:10.84 PID: 23E00231 Username: ABADGUY Image name: BOSTON$DUA0:[SYS0.SYSCOMMON.][SYSEXE]DELETE.EXE Object name: _BOSTON$DUA1:[RWOODS]CONFIDREVIEW.MEM;1 Object type: file Access requested: DELETE Status: %SYSTEM-S-NORMAL, normal successful completion Privileges used: SYSPRV |
The auditing message reveals the name of the perpetrator, the method of access (successful deletion accomplished by using the program [SYSEXE]DELETE.EXE), time of access (7:21 a.m.), and the use of a privilege (SYSPRV) to gain access to the file. With this information, the security administrator can take action.
Note that the security audit message is written to the security audit log file every time any file is accessed and meets the conditions specified in the audit entry of the ACL for that file (see Section 3.10.2). Access to the file CONFIDREVIEW.MEM, as well as access to any file on the system that is protected with security auditing, prompts an audit record to be written to the security audit log file.
After auditing has been introduced, check with your security
administrator periodically to see if any additional intrusions have
occurred.
3.10.3.2 Additional Events to Audit
In addition to file auditing, the security administrator can select other types of events that warrant special attention when they occur. Events triggering an audit or alarm may include the following:
| Events Initiating Security Audits or Alarms | |
|---|---|
|
Logins, logouts, login failures, and break-in attempts
Volume mounts and dismounts |
Modifications to:
System and user passwords System time System authorization file Network proxy file Rights database SYSGEN parameters |
| Connection or termination of logical links |
Execution of:
SET AUDIT command NCP commands |
|
Creation and deletion of selected
protected objects |
Installation of images |
|
Selected types of access and
deaccess to selected protected objects |
Access event requested by an ACL on a protected object |
| Successful or unsuccessful use of a privilege or an identifier | Use of the process control system services, including $CREPRC and $DELPRC |
Logging out of a session conserves system resources and protects your files. Leaving a terminal on line represents one of the greatest sources of inside intrusions. When you leave your terminal on line and your office open, you have effectively given away your password and your privileges and have left your files and those of the other members of your group unprotected. Any user can easily and quickly transfer all files accessible through your account. A malicious insider could rename and delete your files and any other files to which you have write access. If you have special privileges, especially privileges in the Files or All category, a malicious user can do major damage.
Log out when you leave your office even for a brief period of time. If
you have performed remote logins, you must log out of each node. The
following sections describe security considerations for logging out of
specific types of terminals or sessions.
3.11.1 Clearing Your Terminal Screen
You may want to clear your screen each time you log out from a terminal to ensure that your user name, node name, and operating system are not revealed to anyone else. If you are logging out after a remote login, the name of the node to which you return (the local node) is also revealed. If you access multiple accounts remotely (over the network), the final sequence of logout commands reveals all the nodes and user names that are accessible to you on each node (excluding the name of the furthest node reached). To those who can recognize the operating system from the prompt or a logout message, these displays also reveal the operating system.
At some sites, it may be important to leave nothing but the logout message on your screen, as follows:
After the screen clears, the cursor is positioned at the top of the screen, next to the DCL prompt. Enter the DCL command LOGOUT at the prompt. The only information remaining after you log out is your logout command and the logout completion message, for example:
$ LOGOUT RDOGWOOD logged out at 14-AUG-1993 19:39:01.43 |
After you log out from a hardcopy terminal, properly remove, file, or dispose of all hardcopy output that might reveal sensitive information. Your security administrator should provide direction on preferred procedures. Many sites use paper shredders or locked receptacles for this purpose. Handle output that you plan to save just as carefully.
You should also dispose of hardcopy output if the system fails before
you log out. In addition, if you will not be present when the system is
initialized, turn your terminal off.
3.11.3 Removing Disconnected Processes
The system automatically removes your disconnected processes after a certain interval. You can conserve system resources, however, if you directly log out of any disconnected processes, as follows:
Your security administrator may ask you to break the connection to a dialup line when you log out. If you anticipate no further immediate use of the line, use the LOGOUT command with the /HANGUP qualifier. The /HANGUP qualifier directs the system to automatically break the connection to the dialup line after you log out.
The effectiveness of the /HANGUP qualifier depends on how your system manager configures your modem line and how the line connects to the computer. It does not work on lines connected to a terminal server. |
Breaking the connection to a dialup line prevents someone from taking advantage of an open access line. To access the line, someone must know the access number and must personally redial. Breaking the connection is especially important if the dialup line you use is in a public area or where someone might use the terminal after you.
This practice also saves resources by reducing the required number of
dialup lines.
3.11.5 Turning Off a Terminal
If your site has moderate or high security requirements, your security administrator may ask you to turn off your terminal after logging out. This resets terminal characteristics and clears memory buffers. Some Trojan horse attacks use hardware frame buffers and the answerback capabilities that are built into newer terminals.
On VAX systems, users working in a C2 environment must turn off their
terminals. (C2 is a United States government rating of the security of
an operating system. Appendix C describes its requirements.)
3.12 Checklist for Contributing to System Security
Although security features are implemented by the security administrator as requirements for all users, this chapter has described ways in which you can contribute to system security. The following list reviews voluntary security actions:
| Previous | Next | Contents | Index |
|
|
| privacy and legal statement | ||
| 6346PRO_004.HTML | ||