![[Compaq]](../../images/compaq.gif)
![[Go to the documentation home page]](../../images/buttons/bn_site_home.gif)
![[How to order documentation]](../../images/buttons/bn_order_docs.gif)
![[Help on this site]](../../images/buttons/bn_site_help.gif)
![[How to contact us]](../../images/buttons/bn_comments.gif)
![[OpenVMS documentation]](../../images/ovmsdoc_sec_head.gif)
| Document revision date: 19 July 1999 | |
|
|
|
|
|
|
| Previous | Contents | Index |
Compaq recommends that a CD drive be available for each instance in an OpenVMS Galaxy computing environment. A single CD drive ships as part of each AlphaServer 8400, 8200, and 4100 system. If you plan to use multiple system disks in your OpenVMS Galaxy, a CD drive per instance will be very helpful for upgrades and software installations.
If your OpenVMS Galaxy instances are clustered together and use a
single common system disk, a single CD drive may be sufficient because
the CD drive can be served to the other clustered instances. For
operating system upgrades, the instance with the attached CD drive can
be used to perform the upgrade.
3.7 Important Cluster Information
This section contains information that will be important to you if you are clustering instances with other instances in an OpenVMS Galaxy computing environment or with non-Galaxy OpenVMS Clusters.
For information about OpenVMS Galaxy licensing requirements that apply
to clustering instances, see Chapter 4.
3.7.1 Becoming an OpenVMS Galaxy Instance
When you are installing OpenVMS Alpha Version 7.2--1, the OpenVMS installation dialog asks questions about OpenVMS Cluster and OpenVMS Galaxy instances.
If you answered "Yes" to the question
Will this system be a member of a VMScluster? (Yes/No)
|
and you answered "Yes" to the question
Will this system be an instance in an OpenVMS Galaxy? (Yes/No) |
    For compatibility with an OpenVMS Galaxy, any systems in the VMScluster
    which are running versions of OpenVMS prior to V7.1-2 must have a
    remedial kit installed.  The appropriate kit from the following list
    must be installed on all system disks used by these systems.
    (Later versions of these remedial kits may be used if available.)

        Alpha V7.1 and V7.1-1xx         ALPSYSB02_071
        Alpha V6.2 and V6.2-1xx         ALPSYSB02_062

        VAX V7.1                        VAXSYSB01_071
        VAX V6.2                        VAXSYSB01_062
|
This section summarizes information about SCSI device naming for OpenVMS Galaxy computing environments. For more complete information about OpenVMS Cluster device naming, see the OpenVMS Cluster Systems.
If you are creating an OpenVMS Galaxy with shared SCSI buses, you must note the following:
For OpenVMS to give the SCSI devices the same name on each instance correctly, you will likely need to use the device-naming feature of OpenVMS.
For example, assume that you have the following adapters on your system when you enter the SHOW CONFIG command:
PKA0 (embedded SCSI for CDROM) PKB0 (UltraSCSI controller KZPxxx) PKC0 (UltraSCSI controller) |
When you make this system a two-instance Galaxy, your hardware looks like the following:
Instance 0 PKA0 (UltraSCSI controller) Instance 1 PKA0 (embedded SCSI for CDROM) PKB0 (UltraSCSI controller) |
Your shared SCSI will be connected from PKA0 on instance 0 to PKB0 on instance 1.
If you INIT the system with the LP_COUNT environment variable set to 0, you will not be able to boot OpenVMS on the system unless the SYSGEN parameter STARTUP_P1 is set to MINIMUM.
This is because, with the LP_COUNT variable set to 0, you will now have PKB connected to PKC, and the SCSI device-naming that was set up for initializing with multiple partitions is not correct for initializing with the LP_COUNT variable set to 0.
During the device configuration that occurs during boot, OpenVMS will notice that PKA0 and PKB0 are connected together. OpenVMS expects that each device has the same allocation class and names, but in this case, they will not.
The device naming that was set up for the 2-instance Galaxy will not
function correctly because the console naming of the controllers has
changed.
3.8 Security Considerations in an OpenVMS Galaxy Computing Environment
OpenVMS Galaxy instances executing in a shared-everything cluster environment, in which all security database files are shared between all instances, automatically provide a consistent view of all Galaxy-related security profiles.
If you choose not to share all security database files throughout all Galaxy instances, a consistent security profile can only be achieved manually. Changes to an object's security profile must be followed by similar changes on all instances where this object can be accessed.
Because of the need to propagate changes manually, it is unlikely that such a configuration would ever be covered by a US C2 evaluation or by similar evaluations from other authorities. Organizations that require operating systems to have security evaluations should ensure that all instances in a single OpenVMS Galaxy belong to the same cluster.
The OpenVMS Galaxy Software Architecture on OpenVMS (OpenVMS Galaxy) is a system integrated product (SIP). That is, OpenVMS Galaxy code is integrated and delivered with the OpenVMS operating system.
The License Management Facility (LMF) Product Authorization Keys (PAKs)
representing OpenVMS Galaxy licenses allow you to access and use
OpenVMS Galaxy software. For more information about the location of the
PAKs available with OpenVMS Alpha Version 7.2--1, see the Guide to OpenVMS Version 7.2--1 CD--ROMs.
4.1 OpenVMS Galaxy Licensing Requirements
The following list summarizes OpenVMS Galaxy licensing requirements:
The following sections describe these requirements in more detail.
4.1.1 OpenVMS Operating System License
When an AlphaServer system is configured as an OpenVMS Galaxy system, there are no changes in how a system is licensed for the OpenVMS operating system.
One OpenVMS Base License is required for the Galaxy system, plus one
SMP Extension License for each CPU after the first CPU.
4.1.2 OpenVMS Galaxy License
To create and run multiple instances, one OpenVMS Galaxy License is required for each CPU in a Galaxy system.
License rights for running a single-instance Galaxy on any Alpha system
are provided by the OpenVMS Base License.
4.1.3 OpenVMS Layered Products License
Compaq software layered products on OpenVMS Galaxy configurations continue to use standard license types: Traditional, Concurrent Use, and Personal Use.
Instances in an OpenVMS Galaxy computing environment can be clustered
with other instances in a single system, with instances in other Galaxy
systems, or with non-Galaxy systems. Each type of clustering has
different licensing requirements, as described in the following
sections.
4.2.1 Clustering in a Galaxy System
In an OpenVMS Galaxy computing environment, instances can be clustered with other instances within a Galaxy system. Clustered instances use the shared-memory cluster interconnect to communicate with each other.
The licensing and functionality for clustering within a Galaxy system
is provided under the OpenVMS Galaxy License.
4.2.2 Clustering Outside a Galaxy System
Instances in an OpenVMS Galaxy computing environment can be clustered with instances in another OpenVMS Galaxy system or with cluster nodes in non-Galaxy systems. Instances clustered outside of a Galaxy system use traditional cluster interconnects.
Each system that is clustered with another system must be licensed for
OpenVMS Cluster Software. Clustering outside the OpenVMS Galaxy system
is not covered by the OpenVMS Galaxy License.
4.3 License Databases
When an OpenVMS Galaxy system is configured with more than one instance, a license database must be set up for each independent instance or cluster of instances. The PAKs representing the licenses on the OpenVMS Galaxy configuration can be loaded on multiple license databases, as follows:
OpenVMS Galaxy PAK names are as follows:
OpenVMS Galaxy customers must have at least one OPENVMS-ALPHA PAK, plus one additional OPENVMS-ALPHA PAK for each additional processor (CPU) after the first CPU (which is included in the Base Operating System License).
The OPENVMS-ALPHA and OPENVMS-ALPHA-USER PAKs can now be shared by multiple Galaxy instances. To implement this in the License Management Facility (LMF), include all OpenVMS Galaxy instance names in the PAK INCLUDE list.
For example, suppose that a customer has a system named ANDA1A in an OpenVMS Cluster. The OPENVMS-ALPHA license PAK currently has an INCLUDE list on it that has SCS node name ANDA1A in it. If that system is changed to an OpenVMS Galaxy running three instances named ANDA1A, ANDA2A, and ANDA3A, the OPENVMS-ALPHA license PAK must be modified so that all instances can share the NO_SHARE OPENVMS-ALPHA license.
The command to modify the OPENVMS-ALPHA license PAK is:
$ LICENSE MODIFY OPENVMS-ALPHA/AUTHORIZATION=xxxxx- _$ /INCLUDE=3D(ANDA1A,ANDA2A,ANDA3A) |
Because this example assumes that ANDA1A was already in a cluster, the
authorization number is required to identify the one PAK of many
OPENVMS-ALPHA license PAKs in the license database file (LDB).
4.5 For More Information About OpenVMS Licensing
For information about using the OpenVMS Licensing Management Facility, refer to the following books:
OpenVMS Alpha Version 7.2--1 provides support for OpenVMS Galaxy configurations on AlphaServer GS60, GS60E, and GS140 systems. You can run three instances of OpenVMS on AlphaServer GS140 systems or two instances on AlphaServer GS60/GS60E systems.
To create OpenVMS Galaxy environments on AlphaServer GS60, GS60E, and
GS140 systems, you must download the latest version of the V5.4-xx
console firmware from the following location:
http://ftp.digital.com/pub/Digital/Alpha/firmware/interim/gs60gs140/gs140.html
When you have the firmware you can:
This chapter describes how to create an OpenVMS Galaxy computing
environment on an AlphaServer 8400.
6.1 Step 1: Choose a Configuration and Determine Hardware Requirements
Quick Summary of an AlphaServer 8400 Galaxy Configuration
9 slots for:
Console line for each partition:
Rules:
2 partitions, 8 CPUs, 12GB memory
3 partitions, 8 CPUs, 8GB memory
6.2 Step 2: Set Up Hardware
When you have acquired the necessary hardware for your configuration,
follow the procedures in this section to assemble it.
6.2.1 Overview of KFE72-DA Console Subsystem Hardware
The AlphaServer 8400 provides a standard built-in UART, which is used as the console line for the primary Galaxy instance. The console for each additional instance requires a KFE72-DA console subsystem, which is the set of EISA-bus modules that establishes an additional console port.
Note that the AlphaServer 8400 supports a maximum of three I/O modules. Attempting to configure more than three is unsupported.
Each separate KFE72-DA subsystem must be installed in a separate DWLPB card cage with a hose connecting it to a separate I/O module of type KFTIA or KFTHA.
All KFTIA I/O modules must be installed first, starting at slot 8. Any KFTHA I/O modules must follow the KFTIA modules, using the consecutively lower-numbered slots.
You can use any combination of these two I/O modules as long as you follow this slot assignment rule.
When configuring a console subsystem, the I/O hose connecting the I/O module and DWLPB card cage must be plugged into the lowest hose port. Not just the lowest available hose port, but the absolute first hose port; the one closest to the top of the module.
The KFE72-DA contains three EISA modules that provide:
For each instance of the OpenVMS operating system after instance zero, you must install the following three modules in the PCI card cage:
To install these modules, follow the procedures in Section 6.2.2.1 to
Section 6.2.2.3, which supplement the installation procedures for KFE72-DA
modules in Chapter 5 of the KFE72 Installation Guide.
6.2.2.1 Slide the PCI Card Cage Out
Follow procedures in Section 5.2.1 in the KFE72
Installation Guide.
6.2.2.2 Insert Modules and Connect Ribbon Cables
When installing PCI modules, be sure the option bulkheads mate with the EMI gasket on the PCI card cage. |
KFE72-DA modules must occupy slots 0, 1, and 2 of the DWLPB card cage.
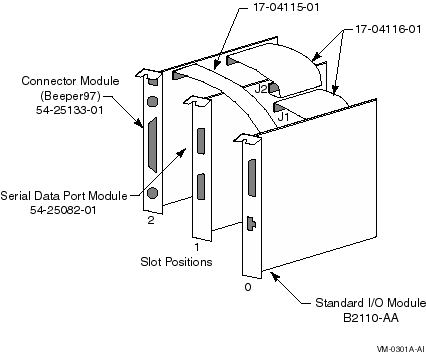
To insert the modules in the PCI card cages and connect the appropriate ribbon cables, refer to Figure 6-1 and perform the following steps:
Figure 6-1 Attaching Ribbon Cables
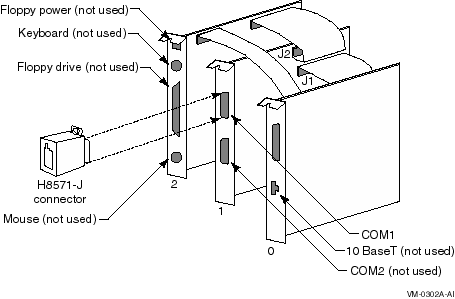
To connect the console terminal and additional devices, refer to Figure 6-2 and connect the console serial line (H8571-J connector) to COM1.
Note that the pair of arrows between the numbers 1 and 2 on the serial port module is an industry standard symbol for a serial port and does not indicate port numbers.
Figure 6-2 Connectors
To return the card cage, follow steps 2 through 9 in the procedure in
Section 5.2.3 in the KFE72 Installation Guide.
6.2.4 Using a Terminal Server
You may want to bring your console lines together using a terminal
server. For example, use a DECserver200 to allow reverse-LAT access to
each console over the network. While this is not strictly required, it
greatly simplifies OpenVMS Galaxy configuration management. Refer to
the appropriate product documentation for details about configuring a
LAT Server or other terminal concentrator.
6.2.5 Installing EISA Devices
Plug-in EISA devices can only be configured in partition 0. After installing EISA devices, the console will issue a message requesting that you run the EISA Configuration Utility (ECU).
Run the ECU as follows:
P00>>> SET ARC_ENABLE ON P00>>> INITIALIZE P00>>> RUN ECU |
There are two versions of the ECU, one that runs on a graphics terminal and another that runs on character cell terminals. Both versions are on the diskette, and the console determines which one to run. For OpenVMS Galaxy systems, the primary console will always be a serial device with a character cell terminal.
If the ECU is not run, OpenVMS will display the following message:
        %SYSTEM-I-NOCONFIGDATA, IRQ Configuration data for EISA
     slot xxx was not found, please run the ECU and reboot.
|
If you ignore this message, the system will boot, but the plug-in EISA devices will be ignored.
Once you have configured and set up the OpenVMS Galaxy hardware as
described in the previous sections, perform the following steps to
install and boot OpenVMS Galaxy instances.
6.3 Step 3: Create A System Disk
Decide whether to use a system disk per instance or to use a cluster common disk.
A new SECURITY.EXE is required for all cluster members running a
version prior to OpenVMS Version 7.1-2 that share the same
VMS$OBJECTS.DAT with Galaxy instances. (For more information, see
Section 1.8.)
6.4 Step 4: Install OpenVMS Alpha Version 7.2--1
No special installation procedures are required to run OpenVMS Galaxy software. Galaxy functionality is included in the base operating system and can be enabled or disabled using the console command and system parameter values described later in this chapter.
For more information about installing the OpenVMS Alpha operating
system, see the OpenVMS Alpha Version 7.2 Upgrade and Installation Manual.
6.4.1 OpenVMS Galaxy Licensing Information
See Section 4.1.
6.5 Step 5: Upgrade the Firmware
Creating an OpenVMS Galaxy environment on an AlphaServer 8400 requires a firmware upgrade to each processor module. If you use these modules again in a non-Galaxy configuration, you will need to reinstall the previous firmware. It is a good practice to have a current firmware CD on hand.
It saves some time if you install ALL processor modules you intend to use and update them at the same time. The AlphaServer 8400 requires that you use the same firmware on all processor boards. If you need to upgrade a board at a later time, you must:
To upgrade your firmware, the system must be powered on, running in non-Galaxy mode (that is, the lp_count console environment variable---if you have established it---must be set to zero).
To set the console environment variable, use the following commands:
P00>>> SET LP_COUNT 0 P00>>> INIT |
To upgrade the firmware, use the Alpha Systems Firmware Update Version 5.4 CD-ROM that is included in the OpenVMS Version 7.2--1 CD-ROM package. Be sure to read the release notes that are included in the package before installing the firmware.
| Previous | Next | Contents | Index |
|
|
| privacy and legal statement | ||
| 6512PRO_002.HTML | ||