Y |
AVERTZ_BLD.COM links the server procedures.
15.1.1 Build Options
This section is mainly for future reference, after you install and run AVERTZ. The information in this section allows you to change components of AVERTZ and incorporate those new components into AVERTZ.
Once you become familiar with the AVERTZ application, you might want to modify some of the source files for learning purposes. When you modify a source file, you must run the AVERTZ_BLD.COM procedure again to include the modified sources into the running application.
The AVERTZ_BLD.COM procedure takes either one parameter or no parameter. The parameters that the AVERTZ_BLD.COM accepts are listed in Table 15-1.
| Parameter | Effect |
|---|---|
| COMPLETE | Executes the entire command procedure |
| CDD | Defines the fields and records in the data dictionary |
| MSG | Compiles and builds the message file |
| TASK | Compiles the task definitions |
| GROUP | Compiles and builds the task group |
| MENU | Builds the AVERTZ menu |
| APPL | Compiles and builds the application definition |
| FORM | Compiles and builds the form |
| PROC | Compiles the server procedures |
| LINK | Links the server procedures |
If you specify COMPLETE as a parameter, AVERTZ recompiles the entire application. The other parameters allow you to selectively choose the components of the application that are recompiled and built into the running application. If you change a task definition, for example, you can run AVERTZ_BLD.COM with the TASK parameter by entering the following command:
$ @AVERTZ_BLD.COM TASK |
The command procedure compiles only the task definitions, and includes
the new task definitions with the running application.
15.2 Setting Up the AVERTZ Environment
Before you can begin running the AVERTZ application, there is some "one time only" work that needs to be done. You must:
- Create AVERTZ accounts
- Define AVERTZ logical names
The next two sections describe how to do this work.
15.2.1 Creating AVERTZ Accounts
The system manager typically creates user accounts for the Application Execution Controller (a component of ACMS that coordinates task execution), and each of the servers (accounts that handle processing work). These accounts are created using the Authorize utility. The name of the Application Execution Controller for AVERTZ is AVERTZ_EXC; the names of the servers for AVERTZ are AVERTZ_LOG, AVERTZ_READ, and AVERTZ_UPD.
Your system manager should create the AVERTZ_EXC account with the following quotas and privileges:
Maxjobs: 0 Fillm: 200 Bytlm: 50000 Maxacctjobs: 0 Shrfillm: 0 Pbytlm: 0 Maxdetach: 0 BIOlm: 190 JTquota: 1024 Prclm: 2 DIOlm: 45 WSdef: 756 Prio: 4 ASTlm: 392 WSquo: 1024 Queprio: 0 TQElm: 221 WSextent: 4096 CPU: (none) Enqlm: 2000 Pgflquo: 50000 Authorized Privileges: GROUP GRPNAM NETMBX SETPRV TMPMBX Default Privileges: GROUP GRPNAM NETMBX TMPMBX |
Your system manager should create the AVERTZ_LOG account with the following quotas and privileges:
Maxjobs: 0 Fillm: 200 Bytlm: 50000 Maxacctjobs: 0 Shrfillm: 0 Pbytlm: 0 Maxdetach: 0 BIOlm: 190 JTquota: 1024 Prclm: 4 DIOlm: 45 WSdef: 756 Prio: 4 ASTlm: 1000 WSquo: 1024 Queprio: 0 TQElm: 221 WSextent: 4096 CPU: (none) Enqlm: 2000 Pgflquo: 60000 Authorized Privileges: GROUP GRPNAM NETMBX SETPRV TMPMBX Default Privileges: GROUP GRPNAM NETMBX TMPMBX |
Your system manager should create the AVERTZ_READ account with the following quotas and privileges:
Maxjobs: 0 Fillm: 200 Bytlm: 50000 Maxacctjobs: 0 Shrfillm: 0 Pbytlm: 0 Maxdetach: 0 BIOlm: 190 JTquota: 1024 Prclm: 2 DIOlm: 45 WSdef: 756 Prio: 4 ASTlm: 392 WSquo: 1024 Queprio: 0 TQElm: 221 WSextent: 4096 CPU: (none) Enqlm: 2000 Pgflquo: 50000 Authorized Privileges: GROUP GRPNAM NETMBX SETPRV TMPMBX Default Privileges: GROUP GRPNAM NETMBX TMPMBX |
Your system manager should create the AVERTZ_UPD account with the following quotas and privileges:
Maxjobs: 0 Fillm: 200 Bytlm: 50000 Maxacctjobs: 0 Shrfillm: 0 Pbytlm: 0 Maxdetach: 0 BIOlm: 190 JTquota: 1024 Prclm: 7 DIOlm: 45 WSdef: 756 Prio: 4 ASTlm: 392 WSquo: 1024 Queprio: 0 TQElm: 221 WSextent: 4096 CPU: (none) Enqlm: 2000 Pgflquo: 50000 Authorized Privileges: GROUP GRPNAM NETMBX SETPRV TMPMBX Default Privileges: GROUP GRPNAM NETMBX TMPMBX |
For the AVERTZ_EXC, AVERTZ_LOG, AVERTZ_READ, and AVERTZ_UPD user accounts, your system manager might need to increase some of the SYSGEN parameters. Your system manager should check the values of the following parameters whose names have the PQL_ prefix --- in particular, the PQL_MENQLM parameter:
| PQL_DASTLM | PQL_DBIOLM | PQL_DBYTLM | PQL_DCPULM |
| PQL_DDIOLM | PQL_DENQLM | PQL_DFILLM | PQL_DJTQUOTA |
| PQL_DPGFLQUOTA | PQL_DPRCLM | PQL_DTQELM | PQL_DWSDEFAULT |
| PQL_DWSEXTENT | PQL_DWSQUOTA | PQL_MASTLM | PQL_MBIOLM |
| PQL_MBYTLM | PQL_MCPULM | PQL_MDIOLM | PQL_MENQLM |
| PQL_MFILLM | PQL_MJTQUOTA | PQL_MPGFLQUOTA | PQL_MPRCLM |
| PQL_MTQELM | PQL_MWSDEFAULT | PQL_MWSEXTENT | PQL_MWSQUOTA |
15.2.2 Defining System Logical Names
The AVERTZ_DEFAULT and AVERTZ_DATABASE logical names are required in order for you to run the AVERTZ application.
The AVERTZ_DEFAULT logical name must point to the directory that contains the AVERTZ source files. Since the ACMS installation places the source files in SYS$COMMON:[SYSHLP.EXAMPLES.ACMS], enter the following command:
$ DEFINE/SYSTEM AVERTZ_DEFAULT SYS$COMMON:[SYSHLP.EXAMPLES.ACMS] |
The AVERTZ_DATABASE logical name must point to the directory that contains the databases. Since the ACMS installation places the databases in SYS$COMMON:[SYSHLP.EXAMPLES.ACMS.DATABASE], enter the following command:
$ DEFINE/SYSTEM AVERTZ_DATABASE SYS$COMMON:[SYSHLP.EXAMPLES.ACMS.DATABASE] |
To ensure that these logical names are defined when your system
reboots, you can also add these lines to your system startup command
procedure. The default startup command procedure for OpenVMS VAX
Version 5.x is SYS$MANAGER:SYSTARTUP_V5.COM. The default startup
command procedure for OpenVMS VAX starting with Version 6.x and for
OpenVMS Alpha systems is SYS$MANAGER:SYSTARTUP_VMS.COM.
15.3 Managing the AVERTZ Environment
Once the AVERTZ accounts and logical names are set up, you can begin to authorize specific users and devices for AVERTZ. You must:
- Authorize users for ACMS
- Authorize terminals for ACMS
The next two sections describe how to do this work. You can refer to
these instructions as you continue to add authorized users and
terminals for AVERTZ.
15.3.1 Authorizing ACMS Users
Authorized OpenVMS users cannot sign in to ACMS until the system manager has also authorized them as ACMS users. The User Definition Utility (UDU) provides the capability to do this. Using the UDU, the system manager creates an ACMS database named ACMSUDF.DAT, located in the SYS$SYSTEM directory. When adding a user to the database, the system manager also specifies the default menu the user sees upon signing in to ACMS.
To add a new user to the ACMS database, perform the following steps:
- Define UDU as a global symbol in your login command file. Then
initialize the symbol by executing your login command file:
$ UDU :== $ACMSUDU
$ @LOGIN.COM
$
- Set the default directory to SYS$SYSTEM:
$ SET DEFAULT SYS$SYSTEM
$
- Invoke UDU:
$ UDU
UDU>
- Add an OpenVMS user name to the ACMS database by entering the ADD
command:
UDU> ADD uname /MDB=AVERTZ_DEFAULT:VR_MENU
UDU>
Include the MDB qualifier to specify the default menu displayed to this user when entering ACMS. - Enter the SHOW command to verify this entry in the ACMSUDF.DAT
database:
UDU> SHOW uname
User name:       UNAME               DISPLAY MENU
Default menu:
Default MDB:     AVERTZ_DEFAULT:VR_MENU
.
.
.
UDU>
An entry under uname indicates that the uname is authorized to sign in to ACMS. The default characteristic DISPLAY MENU causes ACMS to display the top menu in uname's VR_MENU database. - Enter the SHOW SYSTEM command to determine if user name SYSTEM has
been added to the ACMS database (it may not, if this is the first ACMS
access). If you receive a "user does not exist" message, then add
SYSTEM as follows:
UDU> ADD SYSTEM /AGENT
UDU>
Although ACMS assigns the user name SYSTEM to the Command Process (CP) when you install ACMS, it does not automatically authorize the Command Process as an agent. Without this authorization, ACMS cannot sign in any users. The /AGENT qualifier enables an agent to submit a task that has a user name different from the user name of the agent process. - Exit from UDU.
15.3.2 Authorizing ACMS Terminals
Authorized ACMS users must sign in from terminals that have been authorized for access to ACMS. With the Device Definition Utility (DDU), the system manager creates a database named ACMSDDF.DAT that contains a list of authorized ACMS devices. In the simplest case, the system manager can use one DDU definition to authorize all terminals on your system, both local and remote, to use ACMS.
To use DDU to authorize terminals for users, follow these steps:
- Define DDU as a global symbol in your login command file. Then
initialize the symbol by executing your login command file:
$ DDU :== $ACMSDDU
$ @LOGIN.COM
$
- Set the default directory to SYS$SYSTEM:
$ SET DEFAULT SYS$SYSTEM
$
- Invoke DDU:
$ DDU
DDU>
- Use the ADD command to authorize a LAT terminal on your system for
ACMS use. The device name LT authorizes all LAT terminals.
DDU> ADD LT
DDU>
If the ADD LT command has been performed before, you receive the message, "device name already exists in the data base." In this case, you can exit from DDU and proceed to the next section. - Use the SHOW command to display information about the LT entry:
DDU> SHOW LT
Device name:     LT                   NOT CONTROLLED
No Autologin
Printfile
DDU>
When the system manager creates a new ACMSDDF.DAT database, DDU creates a DEFAULT definition that assigns all terminals the NOT CONTROLLED characteristic. From a CONTROLLED terminal, the user signs in directly to ACMS; from a NOT CONTROLLED terminal, the user first logs in to the OpenVMS operating system and then signs in to ACMS from DCL command level. - Exit from DDU.
15.4 Starting and Stopping ACMS and AVERTZ
Both the ACMS system and the AVERTZ application must be started before users can sign in. You can also stop your ACMS system or AVERTZ application at any time. The next two sections describe how to:
- Start ACMS and AVERTZ
- Stop ACMS and AVERTZ
15.4.1 Starting ACMS and the AVERTZ Application
Any account from which the ACMS/START and ACMS/STOP commands are issued must have OpenVMS OPER privilege to execute these commands.
To start the ACMS system (if it is currently stopped), and to start the AVERTZ application, perform the following steps:
- Issue the SHOW SYSTEM command to determine if another user has
already started ACMS:
$ ACMS/SHOW SYSTEM
If the subsequent display states that "current system state" is STOPPED, proceed to the next step and start the ACMS system. However, if the display states that the current system state is STARTED, proceed to step 3. - Issue the START SYSTEM command to start the ACMS system:
$ ACMS/START SYSTEM
If the ACMS system starts successfully, the $ prompt returns with no intervening error messages. - Before you can invoke a command that runs the application, you
need to start the application. Issue the START APPLICATION command with
the name of the AVERTZ application:
$ ACMS/START APPLICATION VR_APPL
If the ACMS system starts successfully, the $ prompt returns with no intervening error messages. However, if your system logical AVERTZ_DEFAULT is not defined on this system, you receive an error message that states, in part, "Error opening TDB file AVERTZ_DEFAULT:[SYSHLP.EXAMPLES.ACMS]..." See Section 15.2.2 for information about defining your system logical.
If you receive an "invalid login attempt" message, your system manager may not have authorized the ACMS Command Process (CP) to run as an agent (described in Section 15.3.1). Without this authorization, ACMS cannot sign in any users.
15.4.2 Stopping the AVERTZ Application and ACMS
You can stop your application and the ACMS system with the ACMS/STOP command. Before you stop the system, however, issue the SHOW SYSTEM command to see if another person is using the ACMS system:
$ ACMS/SHOW SYSTEM |
The system displays the names of any active applications and any active users. If no other applications or users are active, issue both ACMS/STOP commands. Otherwise, issue only the STOP APPLICATION command, specifying the name of your application:
$ ACMS/STOP APPLICATION VR_APPL $ ACMS/STOP SYSTEM $ |
ACMS waits until all active tasks have finished executing before it stops the application and the system.
Chapter 16
User's View
To understand how the AVERTZ application looks to the user, imagine the
conversation between a reservation clerk working for AVERTZ operations
in New England and a customer who needs a rental car.
16.1 Entering AVERTZ
After his morning cup of coffee, Sparky Hartshorn, a reservation clerk at AVERTZ, enters the AVERTZ application from his OpenVMS account:
$ ACMS/ENTER VR_APPL[Return]
AVERTZ displays the AVERTZ Rental Menu shown in Figure 16-1.
Figure 16-1 AVERTZ Rental Menu
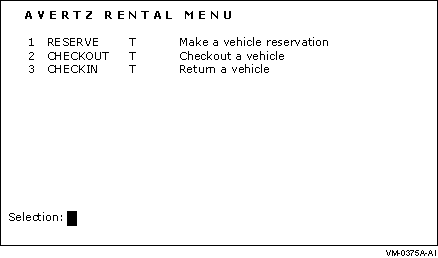
To select an option, the clerk types the option number and presses [Return]. For example, to reserve a car, the clerk types:
Selection:1[Return]
If the clerk needs online help while using AVERTZ, he can display help for any field by pressing [Help] when the cursor is on that field.
The next three sections describe a sample dialog between a customer and the clerk at AVERTZ for the following transactions:
- Reserving a car
- Checking out a car (beginning the rental)
- Checking in a car (ending the rental)
16.2 Customer Reserves a Car
Bertram Simpson needs a car. The following telephone conversation between Bertram and the AVERTZ clerk, on April 19, shows how the reservation option is used in a real business situation. Integrated with the conversation are the steps the clerk must take to enter the car reservation in AVERTZ:
| Clerk: | "Hello, AVERTZ Car Rental ... can I help you?" |
| Customer: | "Oh, hi. My name is Bertram Simpson and I need to rent a car for this weekend." |
| Clerk: |
"OK, Mr. Simpson. Let me just ask you a few questions."
The clerk enters the following at the AVERTZ Rental Menu:
Selection: 1 [Return]
|
Figure 16-2 Reservation Panel
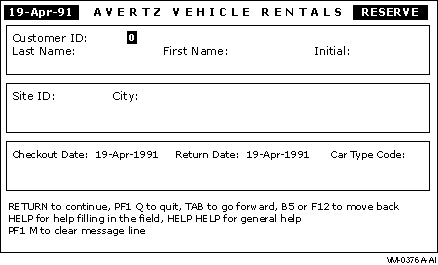
Figure 16-3 Site Selection Panel
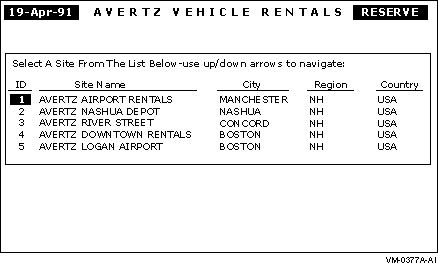
Figure 16-4 New Customer Panel
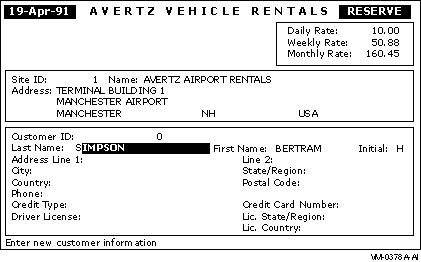
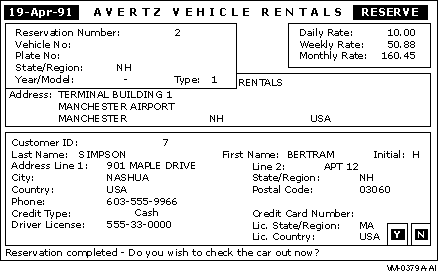
Figure 16-5 Reservation Completed Panel
| Clerk: |
"Have you rented a vehicle with us before?"
The clerk asks this question because, if Mr. Simpson is an existing customer, the clerk can enter his customer ID number instead of his name. |
||||||||||||
| Customer: | "No, I haven't." | ||||||||||||
| Clerk: | "OK, can you give me your full last name, first name, and middle initial, please?" | ||||||||||||
| Customer: | "Sure. Simpson, Bertram H." | ||||||||||||
| Clerk: |
To move to the name field and enter the customer's name, the clerk
enters the following:
[Tab]Simpson
[Tab]Bertram
[Tab]H
[Tab]
"OK, Mr. Simpson. And from what AVERTZ location would you like to pick up your vehicle?" |
||||||||||||
| Customer: | "I'm not sure. I'll be meeting a friend in Manchester, New Hampshire. Where is the closest AVERTZ location to Manchester?" | ||||||||||||
| Clerk: |
"Let me get a list of the sites."
The clerk enters the following to display a list of sites:
[PF1] [ S ]
|
||||||||||||
| Clerk: | "Sir, we have three sites in New Hampshire: one at the Manchester Airport, one at the Nashua Depot, and one in Concord. Is the Manchester Airport location OK with you?" | ||||||||||||
| Customer: | "Great, that's perfect!" | ||||||||||||
| Clerk: |
The clerk enters the following:
[Select]
Because the site selected is the first site on the list, the clerk does not need to move the cursor. If, however, the clerk did need to move the cursor, he could press the up-arrow key or the down-arrow key to select different sites. "OK. What day would you like to start your rental?" |
||||||||||||
| Customer: | "I need the car for the weekend, beginning later today." | ||||||||||||
| Clerk: | "OK, you want to pick up the car today, and return it on April 22. Correct?" | ||||||||||||
| Customer: | "Right." | ||||||||||||
| Clerk: |
The clerk enters the following:
19-APR-1991
[Tab]22-APR-1991
[Tab]
"And would you like a compact, mid-size, or full-size car, Mr. Simpson?" The clerk enters the following to display the car type codes:
[Help]
|
||||||||||||
| Customer: | "There will just be two people using the vehicle, so compact should be fine." | ||||||||||||
| Clerk: |
The clerk enters the following:
1 [Return]
|
||||||||||||
| Clerk: | If Mr. Simpson were an existing customer, the new customer panel would display information for each field, based on the data in Mr. Simpson's database record. | ||||||||||||
| "OK, Mr. Simpson. Because you are a new customer, we would like to collect a few more pieces of information about where you live and how you will pay for the vehicle. First, what is your address?" | |||||||||||||
| Customer: | "901 Maple Drive, Apartment 12, Nashua, New Hampshire." | ||||||||||||
| Clerk: | Based on the address the customer provided, the clerk completes the panel up to the Postal Code field by entering the following: | ||||||||||||
| [Tab] [Tab] [Tab]901 Maple Drive [Tab]Apt. 12 [Tab]Nashua [Tab]NH [Tab]USA [Tab] | |||||||||||||
| "And what is your zip code, sir?" | |||||||||||||
| Customer: | "03060." | ||||||||||||
| Clerk: |
The clerk enters the following:
03060 [Tab]
|
||||||||||||
| Customer: | "603-555-9966." | ||||||||||||
| Clerk: |
The clerk enters the following:
603-555-9966
[Tab]
"Will you be paying with cash or charge?" The clerk enters the following to display the credit type codes:
[Help]
|
||||||||||||
| Customer: | "Cash." | ||||||||||||
| Clerk: |
Because 0 is the code for cash, the clerk enters the following:
0
[Tab]
"Your driver's license number, please?" |
||||||||||||
| Customer: | "555-33-0000." | ||||||||||||
| Clerk: |
The clerk enters the following:
555-33-0000
[Tab]
"And that license is for the state of New Hampshire?" |
||||||||||||
| Customer: | "Actually, no. I just moved to New Hampshire a short while ago. It is a Massachusetts license." | ||||||||||||
| Clerk: |
The clerk enters the following:
MA [Tab]USA [Return]
|
||||||||||||
| Clerk: |
"Mr. Simpson, your reservation for a compact car rental from April 19,
1991, to April 22, 1991, is confirmed, with a reservation confirmation
number of 2. Please stop by our Manchester office later today to check
out the car. Thank you for calling AVERTZ! Bye ..."
Because Mr. Simpson phoned in his reservation, the clerk knows that
he is not ready to check out the car. The clerk enters the following:
[Tab] [Select]
|
||||||||||||
| Previous | Next | Contents | Index |