The screen shown in Figure 4-5, Server Enable/Disable Screen, appears.
Figure 4-5 Server Enable/Disable Screen

| Previous | Contents | Index |
To prevent the license server from running on a particular node, you can add the following logical name definition to that node's startup command procedure:
$ DEFINE/SYSTEM PWRK$LICENSE_SERVER_INHIBIT 1 |
In a cluster environment where all nodes use the same startup procedure, check the node name before executing the DEFINE command. |
The following example prevents the license server from running on node SPOT:
$ IF F$TRNLNM("SYS$NODE") .EQS. "SPOT::" THEN -
DEFINE/SYSTEM PWRK$LICENSE_SERVER_INHIBIT 1
|
The next example allows the license server to run only on node ROVER:
$ IF F$TRNLNM("SYS$NODE") .NES. "ROVER::" THEN -
DEFINE/SYSTEM PWRK$LICENSE_SERVER_INHIBIT 1
|
You can specify the following logical name definition to define which nodes you want the license server to run on. By default, if this logical is not defined, the license server will run on all nodes.
$ DEFINE/SYSTEM PWRK$LS_LICENSE_NODES "node1, node2, node3" |
Each node name that you add to this comma-separated list is a node that is allowed to run the license server. Any node in your OpenVMS cluster that is not specified in the list when the logical is defined, will not run the license server.
If you define PWRK$LS_LICENSE_NODES, and define PWRK$LICENSE_SERVER_INHIBIT (described above), the settings you define with PWRK$LS_LICENSE_NODES supersede any settings defined with PWRK$LICENSE_SERVER_INHIBIT. |
The number of client-based licenses available for a product may change because additional product licenses are added to the LMF database, or existing licenses are unloaded, disabled, deleted, or expired from the LMF database.
The license server must check the LMF database to verify license counts for products currently in the license server database. The license server database is updated to reflect LMF database changes at the following times:
After a license database update occurs, the new numbers you see in the License Manager screens may indicate that you must make some adjustments to your group license allocations.
Changes made to the number of available client-based licenses impact the license server and clients in the following ways:
When licenses have been unloaded or deleted, use one of the following strategies to accommodate client needs:
LMF synchronization occurs when the license server database is updated to reflect the system's LMF database. You can schedule the LMF synchronization to occur when it is most convenient for your system. By default, the synchronization operation occurs at 00:01 system time. To specify a different time for the synchronization to occur, define the logical name PWRK$LSLMFSYNCHMINUTES in the system logical name table equal to the number of minutes past midnight that the LMF synchronization occurs.
For example, if you want the LMF synchronization to occur at 4:15 AM, compute the number of minutes after midnight:
4:15 AM = (4 hours x 60 minutes/hour) + 15 minutes
        = 255 minutes past midnight
|
Then add the following line to the system's startup command procedure:
$ DEFINE/SYSTEM PWRK$LSLMFSYNCHMINUTES 255 |
New synchronization times take effect only after the file server is restarted after the new value is established.
This chapter describes how to configure, start up, and use the License Manager to manage client licenses from an OpenVMS server. It discusses the following topics:
The OpenVMS account used to run the License Manager must have the following privileges:
To start the License Manager, enter the following command from the system where the license server is running:
$ ADMINISTER/LICENSE_MANAGER |
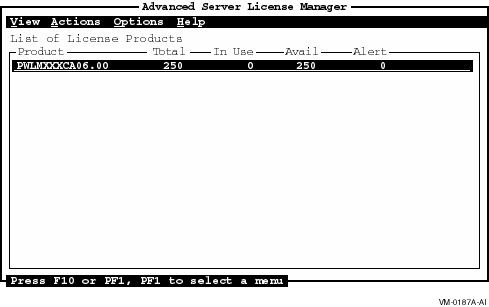
When you start the License Manager, the screen shown in Figure 4-1, Main Menu Screen, appears.
Figure 4-1 Main Menu Screen
The menu toolbar contains the following menu items:
To select a menu, press F10 or PF1 and PF1 again. The system displays the View menu as shown in Figure 4-2, Main Menu with View Menu Displayed.
Figure 4-2 Main Menu with View Menu Displayed
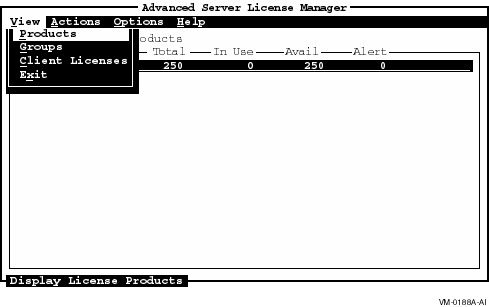
If you want to display one of the other menus, use the arrow key to
move the cursor to that menu, or use your mouse.
4.1.2 Getting Help with the License Manager
To display information about using the License Manager, choose Help from the menu bar. The Help menu displays two options:
Select the appropriate help option. To exit the help screen, press
Return. To exit the list of topics, press F10.
4.1.3 Exiting the License Manager
To exit from the License Manager, follow these steps:
If you attempt to start the License Manager when the license server is not running on the system, the message shown in Figure 4-3, License Server Error Message, is displayed.
Figure 4-3 License Server Error Message

If the license server has not been configured to run, you must reconfigure the file server. Run the initial configuration procedure (PWRK$CONFIG.COM) and specify that you want to run the license server. For information about configuring the file server, and additional information about the PWRK$CONFIG.COM command procedure, refer to your Server Installation and Configuration Guide.
In an OpenVMS cluster, if you attempt to start the License Manager on a node that is not running on the active license server and the license server is active on another member of the cluster, the error message in Figure 4-4, License Server Startup Error Message, appears.
Figure 4-4 License Server Startup Error Message
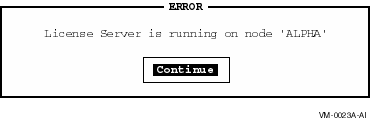
To run the License Manager, issue the ADMINISTER/LICENSE_MANAGER
command on the node that is running the active license server (defined
as nodename in the License Server Startup Error Message).
4.3 Navigating in the License Manager
The following tables describe the keys and buttons you use to navigate within and between the License Manager screens.
| Use this key... | To... | |
|---|---|---|
| Arrow keys | Navigate up and down lists and input fields, and across menu options and buttons. | |
| F10 | Select a menu: | |
| Enter... | To select... | |
| PF1, V | View Menu | |
| PF1, A | Actions Menu | |
| PF1, O | Options Menu | |
| PF1, H | Help | |
| Comma (keypad) | Enable and disable selection of multiple lines in a scroll region. When you perform an action on multiple lines (for example, removing a group), a confirmation box with the following options is displayed: | |
| Select... | To... | |
| YES | Confirm the action for each item selected. | |
| YES TO ALL | Perform the action on all selected items. | |
| CANCEL | Cancel the action. | |
| Space bar | Enable or disable the item selection. Selected items are highlighted. | |
| Tab | Move the cursor from group to group. | |
| Return | Display the screen or dialog box associated after selecting a task and remove the message window after an error message has been displayed. | |
| Hot key | Select the menu item list or input field whose hot key is highlighted. Used with PF1, they are the letters in the menu items that are underlined. For example, press PF1 G at the View menu for a list of server groups. | |
| Use this button... | To... |
|---|---|
| OK | Confirm the actions you performed on a particular screen. After choosing this button in a dialog box associated with a screen, you are returned to the screen. After choosing this button at the bottom of a screen, you are returned to the previous screen. |
| Help | Display help text. To exit the screen, press Return. To exit the list of topics, press F10. |
| Cancel | Cancel the actions you just performed. |
When you enter values in a dialog box that has several fields, use the
up and down arrow keys to navigate back and forth between the fields.
You can back up through the fields in this way to change a value as
long as you have not pressed Return to commit the values.
4.4 Performing License Server Tasks
License server tasks include managing the license server log files and enabling and disabling the license server. These tasks are performed through the following Options menu items:
When you invoke the License Manager, the license server, in most cases, is enabled. Before you add, move, or remove any licenses within license groups with the License Manager, you should disable the license server. Otherwise, it is not necessary to disable the license server before performing these operations. If the license server is enabled while you manage licenses, it can assign the same licenses you are managing, causing unpredictable results.
Whenever you exit the License Manager, the license server is automatically re-enabled.
In certain circumstances, if the license server finds no license server state file in the PWRK$LICENSE: directory, the license server disables itself, logs a message in the license server log file and operator console, creates the default license server state file, and remains disabled until the License Manager enables it. For additional information about the license server state file, refer to Section 3.1, License Server State Files.
To disable or enable a license server, follow these steps:
Figure 4-5 Server Enable/Disable Screen
You can perform the following log file tasks using the License Manager:
You can read or purge old versions of the server log file as you would any OpenVMS file. The file name and location is:
PWRK$LOGS:PWRK$LICENSE_SERVER_servername.LOG |
PWRK$LOGS is defined in the system logical name table when the license server is started. The servername is usually the OpenVMS Cluster alias or the node name of the system the license server is running on. For example, if your node is NASCAR, the file name and location is:
PWRK$LOGS:PWRK$LICENSE_SERVER_NASCAR.LOG |
You can enable logging for events associated with the following operations:
You can disable the logging of all events except server startup and fatal server errors.
If you are experiencing any problems with the license management
software, Compaq Computer Corporation recommends you enable the logging of all types
of license server events. This will provide you with a comprehensive
log file that provides information to assist in troubleshooting
licensing problems.
4.4.2.2 Selecting Events for Logging
To select the events you want to log, follow these steps:
Figure 4-6 Log File Options Screen
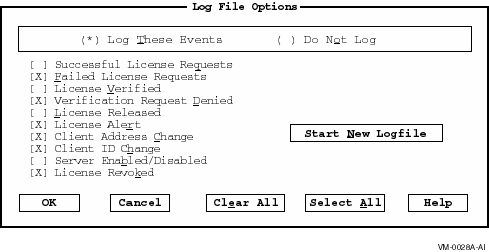
| Option | Description |
|---|---|
| Cancel | Cancel your selections. |
| Clear All | Clear all settings. |
| Select All | Select all settings. |
| Help | Get help on log file options. |
| Start New Logfile | Create a new log file instead of continuing to append information to the existing log file. The log file can become long. This option allows you to start a log file from today. |
A log file can grow quickly when tracking many events. When a log file becomes too large, you can create a new version of the file.
To create a new version of the log file, follow these steps:
1 These events have logging enabled by default when the license server is first started. |
4.5 Performing License Product Tasks
You can use the License Manager to perform the following product license tasks:
To add new or additional product licenses to the license server, follow these steps:
Figure 4-7 Add License Product Screen
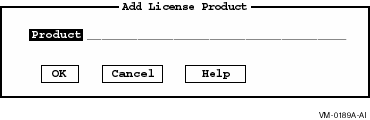
You can use the same procedure to add additional product licenses later.
| Previous | Next | Contents | Index |