![[Compaq]](../../images/compaq.gif)
![[Go to the documentation home page]](../../images/buttons/bn_site_home.gif)
![[How to order documentation]](../../images/buttons/bn_order_docs.gif)
![[Help on this site]](../../images/buttons/bn_site_help.gif)
![[How to contact us]](../../images/buttons/bn_comments.gif)
![[OpenVMS documentation]](../../images/ovmsdoc_sec_head.gif)
| Document revision date: 30 March 2001 | |
|
|
|
|
|
|
| Previous | Contents | Index |
Example 6-1 shows what happens when you create a shadow set by mounting two disk volumes that have never been a part of a shadow set. Because neither disk volume has been a part of a shadow set, the Mount utility (MOUNT) assumes that the first disk named in the MOUNT command is the source member. When the Mount utility checks the volume labels on the disks, it discovers that they are different from each other, and the utility automatically performs a copy operation.
In this example, DSA0 is the virtual unit name, $1$DUA8 and $1$DUA89 are the names of the disk volumes, and SHADOWDISK is the volume label.
| Example 6-1 Copy Operation: Creating a New Shadow Set | |||
|---|---|---|---|
$ MOUNT DSA0: /SHADOW=($1$DUA8:,$1$DUA89:) SHADOWDISK
%MOUNT-I-MOUNTED, SHADOWDISK    mounted on _DSA0:
%MOUNT-I-SHDWMEMSUCC, _$1$DUA8: (FUSS) is now a valid member
                      of the shadow set
%MOUNT-I-SHDWMEMCOPY, _$1$DUA89: (FUSS) added to the shadow
                      set with a copy operation
$ SHOW DEVICE DSA0:
Device                  Device           Error    Volume         Free  Trans Mnt
 Name                   Status           Count     Label        Blocks Count Cnt
DSA0:                   Mounted              0  SHADOWDISK      890937     1   1
$1$DUA8:        (FUSS)  ShadowSetMember      0  (member of DSA0:)

$1$DUA89:       (FUSS)  ShadowCopying        0  (copy trgt DSA0:  1% copied)
|
The SHOW DEVICE display in Example 6-1 shows the shadow set during the copy operation (transient state). Because the SCB information on $1$DUA8 and $1$DUA89 indicates that these devices have never been part of a shadow set, the shadowing software uses the first device named in the command line ($1$DUA8) as the source of the copy operation. The device status "ShadowSetMember" indicates that the $1$DUA8 device is a source shadow set member, and "ShadowCopying" indicates that the physical device $11$DUA89 is the target of a copy operation.
Suppose you want to add a new member to an existing shadow set, and the device you add is a previous member of this same shadow set. In this case, the volume label of the new member matches that of the current shadow set members, but the new member's MOUNT generation number is out of date compared with those of the current members. Thus, the Mount utility automatically performs a copy operation on that member.
Example 6-2 shows the format of the MOUNT command and MOUNT status messages returned when you add the $3$DIA12 device to the shadow set represented by the DSA9999 virtual unit. Notice that you do not need to list the member units currently in the shadow set on the MOUNT command line.
| Example 6-2 Copy Operation: Adding a Member to an Existing Shadow Set | |||
|---|---|---|---|
$ MOUNT /SYSTEM DSA9999: /SHADOW=$3$DIA12: AXP_SYS_071
%MOUNT-I-MOUNTED, AXP_SYS_071 mounted on _DSA9999:
%MOUNT-I-SHDWMEMCOPY, _$3$DIA12: (SHAD03) added to the shadow
                      set with a copy operation
$ SHOW DEVICE DSA9999:
Device                  Device           Error    Volume         Free  Trans Mnt
 Name                   Status           Count     Label        Blocks Count Cnt
DSA9999:                Mounted              0  AXP_SYS_071     70610     1   1
$3$DIA7:      (BGFUSS)  ShadowSetMember      0  (member of DSA9999:)
$3$DIA5:      (SHAD03)  ShadowSetMember      0  (member of DSA9999:)

$3$DIA12:     (SHAD03)  ShadowCopying        0  (copy trgt DSA9999:  0% copied)
|
Example 6-3 shows what happens when a three-member shadow set is dissolved on one node and then is immediately remounted on another node. When the Mount utility checks the volume information on each member, it finds that the volume information is consistent across the shadow set. Thus, a copy operation is not necessary when the shadow set is mounted.
In Example 6-3, DSA10 is the virtual unit and $3$DUA10, $3$DUA11, and $3$DUA12 are the member volumes. The first part of the example displays the output from a SHOW DEVICE command, which shows that the shadow set is mounted and in a steady state. Then the user dismounts the DSA10 shadow set and immediately remounts it.
| Example 6-3 No Copy Operation: Rebuilding a Shadow Set | |||
|---|---|---|---|
$ SHOW DEVICE D
Device                  Device           Error    Volume         Free  Trans Mnt
 Name                   Status           Count     Label        Blocks Count Cnt
DSA10:                 Mounted              0  VAX_SYS_071      292971     1   1
$3$DUA10:    (MYNODE)  ShadowSetMember      0  (member of DSA10:)
$3$DUA11:    (MYNODE)  ShadowSetMember      0  (member of DSA10:)
$3$DUA12:    (MYNODE)  ShadowSetMember      0  (member of DSA10:)
$ DISMOUNT /NOUNLOAD DSA10:
%%%%%%%%%%%  OPCOM  24-MAR-1997 20:26:41.40  %%%%%%%%%%%
$3$DUA10: (MYNODE) has been removed from shadow set.
%%%%%%%%%%%  OPCOM  24-MAR-1997 20:26:41.69  %%%%%%%%%%%
$3$DUA11: (MYNODE) has been removed from shadow set.
%%%%%%%%%%%  OPCOM  24-MAR-1997 20:26:41.69  %%%%%%%%%%%
$3$DUA12: (MYNODE) has been removed from shadow set.
%%%%%%%%%%%  OPCOM  24-MAR-1997 20:26:41.69  %%%%%%%%%%%
$ MOUNT /SYSTEM DSA10: /SHADOW=($3$DUA10:, $3$DUA11:, $3$DUA12:) VAX_SYS_071
%MOUNT-I-MOUNTED, VAX_SYS_071 mounted on _DSA10:
%MOUNT-I-SHDWMEMSUCC, _$3$DUA10: (MYNODE) is now a valid member of
                      the shadow set
%MOUNT-I-SHDWMEMSUCC, _$3$DUA11: (MYNODE) is now a valid member of
                      the shadow set
%MOUNT-I-SHDWMEMSUCC, _$3$DUA12: (MYNODE) is now a valid member of
                      the shadow set
$
|
Example 6-4 shows the output from the SHOW DEVICE command at the time of the merge operation.
When a system fails, the volume information is left in a state that shows that each shadow set member was not properly dismounted. If you issue the MOUNT command again after the node reboots, the shadowing software automatically performs a merge operation on the shadow set.
| Example 6-4 Merge Operation: Rebuilding a Shadow Set | |||
|---|---|---|---|
$ SHOW DEVICE DSA42: Device Device Error Volume Free Trans Mnt Name Status Count Label Blocks Count Cnt DSA42: Mounted 0 ATHRUZ 565997 1 1 $4$DUA2: (MYNODE) ShadowMergeMbr 0 (merging DSA42: 0% merged) $4$DUA42: (YRNODE) ShadowMergeMbr 0 (merging DSA42: 0% merged) |
This chapter describes the minicopy feature of Compaq Volume Shadowing for OpenVMS introduced in OpenVMS Version 7.3. Minicopy and its enabling technology, write bitmaps, are fully implemented on OpenVMS Alpha systems. OpenVMS VAX nodes can write to shadow sets that use this feature but they can neither create master write bitmaps nor manage them with DCL commands. In a mixed-architecture OpenVMS Cluster system, only one Alpha system is required in order to use minicopy.
The primary purpose of minicopy is to shorten the time it takes to
return a shadow set member to the shadow set. The shadow set member is
typically removed for the purpose of backing up the data and is then
returned to membership in the shadow set.
7.1 What Is Minicopy?
A minicopy operation is a streamlined copy operation. Minicopy ensures that the data on a shadow set member, when returned to the shadow set, is identical to the data in the shadow set.
A write bitmap tracks writes to a shadow set and is used to direct a minicopy operation when a shadow set member is returned to the shadow set.
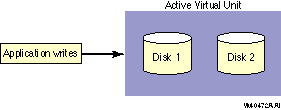
Prior to the removal of a shadow set member, application writes are sent directly to the shadow set (also known as the virtual unit), as shown in Figure 7-1.
Figure 7-1 Application Writes to a Shadow Set
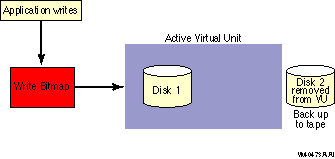
If you specify the minicopy qualifier (/POLICY=MINICOPY[=OPTIONAL]) when you dismount a shadow set member, a write bitmap is created. Subsequent writes to the shadow set are recorded by the write bitmap. Note that the write bitmap records only the logical block numbers (LBNs) of the associated writes, not the contents. The address is noted by setting one or more bits in a write bitmap; each bit corresponds to a range of 127 disk blocks.
When data is written to any block in the range of 127 blocks, the bit in the write bitmap that corresponds to that range is set. After the bit or bits are set, the data is written to the shadow set, as shown in Figure 7-2.
Figure 7-2 Application Writes to a Write Bitmap
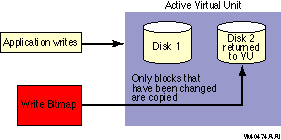
When the member is returned to the shadow set, the write bitmap is used to direct the minicopy operation, as shown in Figure 7-3. While the minicopy operation is taking place, the application continues to read and write to the shadow set.
Figure 7-3 Member Returned to the Shadow Set (Virtual Unit)
With the minicopy function, a full copy is no longer required when a member is returned to its shadow set, provided that the system managers follow the guidelines provided in Section 7.12. Note that, in this chapter, copy and full copy mean the same thing.
Several DCL commands can be used to manage write bitmaps. System
parameters are provided for managing the write bitmap updates in an
OpenVMS Cluster system and for setting an upper limit on shadow sets
per node.
7.2 Different Uses for Copy and Minicopy
Prior to the introduction of minicopy, the copy operation was used for two purposes: to add members to a virtual unit, and to restore a member to the shadow set from which it was removed. In order for a member to rejoin the shadow set, its data must be made to match the data on the shadow set.
The copy operation remains the only method for creating a multiple member shadow set. The minicopy operation is now the preferred method for returning a member to a shadow set.
Typically, the reason for removing a shadow set member is to back up the data onto tape or disk.
To use a shadow set member to perform a backup operation, a system manager must perform the following steps:
For detailed information about the conditions under which this form of backup is supported, see Section 7.12. |
The minicopy operation can be used at the discretion of the system manager and at a time chosen by the system manager.
Because minicopy can significantly reduce the time it takes to return a member to a shadow set, it gives system managers greater flexibility in scheduling the removal and return of a shadow set member, and it improves availability.
The time needed to perform a minicopy is proportional to the amount of change that occurred to a shadow set in the disk's absence. A shorter copy time gives sites more flexibility in managing backups.
Table 7-1 shows the results from one series of tests, comparing full copy and minicopy times for shadow sets over a spectrum of write activity. The results presented in Table 7-1 and Table 7-2 should be used only as an indication of the performance gain you may experience using minicopy.
| Percentage of Bits Set | Time for Full Copy (seconds) | Time for Minicopy (seconds) | Minicopy Time as Percentage of Full Copy Time |
|---|---|---|---|
| 100% | 4196.09 | 3540.21 | 84.4% |
| 90% | 3881.95 | 3175.92 | 81.8% |
| 80% | 3480.50 | 2830.47 | 81.3% |
| 75% | 3290.67 | 2614.87 | 79.5% |
| 70% | 3194.05 | 2414.03 | 75.6% |
| 60% | 2809.06 | 2196.60 | 78.2% |
| 50% | 2448.39 | 1759.67 | 71.9% |
| 40% | 2076.52 | 1443.44 | 69.5% |
| 30% | 1691.51 | 1039.90 | 61.5% |
| 25% | 1545.94 | 775.35 | 50.2% |
| 20% | 1401.21 | 682.67 | 48.7% |
| 15% | 1198.80 | 554.06 | 46.2% |
| 10% | 1044.33 | 345.78 | 33.1% |
| 5% | 905.88 | 196.32 | 21.7% |
| 2% | 712.77 | 82.79 | 11.6% |
| 1% | 695.83 | 44.90 | 6.5% |
Table 7-2 shows the results from another series of tests, comparing performance times of a hardware assisted copy (using MSCP disk copy data (DCD) commands on an HSJ controller) with a minicopy over a spectrum of write activity.
| Percentage of Bits Set | DCD Copy Time (seconds) | Minicopy Time (seconds) | Minicopy Time as Percentage of DCD Copy Time |
|---|---|---|---|
| 100% | 1192.18 | 1181.61 | 99.1% |
| 90% | 1192.18 | 1097.03 | 92.0% |
| 80% | 1192.18 | 979.06 | 82.1% |
| 70% | 1192.18 | 862.66 | 72.4% |
| 60% | 1192.18 | 724.61 | 60.8% |
| 50% | 1192.18 | 627.24 | 52.6% |
| 40% | 1192.18 | 490.70 | 41.2% |
| 30% | 1192.18 | 384.45 | 32.3% |
| 20% | 1192.18 | 251.53 | 21.1% |
| 10% | 1192.18 | 128.11 | 10.7% |
| 5% | 1192.18 | 71.00 | 6.0% |
| 0% | 1192.18 | 8.32 | 0.7% |
To use the minicopy operation:
$ MOUNT DSA42/SHAD=$4$DUA42 volume-label |
$ MOUNT DSA42/SHAD=$4$DUA42 volume-label/POLICY=MINICOPY |
For a detailed description of how to use /POLICY=MINICOPY[=OPTIONAL]
with the MOUNT and DISMOUNT commands, see Section 7.6 and
Section 7.7.
7.5 Minicopy Restrictions
The following restrictions apply to the use of minicopy:
%DISM-F-SRCMEM, only source member of shadow set cannot be dismounted |
| Previous | Next | Contents | Index |
|
|
| privacy and legal statement | ||
| 5423PRO_009.HTML | ||