![[Compaq]](../../images/compaq.gif)
![[Go to the documentation home page]](../../images/buttons/bn_site_home.gif)
![[How to order documentation]](../../images/buttons/bn_order_docs.gif)
![[Help on this site]](../../images/buttons/bn_site_help.gif)
![[How to contact us]](../../images/buttons/bn_comments.gif)
![[OpenVMS documentation]](../../images/ovmsdoc_sec_head.gif)
| Document revision date: 30 March 2001 | |
![[Compaq]](../../images/compaq.gif) |
![[Go to the documentation home page]](../../images/buttons/bn_site_home.gif)
![[How to order documentation]](../../images/buttons/bn_order_docs.gif)
![[Help on this site]](../../images/buttons/bn_site_help.gif)
![[How to contact us]](../../images/buttons/bn_comments.gif)
|
![[OpenVMS documentation]](../../images/ovmsdoc_sec_head.gif)
|
|
| Previous | Contents | Index |
LIB$SIG_TO_STOP causes a signal to appear as though it had been signaled by a call to LIB$STOP.
LIB$SIG_TO_STOP can be enabled as a condition handler for a routine or
be called from a condition handler. When a signal is generated by
LIB$STOP, the severity code is forced to severe, and control cannot
return to the routine that signaled the condition. See Section 9.12.1
for a description of continuing normal execution after a signal.
9.14.5 Matching Condition Values
LIB$MATCH_COND checks for a match between two condition values to allow
a program to branch according to the condition found. If no match is
found, the routine returns zero. The routine matches only the condition
identification field (STS$V_COND_ID) of the condition value; it ignores
the control bits and the severity field. If the facility-specific bit
(STS$V_FAC_SP = bit <15>) is clear in cond-val
(meaning that the condition value is systemwide), LIB$MATCH_COND
ignores the facility code field (STS$V_FAC_NO = bits <27:17>) and
compares only the STS$V_MSG_ID fields (bits <15:3>).
9.14.6 Correcting a Reserved Operand Condition (VAX Only)
On VAX systems, after a signal of SS$_ROPRAND during a floating-point
instruction, LIB$FIXUP_FLT finds the operand and changes it from --0.0
to a new value or to +0.0.
9.14.7 Decoding the Instruction That Generated a Fault (VAX Only)
On VAX systems, LIB$DECODE_FAULT locates the operands for an
instruction that caused a fault and passes the information to a user
action routine. When called from a condition handler, LIB$DECODE_FAULT
locates all the operands and calls an action routine that you supply.
Your action routine performs the steps necessary to handle the
exception condition and returns control to LIB$DECODE_FAULT.
LIB$DECODE_FAULT then restores the operands and the environment, as
modified by the action routine, and continues execution of the
instruction.
9.15 Exit Handlers
When an image exits, the operating system performs the following operations:
If any exit handler exits using the EXIT (SYS$EXIT) system service, none of the remaining handlers is executed. In addition, if an image is aborted by the DCL command STOP (the user presses Ctrl/Y and then enters STOP), the system performs image rundown and does not invoke any exit handlers. Like the DCL STOP/ID, SYS$DELPRC bypasses all exit handlers, except the rundown specified in the privileged library vector (PLV) privileged shareable images, and deletes the process. (The DCL command EXIT invokes the exit handlers before running down the image.)
When a routine is active under OpenVMS, it has available to it temporary storage on a stack, in a construct known as a stack frame, or call frame. Each time a subroutine call is made, another call frame is pushed onto the stack and storage is made available to that subroutine. Each time a subroutine returns to its caller, the subroutine's call frame is pulled off the stack, and the storage is made available for reuse by other subroutines. Call frames therefore are nested. Outer call frames remain active longer, and the outermost call frame, the call frame associated with the main routine, is normally always available.
A primary exception to this call frame condition is when an exit handler runs. With an exit handler running, only static data is available. The exit handler effectively has its own call frame. Exit handlers are declared with the SYS$DCLEXH system service.
The use of call frames for storage means that all routine-local data is reentrant; that is, each subroutine has its own storage for the routine-local data.
The allocation of storage that is known to the exit handler must be in memory that is not volatile over the possible interval the exit handler might be pending. This means you must be familiar with how the compilers allocate routine-local storage using the stack pointer and the frame pointer. This storage is valid only while the stack frame is active. Should the routine that is associated with the stack frame return, the exit handler cannot write to this storage without having the potential for some severe application data corruptions.
A hang-up to a terminal line causes DCL to delete the master process's subprocesses. However, if the subprocesses's exit handler is in a main image installed with privilege, then that exit handler is run even with the DCL command STOP. Also, if the subprocess was spawned NOWAIT, then the spawning process's exit handler is run as well.
Use exit handlers to perform any cleanup that your program requires in
addition to the normal rundown operations performed by the operating
system. In particular, if your program must perform some final action
regardless of whether it exits normally or is aborted, you should write
and establish an exit handler to perform that action.
9.15.1 Establishing an Exit Handler
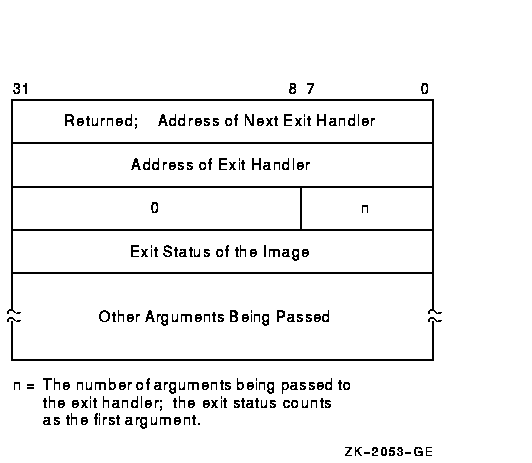
To establish an exit handler, use the SYS$DCLEXH system service. The SYS$DCLEXH system service requires one argument---a variable-length data structure that describes the exit handler. Figure 9-16 illustrates the structure of an exit handler.
Figure 9-16 Structure of an Exit Handler

The first longword of the structure contains the address of the next handler. The operating system uses this argument to keep track of the established exit handlers; do not modify this value. The second longword of the structure contains the address of the exit handler being established. The low-order byte of the third longword contains the number of arguments to be passed to the exit handler. Each of the remaining longwords contains the address of an argument.
The first argument passed to an exit handler is an integer value containing the final status of the exiting program. The status argument is mandatory. However, do not supply the final status value; when the operating system invokes an exit handler, it passes the handler the final status value of the exiting program.
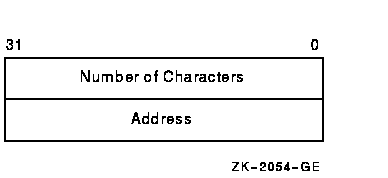
To pass an argument with a numeric data type, use programming language statements to assign the address of a numeric variable to one of the longwords in the exit-handler data structure. To pass an argument with a character data type, create a descriptor of the following form:

Use the language statements to assign the address of the descriptor to one of the longwords in the exit-handler data structure.
The following program segment establishes an exit handler with two arguments, the mandatory status argument and a character argument:
. . . ! Arguments for exit handler INTEGER EXIT_STATUS ! Status CHARACTER*12 STRING ! String STRUCTURE /DESCRIPTOR/ INTEGER SIZE, 2 ADDRESS END STRUCTURE RECORD /DESCRIPTOR/ EXIT_STRING ! Setup for exit handler STRUCTURE /EXIT_DESCRIPTOR/ INTEGER LINK, 2 ADDR, 2 ARGS /2/, 2 STATUS_ADDR, 2 STRING_ADDR END STRUCTURE RECORD /EXIT_DESCRIPTOR/ HANDLER ! Exit handler EXTERNAL EXIT_HANDLER . . . ! Set up descriptor EXIT_STRING.SIZE = 12 ! Pass entire string EXIT_STRING.ADDRESS = %LOC (STRING) ! Enter the handler and argument addresses ! into the exit handler description HANDLER.ADDR = %LOC(EXIT_HANDLER) HANDLER.STATUS_ADDR = %LOC(EXIT_STATUS) HANDLER.STRING_ADDR = %LOC(EXIT_STRING) ! Establish the exit handler CALL SYS$DCLEXH (HANDLER) . . . |
An exit handler can be established at any time during your program and
remains in effect until it is canceled (with SYS$CANEXH) or executed.
If you establish more than one handler, the handlers are executed in
reverse order: the handler established last is executed first; the
handler established first is executed last.
9.15.2 Writing an Exit Handler
Write an exit handler as a subroutine, because no function value can be returned. The dummy arguments of the exit subroutine should agree in number, order, and data type with the arguments you specified in the call to SYS$DCLEXH.
In the following example, assume that two or more programs are cooperating with each other. To keep track of which programs are executing, each has been assigned a common event flag (the common event flag cluster is named ALIVE). When a program begins, it sets its flag; when the program terminates, it clears its flag. Because it is important that each program clear its flag before exiting, you create an exit handler to perform the action. The exit handler accepts two arguments, the final status of the program and the number of the event flag to be cleared. In this example, since the cleanup operation is to be performed regardless of whether the program completes successfully, the final status is not examined in the exit routine. (This subroutine would not be used with the exit handler declaration in the previous example.)
SUBROUTINE CLEAR_FLAG (EXIT_STATUS, 2 FLAG) ! Exit handler clears the event flag ! Declare dummy argument INTEGER EXIT_STATUS, 2 FLAG ! Declare status variable and system routine INTEGER STATUS, 2 SYS$ASCEFC, 2 SYS$CLREF ! Associate with the common event flag ! cluster and clear the flag STATUS = SYS$ASCEFC (%VAL(FLAG), 2 'ALIVE',,) IF (.NOT. STATUS) CALL LIB$SIGNAL (%VAL(STATUS)) STATUS = SYS$CLREF (%VAL(FLAG)) IF (.NOT. STATUS) CALL LIB$SIGNAL (%VAL (STATUS)) END |
If for any reason you must perform terminal I/O from an exit handler,
use appropriate RTL routines. Trying to access the terminal from an
exit handler using language I/O statements may cause a redundant I/O
error.
9.15.3 Debugging an Exit Handler
To debug an exit handler, you must set a breakpoint in the handler and
wait for the operating system to invoke that handler; you cannot use
the DEBUG command STEP/INTO to enter an exit handler. In addition, when
the debugger is invoked, it establishes an exit handler that exits
using the SYS$EXIT system service. If you invoke the debugger when you
invoke your image, the debugger's exit handler does not affect your
program's handlers because the debugger's handler is established first
and so executes last. However, if you invoke the debugger after your
program begins executing (the user presses Ctrl/Y and then types
DEBUG), the debugger's handler may affect the execution of your
program's exit handlers, because one or more of your handlers may have
been established before the debugger's handler and so is not executed.
9.15.4 Examples of Exit Handler
As in the example in Section 9.15.2, write the exit handler as a subroutine because no function value can be returned. The dummy arguments of the exit subroutine should agree in number, order, and data type with the arguments you specify in the call to SYS$DCLEXH.In the following example, assume that two or more programs are cooperating. To keep track of which programs are executing, each has been assigned a common event flag (the common event flag cluster is named ALIVE). When a program begins, it sets its flag; when the program terminates, it clears its flag. Because each program must clear its flag before exiting, you create an exit handler to perform the action. The exit handler accepts two arguments: the final status of the program and the number of the event flag to be cleared.
In the following example, because the cleanup operation is to be performed regardless of whether the program completes successfully, the final status is not examined in the exit routine.
| #1 |
|---|
! Arguments for exit handler
INTEGER*4 EXIT_STATUS       ! Status
INTEGER*4 FLAG /64/
! Setup for exit handler
STRUCTURE /EXIT_DESCRIPTOR/
 INTEGER LINK,
2        ADDR,
2        ARGS /2/,
2        STATUS_ADDR,
2        FLAG_ADDR
END STRUCTURE
RECORD /EXIT_DESCRIPTOR/ HANDLER

! Exit handler
EXTERNAL CLEAR_FLAG

INTEGER*4 STATUS,
2         SYS$ASCEFC,
2         SYS$SETEF

! Associate with the common event flag
! cluster and set the flag.
STATUS = SYS$ASCEFC (%VAL(FLAG),
2                    'ALIVE',,)
IF (.NOT. STATUS) CALL LIB$SIGNAL (%VAL(STATUS))
STATUS = SYS$SETEF (%VAL(FLAG))
IF (.NOT. STATUS) CALL LIB$SIGNAL (%VAL (STATUS))
! Do not exit until cooperating program has a chance to
! associate with the common event flag cluster.

! Enter the handler and argument addresses
! into the exit handler description.
HANDLER.ADDR = %LOC(CLEAR_FLAG)
HANDLER.STATUS_ADDR = %LOC(EXIT_STATUS)
HANDLER.FLAG_ADDR = %LOC(FLAG)
! Establish the exit handler.
CALL SYS$DCLEXH (HANDLER)

! Continue with program
               .
               .
               .
END

! Exit Subroutine

SUBROUTINE CLEAR_FLAG (EXIT_STATUS,
2                      FLAG)
! Exit handler clears the event flag

! Declare dummy argument
INTEGER EXIT_STATUS,
2       FLAG

! Declare status variable and system routine
INTEGER STATUS,
2       SYS$ASCEFC,
2       SYS$CLREF

! Associate with the common event flag
! cluster and clear the flag
STATUS = SYS$ASCEFC (%VAL(FLAG),
2                    'ALIVE',,)
IF (.NOT. STATUS) CALL LIB$SIGNAL (%VAL(STATUS))
STATUS = SYS$CLREF (%VAL(FLAG))
IF (.NOT. STATUS) CALL LIB$SIGNAL (%VAL (STATUS))
|
As of Version 7.0, the OpenVMS Alpha operating system provides support
for 64-bit virtual memory addressing. This capability makes the 64-bit
virtual address space, defined by the Alpha architecture, available to
the OpenVMS Alpha operating system and to application programs. OpenVMS
Alpha Version 7.1 provided extended, additional memory management Very
Large Memory (VLM) features. For information about Very Large Memory,
see Chapter 16.
10.1 Using 64-Bit Addresses
Many OpenVMS Alpha tools and languages (including the Debugger, run-time library routines, and Compaq C) support 64-bit virtual addressing. Input and output operations can be performed directly to and from the 64-bit addressable space by means of RMS services, the $QIO system service, and most of the device drivers supplied with OpenVMS Alpha systems.
Underlying this are system services that allow an application to allocate and manage the 64-bit virtual address space, which is available for process-private use.
By using the OpenVMS Alpha tools and languages that support 64-bit addressing, programmers can create images that map and access data beyond the limits of 32-bit virtual addresses. The 64-bit virtual address space design ensures upward compatibility of programs that execute under versions of OpenVMS Alpha prior to Version 7.0, while providing a flexible framework that allows 64-bit addresses to be used in many different ways to solve new problems.
Nonprivileged programs can optionally be modified to take advantage of 64-bit addressing features. OpenVMS Alpha 64-bit virtual addressing does not affect nonprivileged programs that are not explicitly modified to exploit 64-bit support. Binary and source compatibility of existing 32-bit nonprivileged programs is guaranteed.
By using 64-bit addressing capabilities, application programs can map large amounts of data into memory to provide high levels of performance and make use of very large memory (VLM) systems. In addition, 64-bit addressing allows for more efficient use of system resources, allowing for larger user processes, as well as higher numbers of users and client/server processes for virtually unlimited scalability.
This chapter describes the layout and components of the OpenVMS Alpha 64-bit virtual memory address space.
For more information about the OpenVMS Alpha programming tools and languages that support 64-bit addressing and recommendations for enhancing applications to support 64-bit addressing and VLM, refer to the subsequent chapters in this guide.
10.2 Traditional OpenVMS 32-Bit Virtual Address Space Layout
In previous versions of the OpenVMS Alpha operating system, the virtual
address space layout was largely based upon the 32-bit virtual address
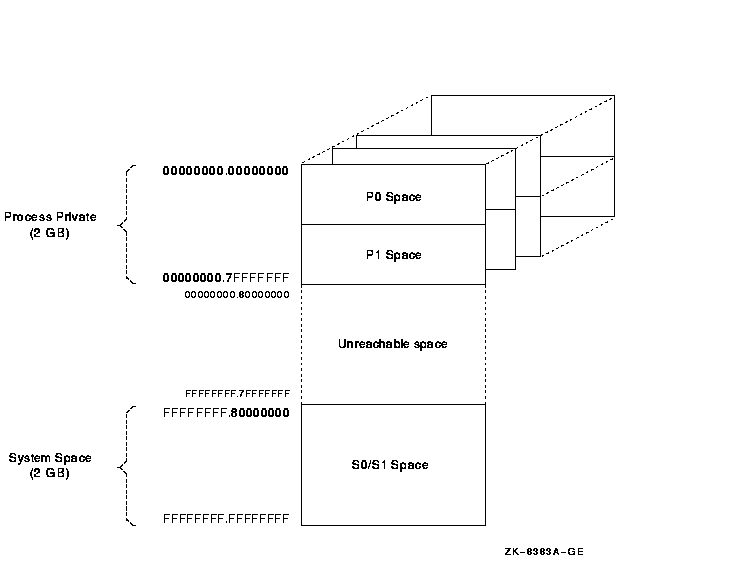
space defined by the VAX architecture. Figure 10-1 illustrates the
OpenVMS Alpha implementation of the OpenVMS VAX layout.
Figure 10-1 32-Bit Virtual Address Space Layout

The lower half of the OpenVMS VAX virtual address space (addresses between 0 and 7FFFFFFF16) is called process-private space. This space is further divided into two equal pieces called P0 space and P1 space. Each space is 1 GB long. The P0 space range is from 0 to 3FFFFFFF16. P0 space starts at location 0 and expands toward increasing addresses. The P1 space range is from 4000000016 to 7FFFFFFF16. P1 space starts at location 7FFFFFFF16 and expands toward decreasing addresses.
The upper half of the VAX virtual address space is called system space. The lower half of system space (the addresses between 8000000016 and BFFFFFFF16) is called S0 space. S0 space begins at 8000000016 and expands toward increasing addresses.
The VAX architecture associates a page table with each region of virtual address space. The processor translates system space addresses using the system page table. Each process has its own P0 and P1 page tables. A VAX page table does not map the full virtual address space possible; instead, it maps only the part of its region that has been created.
10.3 OpenVMS Alpha 64-Bit Virtual Address Space Layout
The OpenVMS Alpha 64-bit address space layout is an extension of the
traditional OpenVMS 32-bit address space layout.
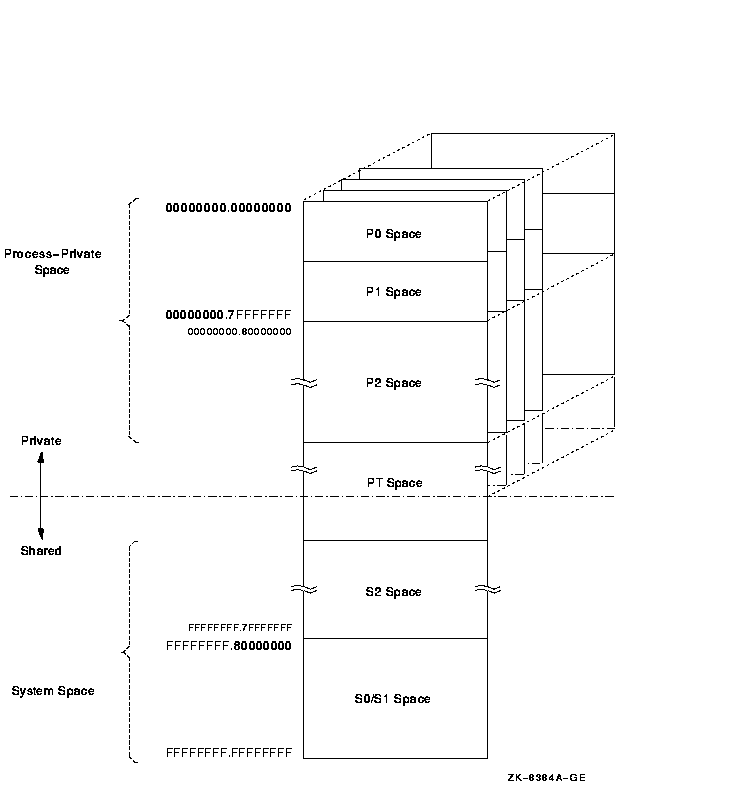
Figure 10-2 illustrates the 64-bit virtual address space layout design.
Figure 10-2 64-Bit Virtual Address Space Layout

The 64-bit virtual address space layout is designed to accommodate the current and future needs of the OpenVMS Alpha operating system and its users. The new address space consists of the following fundamental areas:
Supporting process-private address space is a focus of much of the memory management design within the OpenVMS operating system.
Process-private space, or process space, contains all virtual addresses below PT space. As shown in Figure 10-2, the layout of process space is further divided into the P0, P1, and P2 spaces. P0 space refers to the program region. P1 space refers to the control region. P2 space refers to the 64-bit program region.
The P0 and P1 spaces are defined to equate to the P0 and P1 regions defined by the VAX architecture. Together, they encompass the traditional 32-bit process-private region that ranges from 0.0000000016 to 0.7FFFFFFF16. P2 space encompasses all remaining process space that begins just above P1 space, 0.8000000016, and ends just below the lowest address of PT space.
Note that P2 space addresses can be positive or negative when
interpreted as signed 64-bit integers.
10.3.2 System Space
64-bit system space refers to the portion of the entire 64-bit virtual address range that is higher than that which contains PT space. As shown in Figure 10-2, system space is further divided into the S0, S1, and S2 spaces.
The S0 and S1 spaces are defined to equate to the S0 and S1 regions defined by the VAX architecture. Together they encompass the traditional 32-bit system space region that ranges from FFFFFFFF.8000000016 to FFFFFFFF.FFFFFFFF16. S2 space encompasses all remaining system spaces between the highest address of PT space and the lowest address of the combined S0/S1 space.
S0, S1, and S2 are fully shared by all processes. S0/S1 space expands toward increasing virtual addresses. S2 space generally expands toward lower virtual addresses.
Addresses within system space can be created and deleted only from code that is executing in kernel mode. However, page protection for system space pages can be set up to allow any less privileged access mode read and/or write access.
System space base is controlled by the S2_SIZE system parameter. S2_SIZE is the number of megabytes to reserve for S2 space. The default value is based on the sizes required by expected consumers of 64-bit (S2) system space. Consumers set up by OpenVMS at boot time are the page frame number (PFN) database and the global page table. (For more information about setting system parameters with SYSGEN, see the OpenVMS System Management Utilities Reference Manual: M--Z.)
The global page table, also known as the
GPT, and the PFN database reside in the
lowest-addressed portion of S2 space. By moving the GPT and PFN
database to S2 space, the size of these areas is no longer constrained
to a small portion of S0/S1 space. This allows OpenVMS to support much
larger physical memories and much larger global sections.
10.3.3 Page Table Space
In versions of OpenVMS Alpha prior to Version 7.0, page table space (also known as PT space) was addressable in more than one way. The PALcode translation buffer miss handler used addresses starting at 2.0000000016 to read PTEs, while memory management code addressed the page tables primarily within the traditional 32-bit system space. The process page tables were within the process header (PHD), and the system space page tables were located in the highest virtual addresses, all within the traditional 32-bit system space.
As of OpenVMS Alpha Version 7.0, page tables are addressed primarily within 64-bit PT space. Page tables refer to this virtual address range; they are no longer in 32-bit shared system address space.
The dotted line in Figure 10-2 marks the boundary between process-private space and shared space. This boundary is in PT space and further serves as the boundary between the process-private page table entries and the shared page table entries. Together, these sets of entries map the entire address space available to a given process. PT space is mapped to the same virtual address for each process, typically a very high address such as FFFFFFFC.0000000016.
| Previous | Next | Contents | Index |
![[Go to the documentation home page]](../../images/buttons/bn_site_home.gif)
![[How to order documentation]](../../images/buttons/bn_order_docs.gif)
![[Help on this site]](../../images/buttons/bn_site_help.gif)
![[How to contact us]](../../images/buttons/bn_comments.gif)
|
| privacy and legal statement | ||
| 5841PRO_033.HTML | ||