HEADER IS " EMPLOYEE MENU"; ENTRIES ARE SCHEDULE : TASK IS REVIEW_SCHEDULE IN RAVEN::PERSONNEL; EMPLOYEE : TASK IS EMPLOYEE IN EMPLOYEE; END ENTRIES; END DEFINITION; |
Remember that the EMPLOYEE menu definition is on MAGPIE. The SCHEDULE
entry is a task named REVIEW_SCHEDULE, in the Personnel application
running on node RAVEN. The EMPLOYEE entry is the task named EMPLOYEE in
the Employee application on node MAGPIE. The SCHEDULE entry provides
remote access to the task named REVIEW_SCHEDULE in the Personnel
application on RAVEN.
12.2.8 Naming Default Menu Files
You can assign a default menu database file specification in a menu definition. If you specify a file specification, the Application Definition Utility (ADU) uses the name by default for the menu database created when you build a menu tree.
The DEFAULT MENU FILE clause includes the keywords DEFAULT MENU FILE and the name you assign to the database file. If the file name you assign to the database file does not fit the specifications for an ACMS identifier, enclose the name in quotation marks. By default, ADU assigns the file type .MDB to the menu database file. If you do not include a device or directory specification for the file, ADU uses your current device and directory. For example:
DEFAULT APPLICATION IS PERSONNEL;
DEFAULT MENU FILE IS "PERSONNEL.MDB";
HEADER IS   "                      PERSONNEL MENU";
ENTRIES ARE
  REVIEW   : MENU IS EXAMPLES_DEFINITIONS.REVIEW_MENU;
             TEXT IS "Review Menu";
  UTILITY  : MENU IS EXAMPLES_DEFINITIONS.UTILITY_MENU;
             TEXT IS "Utility Menu";
END ENTRIES;
END DEFINITION;
|
In this example, the default menu file is PERSONNEL.MDB in the current default device and directory. When you build this menu, ACMS creates a menu database called PERSONNEL.MDB.
A menu database file assignment you make with the BUILD command overrides an assignment you make with the DEFAULT MENU FILE clause. If you do not include a file specification for the menu database with the BUILD command, ADU uses the menu database file name assigned with the DEFAULT MENU FILE clause in the menu definition. If you do not name a menu database file either with the BUILD command or in the menu definition, ADU derives the file name from the full CDD given name of the menu definition, including dollar signs and underscores.
ADU ignores the DEFAULT MENU FILE clause if the clause is in any menu
definition other than the menu definition specified in the BUILD
command. For more information on how ADU derives the menu database file
name from a CDD path name, see Compaq ACMS for OpenVMS ADU Reference Manual.
12.2.9 Defining a Menu Forms Product
ACMS uses either DECforms or TDMS to display menus for users. In cases where DECforms or TDMS is not available (if it is not installed on the system, or the user is logged in to an unsupported terminal), ACMS uses OpenVMS QIOs to prompt the user to enter a selection.
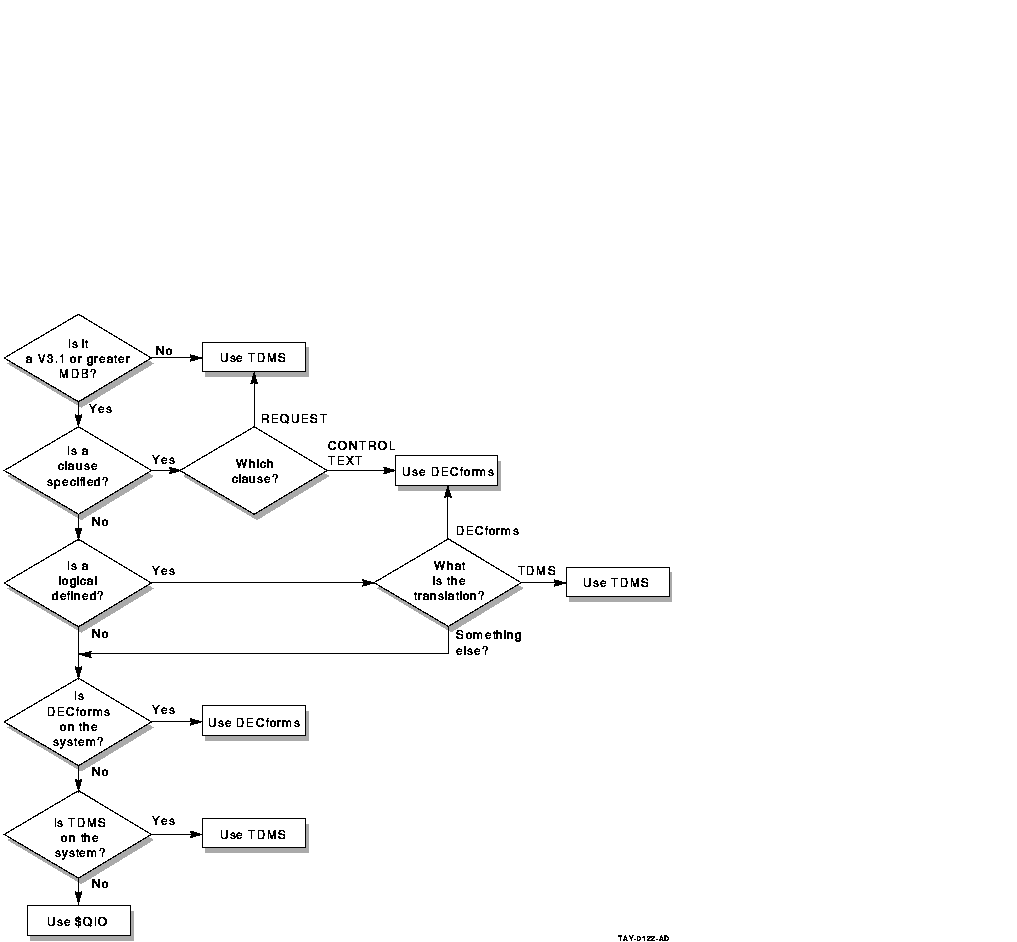
If DECforms or TDMS is available, ACMS uses the following information, in the order specified, to determine which forms product will be used to display the menu:
- If the MDB was built using ACMS Version 3.0 or lower, TDMS will be used.
- You can choose to customize your menu by specifying the REQUEST IS clause for TDMS or the CONTROL TEXT IS clause for DECforms. If one of these clauses is specified in the menu definition, the corresponding forms product will be used. (See Appendix A and Appendix B for specific information on customizing ACMS menus displayed by DECforms or TDMS.)
- You can define the logical ACMS$DEFAULT_MENU_FORMS_PRODUCT to be TDMS or DECforms. This logical forces the forms product for all users in the CP.
- If DECforms is installed on the system, it will be used to display the menu. Otherwise, TDMS will be used.
Figure 12-4 is a diagram of the decisions ACMS makes in selecting DECforms or TDMS to display an ACMS menu.
Figure 12-4 ACMS Menu Choices

If you need to modify the standard ACMS menu format, an advantage to using DECforms is that you do not need to make modifications in both the menu request and in the menu definition. You can make all your changes in the menu form source (.IFDL) file. (See Appendix A for information about customizing DECforms menus.)
To use DECforms to display menus for versions of ACMS prior to ACMS Version 3.1, you must rebuild MDBs.
If you remove TDMS from your system, ACMS does not automatically use DECforms for menus displayed by the CP. Unless you rebuild your MDB, the task submitter sees only a selection prompt. After rebuilding your MDB, you can use DECforms to display menus.
If you want to use two identical menus, one using DECforms and another using TDMS, in your application, you must build two separate MDBs. You can, however, use DECforms for one menu and TDMS for another menu in the same menu tree.
Following are explanations of how to select DECforms or TDMS as a menu forms product in a menu definition or in a logical:
- Selecting a menu displayed by TDMS in a menu definition
If your ACMS application requires a menu format different from the ACMS menu format displayed by TDMS, you can use TDMS to modify the menu format. However, this requires a thorough knowledge of TDMS. See Appendix B for more information on how to modify ACMS menus using TDMS.
To specify a TDMS menu, you must include the REQUEST IS clause in your menu definition. In the REQUEST IS clause, you must include the given name of the request you want ACMS to use for that menu. This given name is not the CDD path name of the request but, rather, the name by which the request is listed in the request library definition. For example:
HEADER IS   "                      PERSONNEL MENU";
REQUEST IS PERSONNEL_MENU_REQUEST WITH 12 ENTRIES PER SCREEN;
DEFAULT APPLICATION IS PERSONNEL;
ENTRIES ARE
  REVIEW   : MENU IS EXAMPLES_DEFINITIONS.REVIEW_MENU;
             TEXT IS "Review Menu";
  UTILITY  : MENU IS EXAMPLES_DEFINITIONS.UTILITY_MENU;
             TEXT IS "Utility Menu";
END ENTRIES;
END DEFINITION;
In this example, the REQUEST clause names the TDMS request PERSONNEL_MENU_REQUEST for the menu format. This definition must be in the request library, ACMSREQ.RLB, which is used by ACMS for displaying menus.
The definition also specifies that the Personnel request display 12 entries per screen. The number in the ENTRIES PER SCREEN phrase must correspond to the number of form fields to which the request writes entry information. The default number of entries for each screen is 16. If you want more or fewer than 16 entries on each screen, you must use the WITH ENTRIES PER SCREEN phrase to define the number of entries. You must also define a request to handle that number of entries.
If you are not customizing the menu format and you want to use TDMS only to display the menu, specify the request name provided by ACMS:
REQUEST IS MENU_REQUEST;
- Selecting a menu displayed by DECforms in a menu definition
If your ACMS application requires a menu format different from the ACMS menu format displayed by DECforms, you can use DECforms to modify the menu format. However, this requires a thorough knowledge of DECforms forms source files. See Appendix A for more information on how to modify ACMS menus using DECforms.
To specify a DECforms menu that you have customized, you must include the CONTROL TEXT IS clause in your menu definition. In the CONTROL TEXT IS clause, you must include a five-character control text item. In the menu form source (IFDL) file, you must define a control text response with the same name. In the menu definition, for example, you enter the CONTROL TEXT IS clause, followed by a one- to five-character string:
HEADER IS   "                      PERSONNEL MENU";
CONTROL TEXT IS "MYMNU";
DEFAULT APPLICATION IS PERSONNEL;
ENTRIES ARE
  REVIEW   : MENU IS EXAMPLES_DEFINITIONS.REVIEW_MENU;
             TEXT IS "Review Menu";
  UTILITY  : MENU IS EXAMPLES_DEFINITIONS.UTILITY_MENU;
             TEXT IS "Utility Menu";
END ENTRIES;
END DEFINITION;
In this example, the CONTROL TEXT IS clause names the control text item MYMNU.
You must enter a reference to MYMNU in the form menu source file; for example:
Control Text Response "MYMNU"
     Activate MY_PANEL
End Response
In this example, the control text response identifies the control text item MYMNU and directs DECforms to display the customized menu panel MY_PANEL to terminal users.
The default number of entries on each screen of menus displayed by DECforms is 16. With menus displayed by DECforms, you specify a different number of entries per screen in the menu form source file. (Appendix A contains instructions for customizing menus displayed by DECforms.)
If you are not customizing the menu format and you want to use DECforms only to display the menu, specify the control text response provided by ACMS:
CONTROL TEXT IS "DFMENU";
- Selecting a forms product by defining a Logical
If you do not use a REQUEST IS or a CONTROL TEXT IS clause in a menu definition to specify a customized menu displayed by TDMS or DECforms, ACMS attempts to translate this logical:
ACMS$DEFAULT_MENU_FORMS_PRODUCT
You can define this logical to be either TDMS or DECforms and thus specify a forms product for all users on the CP. For example:
$ DEFINE/SYSTEM ACMS$DEFAULT_MENU_FORMS_PRODUCT TDMS

$ DEFINE/SYSTEM ACMS$DEFAULT_MENU_FORMS_PRODUCT DECFORMS
This logical name should be defined before you start ACMS. To change the value of the logical after you have started ACMS, stop and restart the ACMS terminal subsystem.
12.3 Processing the Menu Definition
You use the ADU CREATE or REPLACE command to store menu definitions in CDD. After you store a definition in CDD, you use the ADU BUILD command to create a database from the definition that ACMS uses at run time.
As explained in Chapter 1, processing definitions can be simpler if a REPLACE command is included in the source definition file. Include a REPLACE command at the top of each menu source definition file. For example, the command for the Personnel menu is:
REPLACE MENU PERSONNEL_MENU/LOG/LIST |
With the REPLACE command in each source file, type the at sign (@) command and the name of each menu definition source file in response to the ADU> prompt:
$ ADU ADU> @PERSMEN1.MDF |
%ACMSCDU-S-MENREPLAC, Menu UDISK:[CDDPLUS]EXAMPLES_DEFINITIONS.PERSONNEL_MENU replaced ADU> |
The errors you can get when replacing menu definitions are explained in the online error message documentation contained in the file SYS$HELP:ACMSADU.MEM. If you get an error, correct the definition and use ADU to process it again.
Once the corrected definition is stored in CDD, you can use the BUILD command to create menu databases. The BUILD command includes:
- The MENU keyword.
- The CDD relative or full path name of the menu definition of the top-level menu of your menu tree.
- A menu database file specification (optional). If you do not provide a file name, and if the top-level menu definition does not contain a DEFAULT MENU FILE clause, ADU creates one from the full CDD path name including dollar signs and underscores, and the .MDB file type.
Use the BUILD command to produce menu databases. You need to build only the top menu in an application. The other menus are built automatically at the same time. To build the top menu, enter the BUILD command:
ADU> BUILD MENU PERSONNEL_MENU PERSMEN1.MDB/LOG |
%ACMSCDU-I-MENUNAME, Menu named 'REVIEW' %ACMSCDU-I-LODMENNAM, Loading menu %ACMSCDU-I-MENPTHLOD, Menu CDD object 'UDISK:[CDDPLUS]EXAMPLES_DEFINITIONS.REVIEW_MENU' loaded %ACMSCDU-I-PROCMENU, Processing menu 'REVIEW_MENU' %ACMSCDU-I-PROCTASK, Processing task 'REVIEW_SCHEDULE' %ACMSCDU-I-PROCTASK, Processing task 'REVIEW_HISTORY' %ACMSCDU-I-MENUNAME, Menu named 'UTILITY' %ACMSCDU-I-LODMENNAM, Loading menu %ACMSCDU-I-MENPTHLOD, Menu CDD object 'CDD$TOP.EXAMPLES_DEFINITIONS.UTILITY_MENU' loaded %ACMSCDU-I-PROCMENU, Processing menu 'UTILITY_MENU' %ACMSCDU-I-PROCTASK, Processing task 'EDIT' %ACMSCDU-I-PROCTASK, Processing task 'DATR' %ACMSCDU-I-WRITEMDB, Writing MDB -ACMSCDU-I-BYTESWRIT, 1336 bytes (3 blocks) |
This command produces a menu database file, PERSMEN1.MDB, containing the run-time version of all three menu definitions.
All submenus in the menu tree must exist in CDD before the BUILD MENU command can complete successfully.
| Previous | Next | Contents | Index |
