![[Compaq]](../../images/compaq.gif)
![[Go to the documentation home page]](../../images/buttons/bn_site_home.gif)
![[How to order documentation]](../../images/buttons/bn_order_docs.gif)
![[Help on this site]](../../images/buttons/bn_site_help.gif)
![[How to contact us]](../../images/buttons/bn_comments.gif)
![[OpenVMS documentation]](../../images/ovmsdoc_sec_head.gif)
| Document revision date: 10 November 2000 | |
![[Compaq]](../../images/compaq.gif) |
![[Go to the documentation home page]](../../images/buttons/bn_site_home.gif)
![[How to order documentation]](../../images/buttons/bn_order_docs.gif)
![[Help on this site]](../../images/buttons/bn_site_help.gif)
![[How to contact us]](../../images/buttons/bn_comments.gif)
|
![[OpenVMS documentation]](../../images/ovmsdoc_sec_head.gif)
|
|
| Previous | Contents | Index |
To customize the appearance and placement of your icons on the Workspace, choose Icons... from the Workspace Options submenu. The Window Manager displays the Icon Options dialog box.
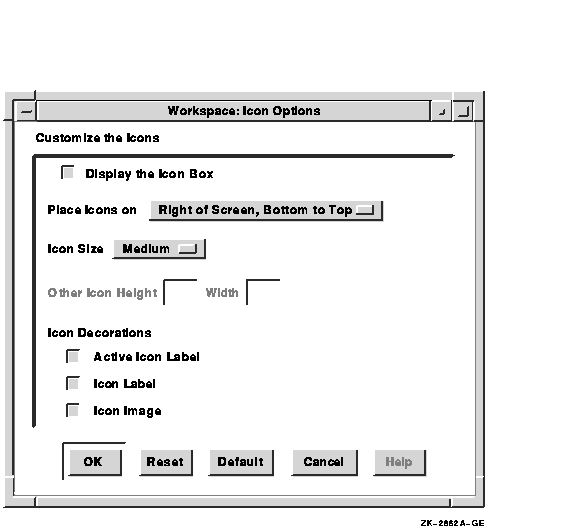
From the Icon Options dialog box, you can change the following settings:
To change your icon colors, choose Icon Colors... from the Workspace Options submenu. The Window Manager displays the Icon Color Options dialog box.
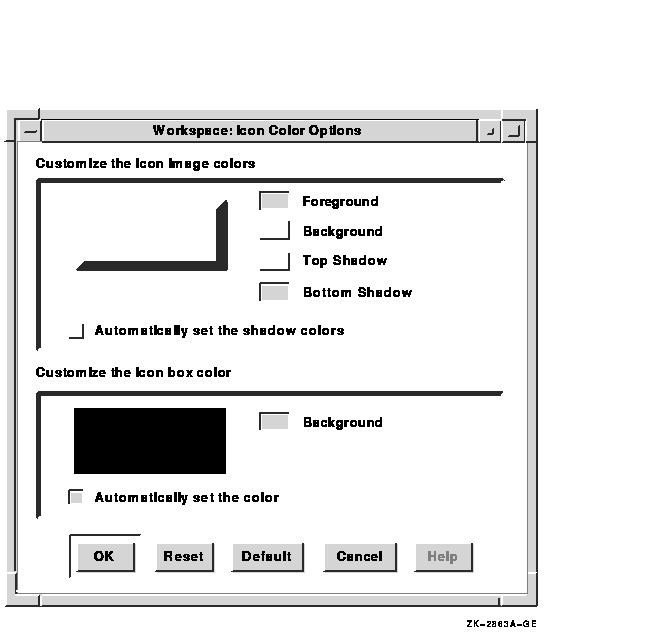
From the Icon Color Options dialog box, you can change the following icon image and icon box color settings.
| Icon Image Colors | Icon Box Color |
|---|---|
| Foreground | |
| Background | Background |
| Top Shadow | |
| Bottom Shadow |
Foreground
To change the icon foreground color, click on the Foreground button. DECwindows displays the Color Mixing dialog box, which lets you select the icon foreground color you want.Background
To change the icon background color, click on the Background button. DECwindows displays the Color Mixing dialog box, which lets you select the icon background color you want.Top Shadow
Icon top and bottom shadow colors have to be well matched to present the three-dimensional look of DECwindows Motif. DECwindows helps you to do this by automatically determining top and bottom shadow border colors when you change the icon background color. This setting is indicated by the shaded Automatic shadow check button.To choose your own icon shadow colors:
- Click on the Automatic shadow check button.
This action disables the setting.- Click on the Top Shadow button.
DECwindows displays the Color Mixing dialog box, which lets you select the top shadow color you want. You should use the HLS model in the Color Mixing dialog box to choose a top shadow color that is lighter and less saturated than the background color.Bottom Shadow
Icon top and bottom shadow colors have to be well matched to present the three-dimensional look of DECwindows Motif. DECwindows helps you to do this by automatically determining top and bottom shadow colors when you change the icon background color. This setting is indicated by the shaded Automatic shadow check button.To select your own Bottom shadow colors:
- Click on the Automatic shadow check button.
This action disables the setting.- Click on the Bottom Shadow button.
DECwindows displays the Color Mixing dialog box, which lets you select the bottom shadow color you want. You should use the HLS model in the Color Mixing dialog box to choose a bottom shadow color that is darker and more saturated than the background color.Icon Box Colors
To change the icon box background color:
- Click on the Automatic color button.
This action disables the setting.- Click on the Background button. DECwindows displays the Color Mixing dialog box, which lets you select the icon background color you want.
To change your matte features, choose Matte... from the Workspace Options submenu. The Window Manager displays the Matte Options dialog box.
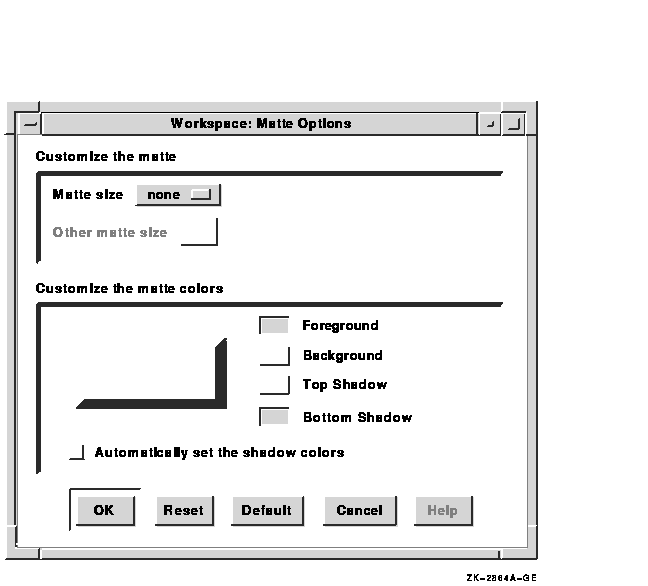
From the Matte Options dialog box, you can change your matte size and
color settings.
10.8 Running the XUI Window Manager
To use the XUI Window Manager instead of the Motif Window Manager:
For more information about adding and removing items from your
automatic startup list, see Chapter 7.
10.9 Advanced Customization
In addition to the menu items available from the Customize submenu, you can change the appearance and behavior of windows by specifying values for elements, known as resources in resource configuration files. The Window Manager gets information from these files each time you start a session, an application, or the Window Manager.
For information about modifying resource files, see Appendix E and the OSF/Motif Programmer's Guide.
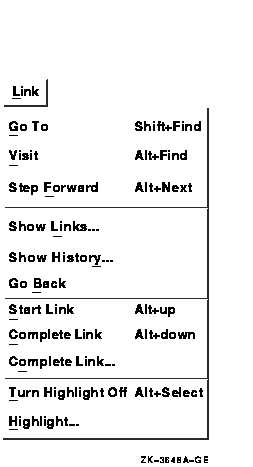
Hyperapplication features allow you to make links between information that is stored and accessed by DECwindows applications. A hyperapplication is an application that, in addition to its regular features (for example, reading online books), allows you to link information and to follow links. You can tell that an application is a hyperapplication if it has the Link menu in its menu bar, as illustrated in the following figure.

This chapter presents a simple example to introduce some basic hyperapplication concepts and techniques. It discusses linkable objects (the pieces of information that you can link). It then discusses the features available from the Link menu, but not in the order that they appear on the menu. Rather, they are presented in an order to make it easy for you to learn and use hyperapplication features:
The chapter concludes with a section on advanced LinkWorks concepts.
Assume that you use DECwindows Mail to send and receive electronic messages, and that you use DECwindows Calendar to keep track of your appointments.
You receive a Mail message notifying you of a meeting two weeks from now. The message contains a detailed agenda and background information about the featured speaker. You make an entry for the meeting in a Calendar timeslot. To identify the timeslot, you simply type in "Project review meeting" rather than trying to paraphrase the agenda and speaker information or to cut and paste the complete message from the Mail window to the timeslot window. However, because you want to remember later why this meeting is important, you also do the following:
Later, when you view the entries for the day of the meeting or when you receive the Calendar alarm --- and you ask yourself, "Why did I want to go to that meeting?" --- you notice that the timeslot entry contains a special indicator (a light bulb icon) that tells you that an information link exists. To see the link, simply do the following:
Linkable objects are pieces of information in hyperapplications that you can link together.
Information from any hyperapplication can be linked to information from the same hyperapplication or from any other hyperapplication. For example, a Calendar timeslot for a seminar could be linked to a Bookreader topic for a chapter that covers material to be discussed at the seminar. You can also link the Bookreader topic to a related topic in the same manual or in a different manual.
The linking possibilities are rich, and you can make them as complex as you want: for example, links between a Calendar timeslot and Bookreader topics and Cardfiler cards, with the topics and cards being linked to still other pieces of information. You can allow others to see and follow your links, and you can see and follow links made by others. We'll see later how you can progress from the simple uses of hyperapplication features to more complex and powerful uses.
Each hyperapplication determines which of its objects are linkable objects, based on the importance and granularity of objects. For example, a Cardfiler card is a linkable object, but a part of a word within a card is not. For a listing of the linkable objects for a specific hyperapplication, see its documentation in the DECwindows Motif for OpenVMS Applications Guide.
To use the features described in the chapter, you should be familiar
with one or more hyperapplications and know how to select objects using
those applications. (As a general rule, clicking on an object selects
it; however, the method of selection can vary depending on the
application and the object. For example, some objects are selected by
clicking and dragging.)
11.3 The Link Menu
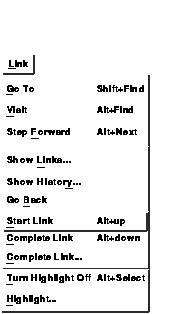
The presence of the Link menu (see the following figure) indicates that an application is a hyperapplication. You use the Link menu to take advantage of the hyperapplication features described in this chapter.
Each link involves two hyperapplication objects. One of these objects becomes the source for the link, and the other becomes the target.
Do not become confused by these terms, because for any given link it does not matter which object is the source and which is the target --- unless you choose to make it matter. You can selectively enable and disable highlighting (discussed later) for sources and targets, and some displays of link information use these two terms. However, when you select an object and retrieve the information to which it is linked, it does not matter whether the object you select was designated as a source or a target: the linked information is still retrieved.
For each pair of objects to be linked, the object selected for Start Link is made the source and the object selected for Complete Link... is made the target. You might want to make the object you were initially viewing the source and the other object the target. For example, you might make the source a Calendar timeslot about a seminar and the target a Bookreader table of contents entry about the seminar's subject. However, the choice of source and target designations for each link is up to you.
To create a link, do the following:
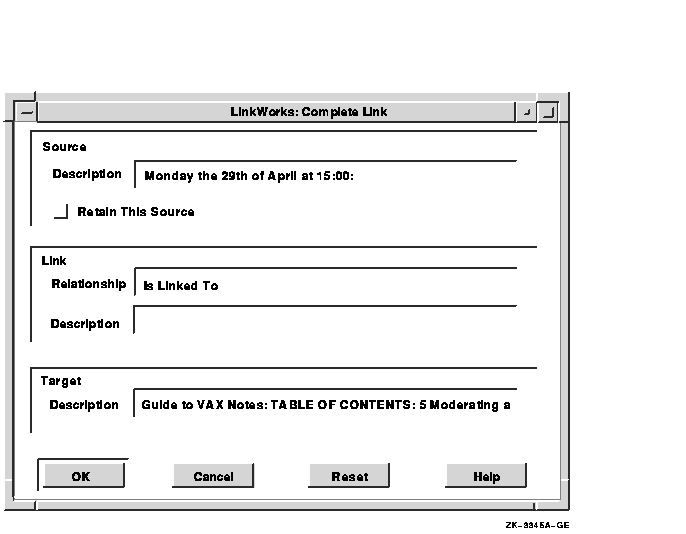
When you have selected one end of a link (the source or the target), you can follow the link to see the information at the other end. However, you must first be able to see which objects are linked and which are not. Objects that are linked are highlighted, unless you disable highlighting (as explained later in Section 11.6).
The method of highlighting varies depending on the application. To see how linked objects are highlighted by a specific hyperapplication, see the DECwindows Motif for OpenVMS Applications Guide.
When you select an object and want to see what it is linked to, you can choose one of these options:
To visit or go to the information to which a linkable object is linked, follow these steps:
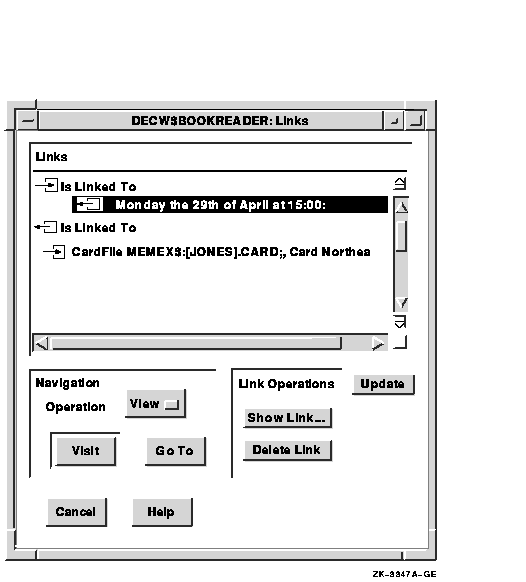
To follow a link, perform these operations using the Links dialog box:
Double clicking on a link is the same as choosing the default menu item (Visit) with the default destination operation on that link. You can use this shortcut if you want to accept the defaults. |
To reverse the effect of the most recent Visit or Go To operation, use
the Go Back menu item. Go Back is useful if you "change your
mind" after performing a Visit or Go To operation and want to
return to where you were. The Go Back operation does not delete or
otherwise affect any actual links.
11.6 Adjusting the Highlighting
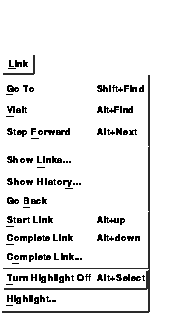
For each hyperapplication, you can enable or disable the highlighting of linked objects; that is, the fact that these objects are linked can be made visible or not visible, depending on whether or not you want to use the features described in this chapter. You can also control which kinds of linked objects are highlighted when highlighting is enabled.
Use the Turn Highlight On/Off menu item to enable and disable highlighting. The wording of this item depends on the current state: if highlighting is enabled (the initial default), this item says Turn Highlight Off; if highlighting is disabled, this choice says Turn Highlight On. Disabling highlighting does not disable the use of hyperapplication features; however, it makes their use impractical because you are unable to see which objects have links.
The Highlight... menu item allows you to specify the kinds of objects to be highlighted. This item displays the Highlighting dialog box.
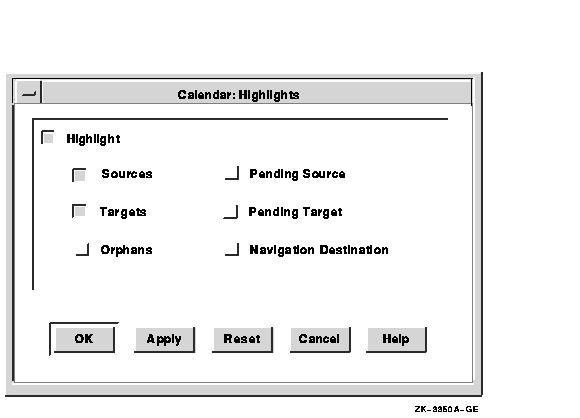
Because this dialog box refers to important concepts, you should understand them before you try to set the buttons:
By default, highlighting is enabled for sources and targets. You can enable or disable all highlighting, and you can specify which kinds of objects are highlighted when highlighting is enabled. Perform the following actions in the Highlighting dialog box (illustrated previously in Section 11.6):
| Previous | Next | Contents | Index |
![[Go to the documentation home page]](../../images/buttons/bn_site_home.gif)
![[How to order documentation]](../../images/buttons/bn_order_docs.gif)
![[Help on this site]](../../images/buttons/bn_site_help.gif)
![[How to contact us]](../../images/buttons/bn_comments.gif)
|
| privacy and legal statement | ||
| 5633PRO_009.HTML | ||