![[Compaq]](../../images/compaq.gif)
![[Go to the documentation home page]](../../images/buttons/bn_site_home.gif)
![[How to order documentation]](../../images/buttons/bn_order_docs.gif)
![[Help on this site]](../../images/buttons/bn_site_help.gif)
![[How to contact us]](../../images/buttons/bn_comments.gif)
![[OpenVMS documentation]](../../images/ovmsdoc_sec_head.gif)
| Document revision date: 10 November 2000 | |
|
|
|
|
|
|
| Previous | Contents | Index |
If you need to send one message to many users, you can create a file, called a distribution list, that contains a list of users. You then specify an at sign (@) and the file name in the To entry box when you send the message (for example, @PROJECT).
Distribution lists are not created within Mail. Use an editor, such as EVE, to create your distribution lists. When creating distribution lists, enter one user name per line. Exclamation points (!) delimit comments; Mail ignores everything to the right of the exclamation point. You can also include the names of other distribution lists by specifying an at sign (@) followed by the name of the distribution list. For example, a distribution list file could contain the following:
MIASMA::FORD ! Craig, project leader YONKIN TUTTLE ! Mona, product manager DARCY::MORRIS @PROJECT |
When naming distribution list files, use a DIS file extension because that is what Mail looks for by default.
To send mail to the users on a distribution list:
If you want to use a distribution list file that is not listed, enter the name of that file in the Selection entry box and click on the OK button.
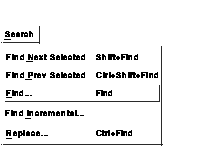
You can search an ASCII text message that you are creating or reading for the text you specify.
To start the search from the beginning of the message area, click MB1 on the beginning of the message.
To search for text:
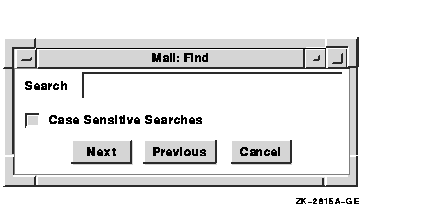
You can also use Find Next Selected and Find Previous Selected on the Search menu to find the next or previous occurrence of the specified text. You can customize your User options to enable or disable Case Sensitive Searches as the default. For more information on customizing your User options, see Modifying Your User Options.
Searching for text with the Search menu's Find Incremental menu item is similar to using Find. With Find Incremental, the search is performed as each character is typed in. This method is useful if you need to find a name that can be spelled several ways (for example, Sloan, Sloane, or Slone).
You can replace text in a message that you are creating with different text.
To replace text:
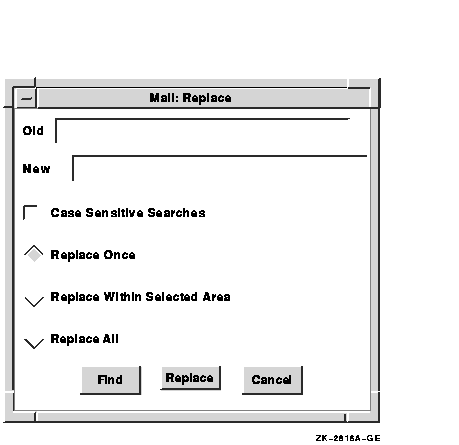
The Find function is not available with Replace Within Selected Area or Replace All.
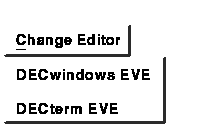
Mail uses the DECwindows editing commands, described in Using DECwindows Motif for OpenVMS, as the default editor you can use to create messages. If more than one editor is available on your system, you can choose a different default editor to create a message. To change your default editor, see Modifying Your Send Options.
You can also change the editor for a specific message by doing the following:
When you send POSTSCRIPT files, do not use an editor. Instead, choose File (no editor)... from the Main window's Create--Send menu. Using the File (no editor)... option ensures that the files contain only POSTSCRIPT language and are formatted correctly.
Before you work with an object (message, drawer, or folder), you first have to select that object.
To select a message, folder, or drawer, point to the object in the main window and click MB1.
To select multiple objects, press and hold the Ctrl key while clicking MB1 on each desired object.
To select a range of drawers, folders, or messages, click MB1 on the first object to be selected, then press the Shift key while clicking MB1 on the last object to be selected.
To select all messages in an open folder, choose Select All from the main window's Edit menu. If more than one folder is open, all messages in those folders are selected.
To cancel the selection of one object, select another object by clicking MB1, or point to the selected object and press and hold the Ctrl key and click MB1.
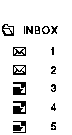
You can use Mail to read an old or a new mail message. New messages are added to the INBOX folder; old messages (messages that have been read) are held in the INBOX folder until you move them elsewhere. (This default can be changed in your mail profile. See Customizing Your Mail Environment for more information about your mail profile.)
When you receive new mail, a message is displayed in your Session Manager window. The number of new messages is displayed in the Mail icon.
To read a new message, start the Mail application if it is not already running. The messages in the INBOX folder are listed; unread messages are identified by an icon resembling an addressed envelope. Double click MB1 on the message to be read. Mail displays the message in a Read window.
A message that you have read remains in the INBOX folder until you move it to another folder or delete it. You can specify that messages be placed automatically in another folder once they are read. See Customizing Your Mail Environment for more information.
If Mail is running on your system when you receive new mail, the Mail icon in your icon box changes and the Read New Mail and Receive Mail buttons in the main window become active. To read a new message, click on the Read New Mail button. This adds new messages to the INBOX folder, opens the INBOX folder, and displays the first unread message in the INBOX folder.
You cannot use the Read New Mail button if you are reading a message from the INBOX folder in a Read window other than the default Read window, or if you are replying to a message in the INBOX folder. (For a description of default Read windows, see Multiple Read Windows.)
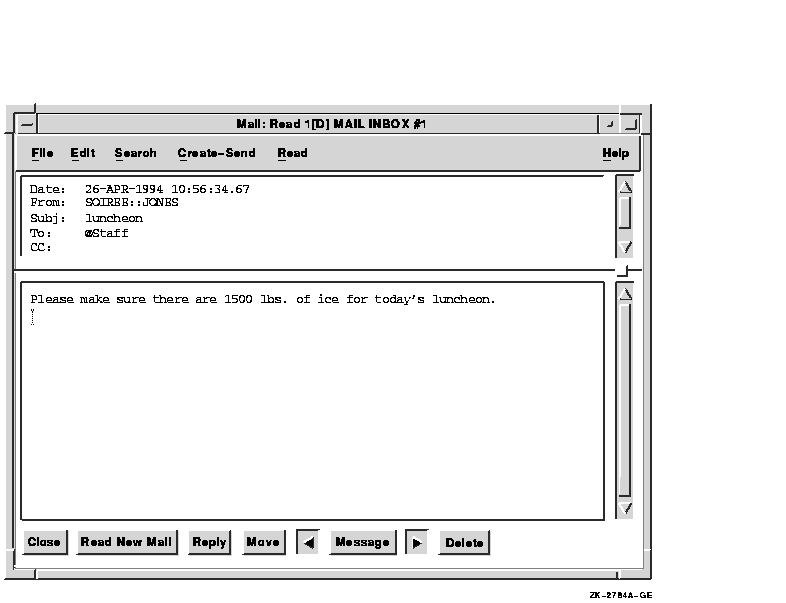
A Read window is divided into an envelope pane and a message pane.
The envelope pane displays the name of the person who sent the message and other address information. Use the scroll bar to display additional information about the message, such as text indicating that the message is marked or has been replied to, the message size, message ID, and whether the message is in a foreign format.
The message pane displays the mail message. Use the scroll bar to display any text that does not fit in the pane.
You can adjust the relative size of the panes by using MB1 to drag the border between the panes. Press MB1 on the pane knob (box) on the far right of the dividing line, drag the line to the desired location, and release MB1. Making one pane smaller makes the other pane larger. This allows you to view more text in either pane without resizing the window.
You can click on the Message button at the bottom of the Read window to display the next page of a message, or the next message if you are at the end of the current message. If there are no more messages, Mail issues an audible beep.
Clicking on the left arrow of the Message button displays the beginning of the previous message in the current folder. Clicking on the right arrow of the Message button displays the beginning of the next message in the current folder.
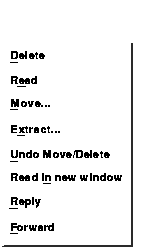
If you receive a message whose contents are not text or are not in POSTSCRIPT, DDIF, or DTIF format, you cannot view the file in Mail. Mail displays a message informing you of the problem. You can print, forward, extract, or reply to the message. See the appropriate sections of this chapter for information about printing, forwarding, extracting, and replying to messages.
To close a Read window, click on the Close button.

You can add new messages to your INBOX folder and update the list of new messages without reading a message. To update the INBOX folder, click on the Receive Mail button in the main window.
If you click on the Receive Mail button while you are reading a message in the INBOX folder, Mail closes the Read window before delivering your mail. If you are reading a message in the INBOX folder in a Read window other than the default Read window, you cannot receive your messages, and Mail displays a message informing you of the problem. See Multiple Read Windows for a description of default Read windows.
You cannot receive new mail if you are replying to a message in the INBOX folder.
To read an old message (one that you have already read), open the drawer and folder containing the message and double click on the appropriate message. The message is displayed in a Read window.
To read a series of old messages that are in different folders or are not consecutive:
You can open more than one Read window at one time. This allows you to read multiple messages at once or to read new mail without disrupting the message you are currently reading.
The first Read window you open is your default Read window. It is identified by the symbol [D] in the window's title bar. Additional Read windows are identified by the number in their title bar, for example, Read 2, Read 3, and so on.
Mail displays your mail messages in the default Read window unless you specify another window. For example, clicking on the Read New Mail button or double clicking on a message in the main window displays the message in your default Read window.
To read new mail in another Read window, display the main window's Read menu and choose New Mail in New Window. A new Read window is opened, and the first message received since the INBOX folder was last opened is displayed. This is possible only if the default Read window is displaying a message from a folder other than the INBOX folder.
To read an old message in another Read window, select the message, display the main window's Read menu, and choose In New Window.

You can reply to a message that is selected in the Main window or to the message currently displayed in a Read window.
To reply to the currently displayed message, click on the Reply button in the Read window.
To reply to the first selected message, choose Reply from the main window's Create--Send menu. If you want to use the text of the message in your reply, choose Reply Using Selected Message instead.
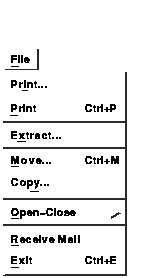
To include a file or the text of another message in your reply, pull down the File menu in the Create--Send window. Choose the appropriate menu item from the list displayed:
Replying to a message opens a Create--Send window. In the To entry box, Mail inserts the name of the sender of the original message. In the Subject entry box, Mail inserts RE: followed by the subject of the original message. If you chose to reply using a message or file, the text of the message or file appears in the message area.
Unless you chose Include File (no editor)... or Include Last Sent (no editor), enter text and make any desired edits.
To send the reply, click on the Send button. To close the Create--Send window, click on the Close button.

You can forward either a message selected in the Main window or the message currently displayed in a Read window to another user.
To forward the selected or currently displayed message:
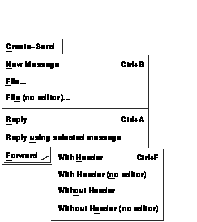
Forwarding a message opens a Create--Send window. In the Subject entry box, Mail inserts FWD: followed by the subject of the forwarded message. In the message area, Mail inserts the forwarded message with its header unless you chose Without Header. If you chose With Header (no editor) or Without Header (no editor), Mail displays a message in the message area showing the name of the file it is sending.
Enter the address information and make any desired changes to the text. If you change the original message and want to include the unedited version in your forwarded message, choose Include Original from the Create--Send window's File menu.
Click on the Send button to send the message. Click on the Close button to close the window.

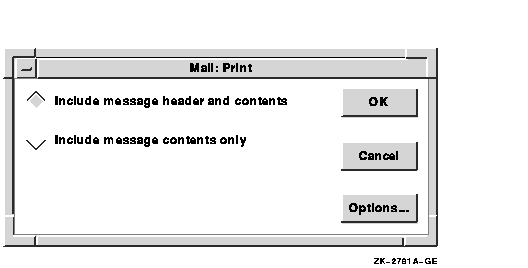
You can print either selected messages or the message currently displayed in a Read window. You can print messages using your default print settings, or you can modify the print settings for the messages being printed.
To print the selected or currently displayed message using your default print settings, click on the Print button in the main window, or choose Print from the Read window's File menu.
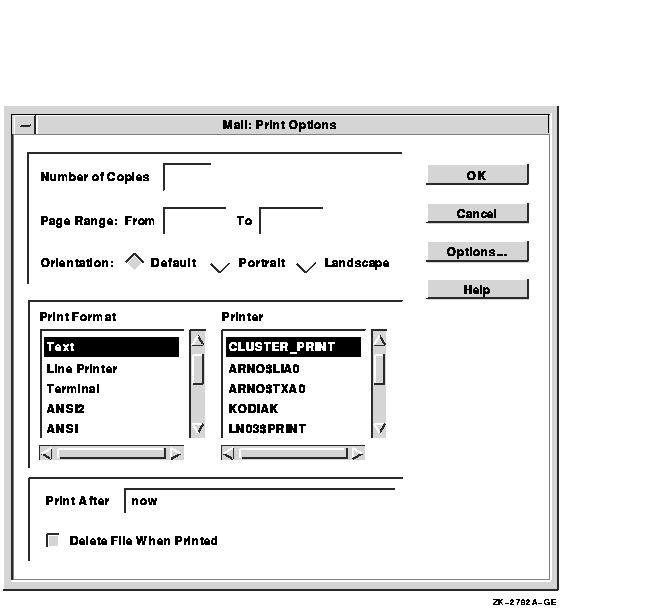
To print the selected or currently displayed message using altered
print settings:

You can create an OpenVMS file from a mail message. You can select an existing message to be copied to a file, or you can create a file from a message you are reading or creating.
To create a file from the selected or currently displayed message:
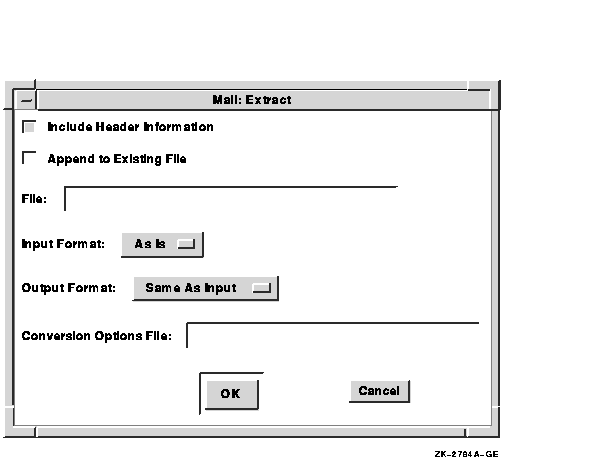
TXT for text and untagged files
DDIF for DDIF files
DTIF for DTIF files
DDIF or DTIF for DOTS files, depending on whether the primary file's extension is DDIF or DTIF
If more than one message is selected and the messages have different data types, non-ASCII messages are converted to ASCII if possible. If they cannot be converted to ASCII, the messages are not extracted.
| Previous | Next | Contents | Index |
|
|
| privacy and legal statement | ||
| 5634PRO_009.HTML | ||