| Previous | Contents | Index |
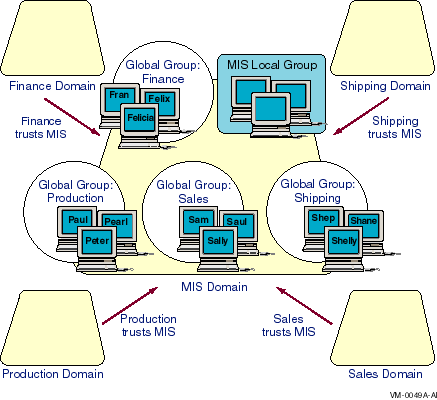
Figure 5-2 shows an example of a company that is divided into several distinct departments and that uses the master domain model. All accounts are created in an MIS master domain, and there is a separate domain for each department. Within the master domain is a global group for each department that includes all user accounts for that department. Every departmental domain trusts the master domain and can make use of its global groups. The MIS domain serves as the account management domain, and a local group of MIS administrators has privileges limited to the MIS domain.
Figure 5-2 Master Domain Model
5.7.2 Master Domain Model: Example with MIS Master Domain
Figure 5-3 presents a setup using the master domain model with MIS
as the master domain. Because MIS is the only master domain, all user
accounts are located there, and all other domains trust the MIS domain.
Figure 5-3 Master Domain Model with MIS as the Master Domain
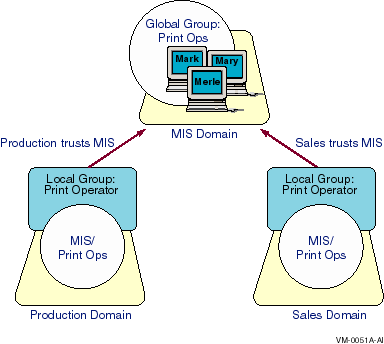
In this example, if you want to create a universal print operators
group that can be used in every domain, you create a PrintOps global
group in the MIS domain and then put MIS\PrintOps into a Print Operator
local group in the Production and Sales domains. You then add the user
accounts of each print operator to the PrintOps global group to manage
all print operators as an entity.
5.7.3 Master Domain Model: Example of Network Security Configuration
A company of 3000 users, organized into 15 departments and a centralized MIS group, is setting up an Advanced Server network. The company selects the master domain model as its network security configuration.
The MIS group creates a domain named MIS to serve as the master domain. This domain has three servers running Advanced Server software; this ensures that the network is failover tolerant if one of the servers must go down for servicing.
All user accounts are created in the MIS domain. The MIS group also creates 15 global groups in the MIS domain. The name of each global group corresponds to one of the 15 departments in the company, and the members of each global group are the employees who work in that department. Initially, each employee is a member of only one of these global groups. No directories or printers are shared in the MIS domain; this domain serves only as an "account-management domain."
Each of the 15 departments has its own Advanced Server domain. Most of these department domains contain only one server running Advanced Server software. Directories and printers on the network are shared by the department domains. Every department domain trusts the MIS domain, but the department domains do not need to trust one another.
The Administrators local group of each department domain contains the user account of at least one user working in that department. This administrator can share resources, create local groups in the domain, and perform other necessary tasks. The MIS\Domain Admins group also is a member of the Administrators local group on every domain. This means that the MIS group can perform software upgrades, back up network servers, and help the departmental administrators with problems.
When a new group of users is needed for use only within a domain, the local department administrator can create a local group in the domain. For example, the administrator of the Sales domain can create a new local group in the Sales domain, containing the user accounts MIS\CristalW, MIS\BillO, and MIS\PegE. In this example, CristalW, BillO, and PegE work in the Sales domain, but their accounts, like those of all other company employees, are located centrally in the MIS domain.
Suppose that a new group of users is needed and this group needs permissions in more than one domain. In this case, a local department administrator could send a message to the MIS group, who could create a global group in the MIS domain with the appropriate members. For example, if the MIS group creates a global group named Budget Planners in the MIS domain, a department manager could grant permission to MIS\Budget Planners for the resources that this group needs.
A different option for this company would be to have departmental
managers act as Server Operators in their own domains only; they would
not be members of the Administrators group. The departmental managers
would still share resources, but only the MIS group would create local
groups and perform other administrative tasks.
5.8 Multiple Master Domain Model
For larger companies that want centralized administration, the multiple master domain model is a good choice because it is the most scaleable.
With this model, a small number of master domains serve as account domains, and every network user account is created on one of these master domains.
Table 5-4 summarizes the advantages and disadvantages of using a multiple master domain model.
| Advantages | Disadvantages |
|---|---|
| Best choice for companies with many users and a centralized MIS department. | Local and global groups may need to be defined multiple times. |
| Scaleable to networks with any number of users. | There are more trust relationships to manage. |
| Resources are grouped logically. | User accounts are located in more than one domain. |
| Department domains can have their own administrators, who manage the resources in the department. |
5.8.1 Multiple Master Domain Model: Example of Domain Configuration
Figure 5-4 shows an implementation of the multiple master domain
model.
The company's MIS group monitors the master domains. In addition to the
master domains, many other domains, such as departmental domains,
provide resources. The departmental domains can be managed by people in
their own departments or by a centralized MIS department.
Figure 5-4 Multiple Master Domain Model
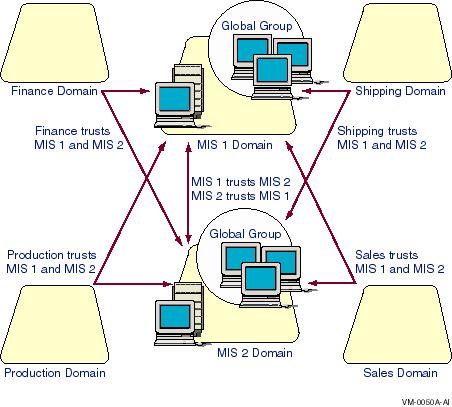
Every master domain trusts the other master domains. All domains in the company trust all master domains; therefore, every user account potentially can access every domain. The departmental domains, however, do not necessarily trust one another.
Note that the management of global groups is slightly more complicated in this model. If a global group needs to contain users from two or more master domains, you must:
To minimize this inconvenience, distribute users among your master
domains by department within your company rather than alphabetically or
otherwise. In this way, the chance that you will need similar global
groups from different master domains is reduced. Your company's central
MIS department can manage the master domains.
5.8.2 Multiple Master Domain Model: Example of Network Security Configuration
A growing company of several thousand users organized into multiple departments and a centralized MIS department is setting up its Advanced Server network. Because of the high number of users, the company selects the multiple master domain model to ensure that performance in the master domains does not degrade.
The company creates two master domains, MIS1 and MIS2 --- each with multiple servers running Advanced Server software. A high number of servers in each domain provides greater performance in approving logon requests. This is needed because many employees will be logging on at about the same time every morning.
Each user account is created in one of the MIS domains. A user's job determines which master domain contains the user's account.
Each department has its own domain with its own administrator who creates local groups, manages the sharing of the department resources, and keeps the department's servers running smoothly.
The two master domains trust one another and every department's domain trusts both of the master domains. Department domains do not need to trust one another.
If a new global group of users is needed, it must be created by the MIS department. If the global group needs to contain users from both of the network's master domains, the MIS department needs to create two global groups (one in each master domain) containing the users whose accounts are in that domain.
For example, a group containing users from both MIS1 and MIS2 may be needed to operate printers in the departments. In this situation, create PrintOps global groups in both MIS1 and MIS2 and put both MIS1\PrintOps1 and MIS2\PrintOps2 in a Print Operator local group in every domain.
Figure 5-5 illustrates this example of a multiple master domain model.
Figure 5-5 Multiple Master Domain Model with MIS1 and MIS2 as the Master Domains
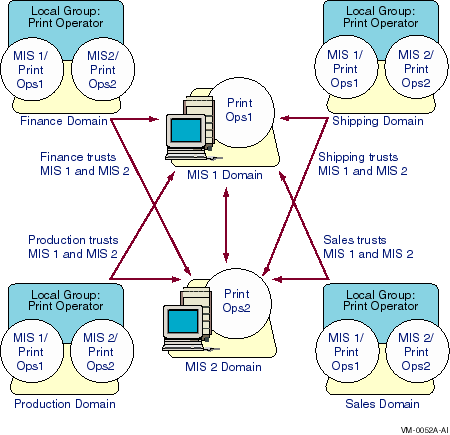
Maintenance of this model is simple: If a print operator leaves the company or a new one joins, you simply remove the user's account from, or add it to, the Domain PrintOps global group in the domain where the user's account is, or should be, located. If new printers needing administration are added to an existing domain, all your print operators will be able to manage them automatically.
If you need to add a workstation with a printer to administer, add all
the Domain PrintOps global groups to the workstation's Power Users
local group. And if a new domain is added to your network, add all the
Domain PrintOps global groups to the Print Operator local group in that
domain.
5.9 Complete Trust Model
The complete trust model is ideal if you want the management of users and domains to be distributed among different departments rather than to be centralized.
With the complete trust model, every domain on the network trusts every other domain. In this way, every department can manage its own domain and define its own users and global groups, and these users and global groups can be used on all of the domains in the network.
Table 5-5 summarizes the advantages and disadvantages of using a complete trust model.
| Advantages | Disadvantages |
|---|---|
| Best for companies with no central MIS group. | Does not provide for central management of users. |
| Scaleable to networks with any number of users. | Large number of trust relationships to manage. |
| Each department has full control over its user accounts and resources. | Each department must be confident that other departments will not add unauthorized users to global groups. |
| Both resources and user accounts are grouped into departmental units. | Difficult to add domains. |
5.9.1 Complete Trust Model: Example of Domain Configuration
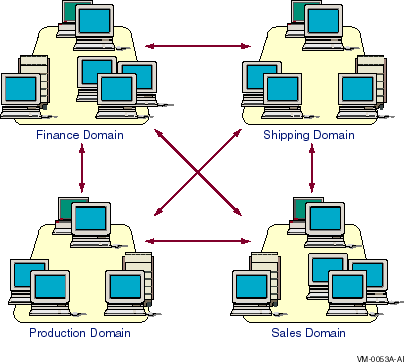
Figure 5-6 shows the trust relationships for a complete trust model.
Because of the number of trust relationships required for this model,
it is difficult to add domains. With the complete trust model, the
number of trust relationships required for a company with n
domains is n*(n-1). For example, 10 domains require 90 trust
relationships, and 20 domains require 380 trust relationships. Adding a
new domain to an existing network of 10 domains requires establishing
20 new trust relationships.
However, this model may be the most suitable for companies that do not have centralized MIS departments. (See Chapter 2, Domains and Trusts, in this guide.)
Figure 5-6 Complete Trust Model
With the complete trust model, the term "trust" applies
totally. Before you create a trust relationship with another domain, be
sure that you have confidence in the administrator of that domain,
especially if you will be giving permissions to global groups from that
domain. After you give permission to a global group from another domain
(or place that global group in a local group in your domain), you are
trusting the administrator of the other domain not to add unauthorized
users to that global group.
5.9.2 Complete Trust Model: Example of Network Security Configuration
A company of 1000 users with no centralized MIS group is setting up its Advanced Server network. Because there is no centralized computer management, each department needs to administer its own server. This makes the complete trust model the best choice.
Every department sets up its own domain and has its own domain administrator who is entirely responsible for both user accounts and shared resources in the domain. Each domain administrator creates user accounts for all employees who work in the department corresponding to that domain.
Each department administrator is also responsible for creating global groups and local groups in the domain. When the department administrator creates a group containing only users from that department's domain, he or she can create a global group. When a group containing users from other domains is needed, a local group is necessary.
Each department administrator can establish two-way trust relationships with other Advanced Server domains. Then users and global groups from one domain can be given rights and permissions or can be placed in local groups in the other domains.
In this case, department administrators must ensure that only authorized users are added to global groups. For example, if the Shipping department trusts the Sales department, the Shipping administrator can give permissions to the Accountants global group from the Sales domain. If the Sales administrator subsequently adds more users to the Accountants global group, these new users will have the permissions granted to Accountants in the Shipping domain. Therefore, the Shipping administrator must be careful to grant permissions only to appropriate global groups from domains with trusted administrators, and the Sales administrator has the responsibility to add only appropriate users to global groups.
One of the most important functions of network servers is to share files and directories with network users. When a directory is shared, users can make connections to the directory from their workstations and access the files in the directory. The shared directory also serves as storage that is available to the network user.
The Advanced Server provides excellent performance, reliability, and security for file sharing. You can set file permissions on files and directories to grant access only to authorized users. With the Advanced Server, you can specify which groups and users can access each file and directory and the level of access that each group or user is permitted.
In addition, the Advanced Server provides audit capabilities for monitoring the access of files and directories on the server. When the Advanced Server audits a file or directory, an entry is written to the server security log when a user accesses the file. You can define the types of access for each file or directory that will cause audit entries to be written.
This chapter explains how the OpenVMS system supports the concept of
file and directory ownership. The Advanced Server lets network clients
view and change the ownership of files and directories, and it
integrates standard OpenVMS system file and directory ownership into
the enterprise-wide, network security model.
6.1 Sharing Files with Network Users
When a directory is shared on a server, a user potentially can gain access to that directory and to all of its subdirectories and files. Every point on the directory tree that is under the shared directory can be made available to network users.
You can block access to some of the directories in a shared directory tree and allow access to others by setting permissions on them.
When you share a directory, you assign it a share name. Network users use a share name to refer to the shared directory. Windows users see the share name when using File Manager or Windows Explorer to browse the network.
A share name can be (but is not required to be) the same as the actual directory name. A shared directory often is referred to simply as a share.
You can share multiple directories on the same directory tree. In this
case, one shared directory might be accessible to users in different
ways --- as a directory that actually is shared and as a subdirectory
of another shared directory.
6.1.1 Autoshares
The Advanced Server supports access to disk devices by offering disk devices as shares at server startup time. These special shares are referred to as autoshares (automatic shares) and are accessible only to users with Administrator rights.
Autoshares are hidden. They are visible only to members of the Administrators group, and only members of this group can connect to them. When connected to an autoshare, you are located at the top-level (root) directory of the device and have access to any subdirectory or file in the directory tree.
For more information on creating autoshares, see your Server Administrator's Guide.
6.1.2 Connecting to Shared Resources
Network users generally make connections to shared directories by assigning a drive letter on their workstation to the shared directory. Then they use the assigned drive letter to refer to the directory to which they have made the connection.
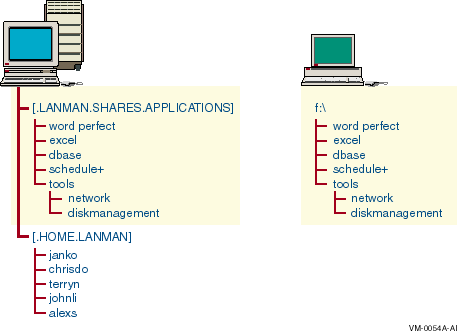
For example, if a user makes a connection to the APPLICATIONS directory and assigns the drive letter F: to the directory, the user sees the contents of the APPLICATIONS directory on the server as the contents of his or her own F: drive. The subdirectory TOOLS appears as F:\TOOLS to the user.
In Figure 6-1, a workstation user assigns a drive letter F: to a directory when making a connection to it. Then, to the user, the contents of the shared directory are the contents of the user's drive letter.
Figure 6-1 Connecting to Shared Resources
After a Windows user has made a connection to a directory, the drive letter assigned to that directory and an icon appear in the Folders pane of Windows Explorer on Windows 95, Windows 98, and Windows NT systems or in the drive bar of the File Manager window.
MS-DOS and OS/2 users with LAN Manager networking software (but without Windows) can use the NET USE command to make network connections. OS/2 users can use File Manager to view the connected drive. OS/2 users can use the NET USE command at the DOS prompt.
MS-DOS users (both with and without Windows 3.1 or Windows for
Workgroups) have restrictions on how they view and access shared
directories. These restrictions are described in the following sections.
6.1.3 Considerations for MS-DOS Users
Share names can include up to 12 characters.
When assigning share names to shared directories, determine whether the
directory will be accessed by users of MS-DOS, Windows 3.1, or Windows
for Workgroups. If so, assign a share name that follows the MS-DOS 8.3
naming convention, where the share name can have up to eight
characters, optionally followed by a period and up to three additional
characters. MS-DOS users cannot access shares with share names that do
not follow this convention. If a share will be accessed only by Windows
NT, Windows 95, or Windows 98 users, the share name can be up to 12
characters long.
6.2 Using Permissions
You set permissions on shared directories to ensure that only authorized users can access each file or directory and that those users can access them only in appropriate ways. The Advanced Server lets you set permissions differently for each file and directory.
Security for access from network clients can work in conjunction with OpenVMS system protections. For information about how to set file and directory permissions, see your Server Administrator's Guide. |
Both Advanced Server and OpenVMS support the concepts of file and directory ownership. Every file and directory has an owner. The owner controls how permissions are set on the file or directory and can grant permissions to others. File ownership provides a way for users to keep files on the server private.
Administrators create most of the files on network servers, often when they install applications on the server. Therefore, most files on a server will be owned by administrators, except for data files created by users and files in users' home directories.
When an Advanced Server user creates a file or directory, that user automatically becomes the owner of the file or directory. The Advanced Server sets the OpenVMS system owner of a file or directory created by an Advanced Server user to the OpenVMS system identity that has been mapped for that user's Advanced Server account.
For more information about how to set up user host mapping, see your Server Administrator's Guide.
Ownership can be transferred in the following two ways:
Although an administrator can take ownership, the administrator cannot then transfer ownership to others. This prevents an administrator who wrongly takes ownership of a user's files from transferring ownership back to the original owner. When the original owner discovers that he or she is no longer the owner of the files, he or she can check the current ownership of the files and discover who took ownership of them.
| Previous | Next | Contents | Index |