Compaq ACMS for OpenVMS
Getting Started
6.4.2 ACMS Interaction with DECforms
In DECforms, the form record is a structure that
controls data transfer between ACMS and the form. The form record
identifies which form data items (variables associated
with the form) are to be returned to ACMS.
Figure 6-4 shows the interaction between DECforms and ACMS when ACMS
requests information from DECforms.
Figure 6-4 DECforms Interaction with ACMS
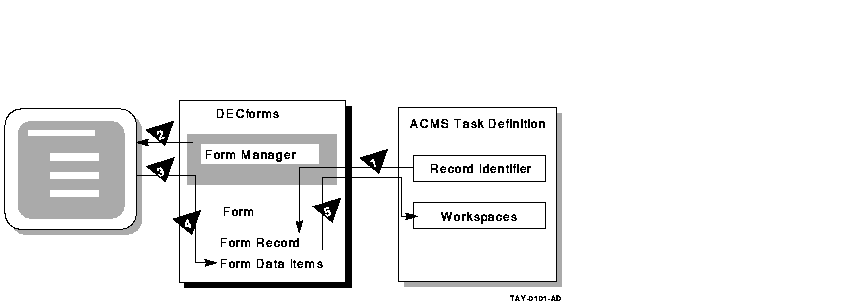
The following steps are the sequence of events that occur when ACMS
requests information from DECforms:
- To request information, ACMS calls the Form Manager with a RECEIVE
or TRANSCEIVE call. In that call, ACMS performs the following
operations:
- Tells the Form Manager the name of the form needed to collect data.
- Tells the Form Manager the record identifier being received.
- Gives the Form Manager the ACMS workspaces used to transfer data.
- The Form Manager displays a panel on the user's terminal screen.
The displayed panel is specified in the form that ACMS names in its
RECEIVE or TRANSCEIVE call to DECforms.
- The Form Manager accepts input from the user's terminal.
- The Form Manager uses the form record to store the user's input
data in the appropriate form data items.
- The Form Manager completes the request by returning data to the
ACMS workspaces.
6.5 ACMS Integration with Resource Managers
Resource managers (RMs) are the software products that store and manage
the data accessed by ACMS applications. A resource manager controls
shared access to a set of recoverable resources, such as a database.
All Compaq's resource managers provide access to recoverable data. Step
procedures can access the following resource managers either locally or
remotely:
- Rdb database management system
- DBMS database management system
- RMS file management system
- ACMS queuing facility
6.5.1 Accessing a Database or a Master File
Compaq's resource managers are not an integral part of the TP system,
but are instead under the control of the operating system (OS). This OS
control of resource managers permits database sharing among TP and
non-TP applications, decision support systems, and remote nodes
requesting data.
ACMS supports Rdb as its primary database management system. For Rdb
conceptual information, refer to the Rdb documentation.
For the sake of simplicity, this tutorial application uses an RMS
master file to store and retrieve records. RMS is an OpenVMS-supplied
file management system that supports sequential, relative, or indexed
files. The initialization procedure in this tutorial creates the RMS
file (EMPLOYEE.DAT) when you run the application for the first time.
6.5.2 ACMS Interaction with a Resource Manager
To access a database, ACMS interacts with a procedure server process.
The procedure server process, in turn, interacts with the resource
manager of the database. As shown in Figure 6-5, processing steps
call step procedures (user-written subroutines) to handle interactions
with the resource managers of databases or files.
ACMS uses a procedure server process for executing a procedure. When
starting a processing step, ACMS allocates a procedure server process
to execute the procedure in that step. The procedure server process
remains allocated to the task for the duration of one or more
processing steps in the task.
In an update task, you need at least one exchange step to prompt the
user for a key value, and another to display the requested record for
modification. You need one processing step to retrieve the record from
the database, and another to write the record back to the database with
the user's changes. Figure 6-5 shows the interactions among ACMS,
the procedure server, and the resource manager to execute a simple
update task.
Figure 6-5 A Resource Manager Interacting with ACMS
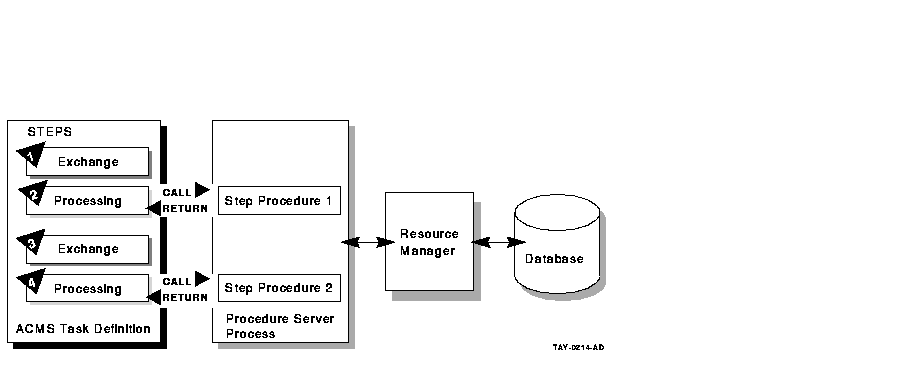
The following steps are the sequence of events that executes the update
task:
- An exchange step calls the Form Manager (not shown) to display a
panel on which the user can supply a key value (for example, an
employee number).
- A processing step calls procedure 1, which in turn retrieves an
employee record from the database through its resource manager. The
record retrieved matches the employee number that the user entered.
- An exchange step calls the Form Manager to display a panel with the
information contained in the employee record. The user can modify this
information (for example, change the employee's address).
- A processing step calls procedure 2, which in turn writes the
modified employee record to the database.
For a full picture of the ACMS execution flow that includes the Form
Manager's role in exchange steps, refer to Figure 6-1.
6.6 Defining Fields and Records in CDD
The CDD dictionary system provides a central storage repository for
shareable data definitions. CDD is an active dictionary system that
provides the user interface known as CDO (Common Dictionary Operator).
The dictionary contains metadata (descriptions of data) in the form of
dictionary definitions. The most commonly used dictionary definitions
are fields, records, and databases.
A field definition describes the data that can be
stored in a specific field in your application. Field definitions
typically include information such as data type and size. The tutorial
application defines the following fields: employee number, name, street
address, city, state, and zip code.
A record definition typically consists of a grouping
of field definitions. The tutorial application defines a record named
EMPLOYEE_INFO_RECORD, which contains a group of field definitions
corresponding to the preceding fields.
This tutorial application creates your personal CDD dictionary. It also
sets up your default CDD directory so that all your definitions are
located there automatically. By setting a default CDD directory, the
tutorial application can identify EMPLOYEE_INFO_RECORD by its name
alone (without having to use its full path name).
Chapter 7
Developing the Data Entry Task
This chapter describes in step-by-step detail how to write the Data
Entry Task using ACMS, DECforms, and CDD definitions. Before you begin,
check the prerequisites for this tutorial listed in Section 6.1.
7.1 Defining a CDD Environment
This tutorial application requires you to create a personal CDD
directory. You then need to define this directory to be your default
CDD directory, so that all your definitions are located there
automatically.
Your system manager can help you decide where to locate your CDD
directory by choosing one of the following alternatives:
- Create your personal subdirectory under CDD$COMPATIBILITY (a system
logical that on most systems points to the system dictionary directory
SYS$COMMON:[CDDPLUS]).
- Or, define a directory in your own account to be your dictionary
(for example, USER$1:[JONES.CDD]).
The directory used as your CDD dictionary in this tutorial is
represented by the placeholder disk:[cdd_directory]. When this
specification appears on subsequent pages, you are required to enter
the disk name and directory name where your CDD dictionary is located
(for example, USER$1:[JONES.CDD]).
If your system manager determines that you should define a dictionary
in your own OpenVMS account, you must first create a subdirectory for
this purpose (for example, a subdirectory named CDD in an account such
as USER$1:[JONES]). For example:
$ CREATE/DIRECTORY [JONES.CDD]
|
This subdirectory must remain dedicated to your CDD dictionary; CDD
stores its files there. Do not store your source files or any other
OpenVMS files in this directory.
To set up your personal CDD directory, follow these steps:
- Enter the CDD Dictionary Operator Utility by issuing the following
command:
$ DICTIONARY OPERATOR
CDO>
|
CDD responds by displaying the CDO> prompt.
- This step is required only if you are creating a CDD dictionary in
your own OpenVMS account. (If you are attaching your personal CDD
directory to the system dictionary, CDD$COMPATIBILITY, skip this step).
Note that the following command line ends with a period:
CDO> DEFINE DICTIONARY disk:[cdd_directory].
CDO>
|
For cdd_directory, substitute the name of the directory that you
created as your CDD dictionary (for example, [JONES.CDD]).
- Set your default directory to the directory that will be your CDD
directory:
CDO> SET DEFAULT disk:[cdd_directory]
CDO>
|
Issue the SHOW DEFAULT command to verify this:
CDO> SHOW DEFAULT
disk:[cdd_directory]
CDO>
|
- Create a CDD subdirectory to use as your personal directory.
Substitute your directory name for d_name in this example and elsewhere
in this manual (for example PJ_DICTIONARY). Note that this command line
ends with a period:
CDO> DEFINE DIRECTORY disk:[cdd_directory]d_name.
CDO>
|
A dictionary directory is a named section of a dictionary that you
use to hold your field and record definitions. Issue the DIRECTORY
command to check that the subdirectory you created is listed in your
anchor directory:
CDO displays the contents of disk:[cdd_directory]; your personal
subdirectory (dictionary) is listed as a directory.
Directory disk:[cdd_directory]
.
.
.
d_name                                DIRECTORY
CDO>
|
- Exit from CDO:
- Using a text editor, edit your login command file to define the
logical name CDD$DEFAULT. The CDO uses this logical name to set your
default CDD directory whenever you invoke CDO. Also, to enter CDO more
quickly, define a symbol for the DICTIONARY OPERATOR command. Add the
following lines to your login command file:
$ DEFINE CDD$DEFAULT disk:[cdd_directory]d_name
$ CDO   :== DICTIONARY OPERATOR
|
Save your login command file and exit the editor.
- Issue the following commands to execute your edited login command
file and to make sure that your default directory is set correctly:
$ @LOGIN.COM
$ CDO
CDO> SHOW DEFAULT
CDD$DEFAULT
    = disk:[cdd_directory]d_name
CDO>
|
- Exit from CDO:
7.2 Defining a CDD Record
In this chapter, you create your first source files: CDD files,
DECforms files, ACMS files, and COBOL files. The easiest way to manage
these files is to create them all in the same OpenVMS directory.
This manual assumes that you are using your default OpenVMS directory
(udisk:[uname]) to hold your source files. In this manual, udisk
represents your OpenVMS disk name, and uname represents your OpenVMS
directory name (for example, USER$1:[JONES]). Make sure that you are
located in your default OpenVMS directory when you create a source file.
To define fields and records in your CDD dictionary, follow these steps:
- Using a text editor, create a source file, EMPLOYEE_FIELDS.CDO, in
your OpenVMS default directory. (All source files are available on
line, if you choose to copy them instead of typing them yourself. See
Appendix B for their location.) Type in your field definitions as
follows:
DEFINE FIELD EMPL_NUMBER
   DATATYPE TEXT SIZE 10.

DEFINE FIELD EMPL_NAME
  DATATYPE TEXT SIZE 30.

DEFINE FIELD EMPL_STREET_ADDRESS
  DATATYPE TEXT SIZE 30.

DEFINE FIELD EMPL_CITY
  DATATYPE TEXT SIZE 20.

DEFINE FIELD EMPL_STATE
  DATATYPE TEXT SIZE 2.

DEFINE FIELD EMPL_ZIP_CODE
  DATATYPE TEXT SIZE 10.
|
Because input records of this format are eventually filled in with
alphabetic and numeric data typed at the terminal, the data type of all
the fields is TEXT, which can be either alphabetic or numeric. In a
more complex application, you would probably use other data types such
as NUMERIC. The SIZE information specifies the maximum number of
characters that the value of a field can have.
Save this file and
exit the editor.
- Execute the source file to place these field definitions in your
dictionary:
$ CDO
CDO> @EMPLOYEE_FIELDS
CDO>
|
If you do not have the necessary privileges to define an object in
CDO, or if you have not turned on your privileges (with the SET
PROCESS/PRIV=xxxx command), you receive an "insufficient privileges"
message here. If so, see your system manager about required privileges.
To check that a field is in your CDD directory, you can issue the
SHOW FIELD command. For example:
CDO> SHOW FIELD EMPL_NUMBER
Definition of field EMPL_NUMBER
|   Datatype                 text size is 10 characters
CDO>
|
-
Exit from CDO. Create a source file named EMPLOYEE_INFO_RECORD.CDO.
Type the following lines:
DEFINE RECORD EMPLOYEE_INFO_RECORD.
  EMPL_NUMBER.
  EMPL_NAME.
  EMPL_STREET_ADDRESS.
  EMPL_CITY.
  EMPL_STATE.
  EMPL_ZIP_CODE.
END RECORD.
|
Save this file and exit the editor.
- Execute the source file:
$ CDO
CDO> @EMPLOYEE_INFO_RECORD
CDO>
|
Issue the SHOW RECORD command to check that your record is accurate:
CDO> SHOW RECORD EMPLOYEE_INFO_RECORD
Definition of record EMPLOYEE_INFO_RECORD
|   Contains field           EMPL_NUMBER
|   Contains field           EMPL_NAME
|   Contains field           EMPL_STREET_ADDRESS
|   Contains field           EMPL_CITY
|   Contains field           EMPL_STATE
|   Contains field           EMPL_ZIP_CODE
CDO>
|
You can display the data type and length of each field in the
record by using the /FULL qualifier after the SHOW RECORD command.
To display a list of all fields and records in your default CDD
directory, issue the DIRECTORY command:
CDO> DIRECTORY
 Directory disk:[cdd_directory]d_name
EMPLOYEE_INFO_RECORD;1                         RECORD
EMPL_CITY;1                                    FIELD
EMPL_NAME;1                                    FIELD
EMPL_NUMBER;1                                  FIELD
EMPL_STATE;1                                   FIELD
EMPL_STREET_ADDRESS;1                          FIELD
EMPL_ZIP_CODE;1                                FIELD
CDO>
|
- Exit from CDO. Create a source file named EMPLOYEE_INFO_WKSP.CDO.
Type the following lines:
DEFINE RECORD EMPLOYEE_INFO_WKSP.
  EMPL_NUMBER.
  EMPL_NAME.
  EMPL_STREET_ADDRESS.
  EMPL_CITY.
  EMPL_STATE.
  EMPL_ZIP_CODE.
END RECORD.
|
Save this file and exit the editor.
- Enter the EMPLOYEE_INFO_WKSP definition in CDD by executing the
source file:
$ CDO
CDO> @EMPLOYEE_INFO_WKSP
CDO>
|
- Exit from CDO.
Note
In this tutorial, the record EMPLOYEE_INFO_RECORD is the same as the
workspace (EMPLOYEE_INFO_WKSP) that ACMS passes to DECforms. In many
ACMS applications these records are not identical. You often pass a
workspace that contains fewer fields than the record definition. Both
the record and the workspace definitions are included in this tutorial
as examples of the usual practice in ACMS application definitions.
|
7.3 Creating a Form Using DECforms
The easiest way to design DECforms panels in a form is to use the
DECforms Panel Editor in the Form Development Environment (FDE). The
definition of the panel that you create is automatically stored in a
form source file
with the file type of .IFDL (Independent Form Description Language).
7.3.1 Creating a Basic Form
To enter FDE and create a basic form and source file, follow these
steps:
- Edit your login command file to define a symbol for the FORMS
DEVELOP command:
Save your login command file and exit the editor.
- Execute your edited login command file:
- Enter the FDE symbol to enter the DECforms interactive environment:
If the DECforms system starts successfully, the system prompts you
for a file name. However, if DECforms does not recognize your device
type, the system responds that this operation must be done with a 100,
200, or 300 series terminal. In this case, issue the SET
TERMINAL/INQUIRE command at the dollar ($) prompt and repeat this step.
- Type the name EMPLOYEE_INFO_FORM at the prompt:
_Input_File: EMPLOYEE_INFO_FORM
|
After you enter your form name, DECforms displays two messages:
Form Development Environment starting...
Creating a new form file called: UDISK:[UNAME]EMPLOYEE_INFO_FORM.FORM
|
DECforms then displays a screen that prompts you to accept a
default layout for your panel (see Figure 7-1).
Note
If you copied the online IFDL source files to your default directory
before starting this tutorial, DECforms translates the existing IFDL
file here and loads the resulting FORM file. It displays the Main Menu
instead of Figure 7-1. In this case, use the arrow keys to choose
the Exit option and press [Select]. Proceed to
Section 7.3.4, step 2.
|
Figure 7-1 DECforms LAYOUT Screen
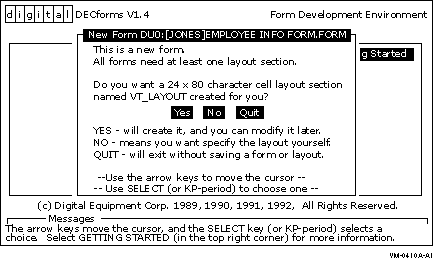
On DECforms screens, use the arrow keys to move the cursor among
the options that are displayed. Then press [Select] to
register your choice of options.
- Press [Select] to accept the default of Yes, because
the example in this tutorial uses just one layout for all types of
terminals and users. DECforms next displays the FDE Main Menu, shown in
Figure 7-2.
Figure 7-2 FDE Main Menu
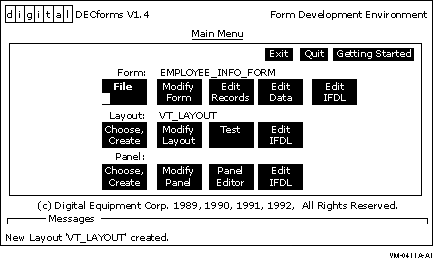
- Using the arrow keys, move the cursor to the EXIT option. Then
press [Select]. DECforms saves all the entries you made and
then displays the following messages notifying you that your form has
been saved in a form source file and in a binary file:
IFDL saved in file: UDISK:[UNAME]EMPLOYEE_INFO_FORM.IFDL;1.
Form saved in file: UDISK:[UNAME]EMPLOYEE_INFO_FORM.FORM;1.
|
You have now created a basic form.
- Enter the TYPE command and your IFDL source file name to display
the IFDL source file:
$ TYPE EMPLOYEE_INFO_FORM.IFDL
|
In the form source file, DECforms places IFDL statements that
identify the form and the layout selected. By selecting the default
layout, you cause DECforms to create the following lines:
Form EMPLOYEE_INFO_FORM
<FF>
     Layout VT_LAYOUT
         Device
             Terminal
                Type %VT100
         End Device
         Size 24 Lines by 80 Columns
     End Layout
End Form
|
To make your form useful, create a panel that produces a display on the
terminal screen. The next section contains instructions for doing this.
7.3.2 Creating a Panel
Follow these instructions to access the Panel Editor and design a panel:
- Reenter FDE by issuing the FDE command and your form name:
DECforms displays the FDE Main Menu (see Figure 7-2).
- Press the down-arrow key to move the cursor to the third line (the
Panel line), and press [Select] at the first choice: Choose,
Create. DECforms superimposes another panel on the FDE Main Menu (see
Figure 7-3).
- Press [Select] at the menu choice: Create Panel.
DECforms displays the Create Panel screen (see Figure 7-4),
containing panel attributes and their default values marked by a
diamond.
Figure 7-3 Choose/Create Panel Menu
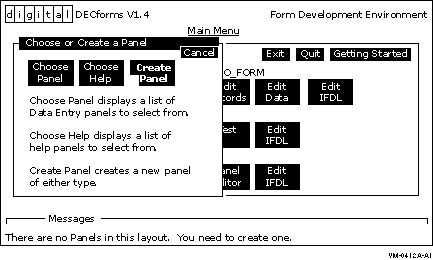
Figure 7-4 Create Panel Screen
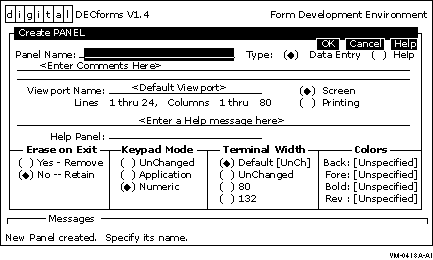
- The Panel Name field is highlighted on your screen. Type the name
of the panel you are creating:
Panel Name: EMPLOYEE_INFO_PANEL
|
Press [Return]. The cursor moves to the Data Entry
field. The panel type specifies whether the panel is for entering data
or displaying help. The diamond before Data Entry indicates that the
panel is a data entry panel.
- Press the down-arrow key to move the cursor to Yes-Remove under
Erase on Exit. Press [Select]. This has the effect of
removing the panel from the screen when the user finishes entering data
and exits the panel.
- Press the up-arrow key to move the cursor to the OK option in the
top right-hand corner. Press [Select]. This means that you
accept all the values on the screen, including the default viewport
size.
Note
DECforms displays a panel within a viewport. To specify a viewport size
other than the default 24 X 80 dimension, you must first enter a
viewport name on the Create Panel screen and then specify line and
column numbers to indicate the size of the viewport in which the panel
is to be displayed.
|
After you select OK, DECforms redisplays the FDE Main Menu, shown in
Figure 7-2.
- Move to the Panel Editor menu choice and press
[Select]. DECforms invokes the Panel Editor and places the
cursor in the top left-hand corner of a blank screen. You are now ready
to format your panel.
Note
Always use the arrow keys to move the cursor within the panel. Do not
use the space bar to position the cursor; the space bar creates literal
spaces on the panel.
|
- Position the cursor with the arrow keys and type the literals on
the screen as shown in Figure 7-5. DECforms displays the panel to
users exactly as you format it.
Figure 7-5 is an example of a
data entry panel composed only of literals. The panel includes a
message to users indicating how to navigate between fields (using
[Return] and [F12] ), how to save the data (using
[Ctrl/Z] ), and how to quit the screen (using
[PF4] ). You define [PF4] later in this chapter.
Because [Return], [F12], and [Ctrl/Z]
are predefined in DECforms, you do not need to define them for use in
this tutorial application.
Figure 7-5 Sample DECforms Panel
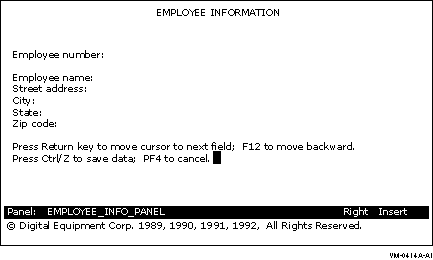
You must now create the fields that correspond to the literals. A
field is that space following the literal in which the user enters the
information. For example, a defined space after the Employee name
literal is a field in which to enter the employee name.
- Use the arrow key to position the cursor two spaces after the
Employee number literal, and press [Do]. DECforms displays
the Command> prompt.
- Type CREATE FIELD after the Command> prompt and press
[Return]:
DECforms then displays the Create Field Menu (see Figure 7-6).
Figure 7-6 Create Field Menu
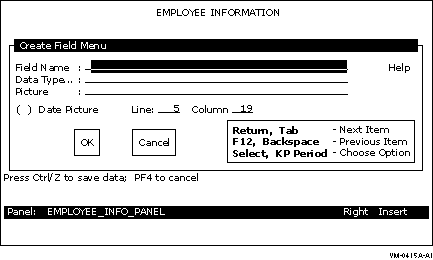
- Enter the field name and press [Return]:
Note
Field names that you specify must correspond to field names that you
entered in the CDD record definition. In the menu, the numbers that
appear after Line and Column indicate where the cursor was when you
began to create the field.
|
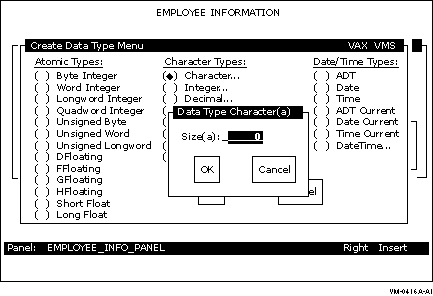
- Press [Select] at the Data Type prompt (the field is
highlighted) to display a list of valid data types: atomic, character,
and date/time. In the list of character types, move the cursor to
Character and press [Select] to register your choice.
DECforms then superimposes the Data Type Character window, shown in
Figure 7-7, on the menu.
Figure 7-7 Data Type Character Window
- Enter the size of the field:
Use the arrow keys to move the cursor to OK, and press
[Select] to confirm your entry.
DECforms again displays
the
Create Field Menu, shown in Figure 7-6.
- Enter the field picture: