![[Compaq]](../../images/compaq.gif)
![[Go to the documentation home page]](../../images/buttons/bn_site_home.gif)
![[How to order documentation]](../../images/buttons/bn_order_docs.gif)
![[Help on this site]](../../images/buttons/bn_site_help.gif)
![[How to contact us]](../../images/buttons/bn_comments.gif)
![[OpenVMS documentation]](../../images/ovmsdoc_sec_head.gif)
| Document revision date: 19 July 1999 | |
![[Compaq]](../../images/compaq.gif) |
![[Go to the documentation home page]](../../images/buttons/bn_site_home.gif)
![[How to order documentation]](../../images/buttons/bn_order_docs.gif)
![[Help on this site]](../../images/buttons/bn_site_help.gif)
![[How to contact us]](../../images/buttons/bn_comments.gif)
|
![[OpenVMS documentation]](../../images/ovmsdoc_sec_head.gif)
|
|
| Previous | Contents | Index |
20.3.3 Declaring Privileged Routines as Universal Symbols Using Transfer Vectors on VAX Systems
On VAX systems, you use the transfer vector mechanism to declare
universal symbols (described in the OpenVMS Linker Utility Manual). However, for
privileged shareable images, the transfer vector must also contain a
CHMx instruction because the target routine operates in a more
privileged mode. You identify the privileged routine by its
identification code, supplied as the only operand to the CHMx
instruction. Note that the code number used must match the code used to
identify the routine in the dispatch routine. The following example
illustrates a typical transfer vector for a privileged routine:
.TRANSFER my_serv .MASK my_serv CHMK <code_number> RET |
Because the OpenVMS system services codes are all positive numbers and
because the call to a privileged routine is initially handled by the
system service dispatcher, you should assign negative code numbers to
identify your privileged routines so they do not conflict with system
services identification codes.
20.4 Creating a User-Written System Service (Alpha Only)
On Alpha systems, in addition to the routines that perform privileged
functions, you must also include a PLV in your source file. However, on
Alpha systems, you list the privileged routines by name in the PLV. You
do not need to create a dispatch routine that transfers control to the
routine; the routine is identified by a special code.
20.4.1 Creating a PLV on Alpha Systems
On Alpha systems, the PLV contains a list of the actual addresses of the privileged routines. The image activator creates the dispatch routines. Figure 20-3 illustrates the linkage for a privileged routine on Alpha systems.
Figure 20-3 Linkage for a Privileged Routine after Image Activation

Table 20-2 describes the components of the privileged library vector on Alpha systems.
| Component | Symbol | Description |
|---|---|---|
| Vector type code | PLV$L_TYPE | Identifies the type of vector. You must specify the symbolic constant, PLV$C_TYP_CMOD, to identify a privileged library vector. |
| System version number | PLV$L_VERSION | System version number (unused). |
| Kernel-mode routine count | PLV$L_KERNEL_ROUTINE_COUNT | Specifies the number of user-supplied kernel-mode routines listed in the kernel-mode routine list. The address of this list is specified in PLV$PS_KERNEL_ROUTINE_LIST. |
| Executive-mode routine count | PLV$L_EXEC_ROUTINE_COUNT | Specifies the number of user-supplied executive-mode routines listed in the executive-mode routine list. The address of this list is specified in PLV$PS_EXEC_ROUTINE_LIST. |
| Kernel-mode routine list | PLV$PS_KERNEL_ROUTINE_LIST | Specifies the address of a list of user-supplied kernel-mode routines. |
| Executive-mode routine list | PLV$PS_EXEC_ROUTINE_LIST | Specifies the address of a list of user-supplied executive-mode routines. |
| User-supplied rundown routine | PLV$PS_KERNEL_RUNDOWN_HANDLER | May contain the address of a user-supplied rundown routine that performs image-specific cleanup and resource deallocation. When the image linked against the user-written system service is run down by the system, this run-time routine is invoked. Unlike exit handlers, the routine is always called when a process or image exits. (Image rundown code calls this routine with a JSB instruction; it returns with an RSB instruction called in kernel mode at IPL 0.) |
| Thread-safe system service | PLV$M_THREAD_SAFE | Flags the system service dispatcher that the service requires no explicit synchronization. It is assumed by the dispatcher that the service provides its own internal data synchronization and that multiple kernel threads can safely execute the service in parallel. |
| RMS dispatcher | PLV$PS_RMS_DISPATCHER | Address of an alternative RMS dispatching routine. |
| Kernel Routine Flags Vector | PLV$PS_KERNEL_ROUTINE_FLAGS | Contains either the address of an array of quadwords that contain the defined flags associated with each kernel system service, or a zero. If a flag is set, the kernel mode service may return the status SS$_WAIT_CALLERS_MODE. |
| Executive Routine Flags Vector | PLV$PS_EXEC_ROUTINE_FLAGS | Contains a zero value, because there are no defined flags for executive mode. |
Example 20-3 illustrates how to create a PLV on Alpha systems.
| Example 20-3 Creating a PLV on Alpha Systems | |||
|---|---|---|---|
! What follows is the definition of the PLV. The PLV lives
! in its own PSECT, which must have the VEC attribute. The
! VEC attribute is forced in the linker. The PLV looks like
! this:
!
!   +-------------------------------------+
!   |         Vector Type Code            | PLV$L_TYPE
!   |         (PLV$C_TYP_CMOD)            |
!   +-------------------------------------+
!   |       System Version Number         | PLV$L_VERSION
!   |             (unused)                |
!   +-------------------------------------+
!   |     Count of Kernel Mode Services   | PLV$L_KERNEL_ROUTINE_COUNT
!   |                                     |
!   +-------------------------------------+
!   |     Count of Exec Mode Services     | PLV$L_EXEC_ROUTINE_COUNT
!   |                                     |
!   +-------------------------------------+
!   |  Address of a List of Entry Points  | PLV$PS_KERNEL_ROUTINE_LIST
!   |       for Kernel Mode Services      |
!   +-------------------------------------+
!   |  Address of a List of Entry Points  | PLV$PS_EXEC_ROUTINE_LIST
!   |         for Exec Mode Services      |
!   +-------------------------------------+
!   |        Address of Kernel Mode       | PLV$PS_KERNEL_RUNDOWN_HANDLER
!   |             Rundown Routine         |
!   +-------------------------------------+
!   |                                     | PLV$M_THREAD_SAFE
!   |                                     |
!   +-------------------------------------+
!   |      Address of Alternative RMS     | PLV$PS_RMS_DISPATCHER
!   |          Dispatching Routine        |
!   +-------------------------------------+
!   |      Kernel Routine Flags Vector    | PLV$PS_KERNEL_ROUTINE_FLAGS
!   |                                     |
!   +-------------------------------------+
!   |      Exec Routine Flags Vector      | PLV$PS_EXEC_ROUTINE_FLAGS
!   |                                     |
!   +-------------------------------------+
!
PSECT OWN = USER_SERVICES (NOWRITE, NOEXECUTE);

OWN PLV_STRUCT : $BBLOCK[PLV$C_LENGTH] INITIAL (LONG (PLV$C_TYP_CMOD,! Type
                                                    ! of vector
0,                                                  ! System version number
(KERNEL_TABLE_END - KERNEL_TABLE_START) / %UPVAL,   ! Number of kernel mode
                                                    ! services
(EXEC_TABLE_END - EXEC_TABLE_START) / %UPVAL,       ! Number of exec mode
                                                    ! services
KERNEL_TABLE_START,   ! Address of list of kernel mode service routine
EXEC_TABLE_START,     ! Address of list of exec mode service routine
RUNDOWN_HANDLER,      ! Address of list of kernel mode rundown routine
0,                    ! Reserved longword
0,                    ! Address of alternate RMS dispatcher
0,                    ! reserved
0));                  ! reserved

PSECT OWN = $OWN$;
|
On Alpha systems, you declare a user-written system service to be a universal symbol by using the symbol vector mechanism. (See the OpenVMS Linker Utility Manual for more information about creating symbol vectors.) However, because user-written system services must be accessed by using the privileged library vector (PLV), you must specify an alias for the user-written system service. Use the following syntax for the SYMBOL_VECTOR= option to specify an alias that can be universal:
SYMBOL_VECTOR = ([universal_alias_name/]internal_name = {PROCEDURE ||
 DATA})
|
In a privileged shareable image, calls from within the image that use the alias name result in a fixup and subsequent vectoring through the PLV, which results in a mode change. Calls from within the shareable image that use the internal name are made in the caller's mode. (Calls from external images always result in a fixup.)
The linker command procedures and options file shown in Example 20-4 illustrate how to declare universal symbols in an Alpha system privileged shareable image.
| Example 20-4 Declaring Universal Symbols for Privileged Shareable Image on an Alpha System | |||
|---|---|---|---|
$ !
$ ! Link the protected shareable image containing
$ ! the user-written system services
$ !
$ LINK  /SHARE=UWSS -
        /PROTECT -
        /MAP=UWSS -
        /SYSEXE -
        /FULL/CROSS/NOTRACE -
        UWSS, -
        SYS$INPUT:/OPTIONS

!
! Set the GSMATCH options
!
GSMATCH=LEQUAL,1,1

!
! Define transfer vectors for protected shareable image
!
SYMBOL_VECTOR = ( -
                FIRST_SERVICE   = PROCEDURE, -
                SECOND_SERVICE  = PROCEDURE, -
                THIRD_SERVICE   = PROCEDURE, -
                FOURTH_SERVICE  = PROCEDURE  -
                )

!
! Need to add the VEC attribute to the PLV psect
!
PSECT=USER_SERVICES,VEC
|
This chapter describes the use of system services and run-time routines that VAX systems use to manage memory. It contains the following sections:
Section 21.1 describes the page size on VAX systems.
Section 21.2 describes the layout of virtual address space.
Section 21.3 describes extended addressing enhancements on selected VAX systems.
Section 21.4 describes the three levels of memory allocation routines.
Section 21.5 discusses how to use system services to add virtual
address space, adjust working sets, control process swapping, and
create and manage sections.
21.1 Virtual Page Size
To facilitate memory protection and mapping, the virtual addresss space
on VAX systems is subdivided into segments of 512-byte sizes called
pages. (On Alpha systems, memory page sizes are much
larger and vary from system to system. See Chapter 22 for
information about Alpha page sizes.) Versions of system services and
run-time library routines that accept page-count values as arguments
interpret these arguments in 512-byte quantities. Services and routines
automatically round the specified addresses to page boundaries.
21.2 Virtual Address Space
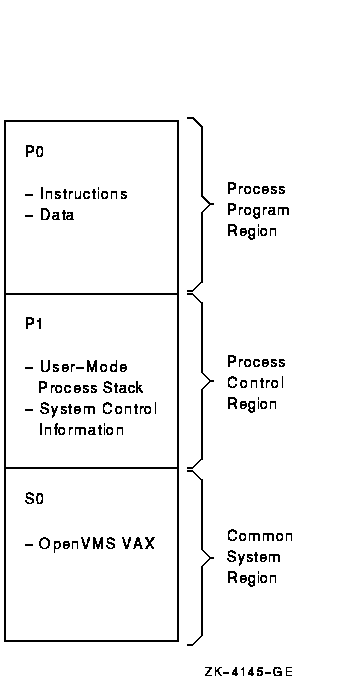
The initial size of a process's virtual address space depends on the size of the image being executed. The virtual address space of an executing program consists of the following three regions:
A summary of these regions appears in Figure 21-1.
Figure 21-1 Virtual Address Overview on VAX Systems

The memory management routines map and control the relationship between physical memory and the virtual address space of a process. These activities are, for the most part, transparent to you and your programs. In some cases, however, you can make a program more efficient by explicitly controlling its virtual memory usage.
The maximum size to which a process can increase its address space is controlled by the system parameter VIRTUALPAGECNT.
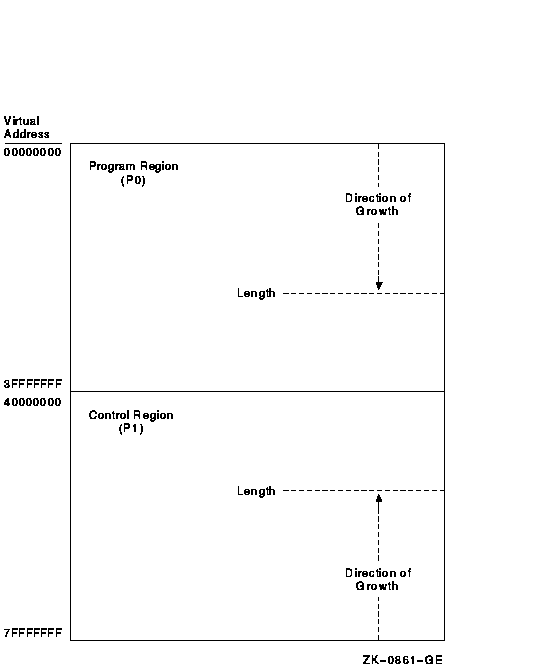
Using memory management system services, a process can add a specified number of pages to the end of either the program region or the control region. Adding pages to the program region provides the process with additional space for image execution, for example, for the dynamic creation of tables or data areas. Adding pages to the control region increases the size of the user stack. As new pages are referenced, the stack is automatically expanded, as shown in Figure 21-2. (By using the STACK= option in a linker options file, you can also expand the user stack when you link the image.)
Figure 21-2 illustrates the layout of a process's virtual memory. The initial size of a process's virtual address space depends on the size of the image being executed.
Figure 21-2 Layout of VAX Process Virtual Address Space

Selected VAX systems have extended addressing (XA) as part of the memory management subsystem. Extended addressing enhancement is supported on the VAX 6000 Model 600, VAX 7000 Model 600, and VAX 10000 Model 600 systems. Extended addressing contains the following two major enhancements that affect system images, system integrated products (SIPs), privileged layered products (LPs), and device drivers:
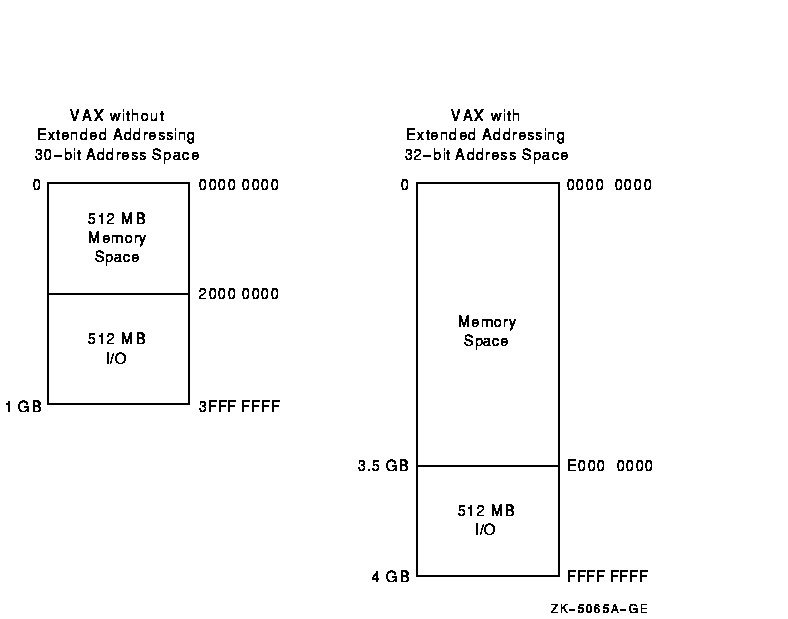
Extended physical addressing increases the size of a physical address from 30 bits to 32 bits. This increases the capacity for physical memory from 512 MB to 3.5 GB as shown in Figure 21-3. The 512 MB is still reserved for I/O and adapter space.
Figure 21-3 Physical Address Space for VAX Systems with XPA

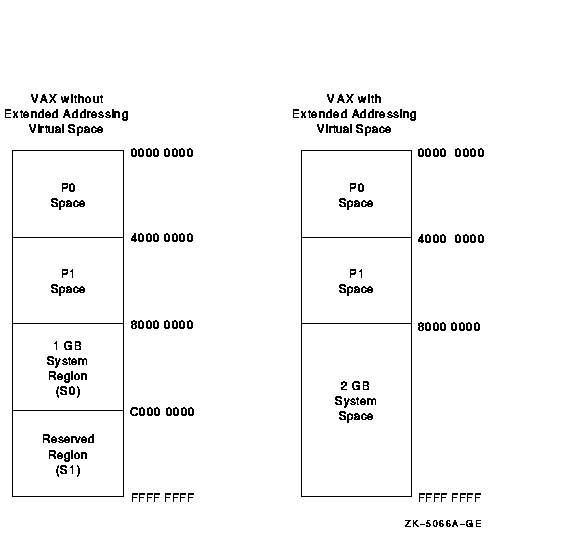
Extended virtual addressing (XVA) increases the size of the virtual page number field in the format of a system space address from 21 bits to 22 bits. The region of system virtual address space, known as the reserved region or S1 space, is appended to the existing region of system virtual address space known as S0 space, thereby creating a single region of system space. As a result, the system virtual address space increases from 1 GB to 2 GB as shown in Figure 21-4.
Figure 21-4 Virtual Address Space for VAX Systems with XVA

As shown in Figure 21-3, extended addressing increases the maximum
physical address space supported by VAX systems from 1 GB to 4 GB. This
is accomplished by expanding the page frame number (PFN) field in a
page table entry (PTE) from 21 bits to 23 bits, and implementing
changes in the memory management arrays that are indexed by PFN. Both
the process page table entry and system page table entry are changed.
21.4 Levels of Memory Allocation Routines
Sophisticated software systems must often create and manage complex data structures. In these systems, the size and number of elements are not always known in advance. You can tailor the memory allocation for these elements by using dynamic memory allocation. By managing the memory allocation, you can avoid allocating fixed tables that may be too large or too small for your program. Managing memory directly can improve program efficiency. By allowing you to allocate specific amounts of memory, the operating system provides a hierarchy of routines and services for memory management. Memory allocation and deallocation routines allow you to allocate and free storage within the virtual address space available to your process.
There are three levels of memory allocation routines:
Modular application programs can call routines at any or all levels of the hierarchy, depending on the kinds of services the application program needs. You must observe the following basic rule when using multiple levels of the hierarchy:
Figure 21-5 shows the three levels of memory allocation routines.
Figure 21-5 Hierarchy of VAX Memory Management Routines

For information about using memory management RTLs, see Chapter 23.
21.5 Using System Services for Memory Allocation
This section describes how to use system services to perform the following tasks:
The system services allow you to add address space anywhere within the process's program region (P0) or control region (P1). To add address space at the end of P0 or P1, use the Expand Program/Control Region (SYS$EXPREG) system service. SYS$EXPREG optionally returns the range of virtual addresses for the new pages. To add address space in other portions of P0 or P1, use SYS$CRETVA.
The format for SYS$EXPREG is as follows:
SYS$EXPREG (pagcnt ,[retadr] ,[acmode] ,[region]) |
Specifying the Number of Pages
Use the pagcnt argument to specify the number of pages to add to the end of the region. The range of addresses where the new pages are added is returned in retadr.
Use the acmode argument to specify the access to be assigned to the newly created pages.
Use the region argument to specify whether to add the pages to the end of the P0 or P1 region. This argument is optional.
To deallocate pages allocated with SYS$EXPREG, use SYS$DELTVA.
The following example illustrates how to add 4 pages to the program region of a process by writing a call to the SYS$EXPREG system service:
#include <stdio.h>
#include <ssdef.h>


main() {
    unsigned int status, retadr[1],pagcnt=4, region=0;

/* Add 4 pages to P0 space */
    status = SYS$EXPREG( pagcnt, &retadr, 0, region);
    if (( status & 1) != 1)
        LIB$SIGNAL( status );
    else
        printf("Starting address: %d Ending address: %d\n",
               retadr.lower,retadr.upper);
}
|
The value 0 is passed in the region argument to specify that the pages are to be added to the program region. To add the same number of pages to the control region, you would specify REGION=#1.
Note that the region argument to SYS$EXPREG is optional; if it is not specified, the pages are added to or deleted from the program region by default.
The SYS$EXPREG service can add pages only to the end of a particular region. When you need to add pages to the middle of these regions, you can use the Create Virtual Address Space (SYS$CRETVA) system service. Likewise, when you need to delete pages created by either SYS$EXPREG or SYS$CRETVA, you can use the Delete Virtual Address Space (SYS$DELTVA) system service. For example, if you have used the SYS$EXPREG service twice to add pages to the program region and want to delete the first range of pages but not the second, you could use the SYS$DELTVA system service, as shown in the following example:
#include <stdio.h>
#include <ssdef.h>

struct {
    unsigned int lower, upper;
}retadr1, retadr2, retadr3;

main() {
    unsigned int status, pagcnt=4, region=0;

/* Add 4 pages to P0 space */
    status = SYS$EXPREG( pagcnt, &retadr1, 0, region);
    if (( status & 1) != 1)
        LIB$SIGNAL( status );
    else
        printf("Starting address: %d ending address: %d\n",
               retadr1.lower,retadr1.upper);

/* Add 3 more pages to P0 space */

    pagcnt = 3;
    status = SYS$EXPREG( pagcnt, &retadr2, 0, region);
    if (( status & 1) != 1)
        LIB$SIGNAL( status );
    else
        printf("Starting address: %d ending address: %d\n",
               retadr2.lower,retadr2.upper);

/* Delete original allocation */
    status = SYS$DELTVA( &retadr1, &retadr3, 0 );
    if (( status & 1) != 1)
        LIB$SIGNAL( status );
    else
        printf("Starting address: %d ending address: %d\n",
               retadr1.lower,retadr1.upper);

}
|
In this example, the first call to SYS$EXPREG adds 4 pages to the program region; the virtual addresses of the created pages are returned in the 2-longword array at retadr1. The second call adds 3 pages and returns the addresses at retadr2. The call to SYS$DELTVA deletes the first 4 pages that were added.
Be aware that using SYS$CRETVA presents some risk because it can delete pages that already exist if those pages are not owned by a more privileged access mode. Further, if those pages are deleted, no notification is sent. Therefore, unless you have complete control over an entire system, use SYS$EXPREG or the RTL routines to allocate address space. |
| Previous | Next | Contents | Index |
![[Go to the documentation home page]](../../images/buttons/bn_site_home.gif)
![[How to order documentation]](../../images/buttons/bn_order_docs.gif)
![[Help on this site]](../../images/buttons/bn_site_help.gif)
![[How to contact us]](../../images/buttons/bn_comments.gif)
|
| privacy and legal statement | ||
| 5841PRO_055.HTML | ||