![[Compaq]](../../images/compaq.gif)
![[Go to the documentation home page]](../../images/buttons/bn_site_home.gif)
![[How to order documentation]](../../images/buttons/bn_order_docs.gif)
![[Help on this site]](../../images/buttons/bn_site_help.gif)
![[How to contact us]](../../images/buttons/bn_comments.gif)
![[OpenVMS documentation]](../../images/ovmsdoc_sec_head.gif)
| Document revision date: 30 March 2001 | |
|
|
|
|
|
|
| Previous | Contents | Index |
WWPPS> PRINT/QUEUE=PRT_QUEUE/RANGE=4:9 file-name
Directories are files that store the names of files. This chapter describes how to use directories to organize and manage files. This chapter includes information about:
Throughout this chapter, examples that specify a node name do not always include an access control string. This is because proxy accounts enable users to perform operations on the remote systems in these examples. |
If you are working in an environment with Extended File Specifications, directory structures and syntax may differ greatly from the traditional structures described here. For information about working with directories in such an environment, refer to the OpenVMS Guide to Extended File Specifications.
For more information, refer to the following:
Figure 5-1 shows a sample directory hierarchy. At the top of the structure is the master file directory (MFD). Its directory name is [000000]. The MFD shown contains entries for user file directories including MARTINO.DIR, PUBLIC.DIR, and JONES.DIR. The top-level directory [JONES] is a user file directory named JONES.DIR;1 in [000000].
The sample directory structure in Figure 5-1 is the basis for many of the examples in this chapter.
Figure 5-1 Directory Structure
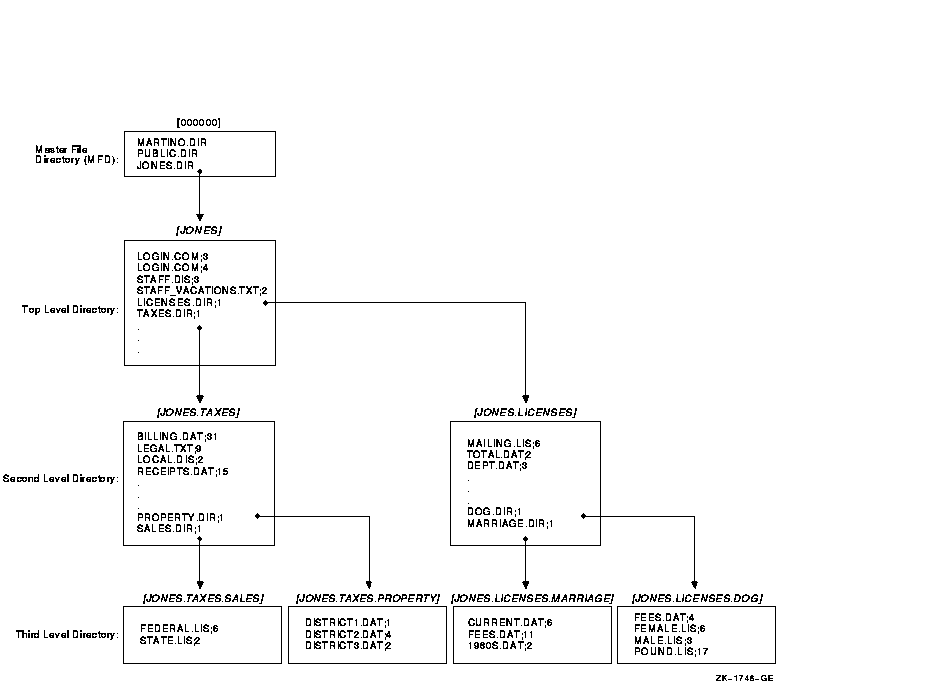
Note the following about this directory structure:
The directory component of a file specification consists of a top-level directory name (such as a UFD) that can be followed by a number of subdirectory names. Subdirectory names are separated by periods (.).
Versions of OpenVMS Alpha prior to Version 7.2 and all versions of OpenVMS VAX support directory components that contain the UFD and no more than seven subdirectory names. OpenVMS Alpha Version 7.2 or later supports 255 names (UFD plus subdirectories) in a directory component.
A directory specification has the following format:
|
[directory.subdirectory] |
To add one or more levels of subdirectories, add a period and another subdirectory name for each subdirectory (up to the limit). A subdirectory of another subdirectory is specified by concatenating the subdirectory name (with the preceding period) to the name of the subdirectory one level above it in the hierarchy.
On versions prior to OpenVMS Alpha Version 7.2, on any version of OpenVMS VAX, and on OpenVMS Alpha systems using ODS-2 disks, a subdirectory name can contain no more than 39 characters.
On OpenVMS Alpha Version 7.2 or later with ODS-5 disks, subdirectory
names are limited by the filename limit since subdirectory files are
stored as <subdirectory-name>.DIR;1. The total number of
characters within the directory and root components of a file
specification (excluding delimiter brackets and periods) should not
exceed 512.
5.2.1 Creating Directories
To create a directory, enter the CREATE/DIRECTORY command. If you want to create a subdirectory under your current directory, you do not have to specify the current directory name; you can enter the subdirectory name preceded by a period.
In the following example, the directory [JONES.TAXES] is created:
$ CREATE/DIRECTORY [JONES.TAXES] |
In the following example, the current default directory is [JONES], and the subdirectory [JONES.LICENSES] is created:
$ CREATE/DIRECTORY [.LICENSES] |
To display the names of files in a directory, enter DIRECTORY at the DCL prompt. To list the files in a subdirectory, enter the DIRECTORY command and the subdirectory name preceded by a period.
When you include certain command qualifiers along with the DIRECTORY command, you can retrieve information in addition to the names of the files. For more information on DIRECTORY command qualifiers, refer to the OpenVMS DCL Dictionary or online help.
In the following example, the files in the directory [JONES] are listed. The example shows that [JONES] contains two subdirectories, [JONES.LICENSES] and [JONES.TAXES], four nondirectory files, STAFF.DIS, STAFF_VACATIONS.TXT, and two versions of LOGIN.COM:
$ DIRECTORY |
Directory DISK1:[JONES] LICENSES.DIR;1 LOGIN.COM;3 LOGIN.COM;4 STAFF.DIS;3 STAFF_VACATIONS.TXT;2 TAXES.DIR;1 Total of 6 files. |
In the following example, the default directory remains [JONES] and the contents of the subdirectory [JONES.LICENSES] are displayed:
$ DIRECTORY [.LICENSES] |
Directory DISK1:[JONES.LICENSES] DEPT.DAT;3 DOG.DIR;1 MAILING.LIS;6 MARRIAGE.DIR;1 TOTAL.DAT;2 Total of 5 files. |
To delete a directory, use the following procedure:
| Step | Task |
|---|---|
| 1 |
Make sure that the directory contains no files. To find out if the
directory contains files, enter the DIRECTORY command.
When there are no files in the directory, the system displays the
following message:
|
| 2 | If the directory contains files, copy them to another directory to save them or delete them if you do not want to save them. If the directory contains subdirectories, examine those subdirectories, copy or delete their files, and delete the subdirectories. |
| 3 | Move to the directory one level above the directory you want to delete. Remember that subdirectories exist as files in directories. When you delete a directory, you delete the file that points to that directory. |
| 4 | Change the file protection of a directory to allow delete access to the file. Directory files in master file directories require SYSPRV privilege to delete. (See Chapter 4 for more information about file protection.) |
| 5 | Delete the directory file using the DELETE command. |
The following example shows how to delete the subdirectory [JONES.LICENSES]:
$ SET DEFAULT [JONES.LICENSES] $ DIRECTORY %DIRECT-W-NOFILES, no files found $ SET DEFAULT [JONES] $ SET SECURITY/PROTECTION=OWNER:D LICENSES.DIR $ DELETE LICENSES.DIR;1 |
To change your default directory, use the SET DEFAULT command. The new default remains in effect until you enter another SET DEFAULT command or log out. To set default to a subdirectory, append the subdirectory name to the name of the directory one level above it.
In the following example, default is set to the directory [JONES] and then the file [JONES]STAFF_VACATIONS.TXT is displayed:
$ SET DEFAULT [JONES] $ TYPE STAFF_VACATIONS.TXT |
In the following example, the file BILLING.DAT, which is located in the subdirectory [JONES.TAXES], is displayed:
$ SET DEFAULT [JONES.TAXES] $ TYPE BILLING.DAT |
Note that the operating system allows you to set default to a
nonexistent disk or directory. If you have set default to a nonexistent
directory, when you try to manipulate a file, the system displays a
message stating that the directory does not exist. If you find yourself
in a nonexistent disk or directory and cannot carry out a desired
operation, set default to an existing disk or directory.
5.3.2 SHOW DEFAULT Command
To display your current default directory, enter the command SHOW DEFAULT, as shown in the following example:
$ SHOW DEFAULT DISK1:[JONES.TAXES] $ SET DEFAULT [PUBLIC] $ SHOW DEFAULT DISK1:[PUBLIC] |
You can use the SET DEFAULT command to change the default device. The default remains in effect until you enter another SET DEFAULT command or log out. You can also specify the device to which you want to set default without including the directory in the command.
The following example shows how to change the default device:
$ SHOW DEFAULT DISK1:[JONES] $ SET DEFAULT DISK2:[GROUP] $ SHOW DEFAULT DISK2:[GROUP] |
In the following example, the directory [JONES] is assumed and exists on DISK1 and DISK2:
$ SHOW DEFAULT DISK1:[JONES] $ SET DEFAULT DISK2: $ SHOW DEFAULT DISK2:[JONES] |
If you enter a list of files and do not give a complete file specification for each file in the list, the system applies temporary defaults for node names, device names, and directory names. To substitute your current default directory for a temporary default, use empty square brackets. If you include a node name in a file that appears in a list, you can override the temporary default by using a double colon.
In the following example, A.LIS and B.LIS are copied from the [STATS] directory to the [RESULTS] directory:
$ COPY [STATS]A.LIS,B.LIS [RESULTS] |
Note that the system uses the preceding file specification in the list, [STATS]A.LIS, to determine that the temporary default directory for file B.LIS is [STATS] as well.
In the following example, a temporary default device and two different directories are used:
$ COPY BASE:[STATS]A.LIS,[TIME]B.LIS,C.LIS [RESULTS] |
All three files (A.LIS, B.LIS, and C.LIS) are copied from the BASE device. The A.LIS file is copied from the [STATS] directory. The other two files are copied from the [TIME] directory.
In the following example, the current default directory is [BETA]. This command copies [ALPHA]TEST.DAT and [BETA]FINAL.DAT to the [RESULTS] directory:
$ COPY [ALPHA]TEST.DAT,[]FINAL.DAT [RESULTS] |
You cannot completely protect a file without applying at least the same protection to the directory in which the file resides. For example, if you deny a user all access to a file but allow that user read access to the file's directory, the user cannot access the contents of the file but can see that it exists. Conversely, a user allowed access to a file and denied access to the file's directory (or one of the parent directories) cannot see that the file exists.
To protect private files, directory protection alone is not adequate. You must also protect each file within the directory. |
By default, top-level directories receive UIC-based protection (S:RWE,O:RWE,G:RE,W:E) and no ACL. Subdirectories receive UIC-based protection from the parent directory. For more information on protection codes, see Section 19.3.
To specify UIC-based protection explicitly when creating a directory, use the /PROTECTION qualifier with the CREATE/DIRECTORY command. You cannot specify an ACL for the directory until the directory is created. To change the UIC-based protection of an existing directory, apply the SET SECURITY/PROTECTION command to the directory file.
You can limit but not prohibit directory access by specifying execute
access but not read access. Execute access on a directory permits you
to examine and read files that you know are contained in the directory;
that means you can examine a file if you already know what the file
specification is, but you cannot display a list of the files in the
directory. For additional security information, see OpenVMS Guide to System Security.
5.5 Using Wildcards to Search the Directory Structure
From any point in a directory structure, you can refer to another directory or subdirectory in the structure. Do this by specifically naming the directory or subdirectory you want or by using the ellipsis (...) and hyphen (-) wildcard characters. For additional information about wildcards, see Section 4.2.
If you are working in an environment with Extended File Specifications,
refer to the OpenVMS Guide to Extended File Specifications for further information about searching
directory structures with wildcards.
5.5.1 Ellipsis Wildcard Character
Use the ellipsis (...) wildcard character to search down into the directory hierarchy. To search the current directory and all the subdirectories below it, use the ellipsis by itself as shown:
$ DIRECTORY [...] |
If you begin the directory specification with an ellipsis, the search begins from your current directory. However, if you begin the directory specification with a period, only the subdirectory that is one level lower than the current directory is searched.
To search all top-level directories and their subdirectories from wherever you are in the directory structure, use an asterisk (*) followed by an ellipsis (...).
In the following example, assuming the current directory is [JONES], the latest versions of all files named FEES.DAT in [JONES] and all subdirectories under [JONES] will be displayed:
$ TYPE [JONES...]FEES.DAT |
In the following example, assuming the current default directory is [JONES], all subdirectories that end in .SALES are searched, and the latest versions of the file FEDERAL.LIS are displayed:
$ TYPE [...SALES]FEDERAL.LIS |
In the following example, the latest versions of all files named DEPT.DAT in [JONES] and all subdirectories under [JONES] are displayed:
$ TYPE [...]DEPT.DAT |
In the following example, assuming the current directory is [JONES], the [.LICENSES] subdirectory will be searched for the file MAILING.LIS, but [JONES.LICENSES.MARRIAGE] will not:
$ TYPE [.LICENSES]MAILING.LIS |
In the following example, assuming the current directory is [JONES], the latest versions of all files named DEPT.DAT in the [.LICENSES] subdirectory under [JONES] and all subdirectories under the [.LICENSES] subdirectory are displayed:
$ TYPE [...LICENSES...]DEPT.DAT |
In the following example, as many as eight levels of directory names (the top-level directory and seven subdirectories) are searched (if they exist). Note that the command shown requires READALL privilege.
$ DIRECTORY [*...] |
Hyphen characters are used as an abbreviated way to specify [sub-]directories above the current process default directory. Each hyphen represents one level. Hyphens can be followed by subdirectory names (with separating periods) to specify other paths down the directory hierarchy.
If you enter so many hyphens that the reference points above the top-level directory, the system displays an error message.
In the following example, the current process default directory is [JONES.LICENSES]. The following command displays the latest version of STAFF.DIS in [JONES]:
$ TYPE [-]STAFF.DIS |
In the following example, the current directory is [JONES.LICENSES]. The command shown displays the latest version of BILLING.DAT in [JONES.TAXES]:
$ TYPE [-.TAXES]BILLING.DAT |
In the following example, the command shown changes the process default directory to one that is two levels above the current level in the directory hierarchy.
$ SET DEFAULT [--] |
On OpenVMS Version 7.2 Alpha or later with ODS-5 disks, file names and subdirectory names can consist solely of hyphens. To distinguish between a (sub-)directory whose name consists of hyphens and a relative specification, the former must be specified with at least one RMS escape character (^). The following specification refers to the directory three levels above the current process default.
[---] |
The following specification refers to the directory (UFD) "---":
[^---] |
Although this chapter focuses on how to use named directories, you can also specify directory names in UIC format. In UIC format, a 2-part octal number forms a user identification code (UIC) that refers to a user file directory (UFD). Almost every DCL command that accepts a file specification can recognize directory names in UIC format. In general, you do not need to use this format unless you are working with a real-time Resource Sharing Executive (RSX) operating system.
A UIC directory specification has the following format:
|
[group,member] |
For example, [122,1] is a UIC directory specification representing member 1 in group 122. Directory names in UIC format generally, but not necessarily, correspond to the UIC of the owner of the directory.
When you refer to a UIC directory, observe the following rules:
It is also possible to use the asterisk (*) wildcard to specify a UIC
directory. For example, [*,6] indicates all directories with any group
number and a member number of 6. The search is limited to directories
in UIC format. The directory specification [*,*] locates all
directories in UIC format. To locate all named directories as well as
all directories in UIC format, use [*].
5.6.2 Translating to Named from UIC Format
Note that you can translate a directory name in UIC format to named format. If necessary, add zeros to the left of the group and member numbers to create a 6-character name.
You cannot combine UIC format and named format. If you have a directory with a name in UIC format and you want to specify one of its subdirectories, translate the UIC format to named format.
The named equivalent of the UIC directory specification [122,1] is as follows:
[122001] |
To refer to the subdirectory [122,1]SUB.DIR, use the named directory [122001.SUB].
| Previous | Next | Contents | Index |
|
|
| privacy and legal statement | ||
| 6489PRO_010.HTML | ||