![[Compaq]](../../images/compaq.gif)
![[Go to the documentation home page]](../../images/buttons/bn_site_home.gif)
![[How to order documentation]](../../images/buttons/bn_order_docs.gif)
![[Help on this site]](../../images/buttons/bn_site_help.gif)
![[How to contact us]](../../images/buttons/bn_comments.gif)
![[OpenVMS documentation]](../../images/ovmsdoc_sec_head.gif)
| Document revision date: 19 July 1999 | |
|
|
|
|
|
|
| Previous | Contents | Index |
Network security should promote interoperability and uniform security approaches throughout networks. The following list shows three major areas of network security:
OpenVMS Cluster system managers should also ensure consistency in the
use of DECnet software for intracluster communication.
5.8.1 Mechanisms
Depending on the level of network security required, you might also want to consider how other security mechanisms, such as protocol encryption and decryption, can promote additional security protection across the cluster.
Reference: See the OpenVMS Guide to System Security and the DECnet for OpenVMS Networking Manual
to understand security for DECnet nodes, including how to set up a
common proxy database (NETPROXY) that allows users on a remote node in
a network to access data by way of a local account on your system.
5.9 Coordinating System Files
Follow these guidelines to coordinate system files:
| IF you are setting up... | THEN follow the procedures in... |
|---|---|
| A common-environment OpenVMS Cluster that consists of newly installed systems | OpenVMS System Manager's Manual to build these files. Because the files on new operating systems are empty except for the Digital-supplied accounts, very little coordination is necessary. |
| An OpenVMS Cluster that will combine one or more computers that have been running with computer-specific files | Appendix B to create common copies of the files from the computer-specific files. |
In a common-environment cluster with one common system disk, you use a common copy of each system file and place the files in the SYS$COMMON:[SYSEXE] directory on the common system disk or on a disk that is mounted by all cluster nodes. No further action is required.
To prepare a common user environment for an OpenVMS Cluster system that includes more than one common VAX system disk or more than one common Alpha system disk, you must coordinate the system files on those disks.
Rules: The following rules apply to the procedures described in Table 5-4:
| Step | Action |
|---|---|
| 1 | Decide where to locate the SYSUAF.DAT and NETPROXY.DAT files. In a cluster with multiple system disks, system management is much easier if the common system files are located on a single disk that is not a system disk. |
| 2 | Copy SYS$SYSTEM:SYSUAF.DAT and SYS$SYSTEM:NETPROXY.DAT to a location other than the system disk. |
| 3 | Copy SYS$SYSTEM:RIGHTSLIST.DAT and SYS$SYSTEM:VMSMAIL_PROFILE.DATA to the same directory in which SYSUAF.DAT and NETPROXY.DAT reside. |
| 4 |
Edit the file SYS$COMMON:[SYSMGR]SYLOGICALS.COM
on each system disk and define logical names that specify the
location of the cluster common files.
Example: If the files will be located on $1$DJA16,
define logical names as follows:
|
| 5 |
To ensure that the system disks are mounted correctly with each reboot,
follow these steps:
$ @SYS$SYSDEVICE:[VMS$COMMON.SYSMGR]CLU_MOUNT_DISK.COM - |
| 6 |
When you are ready to start the queuing system, be sure you have moved
the queue and journal files to a cluster-available disk. Any cluster
common disk is a good choice if the disk has sufficient space.
Enter the following command:
|
In OpenVMS Cluster systems on the LAN and in mixed-interconnect clusters, you must also coordinate the SYS$MANAGER:NETNODE_UPDATE.COM file, which is a file that contains all essential network configuration data for satellites. NETNODE_UPDATE.COM is updated each time you add or remove a satellite or change its Ethernet or FDDI hardware address. This file is discussed more thoroughly in Section 10.4.2.
In OpenVMS Cluster systems configured with DECnet for OpenVMS software, you must also coordinate NETNODE_REMOTE.DAT, which is the remote node network database.
Reference: This database is described thoroughly in
the DECnet for OpenVMS Networking Manual. Updating the database using the SYSMAN utility is
described in Section 8.6.4 in this manual.
5.10 System Time on the Cluster
When a computer joins the cluster, the cluster attempts to set the joining computer's system time to the current time on the cluster. Although it is likely that the system time will be similar on each cluster computer, there is no assurance that the time will be set. Also, no attempt is made to ensure that the system times remain similar throughout the cluster. (For example, there is no protection against different computers having different clock rates.)
An OpenVMS Cluster system spanning multiple time zones must use a
single, clusterwide common time on all nodes. Use of a common time
ensures timestamp consistency (for example, between applications,
file-system instances) across the OpenVMS Cluster members.
5.10.1 Setting System Time
Use the SYSMAN command CONFIGURATION SET TIME to set the time across the cluster. This command issues warnings if the time on all nodes cannot be set within certain limits. Refer to the OpenVMS System Manager's Manual for information about the SET TIME command.
One of the most important features of OpenVMS Cluster systems is the ability to provide access to devices and files across multiple systems.
In a traditional computing environment, a single system is directly attached to its storage subsystems. Even though the system may be networked with other systems, when the system is shut down, no other system on the network has access to its disks or any other devices attached to the system.
In an OpenVMS Cluster system, disks and tapes can be made accessible to
one or more members. So, if one computer shuts down, the remaining
computers still have access to the devices.
6.1 Data File Sharing
Cluster-accessible devices play a key role in OpenVMS Clusters because, when you place data files or applications on a cluster-accessible device, computers can share a single copy of each common file. Data sharing is possible between VAX computers, between Alpha computers, and between VAX and Alpha computers.
In addition, multiple systems (VAX and Alpha) can write to a shared disk file simultaneously. It is this ability that allows multiple systems in an OpenVMS Cluster to share a single system disk; multiple systems can boot off of the same system disk and share operating system files and utilities to save disk space and simplify system management.
Note: Tapes do not allow multiple systems to access a
tape file simultaneously.
6.1.1 Access Methods
Depending on your business needs, you may want to restrict access to a particular device to the users on the computer that are directly connected (local) to the device. Alternatively, you may decide to set up a disk or tape as a served device so that any user on any OpenVMS Cluster computer can allocate and use it.
Table 6-1 describes the various access methods.
| Method | Device Access | Comments | Illustrated in |
|---|---|---|---|
| Local | Restricted to the computer that is directly connected to the device. | Can be set up to be served to other systems. | Figure 6-3 |
| Dual ported | Using either of two physical ports, each of which can be connected to separate controllers. A dual-ported disk can survive the failure of a single controller by failing over to the other controller. | As long as one of the controllers is available, the device is accessible by all systems in the cluster. | Figure 6-1 |
| Shared | Through a shared interconnect to multiple systems. | Can be set up to be served to systems that are not on the shared interconnect. | Figure 6-2 |
| Served | Through a computer that has the MSCP or TMSCP server software loaded. | MSCP and TMSCP serving are discussed in Section 6.3. | Figures 6-2 and 6-3 |
| Dual pathed | Possible through more than one path. | If one path fails, the device is accessed over the other path. Requires the use of allocation classes (described in Section 6.2.1 to provide a unique, path-independent name.) | Figure 6-2 |
| Note: The path to an individual disk may appear to be local from some nodes and served from others. | |||
When storage subsystems are connected directly to a specific system, the availability of the subsystem is lower due to the reliance on the host system. To increase the availability of these configurations, OpenVMS Cluster systems support dual porting, dual pathing, and MSCP and TMSCP serving.
Figure 6-1 shows a dual-ported configuration, in which the disks have independent connections to two separate computers. As long as one of the computers is available, the disk is accessible by the other systems in the cluster.
Figure 6-1 Dual-Ported Disks
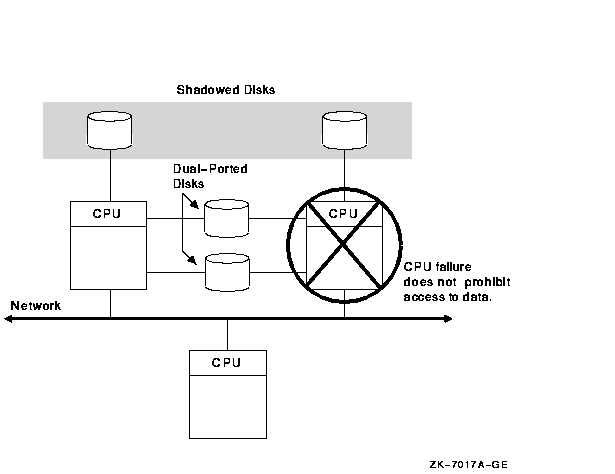
Note: Disks can also be shadowed using Volume Shadowing for OpenVMS. The automatic recovery from system failure provided by dual porting and shadowing is transparent to users and does not require any operator intervention.
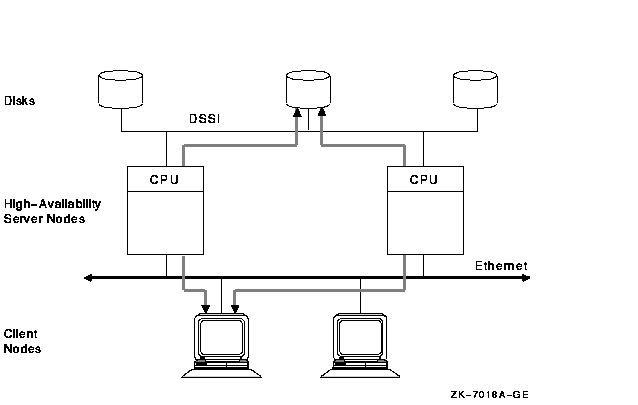
In Figure 6-2, the dotted lines indicate the paths in this dual-pathed DSSI and Ethernet configuration. The disk devices, accessible through a shared DSSI interconnect, are MSCP served to the client nodes on the Ethernet.
Figure 6-2 Dual-Pathed Disks
Dual-pathed disks or tapes can be failed over between two computers that serve the devices to the cluster, provided that:
Caution: Failure to observe these requirements can endanger data integrity.
You can set up HSC or HSJ storage devices to be dual ported between two storage subsystems, as shown in Figure 6-3.
Figure 6-3 Configuration with Cluster-Accessible Devices
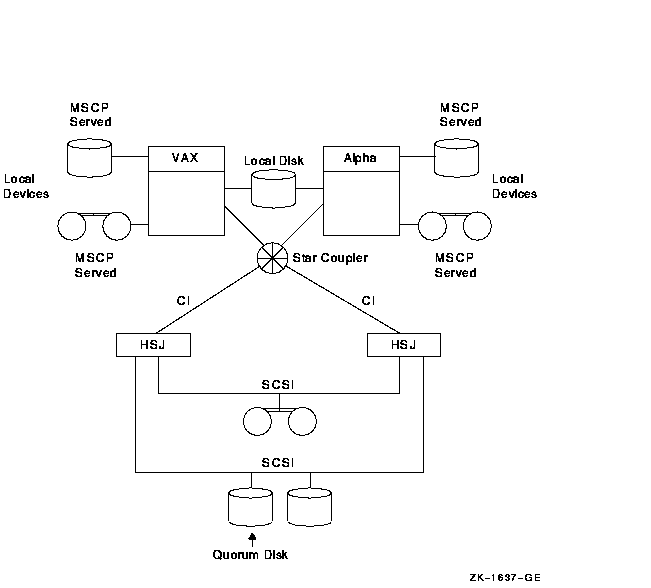
By design, HSC and HSJ disks and tapes are directly accessible by all OpenVMS Cluster nodes that are connected to the same star coupler. Therefore, if the devices are dual ported, they are automatically dual pathed. Computers connected by CI can access a dual-ported HSC or HSJ device by way of a path through either subsystem connected to the device. If one subsystem fails, access fails over to the other subsystem.
Note: To control the path that is taken during
failover, you can specify a preferred path to force access to disks
over a specific path. Section 6.1.3 describes the preferred-path
capability.
6.1.3 Specifying a Preferred Path
The operating system supports specifying a preferred path for DSA disks, including RA series disks and disks that are accessed through the MSCP server. (This function is not available for tapes.) If a preferred path is specified for a disk, the MSCP disk class drivers use that path:
In addition, you can initiate failover of a mounted disk to force the disk to the preferred path or to use load-balancing information for disks accessed by MSCP servers.
You can specify the preferred path by using the SET PREFERRED_PATH DCL command or by using the $QIO function (IO$_SETPRFPATH), with the P1 parameter containing the address of a counted ASCII string (.ASCIC). This string is the node name of the HSC or HSJ, or of the OpenVMS system that is to be the preferred path.
Rule: The node name must match an existing node running the MSCP server that is known to the local node.
Reference: For more information about the use of the SET PREFERRED_PATH DCL command, refer to the OpenVMS DCL Dictionary: N--Z.
For more information about the use of the IO$_SETPRFPATH function,
refer to the OpenVMS I/O User's Reference Manual.
6.2 Naming OpenVMS Cluster Storage Devices
In the OpenVMS operating system, a device name takes the form of ddcu, where:
For CI or DSSI devices, the controller designation is always the letter A; and the unit number is selected by the system manager.
For SCSI devices, the controller letter is assigned by OpenVMS, based on the system configuration. The unit number is determined by the SCSI bus ID and the logical unit number (LUN) of the device.
Because device names must be unique in an OpenVMS Cluster, and because every cluster member must use the same name for the same device, OpenVMS adds a prefix to the device name, as follows:
node$ddcu |
$allocation-class$ddcu |
The purpose of allocation classes is to provide unique and unchanging device names. The device name is used by the OpenVMS Cluster distributed lock manager in conjunction with OpenVMS facilities (such as RMS and the XQP) to uniquely identify shared devices, files, and data.
Allocation classes are required in OpenVMS Cluster configurations where storage devices are accessible through multiple paths. Without the use of allocation classes, device names that relied on node names would change as access paths to the devices change.
Prior to OpenVMS Version 7.1, only one type of allocation class existed, which was node based. It was named allocation class. OpenVMS Version 7.1 introduced a second type, port allocation class, which is specific to a single SCSI interconnect and is assigned to all devices attached to the SCSI interconnect. (Port allocation classes can only be used with SCSI interconnects.) To differentiate between the node-based allocation class and the new port allocation class, the term node allocation class is now assigned to the earlier type.
All nodes that have direct access to the same multipathed device must use the same nonzero value for the node allocation class. Multipathed MSCP controllers also have an allocation class parameter, which is set to match that of the connected nodes. (If the allocation class does not match, the devices attached to the nodes cannot be served.)
The use of port allocation classes is optional. They are designed to
solve the device-naming and configuration conflicts that can occur in a
large OpenVMS Cluster that includes multiple hosts sharing a SCSI
interconnect and multiple SCSI disks.
6.2.2 Specifying Node Allocation Classes
A node allocation class can be assigned to computers, HSC or HSJ controllers, and DSSI ISEs. The node allocation class is a numeric value from 1 to 255 that is assigned by the system manager.
The default node allocation class value is 0. A node allocation class value of 0 is appropriate only when serving a local, single-pathed disk. If a node allocation class of 0 is assigned, served devices are named using the node-name$device-name syntax, that is, the device name prefix reverts to the node name.
The following rules apply to specifying node allocation class values:
System managers provide node allocation classes separately for disks and tapes. The node allocation class for disks and the node allocation class for tapes can be different.
The node allocation class names are constructed as follows:
$disk-allocation-class$device-name $tape-allocation-class$device-name |
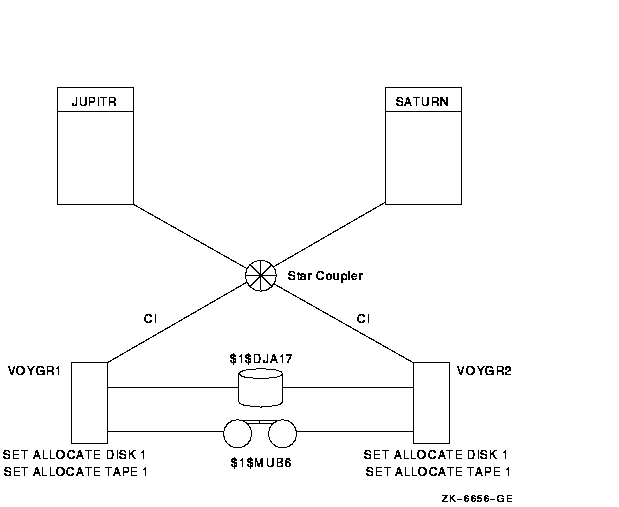
Caution: Failure to set node allocation class values and device unit numbers correctly can endanger data integrity and cause locking conflicts that suspend normal cluster operations. Figure 6-4 shows an example of how cluster device names are specified in a CI configuration.
Figure 6-4 Disk and Tape Dual Pathed Between HSC Controllers
In this configuration:
If one controller with node allocation class 1 is not available, users can gain access to a device specified by that node allocation class through the other controller.
Figure 6-6 builds on Figure 6-4 by including satellite nodes that access devices $1$DUA17 and $1$MUA12 through the JUPITR and NEPTUN computers. In this configuration, the computers JUPITR and NEPTUN require node allocation classes so that the satellite nodes are able to use consistent device names regardless of the access path to the devices.
Note: System management is usually simplified by using the same node allocation class value for all servers, HSC and HSJ subsystems, and DSSI ISEs; you can arbitrarily choose a number between 1 and 255. Note, however, that to change a node allocation class value, you must shut down and reboot the entire cluster (described in Section 8.6). If you use a common node allocation class for computers and controllers, ensure that all devices have unique unit numbers.
| Previous | Next | Contents | Index |
|
|
| privacy and legal statement | ||
| 4477PRO_008.HTML | ||