DIGITAL PATHWORKS for OpenVMS (Advanced
Server)
Server Migration Guide
Chapter 5
Upgrading Your Server Information
5.1 Introduction
This section describes how to upgrade a PATHWORKS LAN Manager server
using the Upgrade utility. There are several different ways to complete
the upgrade. Chapter 3, Changing Server Roles and Domain Names, describes the most common scenarios. In
some cases, you need to modify the existing PATHWORKS LAN Manager
environment before you can run the Upgrade utility, to preserve the
existing database or to avoid a conflict in server roles.
After you have completed the steps described in Chapter 3, Changing Server Roles and Domain Names, you can
use the Upgrade utility as described in the following sections:
5.2 The Order for Upgrading Server Information
The order in which you upgrade servers is important for several reasons:
- When you upgrade a domain with only PATHWORKS LAN Manager servers,
you must upgrade the PDC first.
- When upgrading a BDC, member server, or standalone server, the PDC
in the domain must already be running PATHWORKS Advanced Server or
Windows NT Server software.
Therefore, you must upgrade servers in the following order:
- PDC
- BDC, member server, or standalone server
Note
If your server runs on the license server only, upgrade the license
server before any other server. Refer to the PATHWORKS for OpenVMS
Server Installation and Configuration Guide for more information on installing the standalone license
server.
|
5.2.1 Upgrading OpenVMS Clusters
All nodes in an OpenVMS cluster have the same role: PDC or BDC. OpenVMS
clusters are upgraded in the same manner as other servers. If all the
nodes in the cluster are running PATHOWRKS LAN Manager, they will be
upgraded together. If the cluster is a BDC, then upgrade the PDC first.
You can run the Upgrade utility on any member of the cluster regardless
of whether the PATHWORKS LAN Manager server is running on that node.
However, the node must have access to the PATHWORKS on-disk structure
and the shared resources. You only need to run the Upgrade utility
once. You need not run it on all nodes in the cluster that are running
PATHWORKS LAN Manager.
5.3 How the Upgrade Utility Works
The PATHWORKS Advanced Server kit provides an Upgrade utility that lets
you establish a domain for the server and upgrade server information.
The first time you run the Upgrade utility, the system lets you create
PATHWORKS Advanced Server security account manager (SAM) database files
and identify the domain for the server you are upgrading. See
Appendix A, Files Created by the Upgrade Utility, in this guide.
The Upgrade utility then lets you generate upgrade reports that show
the PATHWORKS LAN Manager server objects that will be upgraded to
PATHWORKS Advanced Server objects. You can then review the reports and
identify and resolve conflicts to ensure a smooth and complete upgrade.
Once the upgrade reports accurately reflect your desired environment,
the Upgrade utility allows you to upgrade objects one at a time or all
at once.
The Upgrade utility creates reports for the following objects:
- Users and Groups --- The User Upgrade report is used as input to
the Group report. Therefore, you must create and edit the user report
prior to the group report. When you upgrade users and groups, the
Upgrade utility takes each user and group from the PATHWORKS LAN
Manager user and groups database, ACCOUNTS.LMX, and moves them into the
PATHWORKS Advanced Server SAM database. The reports are not deleted
after the upgrade is completed. You can create reports, exit the
Upgrade utility, and run Upgrade again to continue.
Note
The upgrade process preserves passwords set with PATHWORKS LAN Manager.
|
When two domains are being merged, if two users have the same
username, you must give one of the users a new username.
- Shares --- The Shares upgrade upgrades PATHWORKS LAN Manager
shares to PATHWORKS Advanced Server shares. When you upgrade shares,
the Upgrade utility takes each share from the PATHWORKS LAN Manager
share database and moves it into the PATHWORKS Advanced Server share
database.
- Miscellaneous (security parameters) --- The miscellaneous option
upgrades security ACLs on devices such as printers and CD-ROM drives,
and the security policy information (password length, age, and so
forth.) You do not need to create a report for Miscellaneous.
- Security (on disk) --- When you upgrade security, the Upgrade
utility reads the PATHWORKS LAN Manager Access Control Lists (ACLs),
creates a security descriptor, and writes it to the Advanced Server
ACL. There are two ways to upgrade security, as described in
Section 5.3.1, About Upgrading Security, in this guide.
5.3.1 About Upgrading Security
Before upgrading security on files, you must upgrade all users and
groups. Otherwise, the security access control entries (ACEs) that
belong to these users and groups will not be upgraded.
There are two ways to upgrade security:
Digital Equipment Corporation recommends that you use the Upgrade utility to upgrade
security on files because this procedure provides greater control and
definition. This allows you to upgrade while the PATHWORKS LAN Manager
server is running. However, if a file is open during the upgrade
process, the file may not be upgraded. You can enable dynamic security
upgrade, to upgrade remaining files dynamically after you complete the
upgrade procedure. Files are upgraded when users make connections to
them. Note that dynamic security upgrade
slows the performance of the server so it is not recommended as a
permanent setting. Dynamic security upgrade is disabled by default. To
enable dynamic security, use the PATHWORKS Configuration Manager. Refer
to the PATHWORKS for OpenVMS (Advanced Server) Server Administrator's Guide for more information about how to
use the Configuration Manager.
The following sections describe the differences between PATHWORKS LAN
Manager and Advanced Server permissions. The PATHWORKS Advanced Server
security upgrade is designed to preserve access to the PATHWORKS LAN
Manager environment. While LAN Manager access can be mapped directly to
the PATHWORKS Advanced Server security model, there are some
differences. These differences are described in the following sections.
5.3.1.1 Administrator Privilege
The PATHWORKS Advanced Server security upgrade process is designed to
preserve the behavior of users with Administrative privilege or their
right to have full access to all files accessible in the PATHWORKS LAN
Manager environment. The Upgrade utility will grant full access to the
ADMIN user and the local Administrators group for any file that has a
PATHWORKS LAN Manager security ACE. By doing so, the access to these
files is preserved.
Note
A user with Administrator privilege may be denied access to some files
after the server had been upgraded if a file has an ACE that explicitly
denies access to the user. With PATHWORKS LAN Manager, this deny-access
ACE is not enforced when the file is accessed by a user with
Administrative privilege.
|
5.3.1.2 Permissions Set on Root Device ACLs
The PATHWORKS Advanced Server security upgrade process does not upgrade
access control information set on the root device directory. If your
environment relies on access control information set on the root
device, you must apply the ACEs to the appropriate directory and file
prior to upgrading security.
5.3.1.3 Permissions Set on Object's Parent ACLs
The PATHWORKS Advanced Server security upgrade process upgrades all
security ACLs on an object. However the access control information set
on the parent directory is not propagated to the object with the
upgrade. Users may lose access to files they had access to when running
PATHWORKS LAN Manager.
With PATHWORKS Advanced Server, the object's parent directory is
checked:
- when the object does not have an access control list
- to ensure no explicit deny access entry is specified
5.3.1.4 Deny-Access ACEs
The PATHWORKS Advanced Server security upgrade process does not upgrade
a group deny-all ACE. With PATHWORKS LAN Manager, if a user was denied
access through a deny-all ACE, the user may gain access to a file if
another ACE in the ACL grants access. With PATHWORKS Advanced Server,
access is denied when any deny ACE is found.
If you used a deny-all ACE to control access to resources in PATHWORKS
LAN Manager, you must reapply these ACEs to individual objects.
5.3.1.5 Full Access and Child Delete Permissions
With PATHWORKS LAN Manager, if a user has full access to a directory,
and has no access to a file in the directory, the user cannot delete
this file. With PATHWORKS Advanced Server, a user with full access to
the directory also is granted a new access right called Child-delete.
This new access right allows the user to delete any file in the
directory and disregards the access setting on the file.
5.3.1.6 Change Attribute (A) and Create (C) Permission Bits
The PATHWORKS Advanced Server security upgrade process does not upgrade
the PATHWORKS LAN Manager "Change Attribute" (A) permission.
Any Change Attribute operation will be successful regardless of the
file or directory permissions.
The PATHWORKS Advanced Server security upgrade process upgrades the
PATHWORKS LAN Manager Create (C) permission to the PATHWORKS Advanced
Server Write permission. If you use Create permission to control access
to a directory, be sure to check these resources after the upgrade, to
ensure that the new permission does not cause a security problem.
5.3.1.7 Printer permission "C" and "P"
The PATHWORKS Advanced Server security upgrade will upgrade printer
permissions as shown in the following table.
| LAN Manager |
PATHWORKS Advanced Server Equivalent |
Description/Differences |
|
C=Y (Yes)
|
Print
|
User can access and send jobs to the printer queue.
|
|
C=N (No)
|
None
|
User cannot access or send jobs to the printer queue.
|
|
None
|
Manage Documents
|
User can control settings for print queues and pause, resume, restart,
and delete print jobs; applies only to PATHWORKS Advanced Server
|
|
P (Yes+Change Permissions)
|
Full
|
Users can access and send jobs to the printer queue; manage print jobs;
control settings for, set access permissions for, and change properties
of the printer queue.
|
5.4 Navigating the Upgrade Utility
The following table describes how to navigate with the Upgrade utility.
You can use either the keyboard or the mouse.
Table 5-1 Navigating the Upgrade Utility
| To do this.... |
Select... |
|
Select an option
|
Do one of the following:
- Select the option with the mouse.
- Use the Tab or arrow keys to highlight the option, and press the
space bar to select it.
- Press an accelerator key.
|
|
Move between options
|
Use the Tab or arrow keys.
|
|
Enter information in a field
|
Do one of the following:
- Select the field and type the information.
- Move to the field using the Tab or arrow keys and type the
information.
|
|
Advance to the next screen
|
Select the Continue Button and press Enter or Return.
|
|
Return to the previous screen
|
Select the Back Button and press Enter or Return.
|
|
Exit from the Upgrade utility
|
Select the Exit Button and press Enter or Return.
|
|
Get information about the utility
|
Select the Help Button and press Enter or Return.
|
5.5 Upgrading a Primary Domain Controller
This table lists the steps for upgrading a Primary Domain Controller
(PDC).
The sections following this table describe each step in detail.
5.5.1 Start the Upgrade Utility
Install the Upgrade utility, as described in Chapter 4, Installing the Upgrade Utility, in this
guide.
Then, start the Upgrade utility as follows:
- From the OpenVMS account, change the default directory to
SYS$UPDATE:
- At the system prompt, enter:
The system then displays transport messages and prompts you for the
role of the server you are upgrading. For example:
Will this server be upgraded as a BDC? [no]
|
- Enter No or press Return if you are upgrading the PDC. The
destination may be either a PDC or a BDC.
If you are upgrading a
BDC, member server, or standalone server, refer to Section 5.6, Upgrading a Backup Domain Controller, Member Server, or Standalone Server, in
this guide.
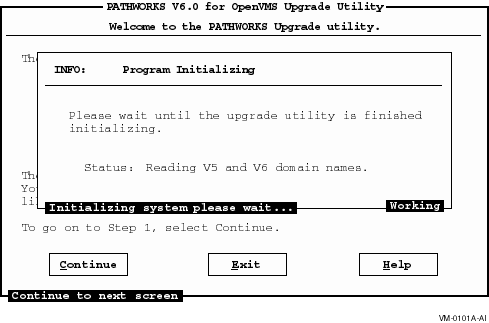
The system displays the Program Initialization Dialog
Box as shown in the following figure.
Figure 5-1 Program Initialization Dialog Box
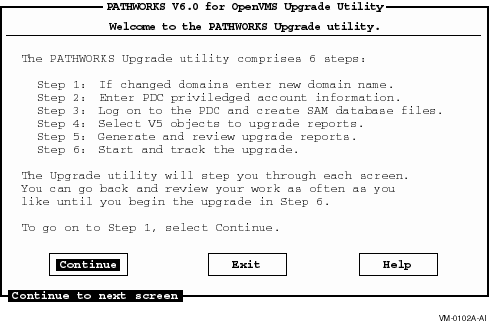
When the program finishes initializing, the Upgrade utility
displays the Main screen as shown in the following figure.
Figure 5-2 Main Screen
- Select the Continue button to go to the Domain Information screen.
5.5.2 Step 1: Enter Domain Information (Optional)
If you are not changing domains, select the Continue button to advance
to the Primary Domain Controller Information screen.
The Domain Information screen allows you to change the domains.
To change the domain information, follow these steps:
- From the Main screen, select the Continue button. The Upgrade
utility displays the Domain Information screen as shown in the
following figure.
Figure 5-3 Domain Information Screen
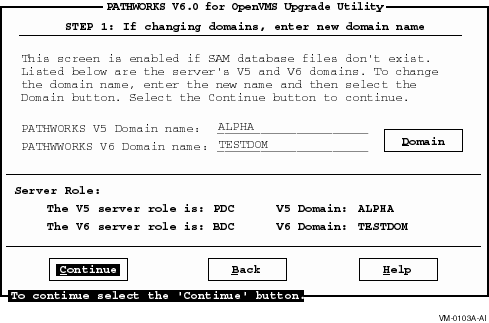
- Enter the domain name for the PATHWORKS LAN Manager Server after
PATHWORKS V5 Domain Name.
- Enter the domain name for the PATHWORKS Advanced Server after
PATHWORKS V6 Domain Name.
- Select Continue to advance to the Primary Domain Controller
Information screen. Or, if you are changing domains, select the Domain
button.
- The system prompts you to confirm the domain name.
- Select OK to confirm the name change and the system returns you to
the Domain Information screen.
- Select the Continue button to advance to the next screen.
5.5.3 Step 2: Enter PDC Information
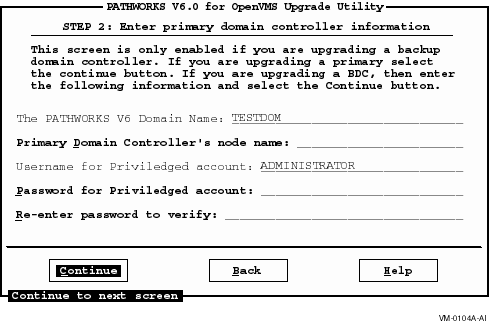
If you are upgrading a BDC, the Primary Domain Controller Information
screen allows you to enter PDC information, as shown in the following
figure.
If you are upgrading a PDC, this screen is disabled.
Figure 5-4 Primary Domain Controller Information Screen
Select the Continue button to proceed to Section 5.5.4, Step 3: Log On to the PDC and Create SAM Database Files.
5.5.4 Step 3: Log On to the PDC and Create SAM Database Files
The Log On to PDC and Create SAM Database Files screen allows you to
create SAM database files. To create the SAM database files, follow
these steps:
- From the Primary Domain Controller information screen, select the
Continue button. The system displays the Log on to PDC and Create SAM
Database Files screen shown in the following figure.
Figure 5-5 Log On to the PDC and Create Database Files
Screen
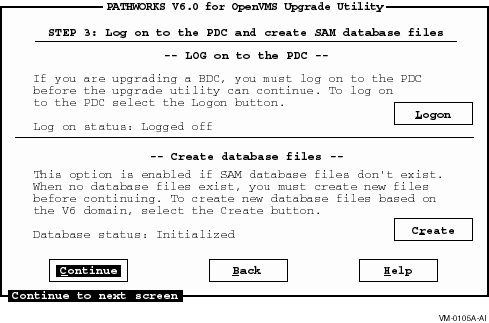
- Select the Create button to create the SAM database files. The
system displays the Program Initialization dialog box and creates and
initializes the database files. (You only need to do this once.)
Now you are ready to upgrade users, groups, and other server upgrade
objects. Begin by creating upgrade reports on each object and resolving
conflicts in the upgrade reports.
5.5.5 Step 4: Select Objects to Upgrade
To select objects to upgrade, follow these steps:
- From the Log On to PDC and Create SAM Database Files screen,
select the Continue button. The Upgrade utility displays the Select V5
Objects to Upgrade screen as shown in the following figure.
Figure 5-6 Select V5 Objects to Upgrade Screen
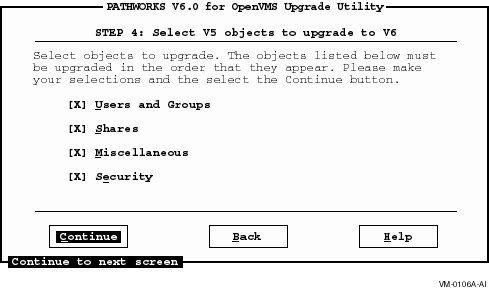
- Select the check boxes next to the objects that you want to
upgrade. You can upgrade them one at a time or all at once.
- Select the Continue button to advance to the next screen.
Note
The Miscellaneous option refers to security parameters, such as
password length or age, and security on devices, such as printers and
CD-ROM drives. These settings are upgraded when you start the upgrade
if you selected the Miscellaneous option. You do not need to create an
upgrade report for the miscellaneous option.
|
5.5.6 Step 5: Create and Edit Upgrade Reports for Selected Objects
This section describes how to create and edit upgrade reports for
selected objects including:
- Users and groups
- Shares
- Security
5.5.6.1 Create and Edit the User Report
To create and edit the User Upgrade report, follow these steps:
- Select Users and Groups on the Select V5 Objects to Upgrade to V6
screen.
- Select the Continue button. The Upgrade utility displays the
Generate Upgrade Reports screen as shown in the following figure.
Figure 5-7 Generate Upgrade Reports Screen
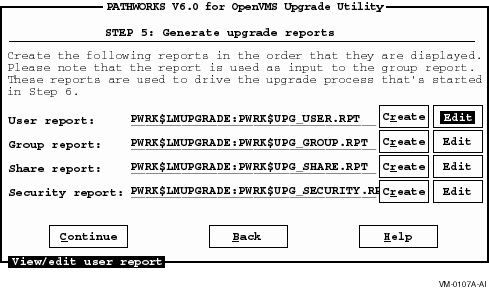
- Select the Create button next to User report. The Upgrade utility
creates the User report.
- Select the Edit button next to User report.
The system prompts
you to select an editor to edit the report as shown in the following
figure.
Figure 5-8 Select a Text Editor Dialog Box
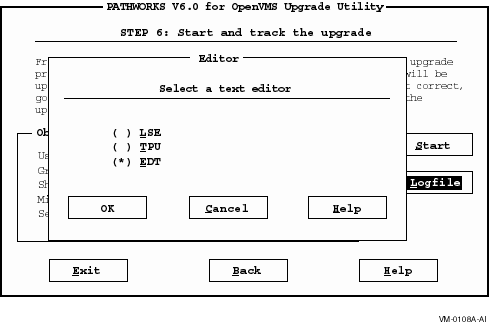
The Select a Text Editor dialog box shows a list of the text
editors available on the system.
- Select the editor you wish to use.
- Select the OK button. The User report is displayed as shown in the
following figure.
Figure 5-9 User Report Screen
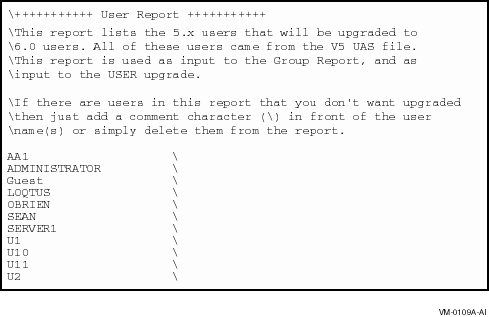
The User report lists the PATHWORKS LAN Manager users that will be
upgraded to PATHWORKS Advanced Server users.
If there are users in the report that you do not want upgraded, type a
backslash (\) in front of the user name or delete the name. Refer to
Appendix B, Resolving Log File Error Messages, in this guide for more information about how to edit
User reports.
Note
The User report is used as input to the Group report; therefore, you
must edit the User report before you create the Group report.
|
After you finish editing the User report, exit the editor and the
system returns you to Step 5: Generate Upgrade Reports screen. Now you
can create and edit the Group report.


