Figure 5-31 Generate Security Report Screen
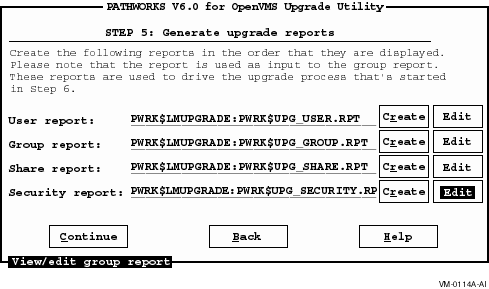
The system displays the Select a Text Editor screen as shown in Figure 5-25. The editor you chose previously is the default editor.
| Previous | Contents | Index |
To create and edit the Security report, follow these steps:
Figure 5-31 Generate Security Report Screen

Figure 5-32 Security Report Screen
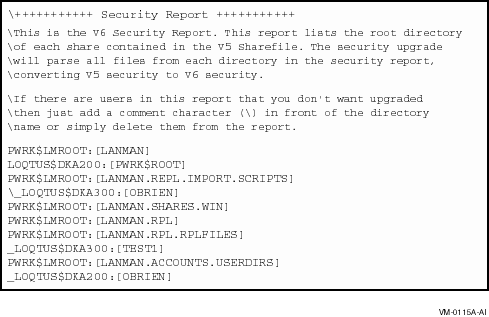
The Security report lists the root directory of each share contained in
the share report. The security upgrade checks all shares from each
directory in the Security report, converting PATHWORKS LAN Manager
security to PATHWORKS Advanced Server security. If there are
directories in the report that you do not want to upgrade, then add a
backslash (\) in front of the directory name, or delete the name from
the report.
5.6.7.4.1 Security Upgrade Restrictions
Note the following security upgrade restrictions:
After you finish editing the report, exit the editor. The system
returns you to the Generate Upgrade Reports screen. Refer to
Appendix B, Resolving Log File Error Messages, in this guide, for information about how to edit the
Security report.
5.6.7.4.2 Upgrading Miscellaneous Components (Security Policy Parameters)
Security policy parameters are system-wide settings, such as password length or password expiration. These settings are upgraded when you start the upgrade if you selected the Miscellaneous option in the Select V5 Objects to Upgrade screen. If you did not select the Miscellaneous option, follow these steps:
The security parameters will be upgraded automatically when you start
the upgrade.
5.6.8 Step 6: Start and Track the Upgrade
When the upgrade reports are accurate, you can start and track the upgrade from the Start and Track the Upgrade screen as shown in the following figure.
Figure 5-33 Start and Track the Upgrade Screen
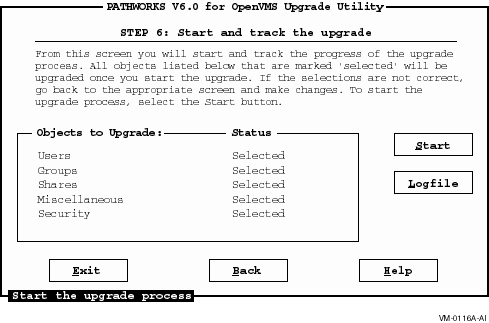
All the objects you selected in the Select V5 Objects to Upgrade screen for the upgrade should be listed 'Selected' on the Start and Track the Upgrade screen.
Follow these steps to upgrade any objects not marked 'Selected' in the Start and Track the Upgrade screen:
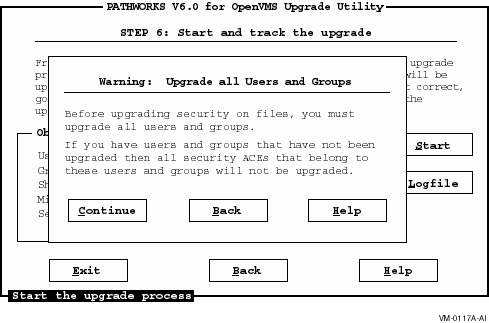
Before you upgrade security on any files, you must upgrade all users and groups. If you have users and groups that have not been upgraded when you upgrade security, the security ACEs that belong to these users and groups will not be upgraded. |
The Upgrade utility displays a warning as shown in the following figure.
Figure 5-34 Security Warning Screen
When you have accurate reports that accurately reflect your desired V6 environment, you can start the upgrade as follows:
Figure 5-35 Start Options Dialog Box
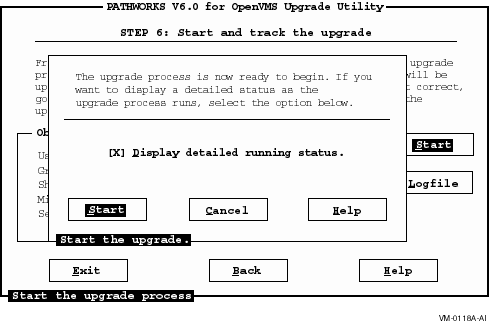
The Start Options Dialog Box allows you to choose the start options shown in the following table:
| To... | Select the... |
|---|---|
| Display a running status of the upgrade | Display detailed running status option. |
| Start the upgrade | Start button. |
| Cancel the upgrade and return to the previous screen, where you can edit the upgrade report | Cancel button or enter Ctrl/Z. |
The Logfile button allows you display error messages logged during the upgrade, as described in the following section. Refer to Section 5.7, Troubleshooting, for more information. |
5.6.8.1 When the Upgrade Completes
When the upgrade is complete, the system displays a message that the
upgrade completed successfully, and displays the status of the upgrade
for each object. Upgrade status messages displayed are shown in the
following table.
| Upgrade Status | Meaning |
|---|---|
| Passed | Upgrade completed without warnings |
| Warnings | Upgrade encountered warnings or errors |
If there are no warnings and the upgrade was successful, you can exit the Upgrade utility. Warnings may be informational, but you should review them before you exit the Upgrade utility.
If the upgrade partially or completely fails, see Section 5.7, Troubleshooting, in
this guide.
5.7 Troubleshooting
This section describes how to troubleshoot:
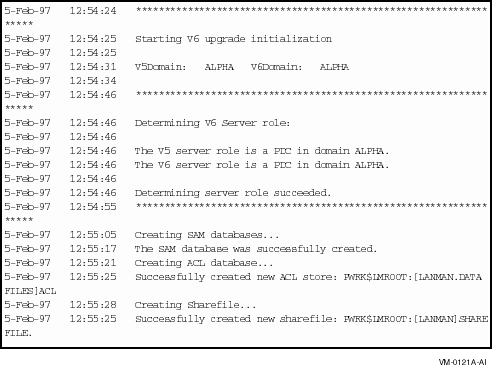
If the upgrade partially or completely fails, the system returns you to the Start and Track the Upgrade screen and prompts you to display the log file. Select the Logfile button to display messages logged during the upgrade. You can also display the log file at the DCL prompt as described in Appendix B, Resolving Log File Error Messages, in this guide.
Figure 5-36 Log File Screen
See Appendix B, Resolving Log File Error Messages, in this guide, for more information on
troubleshooting.
5.7.2 Resolving Problems After the Upgrade
After the upgrade, you may need to repeat the upgrade process if any of the following problems occur:
If you need to repeat the upgrade, delete the PATHWORKS Advanced Server database files created by the Upgrade utility, described in Appendix A, Files Created by the Upgrade Utility.
After you upgrade the PATHWORKS Advanced Server information, you can complete the migration. This section includes the following topics:
When you install the PATHWORKS Advanced Server, it will shut down the
PATHWORKS LAN Manager server and replace PATHWORKS V5 LAN Manager
images with PATHWORKS Advanced Server images. Therefore, you must
schedule downtime on the server prior to installation to avoid an
unexpected interruption of services.
6.3 Before You Install the PATHWORKS Advanced Server Software
PATHWORKS Advanced Server provides a Roll Back procedure that allows you to restore the PATHWORKS LAN Manager server database if the server is not upgraded properly. To enable the Roll Back procedure, you must answer Yes to the following prompt during the VMSINSTAL procedure:
Do you want to preserve the V5 (LAN Manager) environment [Yes]? Yes |
The system will prompt you for a location to store the saveset the procedure will create. The Roll Back procedure needs this saveset to restore the LAN Manager environment.
Refer to the PATHWORKS for OpenVMS Server Installation and Configuration Guide
for more information on the VMSINSTAL procedure.
6.4 Installing and Starting the PATHWORKS Advanced Server Software
After you have upgraded server information, you can install and configure the PATHWORKS Advanced Server software.
Start the PATHWORKS Advanced Server using the
SYS$STARTUP:PWRK$STARTUP.COM
procedure, also described in the PATHWORKS for OpenVMS Server Installation and Configuration Guide.
6.4.1 Starting PDCs
After completing the installation and configuration, make sure you
start the PATHWORKS Advanced Server on the PDC first.
6.4.2 Starting BDCs
After completing the installation and configuration, follow these steps:
NetLogon has detected two machine accounts for server <servername>. The server can be either a Windows NT Server that is a member of the domain or the server can be a LAN Manager server with an account in the SERVERS global group. It cannot be both." |
\\domain\server> MODIFY GROUP SERVERS/REMOVE=DOROTHY |
To set up licensing for the PATHWORKS Advanced Server, follow these steps:
By default, the PATHWORKS license server does not perform license upgrades. To configure a PATHWORKS License Server to upgrade PATHWORKS LAN Manager licenses to PATHWORKS Advanced Server licenses, edit the PATHWORKS license server start-up command file SYS$STARTUP:PWRK$LICENSE_S_START.COM to include the following logical name definition:
$ DEFINE PWRK$LS_V6_ACCESS_UPGRADE 1 |
Define this logical before the following command:
$ RUN SYS$SYSTEM:PWRK$LICENSE_SERVER |
If the PWRK$LS_V6_ACCESS_UPGRADE logical is undefined or defined to be zero (0), the PATHWORKS license server will not upgrade licenses. If the PWRK$LS_V6_ACCESS_UPGRADE logical is defined to be any numeric value other than zero, clients requesting assignment or verification of PATHWORKS LAN Manager licenses will have their licenses upgraded to PATHWORKS Advanced Server licenses, provided sufficient PATHWORKS Advanced Server licenses exist.
When an upgrade operation occurs, the PATHWORKS license server logs both the assignment of the PATHWORKS Advanced Server license and the name of the license returned to the client to the following PATHWORKS license server log file:
PWRK$Logs:PWRK$License_Server_node-name.LOG |
Be aware that when an equivalent PATHWORKS Advanced Server license is returned to the client, the name of the license assigned (PWLMXXXCA06.00) will not match the name of the license returned to the client. For example, if a client requests assignment of a PWLMXXXFP05.00 license (a PATHWORKS LAN Manager license) from the PATHWORKS license server, the PATHWORKS license server will upgrade the request to a PATHWORKS Advanced Server license and assign a PWLMXXXCA06.00 license (assuming one is available). However, the name of the license returned to the client will be PWLMXXXFP06.00.
The reason for this difference is that the client will only accept licenses of the type requested (such as PWLMXXXFPmm.nn) with the requested or higher version number (that is, 05.00 or higher). To get the client to accept an equivalent PATHWORKS Advanced Server license, the PATHWORKS license server returns a different name than that assigned.
From the client's perspective, the license assigned is PWLMXXXFP06.00 and the client will accept that. From the PATHWORKS license server's perspective (as displayed by the PATHWORKS License Manager), the client was assigned a PWLMXXXCA06.00 license. For more information on the names of the licenses returned to clients due to upgrade operations, see the Advanced Server for OpenVMS Guide to Managing Advanced Server Licenses.
After the migration, you should verify that the server is working properly. This section describes how to verify the migration, and includes the following topics:
For more information about how to perform these administrative tasks,
refer to the PATHWORKS for OpenVMS (Advanced Server) Server Administrator's Guide.
7.2 Displaying Domain Servers and Users
To ensure the server is set up in the domain properly, start the server, then use the ADMINISTER commands to display the domain and the users as follows:
$ ADMINISTER LANDOFOZ\\TINMAN> |
LANDOFOZ\\TINMAN> SHOW COMPUTERS

Computers in domain "LANDOFOZ":

Computer           Type                    Description
----------------   --------------------    ------------------
[PD] TINMAN        OpenVMS 3.51 Primary    PATHWORKS V6.0 for
                                           OpenVMS (Advanced
                                           Server)

Total of 1 computer
|
LANDOFOZ\\TINMAN> SHOW USERS

User Name          Full Name       Type    Description
----------------   --------------  ------  ----------------
Administrator                      Global  Built-in account
                                           for administering
                                           the domain

Guest                              Global  Built-in account
                                           for guest access
                                           to the domain

LION                               Global

Total of 3 user accounts
|
LANDOFOZ\\TINMAN> SHOW GROUPS

Groups in domain "LANDOFOZ"

Group Name            Type         Description
-------------------   ------       -----------------------------
Account Operators     Local        Members can administer domain
                                   user and group accounts
Administrators        Local        Members can fully administer
                                   the domain
Backup Operators      Local        Members can bypass file
                                   security to back up files
Domain Admins         Global       Designated administrators of
                                   the domain
Domain Guests         Global       All domain guests
Domain Users          Global       All domain users
Guests                Local        Users granted guest access
                                   to the domain
Print Operators       Local        Members can administer
                                   domain printers
Replicator            Local        Supports file replication in
                                   a domain
Server Operators      Local        Members can administer domain
                                   servers
Users                 Local        Ordinary users
Lion                  Local        Ordinary users

Total of 11 groups
|
LANDOFOZ\\TINMAN> SHOW GROUPS/MEMBERS

Groups in domain "LANDOFOZ":

Group Name            Type     Description
--------------------  ------   -----------------------------
Account Operators     Local    Members can administer domain
                               user and group accounts

    Members: (No members)

Administrators        Local    Members can fully administer the
                               domain

    Members:  [US] Administrator, [GR] Domain Admins

Backup Operators      Local    Members can bypass file security
                               to back up files

    Members: (No members)

Domain Admins         Global   Designated administrators of the
                               domain

    Members: [US] Administrator

Domain Guests         Global   All domain guests

    Members: [US] Guest

Domain Users          Global   All domain users

    Members: [US] Administrator

Guests                Local    Users granted guest access to the
                               domain

    Members: [GR] Domain Guests

Print Operators       Local    Members can administer domain
                               printers

    Members: (No members)

Replicator            Local    Supports file replication in a
                               domain

    Members: (No members)

Server Operators      Local    Members can administer domain
                               servers

    Members: (No members)

Users                 Local    Ordinary users

    Members: [GR] Domain Users

Total of 11 groups
|
LANDOFOZ\\TINMAN> SHOW SHARES

Shared resources on server "LANDOFOZ":

Name                    Type               Description
--------------------    -------------      -----------------------
NETLOGN                 Directory          Logon Scripts Directory
PWUTIL                  Directory          PATHWORKS Client-based
                                           Utilities
USERS                   Directory          Users Directory

Total of 3 shares
|
To add a share or for detailed information on procedures using the ADMINISTER command, refer to the PATHWORKS for OpenVMS (Advanced Server) Server Administrator's Guide.
If you encounter error messages using these commands, refer to the Advanced Server for OpenVMS Commands Reference Manual for information on command syntax.
| Previous | Next | Contents | Index |