![[Compaq]](../../images/compaq.gif)
![[Go to the documentation home page]](../../images/buttons/bn_site_home.gif)
![[How to order documentation]](../../images/buttons/bn_order_docs.gif)
![[Help on this site]](../../images/buttons/bn_site_help.gif)
![[How to contact us]](../../images/buttons/bn_comments.gif)
![[OpenVMS documentation]](../../images/ovmsdoc_sec_head.gif)
| Document revision date: 10 November 2000 | |
![[Compaq]](../../images/compaq.gif) |
![[Go to the documentation home page]](../../images/buttons/bn_site_home.gif)
![[How to order documentation]](../../images/buttons/bn_order_docs.gif)
![[Help on this site]](../../images/buttons/bn_site_help.gif)
![[How to contact us]](../../images/buttons/bn_comments.gif)
|
![[OpenVMS documentation]](../../images/ovmsdoc_sec_head.gif)
|
|
| Previous | Contents | Index |

You can delete mail messages and retrieve deleted messages.
To delete selected messages or the message currently displayed in the Read window, click on the Delete button in the main or Read window.
The index is updated to show which messages have been marked for deletion. Messages are not deleted until the folder is closed. You can still perform many Mail tasks on messages that are marked for deletion, such as moving, copying, and printing. When the folder is closed, the messages are deleted and reference to them is removed.
Once the folder is closed, deleted messages are moved to the WASTEBASKET in the drawer from which the message was deleted.
Deleted messages collect in the WASTEBASKET folder until you empty it. To empty the WASTEBASKET, select the WASTEBASKET or the drawer in which the WASTEBASKET resides, and choose Empty Wastebasket from the main window's Maintenance menu. (An option in your mail profile allows you to specify that the WASTEBASKET be emptied whenever the drawer is closed.) Once the WASTEBASKET is emptied, the deleted messages are irretrievable.
You can also delete entire folders and drawers of messages. See Removing Drawers from the Index and Deleting Folders for more information.
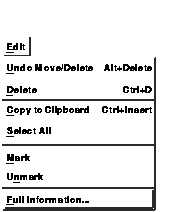
To reverse the delete operation in the main window, before the folder is closed select the messages to be retrieved, pull down the Edit menu, and choose Undo Move/Delete.
To reverse the delete operation in a Read window, press MB3 in the message pane of the deleted message and choose Undo Move/Delete from the pop-up menu.
To update the index of messages to reflect that the messages have been moved to the WASTEBASKET, either select Update Folder from the Maintenance menu in the main window, or reopen the folder that contains the deleted message.
Once you have moved a message to the WASTEBASKET, you can retrieve the message by moving it to another folder. See Moving and Copying Messages to Another Folder for more information about moving messages between folders.
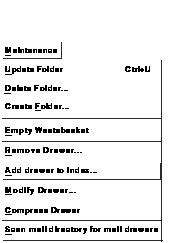
You can add and remove drawers in your index, modify a drawer's file name and display name, create and delete folders, move and copy messages between folders, and reclaim unused space in drawers.
There are two ways to add new drawers to your index. You can add (create) a drawer that does not currently exist, or you can add an existing drawer to the index.
When you create a drawer in DECwindows Mail, the drawer is automatically created in your default mail directory and is listed in your main window. If you create drawers with the OpenVMS Mail utility or if you create drawers in a different directory, they are not automatically added to the list in your main window. To access these drawers, you must add them specifically to the main window.
To add drawers created with the OpenVMS Mail utility in your default mail directory, choose Scan Mail Directory for Mail Drawers from the main window's Maintenance menu. All drawers in your default Mail directory are added to the main window.
To create a new drawer or add a drawer created in a different directory:
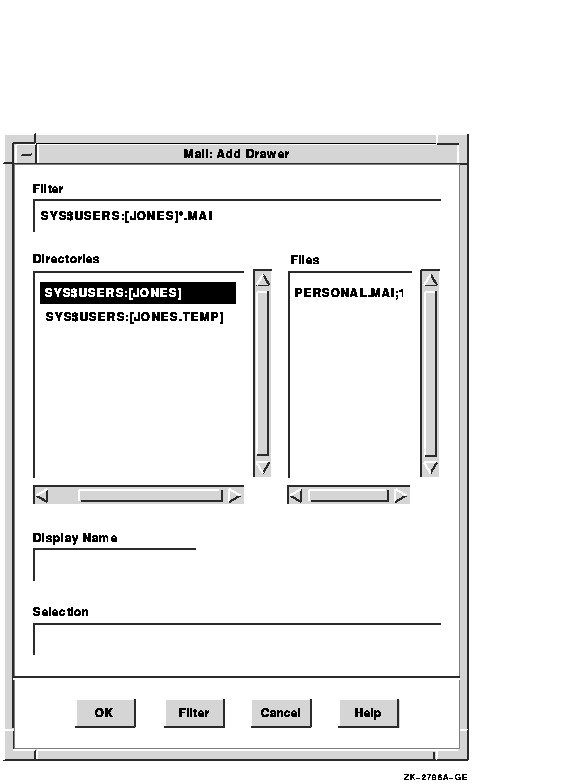
When you add new drawers, a WASTEBASKET is automatically included in each new drawer. You can choose a different name for your folder for deleted mail when you create new drawers by changing your User options. See Modifying Your User Options for more information.
You can enter a new file name or display name, or both, for a mail drawer. You can change the display name for the default MAIL drawer, but you cannot change the file name.
To modify the file name and display name of a drawer:
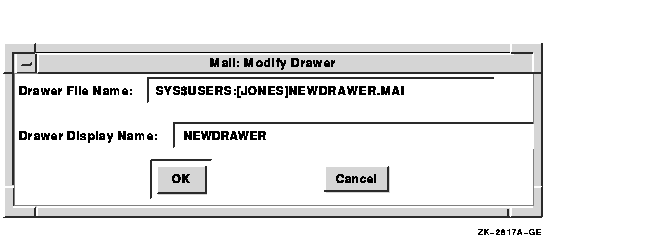
When you no longer need to have a drawer listed in your index, you can eliminate it in one of two ways: you can remove the drawer from the index or you can delete it.
Removing a drawer removes only the drawer's name from the index; the drawer's contents are not affected and the drawer is not deleted. You can retrieve it by choosing Scan Mail Directory for Mail Drawers... or Add Drawer to Index... from the Maintenance menu.
Deleting a drawer removes the drawer's name from the index and deletes the drawer and its contents.
To remove or delete a drawer:
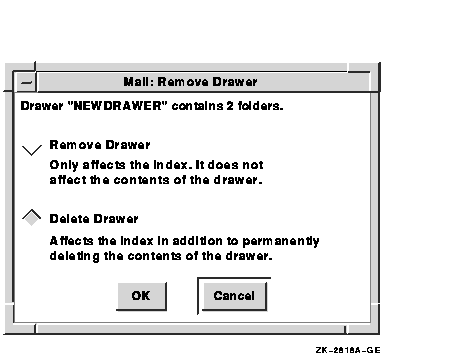
You cannot delete or remove an open drawer or the MAIL drawer.
When you delete a drawer, any folders that existed in the drawer are deleted and the messages in them cannot be retrieved. If you attempt to delete the MAIL drawer, all messages and all folders except INBOX and WASTEBASKET are deleted, but the drawer itself is not deleted.
Choosing Create Folder... allows you to create a new folder in which to store your messages.
To create a new folder:
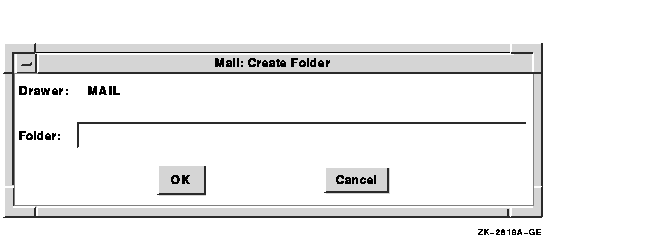
Mail automatically deletes empty folders when the drawer is closed.
You can also create a new folder when you move or copy a message. If you specify a destination drawer or folder that does not exist, the drawer or folder is created.
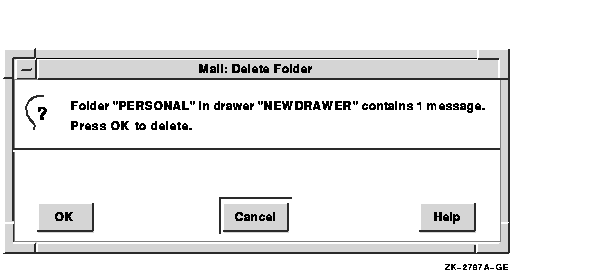
You cannot delete an open folder.
When you delete a folder, any messages that existed in the folder are placed in the WASTEBASKET and can be retrieved until the WASTEBASKET is emptied. If you attempt to delete the INBOX or the WASTEBASKET, all messages in them are deleted but the INBOX and the WASTEBASKET are not deleted.
If you delete all messages in a folder, the folder is automatically deleted when you close the drawer.

You can move or copy a message or group of messages from one folder to a different folder. Moving a message to another folder removes it from the original folder. Copying a message to another folder does not remove it from the original folder.
You can move and copy messages from either the main or the Read window.
To move or copy a selected message or the message currently displayed in the Read window:
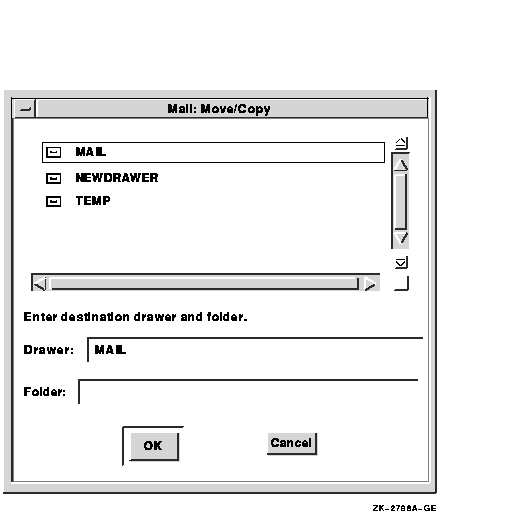
If you are using the Outline style main window, you can also move messages by dragging. You can drag messages within a single window only. Press and hold MB2 on the selected message, and drag MB2 to the folder to which you want to move the message. Release MB2.
You can also move multiple messages at one time. Select the messages by holding the Ctrl key down while clicking MB1 on the messages you choose. Press and hold MB2 on one of the messages, and drag MB2 to the folder to which you want to move the messages. Release MB2.
To reverse the move operation in the main window, select the messages to be retrieved and choose Undo Move/Delete from the main window's Edit menu. You can also reverse the move operation by dragging messages back to their original folders.
To reverse the move operation in a Read window, in the message pane of the moved message, press MB3 and choose Undo Move/Delete from the pop-up menu.
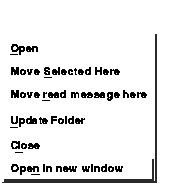
An alternative method for moving messages is to select the messages, point to the destination folder, press MB3, and choose Move Selected Here or Move Read Message Here from the pop-up menu. The read message is the message currently displayed in your default Read window.
Messages are deleted and moved when a folder is closed. If you have deleted or moved several messages from a folder and would like to have your changes take effect without leaving the folder, Mail can automatically close and reopen the folder for you.
To close and reopen a folder, completing all pending delete and move operations, point to the folder name, press MB3, and choose Update Folder from the pop-up menu.
To update several folders at once, select the folders and choose Update Folder from the main window's Maintenance menu.
If you update a folder while you are reading a message from that folder in your default Read window, the window is closed when the folder is closed. The window will not be reopened. (For a description of default Read windows, see Multiple Read Windows.)
When you delete messages and folders, empty space is left in the drawer from which the messages or folders were deleted. To make this space available for reuse, select the drawer to be compressed and choose Compress Drawer from the main window's Maintenance menu.
You cannot compress an open drawer. Close the drawer before choosing Compress Drawer.
When a drawer is compressed, the original (uncompressed) drawer is saved in a file. A message is displayed indicating that this file has been created and showing the name of the file. Once you have used the compressed drawer, the uncompressed file should be deleted. The file cannot be deleted within Mail; you must delete it from FileView.
If you selected multiple drawers, all selected drawers are compressed. Individual messages appear prompting you to delete each uncompressed drawer.
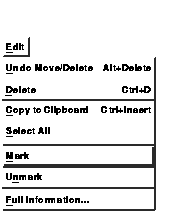
Marking messages allows you to identify messages of particular importance to you. For example, you might mark the messages you want to print at the end of the day, or the messages you want to reread or reply to at another time.
When a message is marked, an asterisk is displayed in the index entry for this message. The message itself is unaffected.
To mark selected messages or the currently displayed message, choose Mark from the main window's or the Read window's Edit menu.
To unmark the currently displayed or selected messages, choose Unmark from the main or Read window's Edit menu.

Mail can search the open or selected folder for messages that have something in common. For example, you could pick messages that were sent by a specific user on a specific day, or messages that contain a specific word in the subject line.
Once it finds messages that meet your criteria, Mail displays a list of these messages. You can then perform tasks such as copying, moving, extracting, or reading on this set of messages.
To pick messages:
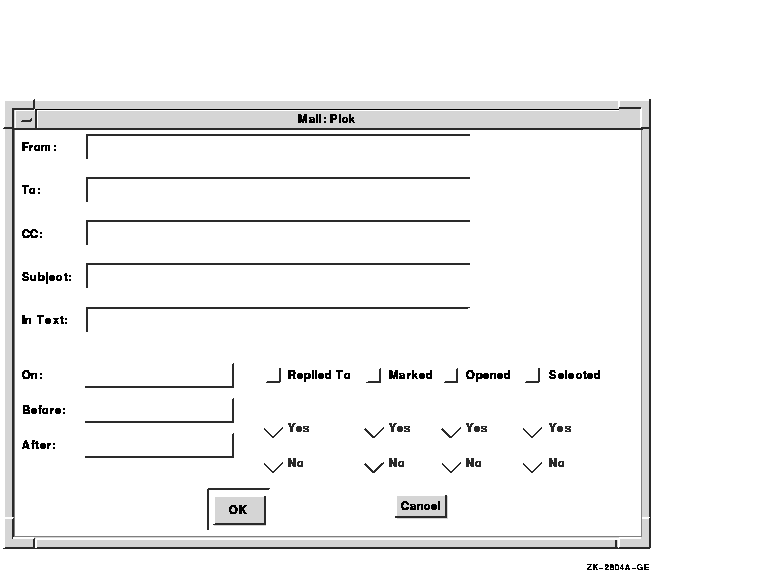
The following table describes the options in the Pick dialog box.
| Option | Description |
|---|---|
| From | The user name of the sender whose messages you want to pick. |
| To | The user name of the addressee (or the name of a distribution list) whose messages you want to pick. |
| CC | The user name of the addressee (or the name of a distribution list) who received courtesy copies of messages you want to pick. |
| Subject | Text included in the subject line of messages you want to pick. |
| In Text | Any text string included in the body of messages you want to pick. |
| On | Messages received on the date you specify. Click MB1 to display the Date dialog box. To specify the day, month, or year, click MB1 on the appropriate box, then click on the up arrow or down arrow to specify the date. Click on the OK button to enter this date in the entry box, or click on the Clear button to clear the date in the entry box. The time is ignored for this option. |
| Before | Messages received before the date and, optionally, the time you specify. Click MB1 to display the date dialog box. See the description of the On option for information about the Date dialog box. The time can be used as a criterion for this option. |
| After | Messages received after the date and, if desired, the time you specify. Click MB1 to display the Date dialog box. See the description of the On option for information about the Date dialog box. The time can be used as a criterion for this option. |
| Replied To | Messages to which you have or have not replied. You activate this option by clicking on Replied To and choosing Yes or No. |
| Marked | Messages that you have or have not marked. You activate this option by clicking on Marked and choosing Yes or No. |
| Opened | Messages that you have or have not read. You activate this option by clicking on Opened and choosing Yes or No. |
| Selected | Messages that you have or have not selected. You activate this option by clicking on Selected and choosing Yes or No. |
When you enter text in any of the first five text entry boxes in the dialog box, Mail searches for matching text anywhere in the corresponding fields of all messages in the open or selected folder.
Searches are not case sensitive. That is, entering the text John in the From entry box might pick messages from Jane Johnson, John Doe, Olav Bejohnesson, and JOHN::Smith.
Once you have picked a set of messages, the message index is updated to list only the picked messages. When the folder is closed, the picking criteria are lost and all messages are again available.
You cannot perform a pick operation if a folder is open in multiple windows and contains messages to be moved or deleted. Close the folder in all additional windows to complete the move or delete operation before performing a pick operation.
The main window's message index lists one line of information about each message. This line contains the message number, the date it was received, the name of the sender, and the subject of the message.
To display additional information about messages, select the messages and choose Full Information... from the main window's Edit menu. The following is displayed:
Opening folders containing numerous messages often fills the window, leaving no room to display other folders and messages. You can display additional messages by creating multiple main windows. You can create a new main window in which all of your drawers and folders are present.
To create a new main window, point to the folder or drawer to be opened in the new window, press MB3, and choose Open in New Window from the pop-up menu. A new main window is displayed, and the current folder or drawer is opened.
You can perform all Mail tasks on the drawer, folders, and messages displayed in this window.
You can send CDA documents as messages. The format of these compound documents is usually DDIF or DTIF. DDIF and DTIF documents cannot be edited with the DECwindows editing commands used by Mail.
To send a CDA document to another user:
If the recipient of a message that contains a CDA document is using a configuration that does not use DECwindows Motif for OpenVMS (such as a character-cell terminal), the recipient receives a message indicating that the mail message is in a foreign format. The recipient can view the mail envelope (address, sender, subject) or can forward, file, reply to, extract, or delete the message, but might not be able to view the message.
If you attempt to mail a CDA document to a user whose mail system does not support CDA, the message is not sent. You are notified that the transmission cannot be completed. You can create a copy of the message in another format and send that file.
To create a copy of a message in another format:
To send the file in the new format:
| Previous | Next | Contents | Index |
![[Go to the documentation home page]](../../images/buttons/bn_site_home.gif)
![[How to order documentation]](../../images/buttons/bn_order_docs.gif)
![[Help on this site]](../../images/buttons/bn_site_help.gif)
![[How to contact us]](../../images/buttons/bn_comments.gif)
|
| privacy and legal statement | ||
| 5634PRO_010.HTML | ||