Compaq TCP/IP Services for OpenVMS
Guide to IPv6


Previous Contents

2.2.3 IPv6 Network-to-IPv6 Network with Router Configuration

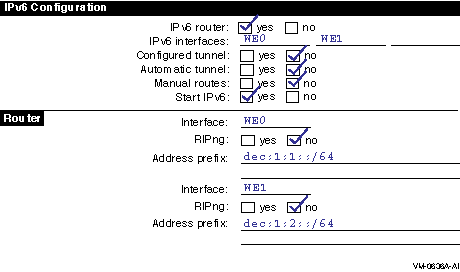
In an IPv6 network-to-IPv6 network with router configuration (shown in Figure 1-12), two IPv6 networks are connected to each other through router A and its two interfaces. Figure 2-4 shows the completed worksheet for router A.

Figure 2-4 IPv6 Network-to-IPv6 Network with Router Configuration


2.2.4 Multiple IPv6 Networks and Multiple Routers Configuration

In this example configuration (shown in Figure 1-13), four IPv6 networks are connected to each other using three routers. In this configuration, the routers must exchange routing information in order to learn the routes to other subnets in the network. To accomplish this, each router must run the RIPng protocol. Figure 2-5 shows the completed worksheet for router A.

Figure 2-5 Multiple IPv6 Networks and Multiple Routers Configuration


The completed worksheets for router B and C would be similar.

2.2.5 Host-to-Host over Tunnel Configuration

In a host-to-host over tunnel configuration (shown in Figure 1-14), two IPv6 systems communicate with each other over a configured tunnel through an IPv4 network and use IPv6 link-local addresses. Figure 2-6 shows the completed worksheet for host A.

Figure 2-6 Host-to-Host over Tunnel Configuration


After you configure IPv6 on host A, add the link-local address for host B to the TCPIP$ETC:IPNODES.DAT file. (For more information about this file, see Section 3.4.) The configuration process for host B in this configuration is similar to that for host A.

With this configuration, no global address prefix is advertised on the tunnel. If you want to advertise a global address prefix, you can configure one of the hosts as a router by using TCPIP$IP6_SETUP. An IPv6 router advertises a global prefix on the link.

To view a local node's link-local and global addresses, use the netstat -in command.

The following TELNET command connects host A to host B:


$ telnet fe80::5.6.7.8 
 

Alternately, you can place the address and node name in the TCPIP$ETC:IPNODES.DAT file. Then use the Node name as the argument to the TELNET command.

2.2.6 Host-to-Router over Tunnel Configuration

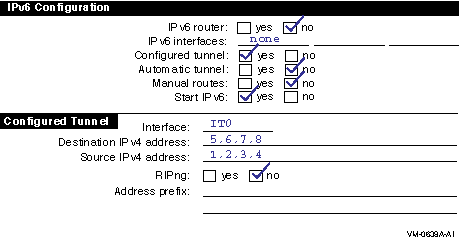
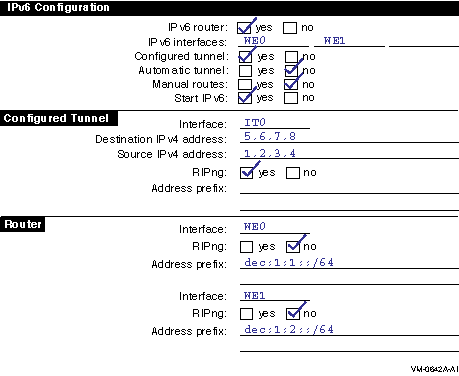
In a host-to-router over tunnel configuration (shown in Figure 1-15), host X communicates with host B over a configured tunnel through an IPv4 network; both nodes use IPv6 addresses. The tunnel in this case is between host X and router A. Figure 2-7 shows the completed worksheet for host X when router A is advertising itself as the default router for the tunnel link and is advertising a global address prefix on the tunnel link.

Figure 2-7 Host-to-Router over Tunnel Configuration


If router A is not advertising a global address prefix on the tunnel link, the value dec:3:1::/64 would be in the Address prefix field in the Configured Tunnel section of the host X worksheet. If router A is not advertising itself as the default router for the tunnel link, the information shown in Figure 2-8 would also be on the host X worksheet:

Figure 2-8 Router Not Advertising a Global Address Prefix


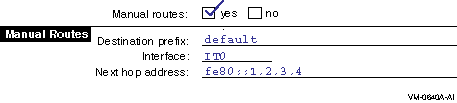
Figure 2-9 shows the completed worksheet for router A when router A is advertising a global address prefix on the tunnel link.

Figure 2-9 Router Advertising a Global Address Prefix


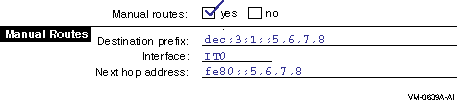
If router A is not advertising a global prefix on the tunnel link, the information shown in Figure 2-10 would be on the router A worksheet. Note the manual route to host X. Instead of specifying a destination network prefix, you specify the host route, dec:3:1::5.6.7.8 , to host X. The next hop is the link-local IPv6 address of host X's tunnel interface, fe80::5.6.7.8 .

Figure 2-10 Router A Not Advertising a Global Prefix on the Tunnel Link


2.2.7 IPv6 Network to IPv6 Network over Tunnel Configuration

In an IPv6 to IPv6 network over tunnel configuration (shown in Figure 1-16), host A communicates with host F over a configured tunnel through an IPv4 network. The host configuration is similar to that of host A Section 2.2.1. All hosts automatically use their default router in order to communicate with hosts on other networks. Figure 2-11 shows the worksheet for router A.

Figure 2-11 IPv6 Network to IPv6 Network over Tunnel Configuration


You do not have to run RIPng on the WE0 and WE1 interfaces because no routers are attached to the interfaces.

The configuration of router B is similar, except that the source and destination addresses for the configured tunnel would be switched and the address prefixes advertised on WE0 and WE1 would be dec:2:1::/64 and dec:2:2::/64 , respectively.

Note

If the routers were not configured to use RIPng over the tunnel interface, each router would need to specify a manual route to the other.

2.3 Configuring IPv6 Hosts and Routers

This section describes how to configure your system as either an IPv6 host or an IPv6 router.

2.3.1 Configuring an IPv6 Host

To configure your system as an IPv6 host, do the following:

  1. Log in as SYSTEM. Configure your IPv4 stack through the menu-driven TCPIP$CONFIG configuration procedure. This procedure is described in the Compaq TCP/IP Services for OpenVMS Installation and Configuration manual.

    Note

    Add the following line to your LOGIN.COM file:


    $ @SYS$MANAGER:TCPIP$DEFINE_COMMANDS.COM 
    

    This command procedure defines the UNIX management commands as foreign commands. Rerun your LOGIN.COM to make the definitions effective for the current process.

  2. Invoke the TCPIP$IP6_SETUP utility by entering the following command:


    $ @SYS$MANAGER:TCPIP$IP6_SETUP 


    The utility displays information about the IPv6 network configuration procedure and tells you that you can configure the system as either an IPv6 host or an IPv6 router.

  3. Choose to configure the system as an IPv6 host by responding to the following prompt:


    Configure this system as an IPv6 router? [NO]: 


    Press Return to configure the system as an IPv6 host.

  4. Answer the prompts about configuring each interface on your system. The procedure displays the following questions:


         Do you want to enable IPv6 on this interface? 
     
    Enable IPv6 on interface WF0? [YES]: 


    Press Return if you want to enable IPv6 on this interface; enter N if you do not.
    If your system has multiple interfaces, the procedure repeats this questions for each interface.

  5. Indicate whether you want to configure an automatic tunnel by responding to the following prompt:


    Configure an IPv6 over IPv4 automatic tunnel interface? [NO]: 


    If you want to configure an automatic tunnel, enter Y and press Return; if not, press Return.

  6. Indicate whether you want to create a configured tunnel or additional configured tunnels by responding to the following prompt:


    Create a configured tunnel? [NO]: 


    If you want to create a configured tunnel, enter Y and press Return. You will be prompted for source and destination addresses in steps 7 and 8.
    If you do not want to create a configured tunnel or if you have finished adding a series of configured tunnels, press Return. The procedure goes to step 10.

  7. If you chose to create a configured tunnel, enter the tunnel's source IPv4 address in response to the following prompt:


    Source IPv4 address of tunnel IT0?: 


    Enter an IPv4 address in the standard format ( xx.xx.xx.xx ) and press Return.

  8. Enter the tunnel's destination IPv4 address in response to the following prompt:


    Destination IPv4 address of tunnel IT0?: 


    Enter an IPv4 address in the following format ( xx.xx.xx.xx ) and press Return.

  9. Indicate whether you want to create another configured tunnel by responding to the following prompt:


    Create another configured tunnel? [NO] 


    If you want to create another configured tunnel, enter Y and press Return. The procedure takes you back to steps 6 through 8 for each additional configured tunnel you choose to create.
    If you do not want to create another configured tunnel, press Return.

  10. The procedure asks whether you want to create a host configuration file based on the choices you have made.


         Create IPv6 Host configuration file? 
     
    Please enter YES or NO [YES]: 


    If you are not satisfied with the configuration, enter N and press Return. The utility ends immediately without changing any of the current configuration files.
    If you are satisfied with the configuration, enter Y and press Return. The TCPIP$IP6_SETUP command procedure creates a configuration file called SYS$SYSTEM:TCPIP$INET6_CONFIG.DAT.

  11. You must now shut down TCP/IP Services for OpenVMS and then restart the network in order to enable IPv6.

2.3.2 Configuring an IPv6 Router

To configure your system as an IPv6 router, do the following:

  1. Log in as SYSTEM. Configure your IPv4 stack through the menu-driven TCPIP$CONFIG configuration procedure. This procedure is described in the Compaq TCP/IP Services for OpenVMS Installation and Configuration manual.

    Note

    Add the following line to your LOGIN.COM file:


    $ @SYS$MANAGER:TCPIP$DEFINE_COMMANDS.COM 
    

    This command procedure defines the UNIX management commands as foreign commands. Rerun your LOGIN.COM to make the definitions effective for the current process.

  2. Invoke the TCPIP$IP6_SETUP utility by entering the following command:


    $ @SYS$MANAGER:TCPIP$IP6_SETUP 


    The utility displays information about the IPv6 network configuration procedure and tells you that you can configure the system as either an IPv6 host or an IPv6 router.

  3. Choose to configure the system as an IPv6 router by responding to the following prompt:


    Configure this system as an IPv6 router? [NO]: 


    If you want to configure the system as an IPv6 router, enter Y and press Return.

  4. Answer the prompts about configuring each interface on your system. The procedure displays the following questions:


         Do you want to enable IPv6 on this interface? 
     
    Enable IPv6 on interface WF0? [YES]: 


    Press Return if you want to enable IPv6 on this interface; enter N if you do not.

  5. Answer the prompts about enabling IPv6 routing on each interface on your system. The procedure displays the following questions:


         Do you want to enable IPv6 routing on this interface? 
     
    Enable IPv6 routing on interface WF0? [YES]: 


    Press Return if you want to enable IPv6 routing on this interface; enter N if you do not.

  6. Indicate whether you want the router to run the RIPng protocol on the designated interface by responding to the following prompt:


    Enable RIPng on interface WF0? [YES]: 


    If you want the router to run the RIPng protocol, press Return; enter N and press Return if you do not.

  7. Indicate whether you want the router to advertise an IPv6 address prefix for the LAN on the designated interface, by responding to the following prompt:


    Address prefix to advertise on interface WF0?: 


    If you want the router to advertise an IPv6 address prefix, enter a 64-bit address prefix for the interface and press Return. The procedure repeats the same prompt. You can enter as many additional prefixes as you want for the interface. When you are finished, enter Done and press Return.
    If you do not want the router to advertise an IPv6 address prefix on the designated interface, enter Done and press Return.
    If there are additional interfaces on your system, the procedure returns to steps 4 through 7 for each interface. Once you have configured all interfaces, the procedure goes to step 8.

  8. Indicate whether you want to configure an automatic tunnel by responding to the following prompt:


    Configure an IPv6 over IPv4 automatic tunnel interface? [NO]: 


    If you want to configure an automatic tunnel, enter Y and press Return; if not, press Return.

  9. Indicate whether you want to create a configured tunnel or additional configured tunnels by responding to the following prompt:


    Create a configured tunnel? [NO]: 


    If you want to create a configured tunnel, enter Y and press Return. You will be prompted for source and destination addresses in steps 10 and 11.
    If you do not want to create a configured tunnel or if you have finished adding a series of configured tunnels, press Return. The procedure goes to step 16.

  10. If you chose to create a configured tunnel, enter the tunnel's source IPv4 address in response to the following prompt:


    Source IPv4 address of tunnel IT0?: 


    Enter an IPv4 address in the standard format ( xx.xx.xx.xx ) and press Return.

  11. Enter the tunnel's destination IPv4 address in response to the following prompt:


    Destination IPv4 address of tunnel IT0?: 


    Enter an IPv4 address in the following format ( xx.xx.xx.xx ) and press Return.

  12. Indicate whether you want to enable IPv6 routing on the interface by reponding to the following prompt:


    Enable IPv6 routing on interface IT0? [YES]: 


    If you want to enable IPv6 routing on the interface, press Return; if not, enter N and press Return.

  13. Indicate whether you want to enable RIPng on the interface by responding to the following prompt:


    Enable RIPng on interface IT0? [YES]: 


    Press Return if you want to enable RIPng protocol on this interface; enter N and press Return if you do not.

  14. Indicate whether you want the host to use an IPv6 address prefix on the tunnel interface by responding to the following prompt:


    Address prefix to advertise on interface IT0?: 


    If you want the host to use an IPv6 address prefix because a router is not advertising a global address prefix, enter the prefix and press Return. Enter as many prefixes as you want. When you are finished entering prefixes for the interface, enter Done and press Return.
    If you do not want the host to use an IPv6 address prefix on the tunnel interface, enter Done and press Return.

  15. Indicate whether you want to create another configured tunnel by responding to the following prompt:


    Create another configured tunnel? [NO]: 


    If you want to create another configured tunnel, enter Y and press Return. The procedure returns to step 9.
    If you do not want to create another configured tunnel, press Return.

  16. The TCPIP$IP6_SETUP utility displays the configuration information and asks you to indicate whether you want to update the current startup procedures with the new configuration information.


         Create IPv6 Router configuration files? 
     
    Please enter YES or NO [YES]: 


    If you are not satisfied with the configuration, enter N and press Return. The utility ends immediately without changing any of the current configuration files.
    If you are satisfied with the configuration, enter Y and press Return. The TCPIP$IP6_SETUP command procedure creates a configuration file called SYS$SYSTEM:TCPIP$INET6_CONFIG.DAT and a router configuration file called SYS$SYSTEM:TCPIP$IP6RTRD.CONF, both with default values.

  17. You must now shut down TCP/IP Services for OpenVMS and then restart the network in order to enable IPv6.

2.4 Postconfiguration Tasks

After restarting the network with IPv6 enabled, you might want to do the following:

The following sections describe these tasks.

2.4.1 Connecting to the 6bone Network

To connect to the 6bone, choose a 6bone point that is reasonably close to your normal IPv4 paths into the Internet. The 6bone web site at http://www.6bone.net contains information on how to join the 6bone and how to find an attachment point. If you want to connect to the 6bone through the Compaq Palo Alto site either before or after you configure IPv6 on your host or router, complete the following steps:

  1. Register your IPv4 tunnel by sending your 6bone IPv6 address prefix and the IPv4 address of your router to the following address:


         gw-6bone@pa.dec.com 
    

  2. Wait for confirmation that support for your tunnel is configured at Compaq.
    Compaq will provide both an IPv6 global address prefix for you to use at your site and the IPv4 address of the Compaq Palo Alto router.
  3. Configure your tunnel by running the TCPIP$IP6_SETUP utility.
  4. Verify that your tunnel is operational by issuing the ping command to one of the following Compaq IPv6 nodes:


              altavista.ipv6.digital.com 
              ftp.ipv6.digital.com 
              www.ipv6.digital.com 
    

    For additional information on connecting to the 6bone, see the 6bone home page at the following location:


    http://www.6bone.net 


2.4.2 Initializing a New Interface for IPv6

In some cases, you might want to either add a new interface card to your system or change an interface card from one type to another. After the new card is installed, you must initialize it for IPv6 operation. To initialize an interface, use the ifconfig command with the following syntax:


ifconfig device ipv6 up 
 

Note

OpenVMS interface names must be in uppercase. When you enter them with UNIX management commands at the DCL prompt, you must enclose the name of the interface in double quotation marks.

For LAN interfaces, the ifconfig command creates the link-local address (FE80::) and starts detection of duplicate addresses.

For example, to initialize Ethernet interface WE0 for use with IPv6, enter the following:


$ ifconfig "WE0" ipv6 up 
 

To initialize the loopback interface for use with IPv6, enter the following:


$ ifconfig "LO0" ipv6 up 
 

To initialize the automatic tunnel interface, enter the following:


$ ifconfig "TN0" ipv6 up 
 

This command designates one of the system's IPv4 addresses for use as the tunnel endpoint.

If you want the designated IPv4 address to be the permanent tunnel endpoint, you must use TCPIP$IP6_SETUP.

2.4.2.1 Setting the IPv6 Interface Identifier

You can set the IPv6 interface ID at the same time you initialize an interface by using the ifconfig command with the ip6interfaceid parameter. For example, to initialize Ethernet interface WE0 for use with IPv6 and to set its interface ID to the 64-bit value 0x0123456789abcdef , enter the following:


$ ifconfig "WE0" ip6interfaceid ::0123:4567:89ab:cdef ipv6 up 
 

Although the interface ID is expressed in standard IPv6 address format, only the low-order 64 bits are used.


Previous Next Contents