![[Compaq]](../../images/compaq.gif)
![[Go to the documentation home page]](../../images/buttons/bn_site_home.gif)
![[How to order documentation]](../../images/buttons/bn_order_docs.gif)
![[Help on this site]](../../images/buttons/bn_site_help.gif)
![[How to contact us]](../../images/buttons/bn_comments.gif)
![[OpenVMS documentation]](../../images/ovmsdoc_sec_head.gif)
| Document revision date: 10 November 2000 | |
|
|
|
|
|
|
| Previous | Contents | Index |
When you press and hold MB3 on any file name, FileView displays the pop-up menu defined for that file type.
Look at what FileView's pop-up menus already contain:
To add a menu item to a FileView pop-up menu:
Enabling the Sort & Merge setting ensures that the private customization file created when you customize FileView is merged with any other system or public customization files that FileView reads. If you disable the Sort & Merge setting, FileView cannot merge your new definition with the public and system definitions for that menu. This means that you would not see any changes (for example, a new pull-down menu) made to a public customization file. A menu also becomes unsorted if you rearrange the contents of a menu by using the up or down arrows. For more information about how FileView uses private, public, and system customization files, see Chapter 14. |
To remove a menu item from a FileView pop-up menu:
Note that when you remove a built-in menu item from a pop-up menu, you
create a copy of that menu in your private customization file. Any
subsequent changes made to the public customization file are not
reflected in your private FileView. See Chapter 14 for more
information about how FileView uses private, public, and system
customization files.
9.3.4 Looking at Double-Click Menu Item Definitions
As described in Chapter 6, FileView executes a predefined command when you double click on a specific file type. In the File Types dialog box, you can change the double-click menu item defined for a file type and execute a different command.
Look at the double-click menu item currently defined for each file type:
To change the double-click menu item defined for a file type:
To add a file type to the File Types list box:
To remove a file type that you added to the File Types list box but no longer need:
Once you finish working with the File Types dialog box, you need to save your changes.
| Click on | To |
|---|---|
| OK | Save new settings and dismiss the dialog box. |
| Apply | Save new settings without dismissing the dialog box. |
| Reset | Redisplay the current settings if you changed settings without applying them. |
| Cancel | Dismiss the dialog box without changing any settings. If you made any changes without applying them, clicking on the Cancel button cancels those changes. |
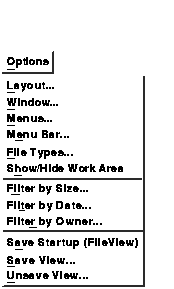
FileView provides two ways to work with your customized FileView settings. You can use options dialog boxes to make changes and save them, as described in the previous sections of this chapter. You can also create FileView windows with different sets of customized settings that you can name and switch between. These customized FileView windows are called views.
The following sections describe how to design and save your own views
and how to use predefined views.
9.4.1 Designing a View
As described in Chapter 6, the FileView window contains several components.
To design a view, you choose different combinations of FileView's components from the Save View dialog box. To display the Save View dialog box, choose Save View... from FileView's Options menu. The dialog box is displayed.
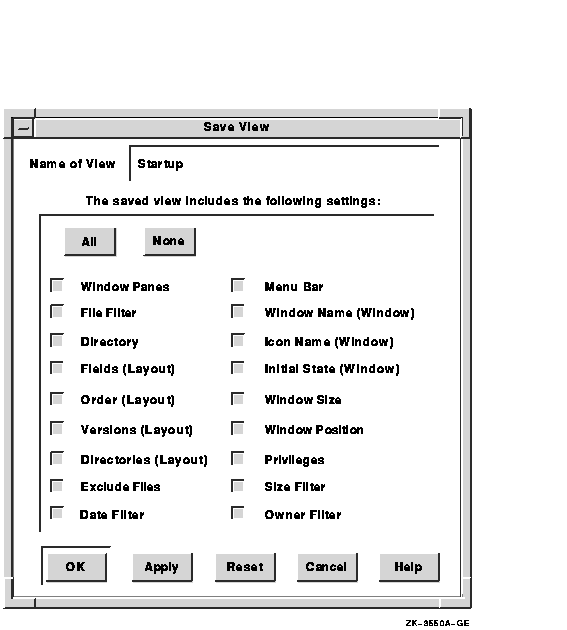
By default, all of the following FileView components are saved in the new view.
| Component Setting | Information Preserved |
|---|---|
| Window Panes | Areas displayed in a FileView window. For example, you can use the Show/Hide Work area menu item to display or not display FileView's work area. You can also use the Exclude Files entry box to change the areas that are displayed in a FileView window. |
| File Filter | Text you specify in the File Filter entry box in the FileView window. |
| Directory | Name of the directory you specify in the Directory entry box. |
| Fields | Field settings---such as Create Date and Size Used---you specify in the Layout dialog box (Options menu). |
| Order | Order settings---such as Unsorted or By Name---you specify in the Layout dialog box (Options menu). |
| Versions | Version number settings---either Show All or Show Highest---you specify in the Layout dialog box (Options menu). |
| Directories | Directories you specify in the subdirectory list. |
| Date Filter | Date-filter settings you specify in the Filter by Date dialog box (Options menu). |
| Menu Bar | Any menu names you added to the menu bar (Options menu). This setting allows you to have different menu bars for different tasks. (See Chapter 8 for more information about adding menu names to the menu bar.) |
| Window Name | Name of your FileView window you specify in the Window dialog box (Options menu). |
| Icon Name | Name of the FileView icon you specify in the Window dialog box (Options menu). |
| Initial State | Initial state of FileView window--- icon or window---you specify in Window dialog box (Options menu). |
| Window Size | Size of the FileView window on your screen. |
| Window Position | Location of the FileView window on your screen. |
| Privileges | Process privileges you specify in the Privileges dialog box (Session menu in Session Manager). |
| Size Filter | Size-filter settings you specify in the Filter by Size dialog box (Options menu). |
| Owner Filter | Owner-filter settings you specify in the Filter by Owner dialog box (Options menu). |
If you enable all the component settings, your saved view is a snapshot of the current FileView window. For example, you might want to save a view of a subdirectory you frequently access. When you restore the view, the current FileView display changes to reflect the components of the view you saved. Because you saved every component, the FileView window changes to display a view of that subdirectory. By using a saved view in this way, you establish a shortcut for ascending and descending the directory structure.
When you enable only some component settings and save the current
FileView display, only those components you specified are saved. When
you restore that saved view, only those components you saved are
changed; those components not saved are obtained from the current
FileView display. For example, you might always want your FileView
window to appear in the upper left-hand corner of your screen. By
moving the FileView window to the upper left-hand corner, enabling only
the window position setting in the Save View dialog box and saving it
as a view called "Corner FileView" you save only one
component from the current FileView. You can continue to work with and
change your FileView display. When you restore the Corner FileView
saved view, no information in your current FileView display changes,
but the FileView window moves to the upper left-hand corner of your
screen.
9.4.2 Saving a View
To save a view:

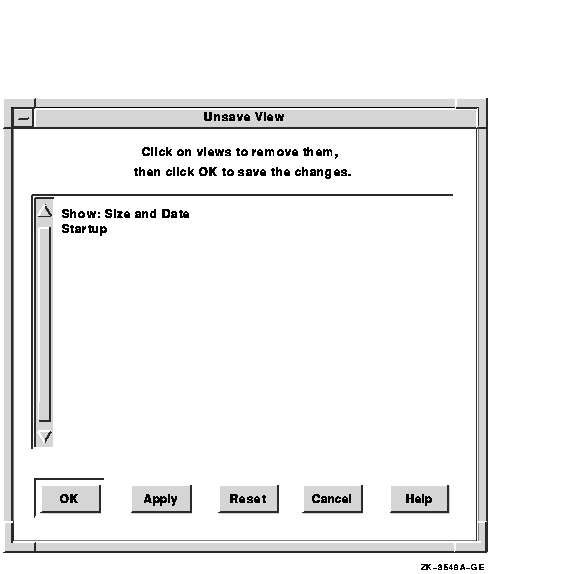
Several commonly used views have already been saved for you. To see the
list of the built-in views that DECwindows provides, click on
FileView's Views menu. As you save additional views, FileView adds them
to this list.
9.4.4 Saving Your Startup View
You can save the view you want to see whenever you start FileView. For
example, you might want to display your SCHEDULES subdirectory when you
start FileView. To save a startup view, customize the FileView window
the way you want it saved. Choose Save Startup from FileView's Options
menu. The next time you start FileView, your customized FileView is
displayed.
9.4.5 Replacing a Saved View
You can replace a saved view by saving another view with the same name. To supersede a saved view:
When you restore a saved view, those components not saved are obtained from the current view. By saving only some components of a view, such as the fields and order, you can quickly change the look of your current FileView display.
To restore a saved view in the current FileView window, choose the saved view you want from FileView's Views menu.
To restore a saved view in a new FileView window:
To delete a view you no longer need:
If you want to work with views from Session Manager, add the Views menu to Session Manager's menu bar. For more information about adding a menu to a menu bar, see Chapter 8. |
If you want to conceal FileView's work area that displays files and display only FileView's menu bar, choose Show/Hide Work Area from FileView's Options menu. FileView is displayed as a menu bar.
To display FileView's work area again, choose Show/Hide Work Area from FileView's Options menu.
By using the Window Manager's customization options, you can change the way your windows look and behave. The Window Manager provides a customization submenu that contains menu items for customizing the following window features:
This chapter describes how to use the Workspace Options submenu to change your Window Manager features. It also includes information about advanced Window Manager customization options.
Although the procedures in this chapter describe how to use the Window Manager's Options submenu from the Workspace menu, you can access the same Options submenu from every application's Window menu. To display the Window Manager's Options submenu, from the Window menu:
|
Every Window Manager Customize dialog box contains push buttons you can use to record your settings, cancel the dialog box, or restore default settings.
| Click on | To |
|---|---|
| OK | Save new settings and dismiss the dialog box. |
| Reset | Redisplay the settings in the dialog box since the last time you applied the settings. |
| Default | Reinstate the system default settings. |
| Cancel | Dismiss the dialog box without changing any settings. |
To see your changes, choose Apply Current settings from the Options submenu. This restarts the Window Manager.
Another way to restart the Window Manager is to choose Restart... from
the Workspace menu. This is useful for customizing Window Manager
information that is not provided through the Options dialog boxes. For
more information about making Window Manager changes that are not
available through options dialog boxes, see Section 10.9.
10.2 Customizing Your Workspace
You can change the way to make a window active, when a window automatically becomes active, and other Workspace features by changing your Workspace settings.
To change your Workspace settings, choose Workspace... from the Workspace Options submenu. The Window Manager displays the Workspace Options dialog box.
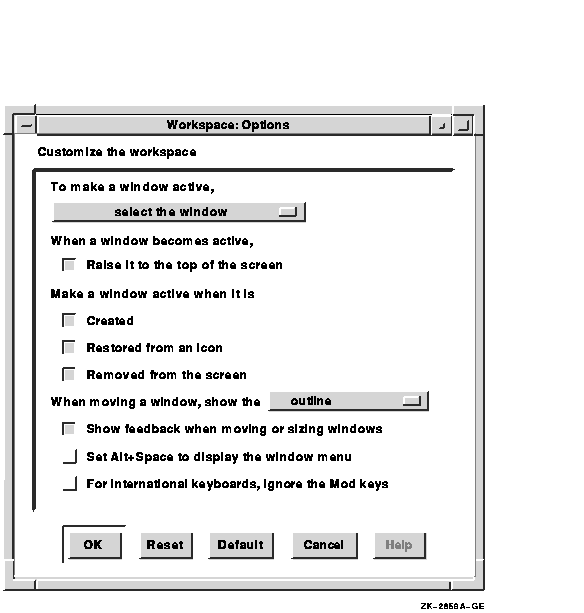
Click on the settings in the dialog box to customize the features you want to change.
Change the Moving a Window setting from outline to entire window on higher-performance workstations only. To improve performance when moving and sizing windows, disable the Show feedback setting. If you enable the Alt+Space setting, you can use compose sequences only on keyboards that have both Alt and Compose keys. |
To change your window borders, choose Border... from the Workspace Options submenu. The Window Manager displays the Border Options dialog box.
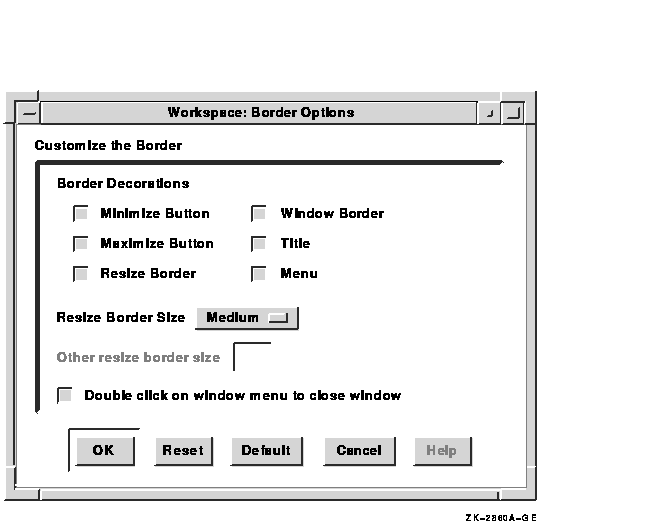
From the Customize Border dialog box, you can change the following settings:
Border decorations
Click on a border decoration to add or remove it from all your window frames.Resize border size
The resize border is the border around the window that you drag to resize a window. To change the size of the border, choose one of the default sizes from the Options menu, or choose the Other menu item to enter your own border size.Other resize border size
If you choose the Other menu item from the Resize Border Size options menu, the Other Resize Border Size entry box receives input focus. Enter a value in this box to define your own border size.Double click on window menu to close window
Click on this setting to enable or disable the close menu item when you double click on the window menu.
To change your window border colors, choose Border Colors... from the Workspace Options submenu. The Window Manager displays the Border Color Options dialog box.
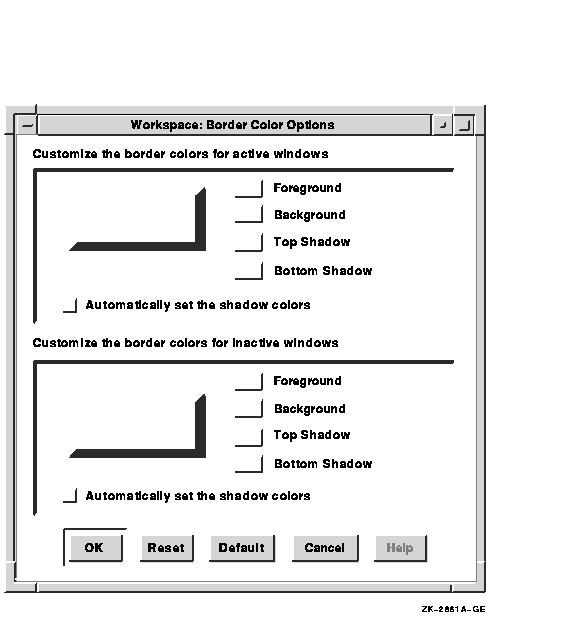
From the Border Color Options dialog box, you can change the following settings for active or inactive windows. You should create distinct active and inactive background colors so that it is easy to see which window is active.
Foreground
To change the Window Border Foreground color (that is, the color of the title), click on the Foreground button. DECwindows displays the Color Mixing dialog box, which lets you choose the border foreground color you want.Background
To change the Window Border Background Color (that is, the color behind the title), click on the Background button. DECwindows displays the Color Mixing dialog box, which lets you choose the border background color you want.Top Shadow
Window border top and bottom shadow colors (that is, colors on the top and left sides of the border) have to be well matched to present the three-dimensional look of DECwindows Motif. DECwindows helps you to do this by automatically determining top and bottom shadow border colors when you change the background color. This setting is indicated by the shaded Automatic shadow check button.To choose your own top shadow colors:
- Click on the Automatic shadow check button.
This action disables the setting.- Click on the Top Shadow button.
DECwindows displays the Color Mixing dialog box, which lets you select the top shadow color you want. You should use the HLS model in the Color Mixing dialog box to choose a top shadow color that is lighter and less saturated than the background color.Bottom Shadow
Window border top and bottom shadow colors (that is, colors on the bottom and right sides of the border) have to be well matched to present the three-dimensional look of DECwindows Motif. DECwindows helps you to do this by automatically determining top and bottom shadow colors when you change the background color. This setting is indicated by the shaded Automatic shadow check button.To select your own Bottom shadow colors:
- Click on the Automatic shadow check button.
This action disables the setting.- Click on the Bottom Shadow button.
DECwindows displays the Color Mixing dialog box, which lets you select the Bottom Shadow color you want. You should use the HLS model in the color mixing dialog box to choose a bottom shadow color that is darker and more saturated than the background color.
| Previous | Next | Contents | Index |
|
|
| privacy and legal statement | ||
| 5633PRO_008.HTML | ||