![[Compaq]](../../images/compaq.gif)
![[Go to the documentation home page]](../../images/buttons/bn_site_home.gif)
![[How to order documentation]](../../images/buttons/bn_order_docs.gif)
![[Help on this site]](../../images/buttons/bn_site_help.gif)
![[How to contact us]](../../images/buttons/bn_comments.gif)
![[OpenVMS documentation]](../../images/ovmsdoc_sec_head.gif)
| Document revision date: 10 November 2000 | |
|
|
|
|
|
|
| Previous | Contents | Index |
To change the settings in your Message Window:
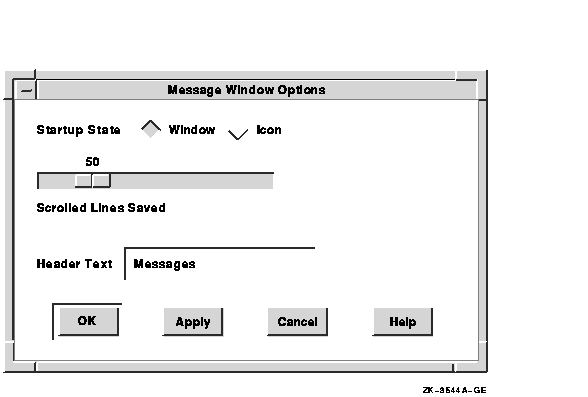
From the Message Window Options dialog box, you can change the following settings:
Startup State
Click on the Icon radio button to specify that the Message Window be displayed an icon when you start it.Scrolled Lines Saved
By default, you can scroll through the last 50 lines of text in Session Manager's message area to view messages you may have missed. The Scrolled Lines Saved slider lets you vary the number of lines that Session Manager saves.Header Text
Session Manager message area is labeled Messages. To change this heading, type a new heading in this text entry box.
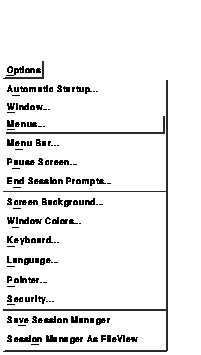
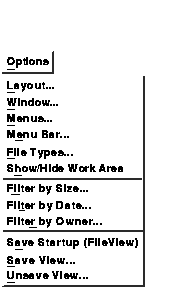
You can change Session Manager's and FileView's menus and menu bars by deciding what to include on a menu bar, adding menu items to menus, and defining your own menu items. For example, if you write your own application, you can add it to Session Manager's Applications menu and invoke it as you would any other DECwindows application.
This chapter describes how to do the following:
You can customize Session Manager's and FileView's menus by changing the menu items they contain.
By displaying the Menus dialog box, you can see how a pull-down menu is created and what happens when you choose a menu item from a Session Manager or FileView menu. Once you understand the components of menus, you can modify them and the menu items they contain.
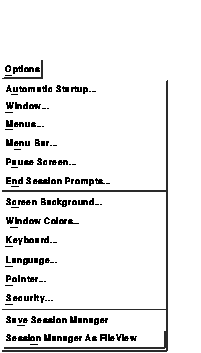
To display the Menus dialog box, choose Menus... from Session Manager's or FileView's Options menu. The following dialog box is displayed:
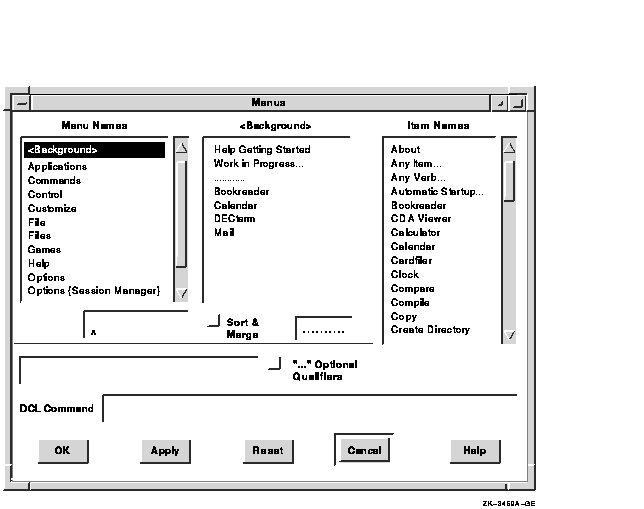
The Menus dialog box contains the following components:
In the Menus dialog box, look at the menus that are already defined.
To add a menu item to a pull-down menu:
Enabling the Sort & Merge setting ensures that the private customization file that you create when you customize FileView is merged with any other system or public customization files that FileView reads. If you disable the Sort & Merge setting, FileView cannot merge your new definition with the public and system definitions for that menu. A menu also becomes unsorted if you rearrange the contents of a menu. For more information about how FileView uses private, public, and system customization files, see Chapter 14. |
To remove a menu item from a pull-down menu:
When you remove a built-in menu item from a pull-down menu, you create a copy of that menu in your private customization file. Any subsequent changes made to the public customization file (for example, a new menu item is added to a pull-down menu) are not reflected in your private Session Manager or FileView. For more information about how Session Manager and FileView use private, public, and system customization files, see Chapter 14. |
Each item on a Session Manager or FileView menu has a corresponding DCL command definition or command file that executes when you choose that item. You can replace a menu item's current command definition with a new command definition that executes a different series of commands. For example, when you choose the Type menu item from FileView's Commands menu, the command file VUE$LIBRARY:VUE$TYPE runs. By designing a new command file and associating it with the Type menu item, you can run a different series of commands when you choose Type from FileView's Commands menu.
To see the name of the DCL command file that is associated with a
particular menu item, select that menu item in the Item Names list box
in the Menus dialog box. The associated command file is displayed in
the DCL Command entry box.
8.1.5 Changing a Menu Item Definition
To change the DCL command or command file that executes when you choose a menu item from a menu:
To define a menu item and add it to a pull-down menu:
$ @command_file_name.COM |
To delete a menu item name that you defined:
You can create new menu names to which you can then add menu items. To create a menu name:
To delete a menu name that you defined:

Once you create a new menu, you need to add it to a menu bar. You can also remove menus that you do not need.
To add a menu name to a menu bar:
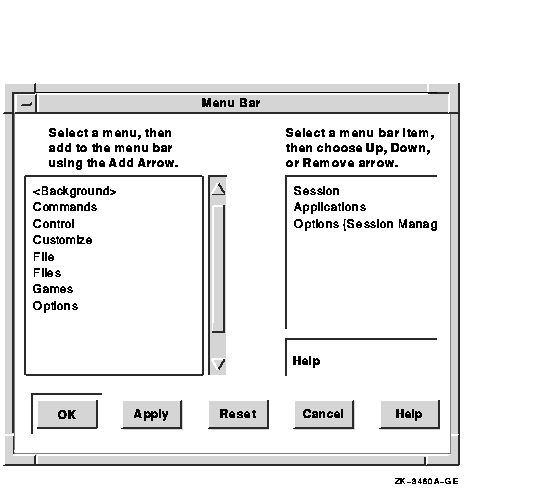
To remove a menu name from a menu bar.
Any changes you make to a menu bar affect only the current Session Manager or FileView window. If you want different menu bars for different tasks---for example, one for system management tasks and another for text-processing tasks---you can create multiple menu bars and save them as views, as described in Chapter 9. |
By adding the Session Manager as FileView menu item to Session Manager's Options menu, you can combine Session Manager's and FileView's features into one window.
To make Session Manager menu bar look and behave like a FileView window:
You can also make Session Manager's menu bar look and behave like a FileView window by adding the Show/Hide Work Area menu item to one of Session Manager's menus. |
In addition to customizing FileView's menus and menu bar, you can change other FileView features. For example, you can change the look of your file list, build your own pop-up menus, and create a customized FileView window.
This chapter describes how to use FileView's Options menu to customize
FileView.
9.1 Changing the Look of Your File List
When you first start DECwindows, your file list in the FileView window contains the following information about every file in your current directory:
You can change the way the files in your current and subsequent file lists are listed. For example, you might want to list each file by its size or the date it was created or change the order in which the files are listed.
To change the way files are listed, choose Layout... from FileView's Options menu. FileView displays a dialog box:
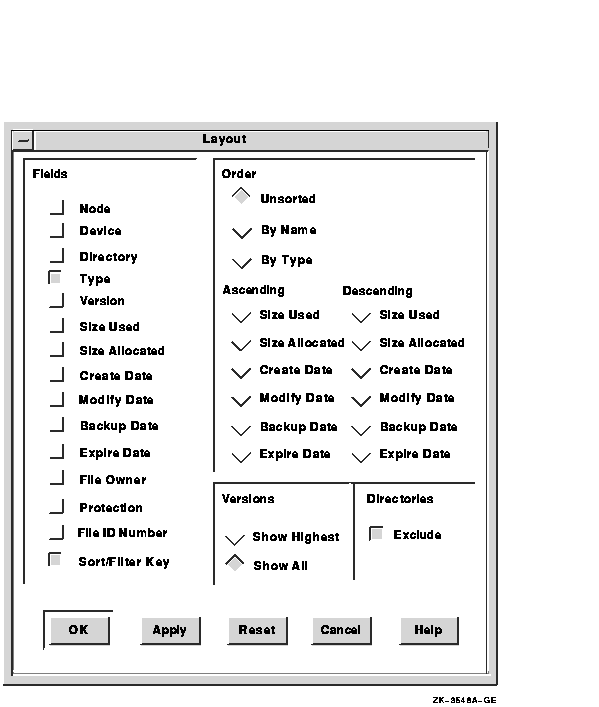
The settings in the Layout dialog box are divided into groups. Some
settings are preset and are already in effect. When you choose a
setting from the Layout dialog box, it affects every subsequent file
list until you change the setting again.
9.1.1 Changing the Fields in Your File List
By using the check buttons in the Fields column, you can display the following information about each file in your file list:
| Field | Information Displayed |
|---|---|
| Node | DECnet node name of the file 1 |
| Device | Device on which the file is stored |
| Directory | Directory in which the file is stored |
| Type | File type of the file |
| Version | Version number of the file |
| Size Used | Size, in blocks, used in the file |
| Size Allocated | Size, in blocks, allocated to the file |
| Create Date | Date and time the file was created |
| Modify Date | Date and time the file was last modified |
| Backup Date | Date and time the file was last backed up |
| Expire Date | Date the file expires |
| File Owner | Owner, in numeric or text format, of the file |
| Protection | Protection settings for the file |
| File ID Number | Unique file identification for the file |
| Sort/Filter Key | Displays the sort key field |
In the Layout dialog box, the Show Highest Version option is enabled by default. This setting is indicated by the shaded radio button, and only the highest version of each file in your current directory is displayed. Every version number of a file is not shown.
To display all versions of the files in your current directory, click
on the Show All Versions radio button. All of the versions of your
files are displayed.
9.1.3 Changing the File Order in Your File List
By default, the files in your file list are listed in the order in which they appear in the directory structure. This order is alphabetical unless your file list includes files from more than one directory. To list files alphabetically, even if multiple directories are shown, click on the By Name radio button under the Order column. To list files alphabetically by file type, click on the By Type radio button. You can choose only one radio button from the Order column at a time.
To list your files in ascending (low to high) order and descending (high to low) order, click on one of the following options represented by the Ascending or Descending groups of radio buttons:
| Option | Sorts files in file list by |
|---|---|
| Size Used | Blocks used |
| Size Allocated | Blocks allocated to the file |
| Create Date | Date and time each file was created |
| Modify Date | Date and time each file was most recently changed |
| Backup Date | Date and time each file was most recently backed up |
| Expire Date | Expiration date |
Once you finish working with the Layout dialog box, you need to save your changes.
| Choose | To |
|---|---|
| OK | Save new settings and dismiss the dialog box. |
| Apply | Save new settings without dismissing the dialog box. |
| Reset | Redisplay the current settings if you changed settings without applying them. |
| Cancel | Dismiss the dialog box without changing any settings. |
You can change FileView's icon name and window name as well as its startup state. To change your FileView window settings, choose Window... from FileView's Options menu. FileView displays the Window dialog box.
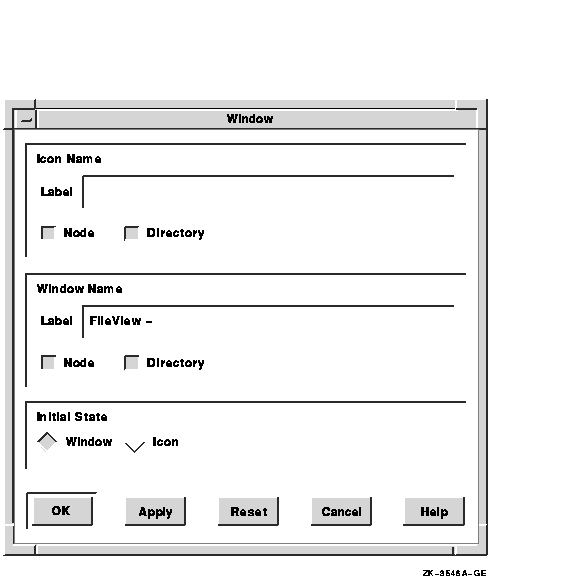
From the Window dialog box, you can change the following settings:
Icon Name
To change FileView's icon label, type the new label name in the Icon Name entry box.Window Name
To change FileView's window label, type the new window name in the Window Name entry box.Initial State
When you start FileView, it displayed as a window. Click on the Icon button in the Initial State entry box to specify that FileView be stored as an icon when you start it.
As described in Chapter 6, FileView provides pop-up menus and double-click command definitions to make it easier for you to work with files. Using the File Types dialog box, you can modify the pop-up menus and double-click command definitions associated with each file type.
To display the File Types dialog box, choose File Types... from FileView's Options menu.
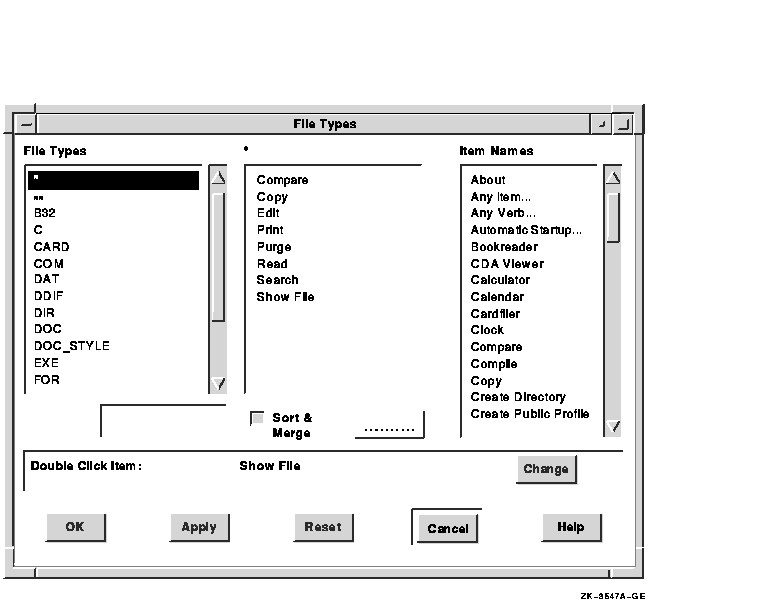
The File Types dialog box contains the following components:
| Previous | Next | Contents | Index |
|
|
| privacy and legal statement | ||
| 5633PRO_007.HTML | ||