


Common Desktop Environment: User's Guide
10 Using Text Editor
Contents of Chapter:
- Opening and Closing Text Editor
-
 To Open Text Editor
 -
- To Close Text Editor
-
- Text Editor Window
-
- To Display the Status Line
-
- Opening and Saving Documents
-
- To Create a New Document
-
- To Save a Document to a New File
-
- To Save a Document to the Original File
-
- Opening an Existing Document
-
- To Open an Existing Document from Text Editor
-
- To Open an Existing Document from File Manager
-
- Entering Text
-
- To Enter New Text
-
- Using Wrap To Fit
-
- To Set Wrap To Fit On or Off
-
- Entering Special Characters
-
- Moving the Cursor in a Document
-
- To Go to a Specific Line
-
- To Scroll a Document
-
- Selecting Text
-
- To Select Text with the Mouse
-
- Secondary Selection
-
- To Replace Text Using Secondary Selection
-
- To Select Text with the Keyboard
-
- Editing Text
-
- Editing Keys
-
- Menu Shortcut Keys
-
- UNIX Key Bindings
-
- To Enable UNIX Key Bindings
-
- To Set Overstrike Mode
-
- To Type Over Text
-
- To Delete Text
-
- To Clear Text
-
- To Undo an Edit
-
- To Copy Text
-
- To Move Text (Cut and Paste)
-
- To Correct Misspelled Words
-
- To Include a File
-
- Using Drag and Drop
-
- To Move Text Using Drag and Drop
-
- To Copy Text Using Drag and Drop
-
- To Include a File Using Drag and Drop
-
- Searching a Document
-
- To Find Text
-
- To Find and Change Text
-
- To Find and Delete Text
-
- Formatting and Printing Documents
-
- To Format a Document
-
- To Print an Open Document
-
- To Print a Closed Document
-
- Recovering a File
-
- To Recover a File
-
- Text Editor and Other Applications
-
This chapter describes how to create and edit short documents such as memos, mail messages, or resource files using Text Editor.
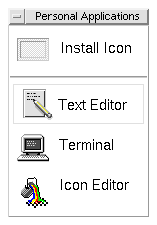
There are several ways to start Text Editor from your desktop.
To Open Text Editor
- Click the Text Editor control in the Front Panel.

- Or, open the Personal Applications subpanel in the Front Panel and click the Text Editor control.
Text Editor can also be started from the command line by typing this command in a Terminal window:
dtpad filename &
The file name is optional.
To Close Text Editor
 Choose Close from the File menu or press Alt+F4.
Note: If your keyboard does not have an Alt key, ask your system administrator to identify the corresponding key.
You create and edit a document in the Text Editor window. The title bar displays the name of the current document. A new document is named (UNTITLED).
Figure 10-1 Text Editor window
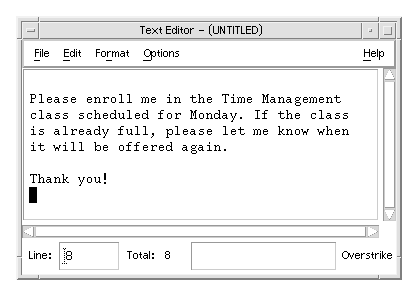
You can optionally display a status line that reports the number of lines in your document and enables you to go to a specific line number.
The status line displays the line number where the insertion cursor is located and the total number of lines in the document. It also reports Text Editor messages and indicates whether Overstrike mode is active.

Choose Status Line from the Options menu. To remove the status line, choose Status Line again from the menu.
You can create a new document or open an existing document. Opening a document displays the contents of a selected file in the Text Editor window.
Saving a document stores the edited contents into a file. You can save a document to its original file or to a new file.
To Create a New Document
A new document named (UNTITLED) is created when you start Text Editor. To enter text in your document, see "Entering Text". You provide a new file name when you save the document.
After finishing a document, you can create another document using the New command.
Choose New from the File menu.
- The Text Editor window is cleared and a new document is created. If you have not saved your current document, a dialog box is displayed that enables you to save your document.
To Save a Document to a New File
- Choose Save As from the File menu.
The Save As dialog box lists files and folders located in your current folder. You can store your document in the current folder, a subfolder, or a folder that you specify.
If you used Wrap To Fit, the dialog box includes an additional choice about handling line endings. If Wrap To Fit is set off, the dialog box omits this choice (see "Using Wrap To Fit").
Figure 10-2 Save As dialog box
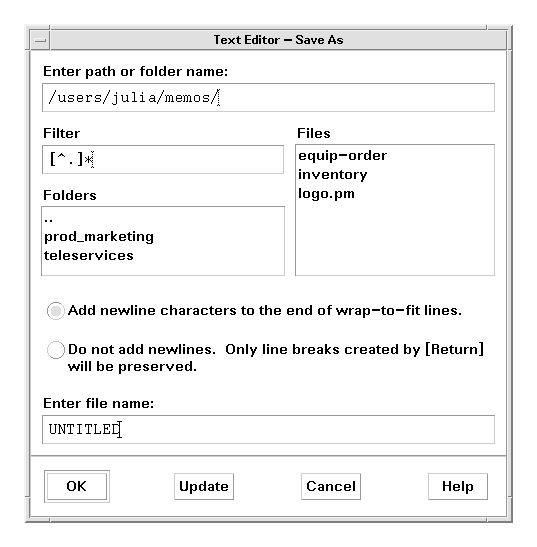
- Optional. If you do not want to save the file to the current folder, choose a subfolder or indicate a different folder.
- For a subfolder, select the subfolder in the Folders list and press Return.
- For a different folder, use the .. (go up) icon to change to a folder or type its path name in the Enter path or folder name field.
- Type a new file name in the Enter file name field.
- Press Return or click OK.
To Save a Document to the Original File
Choose Save from the File menu to save your work and continue editing your document.
- If you used Wrap To Fit, the Save dialog box includes an additional choice about handling line endings (see "Using Wrap To Fit").
Opening an Existing Document
You can open an existing document in these ways:
- Open the document in Text Editor.
- Select the file icon in File Manager and choose Open from the File Manager Selected menu.
- Double-click the file icon in File Manager.
- Drag the document's file icon to the Text Editor control in the Front Panel.
To Open an Existing Document from Text Editor
- Choose Open from the File menu.
The Open a File dialog box lists files and folders in your current folder. You can browse the documents listed, or change to a new folder to locate other files on your system.
Figure 10-3 Open a File dialog box
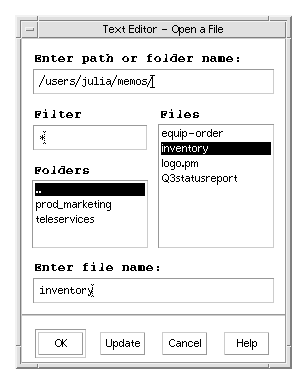
- Select the name of the document you want to open, or type the document name in the Enter file name field.
- Press Return or click OK.
Note: You can also use this shortcut: double-click the document name in the dialog box.
To Open an Existing Document from File Manager
- Display the document's file icon in a File Manager window.
Figure 10-4 Document file icon

- Open the document in one of the following ways:
- Double-click the document.
- Select the document, then choose Open from the File Manager Selected menu.
- Drag the document file icon to the Front Panel and drop the icon on the Text Editor control.
As you create a document, you type and edit text. A cursor (I) shows your current position. Characters are inserted unless you set Overstrike mode (see "To Set Overstrike Mode").
To Enter New Text
Click in the document and start typing.
- To start a new line, press Return. Or, you can use the Wrap To Fit option to automatically wrap text at the edge of the window.
- To start a paragraph, press Return twice.
Wrap To Fit controls whether lines are automatically wrapped to fit the width of the window. When Wrap To Fit is set on, lines are broken automatically at the edge of the window. Because these line breaks are dynamic, you can resize the Text Editor window and the text automatically adjusts to fit the new window width.
When you save your document, you decide whether to add a line break to each of the wrapped lines, or to retain the dynamic line endings. When you save your document, you choose one of these options:
- Add a newline character (hard return) to the end of each wrapped line to preserve each line ending as it currently appears.
- Or, preserve only line breaks that were created by pressing Return.

To Set Wrap To Fit On or Off
To set Wrap To Fit on, choose the Wrap To Fit toggle button in the Options menu. To set Wrap To Fit off, choose the toggle button again.
Different systems often use certain key combinations to insert special characters. In some instances, a key combination may be reserved by Text Editor. For example, a Text Editor mnemonic for displaying a menu might conflict with a key sequence you want to use on your keyboard.
To insert the correct character you may need to override the reserved behavior by preceding the key combination with Control+Q.
As you enter and edit text, you move the insertion cursor using the mouse and keyboard cursor keys. Using the mouse, move the pointer to the new location in the document and click mouse button 1.
You can also use the keyboard cursor movement keys:
- Key
- Cursor Movement
- Up Arrow
- Up one line
- Down Arrow
- Down one line
- Left Arrow
- Left one character
- Right Arrow
- Right one character
- Control+Left Arrow
- Move left to previous word
- Control+Right Arrow
- Move right to next word
- Home
- Beginning of the current line
- End
- End of the current line
- Control+Up Arrow
- Beginning of the previous paragraph
- Control+Down Arrow
- Beginning of the next paragraph
- Control+Home
- Beginning of the document
- Control+End
- End of the document
- Control+G
- To the Line field in the status line
Note: If your keyboard uses different key labels, ask your system administrator to identify the corresponding keys.
To Go to a Specific Line
- Display the status line (see "To Display the Status Line").
- Press Control+G or click in the Line field of the status line.
- Type the line number you want to go to and press Return.
To Scroll a Document
Select and drag the vertical scroll bar to view more text. Use the horizontal scroll bar to view long lines.
- You can also use the scrolling keys:
- Key
- Scroll Movement
- Page Up
- Up one page
- Page Down
- Down one page
- Control+Page Up
- Left one page
- Control+Page Down
- Right one page
Selecting Text
Before using edit commands such as cut and paste, you must select the text. You can select text using the mouse or the keyboard.
To Select Text with the Mouse
- Click at the beginning of the text you want to select.
- Press and hold mouse button 1 and drag to the end of the text.
To deselect text, click any area in the window.
Note: To modify a selection you have made, press and hold the Shift key and mouse button 1. Then drag forward or backward to adjust the amount of selected text. Or, hold down the Shift key and one of the arrow keys to change the selection.
You can also use these shortcuts for selecting text:
- Word
- Double-click the word
- Line
- Triple-click the line
- All text
- Quadruple-click in the text
Secondary Selection
This method enables you select text and replace it with another selection, which is used as the replacement text.
To Replace Text Using Secondary Selection
- Select the text that you want to replace.
- Move the pointer to the beginning of the text you want to replace the first selection with. Hold down the Alt key and mouse button 2 and drag to the end of the text you want to use.
The text is underlined.
Note: If your keyboard does not have an Alt key, ask your system administrator to identify the corresponding key.
- Release the Alt key and mouse button.
The underlined text overwrites your first selection.
To Select Text with the Keyboard
- Text to Select
- Action
- Text block
- Move the cursor to the beginning of the text block. Hold down the Shift key and an arrow key to move the cursor to the end of the text block.
- Cursor to beginning of line
- Shift+Home
- Cursor to end of line
- Shift+End
- Cursor to beginning of paragraph
- Shift+Control+Up Arrow
- Cursor to end of paragraph
- Shift+Control+Down Arrow
- Cursor to beginning of document
- Shift+Control+Home
- Cursor to end of document
- Shift+Control+End
- All text
- Control+/
- Deselect all text
- Control+\
Minor edits can be made using the editing keys. You may also want to copy, move, or delete portions of text, find and change a word or phrase, or check the spelling of your document.
Editing Keys
- Key
- Action
- Backspace
- Deletes the character before the cursor
- Delete
- Deletes the character following the insertion cursor
- Control+Backspace
- Deletes the previous word
- Shift+Backspace
- Deletes characters from the cursor to the beginning of the line
- Control+Delete
- Deletes all the characters from the cursor to the end of the current line
- Insert
- Toggles Overstrike and Insert mode
You can also use these shortcut keys when making edits.
- Control+C
- Copy selected text
- Control+X
- Cut selected text
- Control+V
- Paste selected text
- Control+F
- Find/Change text
- Control+Z
- Undo a cut, delete, clear, include, copy, or paste command
UNIX Key Bindings
UNIX key bindings enable you to use a set of extended Emacs keys, such as Alt+B (back word) or Control+N (next line), in Text Editor. To enable UNIX key bindings (which are set off by default) you edit a file in your home directory.
- Add the following line to the
.Xdefaults file in your home directory:
#include "/usr/dt/app-defaults/language/UNIXbindings"
Replace language with the name of your language environment.
If the .Xdefaults file does not exist, create the file in your home directory.
- Log out of your current session.
- Log in and restart Text Editor.
Some Text Editor menu accelerators conflict with UNIX key bindings. When UNIX key bindings are enabled, Text Editor provides alternate menu accelerators for these commands:
- Command
- Alternate Menu Accelerator
- Find/Change (Control+F)
- Control+S
- Paste (Control+V)
- Shift+Insert
- Print (Control+P)
- no alternate accelerator
- Undo (Control+Z)
- Control+_
If you want to modify these menu accelerators, copy the contents of the /usr/dt/app-defaults/language/UNIXbindings file into your .Xdefaults file and then make your changes.
Note: When using UNIX key bindings, the Delete key deletes the previous character rather than the character that follows the cursor.
As you type, new characters are inserted. If you want to type over existing characters, change to Overstrike mode.
- Choose Overstrike from the Options menu. To return to Insert mode, choose Overstrike again from the menu.
- Or, use the Insert key to switch between Insert and Overstrike mode.
When Overstrike mode is on, the cursor changes to a block (  ). If you use Overstrike mode often, you may want to display the status line (see "To Display the Status Line") because it indicates whether Overstrike mode is on or off.
To Type Over Text
- Select the text.
- Type the replacement text.
You can also choose Overstrike from the Options menu to turn off Insert mode and type over the text directly.
To Delete Text
- Select the text.
- Choose Delete from the Edit menu or press the Delete key.
Deleted text cannot be pasted, but it can be recovered with the Undo command (see "To Undo an Edit").
If you intend to paste the text that you delete, use the Cut command (see "To Move Text (Cut and Paste)").
To Clear Text
The Clear command replaces the selected text with spaces or blank lines.
- Select the text to be cleared.
- Choose Clear from the Edit menu.
Choose Undo from the Edit menu or press Control+Z.
- Undo reverses the last cut, paste, clear, delete, change, include, or format operation.
To Copy Text
- Select the text to be copied.
- Choose Copy from the Edit menu or press Control+C.
A copy of the text is stored on a clipboard where it can be accessed or replaced by other applications.
- Click where you want to insert the text.
- Choose Paste from the Edit menu or press Control+V.
You can also use drag and drop to copy text (see "To Copy Text Using Drag and Drop").
Note: Use this shortcut to copy a word or phrase: Select the text, move the pointer to where you want to insert the text, and click mouse button 2. This is a quick way to copy text into a dialog box.
- Select the text.
- Choose Cut from the Edit menu or press Control+X.
The text is erased from the document and stored on a clipboard where it can be accessed or replaced by other applications.
- Move the cursor to where you want to insert the text.
- Choose Paste from the Edit menu or press Control+V.
You can also use drag and drop to move text (see "To Move Text Using Drag and Drop").
To Correct Misspelled Words
- Choose Check Spelling from the Edit menu.
The Spell dialog box lists misspelled or unrecognized words.
Figure 10-5 Spell dialog box
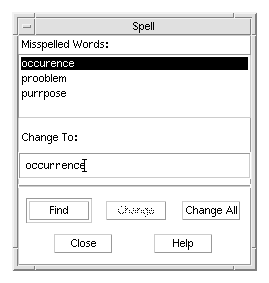
- Select the misspelled word in the Misspelled Word list that you want to find and press Return. Or, just double-click the word.
The next occurrence of the word is highlighted in your document.
- Type the correct word into the Change To field.
- Click Change to correct a single occurrence.
- To find and change additional occurrences, click Find and then Change.
Or, click Change All to replace all occurrences.
- Click Close when you are done.
Note: The Check Spelling feature is only available for the English language.
You can insert a text file into your document using a menu command or by dragging a file icon into the Text Editor window (see "To Include a File Using Drag and Drop").
- Position the cursor where you want to insert the text file.
- Choose Include from the File menu.
The Include a File dialog box lists files and folders on your system. You can browse the documents listed, or change to a new folder to locate other files on your system.
Figure 10-6 Include a File dialog box
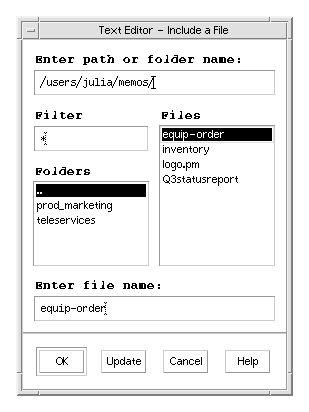
- Select the document you want to insert in the Files list.
- Press Return or click OK.
Using Drag and Drop
You can use drag and drop to move or copy text between Text Editor documents or other applications. You can also include a file into your document using drag and drop.
- Select the text that you want to move.
- With the pointer on the selection, press and hold mouse button 1, and drag to where you want to insert the text.
- Release the mouse button.
The text is inserted into your document relative to the position of the drag icon.
- Select the text you want to copy.
- With the pointer on the selection, press and hold the Control key and mouse button 1, and drag to where you want to copy the text.
- Release the Control key and mouse button.
The text is copied relative to the position of the drag icon.
When using drag and drop, the contents of the file are copied into the Text Editor window at the position of the insertion cursor. The original file remains intact.
- Click in your document where you want to include the file.
- Drag the file icon that you want to include into the Text Editor window.
You can search for a word or phrase in your document. The Find command begins from the position of the insertion cursor and proceeds through the entire document. You can automatically replace or delete occurrences found in your document.
Searches are case sensitive. To find all occurrences, search for both lowercase and uppercase instances.
To Find Text
- Choose Find/Change from the Edit menu or press Control+F.
Figure 10-7 Find/Change dialog box

- Type the text you want to find in the Find field.
- Press Return or click the Find button to locate the next occurrence of the text.
- To find additional occurrences, press Return or click Find again.
To Find and Change Text
- Choose Find/Change from the Edit menu or press Control+F.
- Type the text you want to find in the Find field.
- Type the replacement text in the Change To field.
- Press Return or click the Find button to locate the next occurrence of the text.
- Click Change to replace a single occurrence.
- To find and change additional occurrences, click Find and then Change.
Or, click Change All to replace all occurrences.

Caution: There is no Undo for Change All.
- Click Close when you are done.
To Find and Delete Text
- Choose Find/Change from the Edit menu or press Control+F.
- Type the text you want to delete in the Find field.
- Leave the Change To field blank.
- Press Return or click Find to locate the next occurrence.
- Click Change to delete a single occurrence.
- To find and change additional occurrences, click Find and then Change.
Or, click Change All to replace all occurrences.
- Click Close when you are done.
Once your editing is complete, format your document by choosing margins and text alignment.
To Format a Document
- Choose Settings from the Format menu.
Figure 10-8 Format Settings dialog box
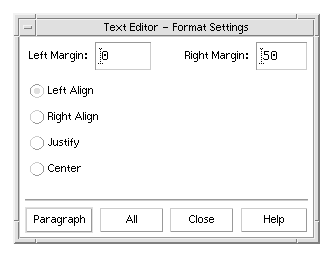
- Enter margins.
The default left margin is 0 and the right margin is dynamically set to the width of the Text Editor window. Margins are specified as a number of character columns.
- Select left, right, justify (block style), or center alignment.
- Determine the scope of the formatting:
- To format a single paragraph, place the cursor in the paragraph, then click Paragraph.
- To format the entire document, click All.
- After closing the dialog box, choose Paragraph or All from the Format menu to apply the settings.
To Print an Open Document
- Open the document in Text Editor.
- Choose Print from the File menu or press Control+P.
The Print dialog box displays the name of your system's printer and enables you to set printing options. By default, your document is printed on your system printer. If desired, you can direct your job to a different printer.
Figure 10-9 Print dialog box

- Optional. Set any of these printing options:
- Type the number of copies to print.
- Type text to appear on the printer banner page.
- Click Print Page Numbers if you want to number the pages.
- Type command-line printer options.
- Click Print.
The Print dialog box closes when you print your document. To close the dialog box without printing your file, click Cancel.
To Print a Closed Document
- Display the document's file icon in File Manager.
- Drag the file icon to the Printer control in the Front Panel.
The Print dialog box is opened.
- Optional. Set printing options.
- Click Print.
Recovering a File
If Text Editor is interrupted due to a system error, it attempts to save your changes in a recovery file in your current folder. The recovery file is named #filename#, where filename is the name of the document. If you had never named your document, the recovery file name is #UNTITLED#.
To Recover a File
- Start Text Editor.
- Open the recovery file.
- Save the document using your original file name or provide a new name for a previously unsaved document.
Text Editor and Other Applications
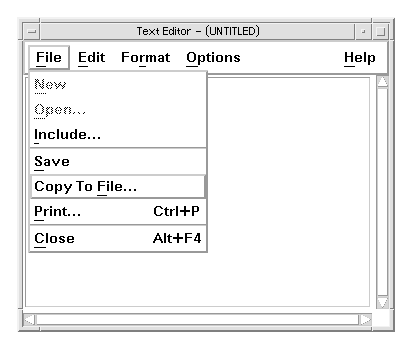
Other applications can use Text Editor as a tool to edit documents or other types of information. Under certain conditions, an application may choose to restrict your editing choices. In the example below, the File menu has been modified. The Save As command has been replaced with a Copy To File command and the New and Open commands are not available.
Figure 10-10 Text Editor with modified File menu
Generated with CERN WebMaker