


Common Desktop Environment: User's Guide
Contents of Chapter:
 To Start Calendar
-
- Calendar Main Window
-
- Calendar Tool Bar
-
- Calendar Views
-
- Day View
-
- Week View
-
- Month View
-
- Year View
-
- Appointments
-
- To Schedule a Basic Appointment
-
- To Set Appointment Options
-
- To Change an Appointment
-
- To Delete an Appointment
-
- To Find an Appointment
-
- To View an Appointment List
-
- To Do Items
-
- To Insert a To Do Item
-
- To Change a To Do Item
-
- To Delete a To Do Item
-
- To View a To Do List
-
- Marking To Do Items Completed
-
- To Mark an Item Directly in the To Do List
-
- To Use the To Do Editor To Mark an Item
-
- Printing Calendars, Appointment, or To Do Lists
-
- To Print Current Day, Week, Month, or Year Views
-
- To Print Your Appointment or To Do List
-
- To Change the Print Options for a Single Print Job
-
- Browsing Calendars on a Network
-
- To Obtain the Names of Other Calendars
-
- To Add or Delete Calendars in the Browse List
-
- To Determine Whether You Have Access to Other Calendars
-
- Scheduling Appointments on Other Calendars
-
- To Schedule a Group Appointment
-
- To Mail Reminders to a Group Using Calendar
-
- To Create an Appointment Message Using a Mail Program
-
- To Drag an Appointment from Another Application to Calendar
-
- To Drag an Appointment from Calendar to Another Application
-
- Customizing Calendar
-
- To Change Appointment Editor Defaults
-
- Changing the Display Settings
-
- To Set the Initial Calendar Displayed
-
- To Set the Time Boundaries on Day and Week Views
-
- To Set the Default Calendar View
-
- To Change Access and Permissions
-
- To Grant Access to Your Calendar
-
- To Deny Access to Your Calendar
-
- To Change the Printer Settings for Future Print Jobs
-
- To Change the Date Format
-
- To Change the Default Time Zone
-
- Accessing Calendar through a Command-Line Interface
-
- dtcm_editor
-
- dtcm_lookup
-
- dtcm_insert
-
- dtcm_delete
-
- dtcm
-
Calendar is a desktop application that enables you to schedule appointments and To Do items, set reminders, make and print appointment and To Do lists, browse other calendars, and schedule group appointments.
To Start Calendar
To start Calendar, click the Calendar control in the Front Panel.

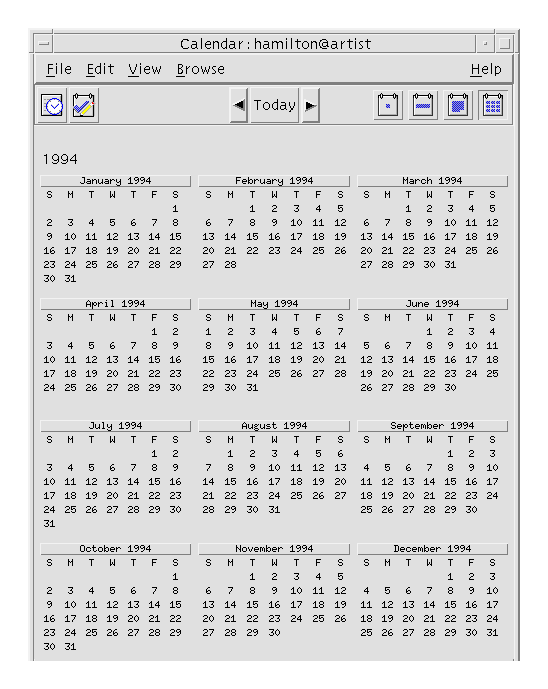
Calendar Main Window
The menus and tool bar controls are at the top of the main window. The selected Calendar view is displayed in the lower part of the main window.
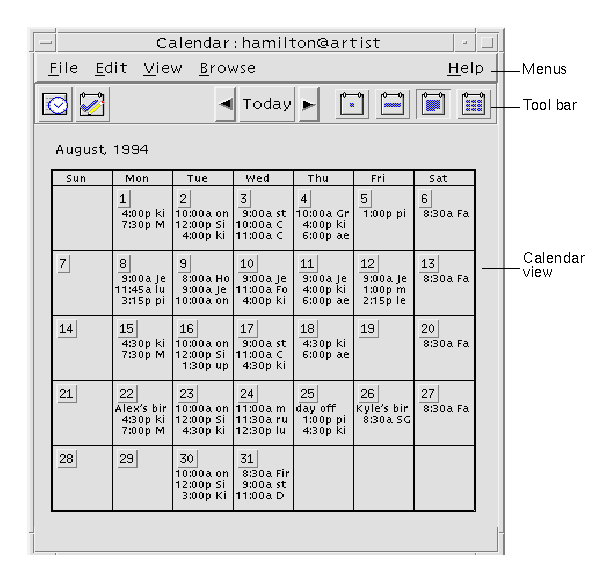
Calendar Tool Bar
Calendar's tool bar provides controls for quick navigation through calendars. The tool bar controls and their functions are described in Table 11-1.
Table 11-1 Calendar Tool Bar Icons

Calendar Views
The Calendar view is the day, week, month, or year displayed in the main Calendar window.
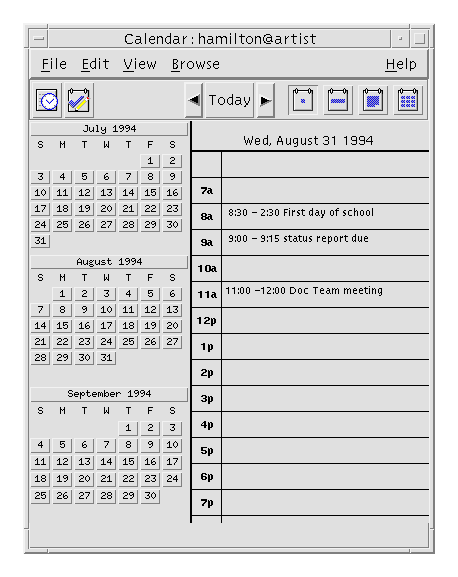
Day View
Day view displays the calendar you are viewing with one day's appointments in the window. Day view also provides a three-month mini-calendar that displays the month you are viewing and the previous and next months.
Clicking on a day in the three-month mini-calendar changes the Day view to display the selected day. Clicking on a month name in the mini-calendar changes the Calendar display from Day view to Month view.
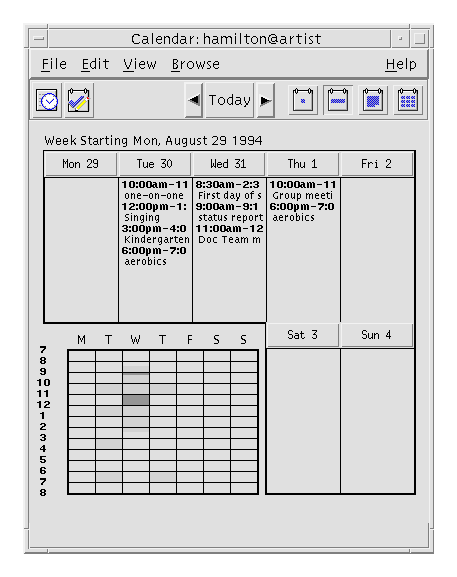
Week View
Week view displays the calendar you are viewing with one week's appointments in the window. The selected day is highlighted.
Week view also provides a week grid showing at a glance the times that are scheduled (shaded) and the times that are available (unshaded).
Clicking on a day name in the Week view changes the Calendar display from Week view to Day view.
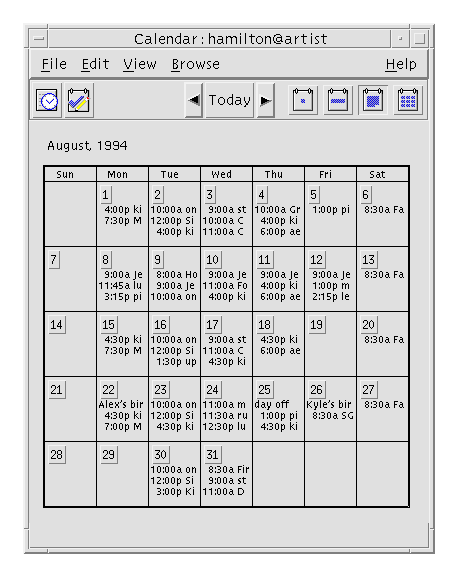
Month View
Month view displays the calendar you are viewing with one month's appointments in the window. The selected day is highlighted.
Clicking on a day in Month view changes the Calendar display to Day view.
Year View
Year view displays a year calendar. Appointments are not displayed. Clicking on a month name in Year view changes the Calendar display to Month view.
Appointments
Use the Appointment Editor to insert, change, or delete appointments on your calendar.
- In Day, Week, or Month view, display the day for which you want to schedule an appointment.
- Double-click that day to open the Appointment Editor.
- Choose the Start and End times.
The default appointment duration is one hour. If your appointment is longer or shorter, edit the time in the End field.
- Type a description of the appointment in the What field.
For example, you may want to enter the appointment's location and purpose.
If you want to add optional settings to an appointment, see "To Set Appointment Options."
- Click Insert.
The appointment is added to your calendar.
- Click Cancel to close the Appointment Editor.
- Set up a basic appointment, as described above.
- Click the More button in the Appointment Editor to display additional appointment options.
- Select the desired appointment in the Appointment Editor list.
- Select Beep, Flash, Popup, or Mail (or more than one, in combination) for the types of reminders you want.
- Edit the reminder intervals or the calendar-name@hostname entry if necessary.
- Optional. To repeat the appointment more than once, choose an option from the Occurs menu, and then choose an option from the For menu.
If you don't see the interval you want, choose Repeat Every from the Occurs menu, and type the desired interval in days, weeks, or months.
- Choose an option from the Privacy menu.
- Others See Time and Text
- Displays full appointment to others.
- Others See Time Only
- Displays only time commitment, not description.
- Others See Nothing
- Displays nothing to others.
- Click Change.
If you set the appointment options at the same time as setting up a basic appointment, click Insert at this step.
Note: If you are inserting multiple appointments one after another, be sure to click Clear between insertions. This will reset options that you may not want to carry over from one appointment to the next.
- Click Cancel to close the Appointment Editor.
- Click the Appointment Editor icon.
- Select the appointment in the appointment list that you want to change.
- Edit the appointment date, start or end time, description, reminders, frequency, or privacy.
- Click Change.
- Click Cancel to close the Appointment Editor.
- Click on the Appointment Editor icon to open it.
- Select the appointment in the appointment list.
- Click Delete.
- Click Cancel to close the editor.
- Choose Find from the View menu.
The Find dialog box is displayed
- Type some text in the in the Find field that can become a keyword for the search; for example, conference.
The Find field is not case-sensitive.
By default, Calendar searches the past and future six months in your calendar. If you want to change the search range, click Search all to search your entire calendar (can take a long time) or edit the dates in the Search from fields.
- Click Find.
Appointments with matching text are displayed in the Find window.
- Select the desired appointment in the list.
- Click Show Appointment to display the entire appointment.
- Click Close to close the Find dialog box.
This section describes how to create an appointment list and display it on your system. If you want to print your Appointment list, see "Printing Calendars, Appointment, or To Do Lists."
- Display the view of the calendar that you want the appointment list to show.
- Choose Appointment List from the View menu.
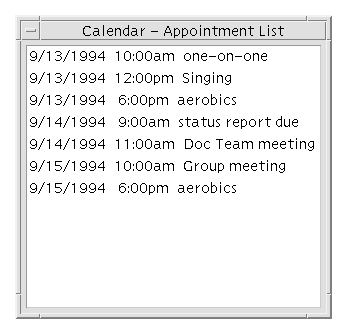
Appointments are listed chronologically and show date, time, and description. For example, if you are viewing by week, the Appointment List displays the week's appointments.
To Do Items
Use the To Do Editor to insert, update, or delete To Do items in your Calendar.
- Click the To Do Editor icon.

- Type or edit the due date for the item in the Due Date field.
- Type a description of the To Do item in the What field.
- Click Insert.
- Click Cancel to close the To Do Editor.
- In Day, Week, or Month view, display the day for which you want to change a To Do item.
- Select that day.
- Click the To Do Editor icon.
- Select the To Do item in the To Do list.
- Edit the due date or the description of the To Do item.
- Click Completed to change the status of the To Do item, if applicable.
- Click Change.
- Click Cancel to close the To Do Editor.
- Click the To Do Editor icon to open it.
- Select the To Do item in the To Do list.
- Click Delete.
- Click Cancel to close the editor.
This section describes how to create a list of To Do items and display it on your system. If you want to print your To Do list, see "Printing Calendars, Appointment, or To Do Lists."
- Display the view of the calendar that you want the To Do list to show.
- Choose To Do List from the View menu.
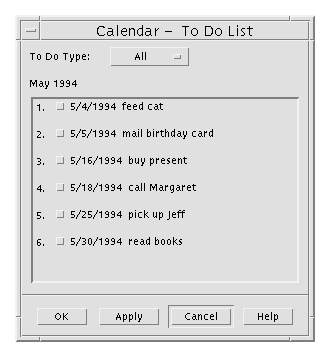
To Do items are listed chronologically and show a check box beside each item, due date, and description. For example, if you are viewing by day, the To Do List displays the day's To Do items.
Calendar keeps track of the state of To Do items: whether they're completed or pending. In the To Do List dialog box, you can choose to display all To Do items, only completed items, or only pending items.
If you make a To Do list and then want to check off an item on the list, use one of the two methods described below.
To Mark an Item Directly in the To Do List
- Choose To Do List from the View menu.
- Click the check box beside the To Do item you've completed.
- Click Apply or OK.
This changes the item's state to completed.
To return the item's state to pending, click the check box again and apply your changes.
- Click the To Do Editor icon.
- Select the To Do item in the To Do list.
- Click Completed to mark the item completed.
To return the item's state to pending, click Completed again.
- Click Change.
This changes the item's state to completed.
- Click Cancel to close the To Do Editor.
You can print any of the four Calendar views, plus appointment and To Do lists. Calendar uses the default printer settings when you choose Print Current View from the File menu. To customize printer settings, see "To Change the Printer Settings for Future Print Jobs".
- Display the Calendar view you want to print.
- Choose Print Current View from the File menu.
- Display the Calendar view containing the day for which you want to print an appointment or To Do list.
- Select that day.
- Choose Print from the File menu.
The Print dialog box is displayed.
- Choose Appointment List or To Do List from the Report Type menu.
- Specify a printer in the Printer Name field.
- Click Print.
- Choose Print from the File menu.
The Print dialog box is displayed.
- Double-click in the Printer Name field to select the contents and type a printer name.
- Choose the view or list you want to print from the Report Type menu.
- Click the arrows next to the Copies field to adjust the number of copies to be printed or type the number.
- Optional. Change the range of time to print in the From or To fields.
- Optional. Add printer options in the Print Command Options field.
For example, to save paper, you may want to specify -o nobanner to suppress header pages.
- To print Calendar data to a file instead of to a printer, select Print to file.
Click again on this setting to deselect it.
- Edit the file name, if desired.
- Click Print.
- Click Close to close the Print dialog box.
If you know the names of other calendars on a network, you can use Calendar to browse those calendars. A practical example is to set up a meeting or appointment for several people. You can use Calendar to check for free times.
To browse other calendars and possibly to insert an appointment, you need:
- The calendar names in the form calendar-name@hostname, such as kent@dailyplanet
- To add calendars to the Browse list
- To determine if you have access to other calendars
By default, Calendar allows the world to have browse permission. Only the calendar owner has insert and delete permission. To change access and permissions, see "To Change Access and Permissions".
Calendar doesn't yet provide a way for you to look up other calendar names.
 Call or talk to people and get them to tell you their calendar-name@hostname information.
To add:
- Choose Menu Editor from the Browse menu.
- Type the calendar-name@hostname in the User Name field.
- Click Add Name.
- Click OK to add the calendar to the Browse list and close the Menu Editor dialog box.
To delete:
- Select a calendar name in the Browse list.
- Click Remove Name.
- Click OK to delete the calendar from the Browse list and close the Menu Editor dialog box.
- To erase your changes and leave the dialog box displayed, click Reset before clicking Apply.
- To save your changes and close the dialog box, click OK.
To save your changes and leave the dialog box displayed, click Apply.
To erase your changes and close the dialog box, click Cancel.
- Choose Compare Calendars from the Browse menu.
- Select one or more entries in the Browse list that you want to check for access.
- Click Schedule to open the Group Appointment Editor.
- Look at the Calendar Access list.
The Calendar Access list displays the calendar names that you selected in the Compare Calendars dialog box.
A "Y" in the Access column means you have insert access. An "N" means you don't.
To add appointments or To Do items to other calendars, ask the owners to grant you insert access. To find out how to grant or deny access to your calendar by others, see "To Change Access and Permissions".
Once you've browsed calendars for free times and have permission to insert appointments on other calendars, you can schedule a group appointment.
Use the Group Appointment Editor to insert, change, or delete group appointment on your and other calendars. If you don't have insert access to other calendars, you can use the Group Appointment Editor to mail notices of group appointments to other users.
- Choose Compare Calendars from the Browse menu.
- Click one or more entries in the Browse list.
Notice that the grid overlays calendars one on top of another and displays busy times shaded darker and available times unshaded.
- Click in an unshaded time block in the grid.
- Click Schedule.
The Group Appointment Editor is displayed with the fields for date, time, and mail automatically filled out.
- Type (or edit) the group appointment start time in the Start field.
- Type (or edit) the group appointment end time in the End field.
- In the What field, typethe appointment description, such as its location or purpose.
- Click More.
- Choose the repeat interval and duration for the group appointment.
- Click Insert to add the group appointment to the selected calendars.
If you don't have insert access on all the calendars, you can send mail to notify others about the group appointment. See "To Mail Reminders to a Group Using Calendar."
- Click Cancel to close the Group Appointment Editor.
Once you've set up a group appointment (date, start and end times, description, repeat interval), you may want to mail the group a reminder. To send mail:
- Click More in the Group Appointment Editor to display additional options.
- Click Mail.
Calendar displays a Compose window containing an appointment attachment. The appointment attachment is pre-addressed to the selected users and automatically filled out with the date and appointment start and end times.
- Click Deliver in the Compose window.
Calendar mails the reminder to the selected users.
Recipients of a mail message with a calendar-formatted reminder can drag the message from the mailer header window and drop it on their calendars to automatically schedule the pre-formatted appointment.
- Start the mail program.
- Open a compose window or create a blank message.
- Add a section to the message that includes exactly the following format. Replace
<tab> with a tab character, <blank line> with a blank line, and replace the italicized format information with actual data.
<tab>** Calendar Appointment **
<blank line>
<tab>Date:<tab>mm/dd/yy
<tab>Start:<tab>hh:mm am
<tab>End:<tab>hh:mm pm
<tab>What:<tab>description line 1
<tab><tab>description line 2
An example might be:
	** Calendar Appointment **

	Date:	11/22/94
	Start:	10:00 am
	End:	11:00 am
	What:	Staff meeting
		Monet conference room
- Insert any additional text into the mail message.
- Address the message to the recipient and include the subject of the message.
- Send the message.
For information about using Mailer, see Chapter 8, "Using Mailer."
From Mailer or File Manager, and possibly other applications, you can drag an appointment icon to Calendar to schedule it.
- In the Mailer message header list, click the header containing the formatted appointment.
- Drag the header to Calendar and drop it.
The pointer changes to an icon representing the moving file.
Calendar schedules your appointment and prints a message in the message area stating that the appointment was scheduled.
- Display the Calendar view containing the day on which you scheduled the appointment.
- Double-click that day to open the Appointment Editor.
Verify that the appointment is scheduled for the correct day and time.
For more information on using Mailer, see Chapter 8, "Using Mailer."
If you have a file containing a formatted appointment:
- In an open File Manager window, navigate to a folder containing a file with a formatted appointment.
- With both the formatted appointment and Calendar visible on your screen, drag the formatted appointment file to Calendar and drop it.
Calendar schedules your appointment.
- Double-click that day to open the Appointment Editor.
Verify that the appointment is scheduled for the correct day and time.
For more information about File Manager, see Chapter 5, "Managing Files with File Manager."
To Drag an Appointment from Calendar to Another Application
From Calendar, you can drag an appointment icon to Mailer to mail it to someone or to File Manager to save it in your file system.
- Use the Appointment Editor to create an appointment but don't click Insert.
- Start Mailer and choose New Message from the Compose menu.
Make sure both the Appointment Editor and Mailer's Compose window are visible on your screen.
- Drag the Drag Appt icon from the Appointment Editor and drop it on Mailer's attachment list.
The pointer changes to an appointment icon representing the moving file.
Mailer displays your appointment as a text file in the attachment list.
- Compose and address your mail message and send it.
For more information on using Mailer, see Chapter 8, "Using Mailer."
- Use the Appointment Editor to create an appointment but don't click Insert.
- In an open File Manager window, navigate to a folder where you want to save the appointment in a file.
- With both the File Manager window and Calendar Appointment Editor visible on your screen, drag the Drag Appt icon from the Appointment Editor and drop it on the File Manager window.
The appointment is saved in a text file in the folder where you dropped it.
For more information about File Manager, see Chapter 5, "Managing Files with File Manager."
Customizing Calendar
Calendar provides Options dialog boxes to change the settings for all future appointments. To change the settings for individual appointments, see "To Set Appointment Options".
- Choose Options from the File menu.
The Calendar Options dialog box is displayed.
- Choose Editor Defaults from the Category menu.
- Optional. Change the default appointment duration in the Duration field.
- Optional. Change the default appointment start time by choosing from the Start menu.
- Select Beep, Flash, Popup, or Mail reminders.
- Beep
- Causes your system to emit an electronic beep
- Flash
- Causes your calendar to flash
- Popup
- Displays a reminder dialog box
- Mail
- Sends electronic mail
- Edit the default time intervals if necessary.
The time interval fields are active for each reminder you select. They specify the time before an appointment that the reminder will be activated.
- Choose a privacy option from the Privacy menu.
- Others See Time Only
- The default - displays only the time of an appointment so others can see you're busy
- Others See Time and Text
- Displays the time and text of an appointment in your calendar
- Show Nothing
- Displays nothing about an appointment in your calendar for maximum privacy
- Click Apply to apply the new defaults to all future appointments.
- Click Cancel to close the Calendar Options dialog box.
Changing the Display Settings
You can customize many parts of the Calendar display:
- Determine the initial calendar that displays
- Set time boundaries
- Set the default view
You can set Calendar to display a calendar other than your own when you first start it.
- Choose Options from the File menu
The Calendar Options dialog box is displayed.
- Choose Display Settings from the Category menu.
- Double-click in the Initial Calendar View field and type calendar-name@hostname for the calendar you want to view each time you start Calendar.
- Click Apply.
- Click Cancel to close the Options dialog box.
Time boundaries are the earliest and latest hours you want displayed in your calendar.
- Choose Options from the File menu.
- Choose Display Settings from the Category menu.
- Move the Begin and End sliders to adjust the earliest and latest hours you want displayed on your calendar.
- Select 12 Hour or 24 Hour time display.
- Click Apply.
- Click Cancel.
Calendar displays the default Calendar view each time you start it. The initial default view is by month. You may want to set the default to the view you use most often, such as Week view.
- Choose Options from the File menu.
- Choose Display Settings from the Category menu.
- Select Day, Week, Month, or Year from the Default View options.
- Click Apply.
- Click Cancel.
You can set access to your calendar, controlling what others can do in your calendar. To determine whether you have access to other calendars, see "To Determine Whether You Have Access to Other Calendars".
- Choose Options from the File menu.
- Choose Access List and Permissions from the Category menu.
The Access List and Permissions dialog box is displayed.
Note: Depending on the version of your calendar, your Access List and Permissions dialog box may look different than the one pictured in Figure 11-1. If so, go to Figure 11-2 and follow the instructions after that figure.
Figure 11-1 Access List and Permissions dialog box - Version 1
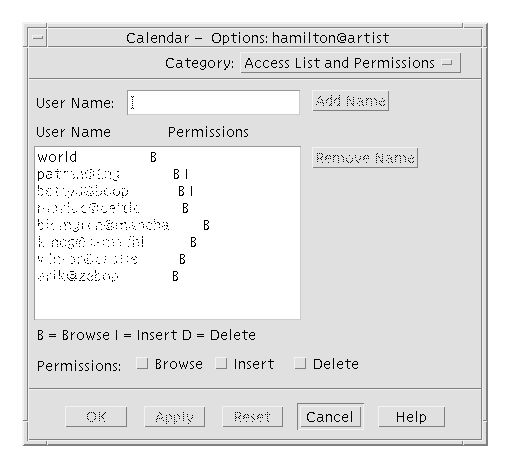
- In the User Name field, type calendar-name@hostname for the calendar to which you want to grant access.
The default permission is for browse access only.
- Select Browse, Insert, or Delete permissions.
- Browse
- The default - enables others to see information in your calendar
- Insert
- Others can add appointments or To Do items to your calendar
- Delete
- Others can delete appointments or To Do items from your calendar
- Click Add Name to add the calendar to the Access list with the permissions you've chosen.
- To erase your changes and leave the dialog box displayed, click Reset before clicking Apply.
To save your changes and close the dialog box, click OK.
To save your changes and leave the dialog box displayed, click Apply.
- To erase your changes and close the dialog box, click Cancel.
Saving your changes grants the selected access to the specified calendar.
If your Access List and Permissions dialog box resembles
Figure 11-2, follow the instructions after the figure.
Figure 11-2 Access List and Permissions dialog box - Version 2
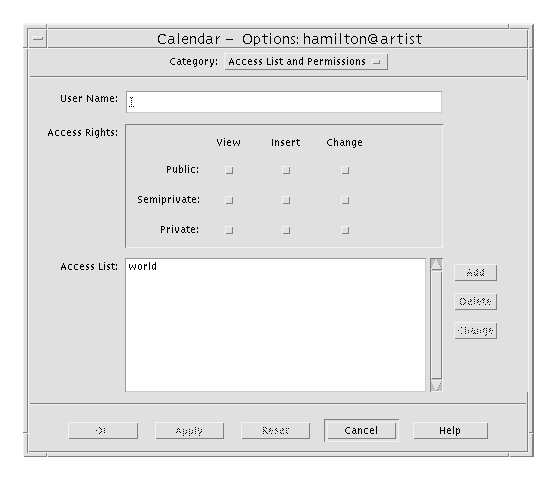
- In the User Name field, type calendar-name@hostname for the calendar to which you want to grant access.
The default permission is for view access to public appointments only.
- Select View, Insert, or Change permissions.
Permissions control whether others can perform specific operations on your calendar. You can choose more than one permission.
- Select Public, Semiprivate, or Private access rights.
Access rights control the specific types of appointments others can see.
- Public
- Enables another calendar to display the time and text of your appointments marked Others See Time and Text.
- Semiprivate
- Enables another calendar to display the time and text of your appointments marked Others See Time Only.
- Private
- Enables another calendar to display the time and text of your appointments marked Others See Nothing.
- Click Add to add the calendar to the Access list with the permission and access rights you've chosen.
- To erase your changes and leave the dialog box displayed, click Reset before clicking Apply.
To save your changes and close the dialog box, click OK.
To save your changes and leave the dialog box displayed, click Apply.
To erase your changes and close the dialog box, click Cancel.
Saving changes grants the selected access and permissions to the specified calendar.
- Choose Options from the File menu.
- Choose Access List and Permissions from the Category menu.
- Select the calendar for which you want to deny access in the Access list.
- Click Remove Name (or Delete) to remove the user from the Access list.
To erase your changes and leave the dialog box displayed, click Reset before clicking Apply.
To save your changes and close the dialog box, click OK.
To save your changes and leave the dialog box displayed, click Apply.
To erase your changes and close the dialog box, click Cancel.
Saving changes removes access for the specified calendar.
To print a Calendar view or appointment or To Do list using the default printer settings, see "To Print Current Day, Week, Month, or Year Views". To change the printer settings for future print jobs:
- Choose Options from the File menu.
The Options dialog box is displayed.
- Choose Printer Settings from the Category menu.
The Printer Settings dialog box is displayed.
- Select Printer or File.
- Type the name of your default printer.
- Edit the Options field to specify print command-line options, if any.
For example, to save paper, you may want to specify -o nobanner to suppress header pages.
- Edit the page dimensions or position, if necessary.
- Edit the number of units, if desired.
For example, if you are printing Week view and you set Units to 2, you will print the current week and the next week.
- Edit the number of copies if you want more than one.
- Choose the desired privacy option for the information you want printed.
See Step 7 of "To Change Appointment Editor Defaults" for privacy options.
- To erase your changes and leave the dialog box displayed, click Reset before clicking Apply.
To save your changes and close the dialog box, click OK.
To save your changes and leave the dialog box displayed, click Apply.
To erase your changes and close the dialog box, click Cancel.
- Choose Options from the File menu.
- Choose Date Format from the Category menu.
The default date format in Calendar is MM/DD/YY.
- Choose the desired date order option.
- Choose the desired date separator.
- To erase your changes and leave the dialog box displayed, click Reset before clicking Apply.
To save your changes and close the dialog box, click OK.
To save your changes and leave the dialog box displayed, click Apply.
To erase your changes and close the dialog box, click Cancel.
You can set Calendar to view your or another calendar's appointments in a time zone other than your local one.
- Choose Time Zone from the View menu.
- Choose the Custom Time setting.
- In the Hours field, edit the number of hours before or after Greenwich Mean Time that you want your calendar set to.
For example, to synchronize your calendar for Pacific Standard Time, choose GMT+8 hours. For Finland, choose GMT-2 hours. For Japan, choose GMT-9 hours. You may have to adjust by one hour for daylight, or summer, time.
- To revert to your own time zone, click the My Time setting in the Time Zone dialog box.
- Click OK to apply changes and close the dialog box.
Accessing Calendar through a Command-Line Interface
Calendar offers the capability to look up, insert, and delete appointments through a terminal emulator command-line interface.
Use the standalone Appointment Editor to create a Calendar-formatted appointment and save it in a file.
- Type dtcm_editor filename at the command line.
The standalone Appointment Editor is displayed.
- Type a date in the Date field.
Remember to use the date format set in the Date Format dialog box.
- Choose the Start and End times for the appointment.
- Type a description of the appointment in the What field.
- Choose a frequency for the appointment from the Occurs menu.
- Click Save to write the appointment contents to the file you specified on the command line.
Use dtcm_lookup to view appointments on your calendar.
- Type dtcm_lookup at the command line to view appointments for the default view. For example, if Day view is the default, to view appointments for the current day:
system% dtcm_lookup
Appointments for Monday October 31, 1994:
	1) Halloween
	2) 2:30pm-3:30pm Staff meeting
	3) 6:00pm Trick-or-treating
	4) 7:15pm-10:00pm Choir practice
- To choose the calendar, date, or range of time for which to look up appointments, use the following syntax:
dtcm_lookup [-c calendar] [-d date] [-v view]
For example:
system% dtcm_lookup -c hamilton@artist -d 10/28/94 -v day
Appointments for Friday October 28, 1994:
	1) 9:00am-10:00am Project meeting
	2) 1:30pm-2:00pm Testing
Use dtcm_insert from the command line to insert appointments on your calendar. For example:
system% dtcm_insert -d 11/1/94 -s 11:30am -e 12:30pm -w workout
Appointments for Tuesday November 1, 1994:
	1) 10:00am-11:00am one-on-one
	2) 11:30am-12:30pm workout
	3) 12:30pm-1:00pm eat lunch
dtcm (Calendar) automatically prints the appointments scheduled so you can see that the new appointment was inserted.
Use dtcm_delete from the command line to delete appointments from your calendar. For example:
system% dtcm_delete -d 11/1/94
Appointments for Tuesday November 1, 1994:
	1) 10:00am-11:00am one-on-one
	2) 11:30am-12:30pm workout
	3) 12:30:pm-1:00pm eat lunch
Item to delete (number)? 3
Appointments for Tuesday November 1, 1994:
	1) 10:00am-11:00am one-on-one
	2) 11:30am-12:30pm workout
When you don't want to delete any more items, press Control+C.
Use dtcm to run Calendar from the command line. For example:
system% dtcm &
Generated with CERN WebMaker