


Common Desktop Environment: User's Guide
5 Managing Files with File Manager
Contents of Chapter:
 To Open File Manager
-
- Introducing the File Manager Window and Desktop
-
- Basic File System Concepts
-
- Files
-
- Folders
-
- Objects
-
- Paths
-
- Basic File Management Skills
-
- To Select a Single File or Folder
-
- To Select Multiple Files and Folders
-
- To Drag and Drop a File or Folder
-
- To Display a Pop-up Menu
-
- To Rename a File or Folder
-
- To Get Help on a File or Folder
-
- Opening a File or Folder
-
- To Open a File or Folder
-
- Manipulating Files and Folders
-
- To Create a New File or Folder
-
- To Move a File or Folder
-
- To Copy a File or Folder
-
- To Create a Symbolic Link
-
- Navigating to Folders and Subfolders
-
- To Change to Another Folder
-
- To Go to Your Home Folder
-
- To Change to the Parent Folder
-
- To Open a Terminal Window in the Current Folder
-
- Executing an Action for a File or Folder
-
- To Execute the Default Action
-
- To Execute Other Actions
-
- Deleting Objects to the Trash Can
-
- To Open the Trash Can Window
-
- To Put an Object in the Trash Can
-
- To Put Back a File or Folder from the Trash Can
-
- To Delete a File or Folder Permanently
-
- File Ownership and Security
-
- Who Has Access?
-
- Types of Access Permissions
-
- Default Permissions
-
- To Change the Owner of a File or Folder
-
- To Change the Permissions on a File or Folder
-
- Using File Manager Objects on the Desktop
-
- To Put a File or Folder on the Workspace Backdrop
-
- To Display the Pop-up Menu for a Workspace Object
-
- To Remove an Object from the Workspace
-
- Locating Files
-
- To Find an Object by Name
-
- To Find a File by Contents
-
- Customizing File Manager Views
-
- To Configure the Headers
-
- To Configure How Icons are Placed
-
- Using the Tree View
-
- To Display the Tree View
-
- To Display the Folder View
-
- To Change How Objects Are Represented
-
- To Change the Order Icons Are Sorted
-
- To Re-Sort (Clean Up) Objects
-
- To Save the Current Preferences as Your Default
-
- Hiding Files and Folders
-
- To Show or Hide Files and Folders
-
- To Specify Which Data Types Are Hidden
-
- Icon Browsing
-
- To Enable Icon Browsing
-
- To Disable Icon Browsing
-
- To Change the Icon Display Area Size
-
Use File Manager to create, find, and use desktop objects: files, folders, and applications. Each object is represented by an icon in File Manager.
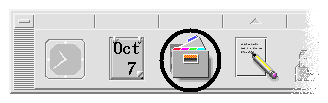
To Open File Manager
 Click the File Manager control in the Front Panel.
The File Manager main window is a view of a folder on your system. The folder you are currently viewing is called
the current folder.
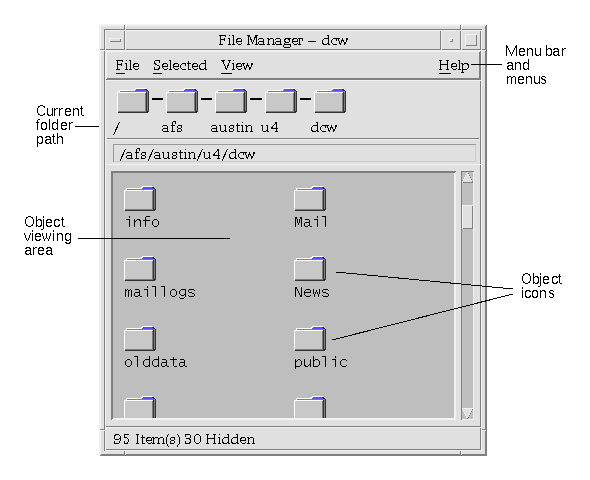
- Current folder path
- Displays the path to the current folder
- Menu bar and menus
- Contain the commands available in File Manager
- Object viewing area
- Shows the objects (files and folders) in the current working folder
- Object icons
- Icons representing the files and folders in the current folder
This section describes basic file system concepts.
Files
A file is a container that holds information. Most of the files you use contain information (data) in some particular format--a document, a spreadsheet, a chart. The format is the particular way the data is arranged inside the file. The format of a file is known as its data type.
When File Manager is in one of its icon-view modes, you can identify the data type of a file by the icon used to represent the file. Each data type has a different icon.
Most application programs understand a limited number of data types. For example, a document editor probably cannot read a spreadsheet file. The desktop helps you recognize different types of files using a data type database. A data type identifies the files of a particular format and associates them with the appropriate applications. These associations mean you don't have to remember commands to accomplish frequent tasks. In most cases, when you double-click a file, the desktop will automatically launch the application that understands that file's data type.
The maximum allowable length of a file name varies from system to system. Some operating systems do not allow file names longer than 14 characters. If necessary, consult with your system administrator.
Folders
A folder is a container for files, similar to a folder in a file cabinet. In fact, File Manager uses a folder icon to represent a folder. A folder can contain other folders--sometimes called subfolders. With folders and subfolders, you can create multiple layers of organization that form a hierarchy. In other contexts, folders are often referred to as directories.
If you drew a picture of the folder hierarchy with each subfolder underneath the folder that contains it--its parent folder--and drew a line from each folder to its parent, the picture would look like an upside-down tree. Therefore, we often call the folder hierarchy a folder tree.
Within any single folder, each file name must be unique. However, files in different folders may have the same name.
As you navigate from folder to folder, your current location is referred to as the current folder.
Objects
Since files and folders are both represented in File Manager as icons, the term object is used to describe them both. Objects are discrete things on the desktop that you can create and manipulate.
On the desktop, applications can also be represented as objects. For example, Application Manager contains objects representing the applications available on your system.
Paths
The location of a file is often specified by listing the folders and subfolders that lead to the file--this list is called a path. A file's path is visible in two places in File Manager. First it is shown in the iconic path as a string of folders. Second, it is shown in a text form in the text path line above the view area. These two areas can be turned off. (See "To Configure the Headers" for more information.)
Paths and Path Names
The path to an object is a way to specify where the object is located in the file system. There are two ways to specify the path: absolute path and relative path.
Absolute Paths
A path is an absolute path if it begins at the root folder. The root folder is the single common folder on your system where the hierarchy begins. If a path begins with a slash (/), it is an absolute path specified from the root folder. For example, the following is an absolute path to the file letter:
/usr/dt/config/letter
Relative Paths
A path is relative if it describes the location of a file or folder as it relates to the current folder. If you are in a folder and you want to move down the folder tree, you don't need to type the absolute path name. You can just type the path starting with the name of the next folder in the path. If a path does not begin with a slash, it is a relative path. For example, if the current folder is /usr/dt and you want to move to the folder /usr/dt/config/letters, you would use the following relative path:
config/letters
Two special folder names are useful when specifying relative paths. The "." folder (sometimes called "dot") represents the current folder. The ".." folder (sometimes called "dot-dot") represents the parent folder--the folder one level up in the folder hierarchy. For example, if your current folder is /usr/dt/config, then the relative path to the Dtwm file becomes:
../app-defaults/language/Dtwm
because the file is in the /usr/dt/app-defaults/language folder, one level above the current folder and in the app-defaults/language subfolder.
See Also
If you still want to learn more about your computer's file system, refer to the online help or documentation for your operating system. There are also many commercial books available that cover the basics of file systems and file management.
To get started using File Manager, you need to learn a few basic skills. Each icon in File Manager represents an object that you can manipulate in a variety of ways, including:
- Object selection
- Dragging and dropping
- Using pop-up menus
- Renaming objects
- Getting online help on objects
- Opening objects
To Select a Single File or Folder
When you select the icon of a file or folder, its name is highlighted. Many choices in File Manager's menus apply to the currently selected file or folder. You select an object so that you can use one of the Selected menu choices on that object. The Selected menu contains choices that affect only the currently selected objects. The contents of this menu will change as you select different kinds of objects in the view area. These choices will appear dimmed until you select an icon.
Mouse
Click once on the icon.
Keyboard
- Use the Tab and arrow keys to move the highlight to the icon you want to select.
- Press the Spacebar.
To deselect a file or folder, select another icon or click an empty area within the File Manager window.
To Select Multiple Files and Folders
You select multiple objects so that you can use one of the Selected menu choices on these objects. Selecting multiple files is useful if you want to delete several files at once, or move a group of files to a new folder. However, when you select more than one object, the Actions portion of the Selected menu will be empty.
When multiple icons are selected, dragging any one of the selected icons drags the whole group. The Selected menu and various menu commands that apply only to a single object are inactive.
Mouse
- Press mouse button 1 in a blank area of the view, drag the mouse to draw a box around the icons you want to select, then release the mouse button.
Or, you can click mouse button 1 to select the first icon, then hold down the Control key and click mouse button 1 to select each additional icon. This method is useful when the icons you want to select are not located next to each other.
- To remove a single icon from a selected group, hold the Control key down and click the icon you want to remove.
Keyboard
- Select the first file or folder icon by pressing the Spacebar.
- For each additional icon you want to select, move the highlight to it, then press Control+Spacebar.
To Drag and Drop a File or Folder
- Put the mouse pointer over the file or folder.
- Press and hold mouse button 1.
- Drag the icon to where you want to drop it.
- Release the mouse button.
So, the motion for dropping an object is press...drag...release.
To cancel a drag in progress, press Esc before releasing the mouse button.
Figure 5-1 Drag icon showing the object being dragged
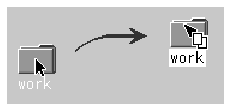
If more than one icon is selected, you drag the entire group by dragging any of the selected icons.
Note: You cannot drag and drop an object without a mouse or other pointing device.
Basic Drag-and-Drop Tasks
- To move a file to another folder, drop the icon on the destination folder's icon. Or, if both the source and destination folders are open, drag the icon from the source folder's view window and drop it onto the background of the folder's view window.
- To place an icon for a file or folder on the backdrop of your current workspace, drop the file or folder icon outside of any window. A desktop object is really just a reference to the real object, which remains in the File Manager view, unchanged.
- To print a file, drop the file icon onto the Printer control in the Front Panel (or one of the printers in the Personal Printers subpanel).
- To delete a file or folder, drop the file or folder icon onto the Trash Can control in the Front Panel.
If you try to drop an icon in a location that does not support dropped objects, the icon snaps back to its original location in File Manager or on the desktop.
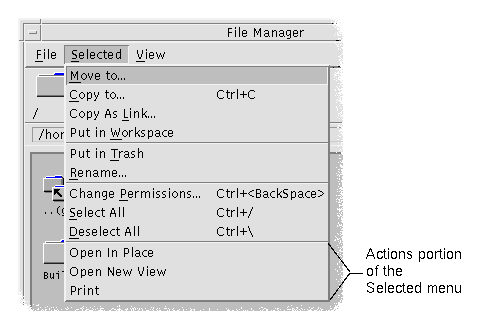
To Display a Pop-up Menu
Each object in File Manager has a pop-up menu. The File Manager window itself has a pop-up menu viewable when the pointer is placed in a location in the view window outside the boundaries of the individual file or folder objects.
Mouse
- Point to the icon whose pop-up menu you want to display and press mouse button 3. (On a two-button mouse, press the right mouse button.)
Figure 5-2 Sample pop-up menu

- To choose a command from the menu, drag to the command, then release. Or, click the command.
Keyboard
- Using the Tab and direction keys, move the highlight to the icon whose menu you want to display.
- Press Shift+F10.
- To choose a command from the menu, use the direction keys to highlight the command, then press Return.
- To cancel the menu without choosing a command, press Esc.
To Rename a File or Folder
Note: You can't rename actions.
Mouse
- Select the file or folder name by clicking the name beneath its icon.
- Type the new name.
- Press Return. If you click outside the name without first pressing Return, your changes will be lost.
To cancel a rename operation, press Esc.
Keyboard
- Use the Tab and arrow keys to move to the icon for the file or folder you want to rename.
- Press the Spacebar to highlight (select) the icon name.
- Choose Rename from the Selected menu.
- Type the new name.
- Press Return.
To cancel a rename operation, press Esc.
To Get Help on a File or Folder
The description displayed when you ask for help on an icon describes the data type associated with the file or folder. The description is specified in the data-type definition.
Mouse
- Select the file or folder, then press F1.
- Or, put the mouse pointer on the object and select help from the object's pop-up menu (displayed by pressing mouse button 3).
- Or, choose On Item from the Help menu, then click the file or folder's icon.
Keyboard
Use the Tab and arrow keys to move to the icon, then press F1.
See Also
Opening a File or Folder
The most basic action you can perform on an object is to open it. "Open" is a very general term, and the action taken depends on the type of object you are opening. For example, opening a folder changes the File Manager view to show the contents of that folder. Opening a data file usually starts the application that created the file and loads the data file
To Open a File or Folder
- Double-click the icon.
Double-clicking an icon executes the object's default action, which is always the first action in the Actions portion of the Selected menu. For most data files, the default action opens the file by starting the appropriate application and loading the file.
- Or, select the icon, then go to the menu bar and choose Open (or Open In Place or Open New View) from the Selected menu.
- Or, choose an Open item from the icon's pop-up menu (displayed by pressing Shift+F10 or mouse button 3).
The major identifying features of a file or folder are:
To Create a New File or Folder
- Choose New File or New Folder from the File menu.
- Type the name into the New File or New Folder field.
- Click OK or press Return.
To close the New File or New Folder dialog box without creating a new file or folder, click Cancel or press Esc.
Other Ways to Create Objects
- Copy an existing object, then rename the copy (see "To Copy a File or Folder").
- Create a new file within an application. For example, Text Editor creates a new file when you save a new document.
To Move a File or Folder
Note: If you attempt to move a file or subfolder from a folder where you do not have permission to make changes, File Manager may create a copy of the object, and display an error message indicating that you cannot delete the original file.
Mouse
- Make the source and destination folders visible:
Open a File Manager view of the contents of the destination folder or the icon of the closed destination folder.
- Select the file or folder to be moved and drag it to the destination folder.
If you move a folder, the entire folder and its contents are moved.
Keyboard
- Use the Tab and direction keys to move the highlight to the file or folder to be moved.
- Press the Spacebar to select the object.
- Choose Move to from the Selected menu.
- Type a name into the Destination Folder text field.
For example, if you want to move the file report into the folder /u/john, you would type /u/john
- Click OK or press Return.
If you move a folder, the entire folder and its contents are moved.
Mouse
- Make the source and destination folders visible:
Open a File Manager view of the contents of the destination folder or the icon of the closed destination folder.
- Select the file or folder to be copied.
- Press and hold the Control key.
- Drag the file or folder and drop it onto the destination folder.
Make sure that you release the mouse button before you release the Control key. Otherwise, you will move instead of copy the file or folder.
Keyboard
- Select the icon.
- Choose Copy to from the Selected menu.
- Type a name into the Destination Folder text field.
Note that this must be the new full path name for the file. For example, if you want to copy the file report into the folder /u/jon, you would type /u/jon.
- Click OK or press Return.
To close the Copy File dialog box without copying a file, click Cancel or press Esc.
To Create a Symbolic Link
A link icon is a copy of an icon that points to the same file or folder as the original icon. Any changes you make after opening the link icon will also appear when you access the file or folder using the original icon.
Mouse
- Make the source and destination folders visible:
- Open a File Manager view of the contents of the destination folder.
- Or, open a File Manager view that shows the icon of the closed destination folder.
- Select the file or folder to be copied.
- Press and hold the Shift key and the Control key while dragging and dropping the icon of a file or folder onto the icon of a new folder.
When you drop the icon, File Manager creates symbolic link in the new folder that points to the original file or folder. Make sure that you release the mouse button before you release the Shift key and the Control key. Otherwise, you will move instead of link the file or folder.
Keyboard
- Use the Tab and arrow keys to move the highlight to the icon of the file or folder to which you want to link.
- Press the Spacebar to select the icon.
- Choose Copy as Link from the Selected menu.
- Type a name into the Destination Folder text field including the path for the name of the folder where you want this link icon to appear. If you want this link icon to have a different name that the original icon, type a new name in the Name for copy text field.
- Click OK or press Return.
Each File Manager window (also called a view) shows the contents of a single folder.
If you are not familiar with hierarchical file systems, see "Basic File System Concepts".
You can change to another folder in any of the following ways:
- Double-click a folder icon.
- Select a folder icon and choose Open In Place from the Selected menu to open the folder in the current window or Open New View from the Selected menu to open it in a new window.
- Choose the Open In Place or Open New View command from the folder's pop-up menu (displayed by pressing Shift+F10 or mouse button 3).
- Double-click a folder in the iconic path to change the view to that folder.
- Select (click) the current folder line to change it into a text field. Type the name of the path you want and then press Return.
- In the current folder line, double-click a segment of the current path. For example, if the current folder is
/users/tom/.dt/types, you can change to the /users/tom folder by double-clicking the word tom.
To Go to Your Home Folder
Choose Go Home from the File menu.
To Change to the Parent Folder
- Choose Go Up from the File menu
- Or, double-click the .. (go up) icon.
To Open a Terminal Window in the Current Folder
This procedure opens a terminal emulator window with the same current folder as the File Manager window. This is a quick way to type a command to affect the contents of the folder you are currently viewing.
Choose Open Terminal from the File menu.
Note: You must have execute permission for a folder before you can open a Terminal window from it.
To find out how to use terminal emulators, see Chapter 12, "Using Terminal."
Executing an Action for a File or Folder
Actions act on objects, and are a basic part of working with them. For example, printing the contents of an object uses the Print action. Starting an application for a data file object uses an Open action, or some other application action.
The Selected menu contains a list of commands followed by a list of actions you can use with the selected icon. The contents of the actions portion of the Selected menu change depending on the type of icon that is currently selected.
The action listed at the top of the action portion of the menu (the default action) is the action that will be taken when you double-click a file or folder. In the menu shown in the figure, the default action is Open In Place.
To Execute the Default Action
The default action is the first action listed in the actions portion of the Selected menu.
Double-click the object's icon.
To Execute Other Actions
- Select the object's icon.
- Choose the action you want to execute from the Selected menu or from the object's pop-up menu.
The Trash Can collects the files and folders that you delete. They are not actually removed from the file system until the trash is "emptied." You can only change your mind and restore a file you've put in the Trash Can if the Trash Can hasn't been emptied.
To Open the Trash Can Window
Click the Trash Can control in the Front Panel.

- Choose Put in Trash from the object's pop-up menu (displayed by pressing Shift+F10 or mouse button3).
- Or, select the object's icon, then choose Put in Trash from the Selected menu.
- Or, drag and drop the object's icon onto the Trash Can control in the Front Panel.
- Or, drag an object's icon to the open Trash Can window.
To Put Back a File or Folder from the Trash Can
- Drag the object from the Trash Can window to File Manager.
- Or, in the Trash Can window, select the object you want to restore and choose Put back from the File menu.
- Or, choose Put back from the object's pop-up menu (displayed by pressing Shift+F10 or mouse button 3).
To Delete a File or Folder Permanently
When you delete a file permanently, it cannot be recovered (unless you have a backup mechanism.)
- Open the Trash Can.
- Select the objects you want to empty from the Trash Can.
Select individual objects, or choose Select All from the File menu.
- Choose Shred from the File menu or from the object's pop-up menu (displayed by pressing Shift+F10 or mouse button 3).
- Click OK in the confirmation dialog box.
Note: The Trash Can is automatically emptied when you log out of a session.
File Ownership and Security
Three groups of users can access files: owner, group, and other. File access is divided into three types of permissions: read, write, and execute.
Who Has Access?
The three basic classes of users are:
- Owner - Usually the person who created the object.
- Group - Users that have been grouped together by the system administrator. For example, the members of a department might belong to the same group.
- Other - All other users on the system.
Types of Access Permissions
The access permissions on a files specify how that file can be accessed by the owner, members of the group, and other users.
- Read Permission - Allows access to retrieve, copy, or view the contents of the object.
- Write Permission - Allows access to change the contents of the object or remove the object.
- Execute Permission - For a file, allows access to run the file (for executable files, scripts, and actions). For a folder, allows access to run commands, scripts, and actions within that folder.
If you do not have permission to write inside a folder, the folder will look like this:

If you do not have read or execute permission for a folder, the folder will look like this:

Examples
To make a folder private:
- Change the folder's properties, giving yourself (the owner) read, write, and execute permission, but giving no permissions for group and other. This means that only you and the root user can view the contents of the folder.
To make an object that you've created available for everyone to use but protect it so it isn't inadvertently overwritten:
- Change the file's properties, giving read and execute permission to owner, group, and other. Don't give anyone write permission.
Default Permissions
The default permissions used when you create a new file or folder may be altered by your system administrator. To determine what your current defaults are, create a new file or folder, then open the Permissions dialog box for that file or folder.
Check with your system administrator regarding how to change your default permissions.
To Change the Owner of a File or Folder
You must be the owner or the system administrator (root user) in order to change the ownership of a file or folder.
- Select the object's icon.
- Choose Change Permissions from the Selected menu or from the object's pop-up menu (displayed by pressing Shift+F10 or mouse button 3).
- Type the new owner's name into the Owner Name text field.
- Click OK or press Return.
Note: If you give ownership of the file to another user, you may not be able to change the permissions again unless that user returns ownership to you.
If you do not have permission to change the properties, some of the controls in the Permissions dialog box are unavailable.
You must be the owner or the system administrator (root user) in order to change the permissions of a file or folder.
- Select the icon for the file or folder.
- Choose Change Permissions from the Selected menu or from the icon's pop-up menu (displayed by pressing Shift+F10 or mouse button 3).
- Select the permissions for the file or folder.
The permissions selected in the Group row indicate the access privileges for any user belonging to the named group. The permissions selected for the Other row apply to all other users.
- Read
- The file can be read
- Write
- The file can be altered
- Execute
- The file can be run
If you give ownership of the file to another user, you may not be able to change the permissions again unless that user returns ownership to you. If you do not have permission to change the properties, some of the controls in the Permissions dialog box are unavailable.
- Click OK or press Return.
Note: The Group row of permissions shows the permissions for users who are members of the group listed in the Group Name text field. You can specify a different group by typing a new name in this field.
The desktop lets you put any file or folder icon directly on the backdrop of the current workspace for quick access. Any icon you drop on the desktop stays where you put it.
File Manager provides a way to view all the objects in your file system. However, the object is only visible when you are viewing the folder it is in.
To make an object more accessible, you can put it directly on the workspace backdrop. The desktop is that area or surface on which windows appear to lie. When an object is placed there, it is called a workspace object. There is a separate desktop for each workspace.
Placing an object on the workspace does not alter the original file or folder. In fact, the icon that appears on the workspace is really just a shortcut for accessing the real file or folder. Any operation you perform on the workspace object is actually performed on the file or folder it represents.
Workspaces in the Desktop
You can have several workspaces on your desktop, so you can set up your working environment by putting the files and folders in the workspaces where you use them most, or in more than one workspace, if needed.
Pop-up Menus
Each workspace object has its own pop-up menu, displayed with mouse
button 3 or by pressing Shift+F10 when the icon is selected. This menu contains commands for manipulating the object, including all the actions that appear in the File Manager's Selected menu when the object is selected. The Workspace pop-up menu is similar to the pop-up menu available within File Manager windows, but contains a few different commands.
To Put a File or Folder on the Workspace Backdrop
This procedure creates a copy of the icon on the workspace backdrop. Any changes you make to the copy on your workspace backdrop will also be made to the original that is still in File Manager.
- Switch to the workspace where you want to display the object.
- Then:
- Drag and drop the object's icon onto the workspace.
- Or, select the icon, then choose the Put in Workspace command from the Selected menu or from the icon's pop-up menu (displayed by pressing Shift+F10 or mouse button 3).
You can repeat these steps to put an icon on the desktop in as many workspaces as you want.
To Display the Pop-up Menu for a Workspace Object
Mouse
- Point to the object's icon.
- Press mouse button 3.
- Choose a command from the menu by dragging to the command then releasing the mouse button.
Keyboard
- Move the highlight to the object's icon using Alt+Tab.
- Press Shift+F10.
- Choose a command from the menu by using the direction keys to highlight the command, then press Return.
To cancel the menu without choosing a command, press Esc.
To Remove an Object from the Workspace
- Switch to the workspace where the object resides.
- Locate the object's icon on the desktop
- Choose Remove From Workspace from the object's pop-up menu.
Removing an object from the workspace does not alter the original object. That is, the object still exists in File Manager.
Keeping track of many files can quickly become difficult. File Manager helps by providing the ability to search for a file or folder by name. You can also search for files based on the contents of the file.
- Choose Find from the File menu.
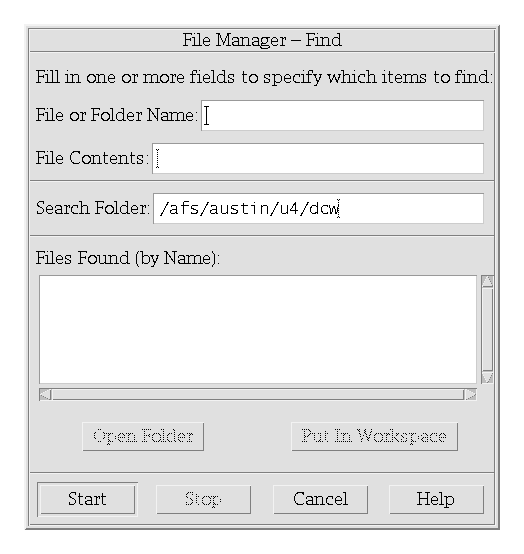
- Type the name of the file or folder you want to find into the File or Folder Name field.
When you specify a file or folder name, you can include wildcard characters, such as asterisk (*) and question mark (?). The * matches any string of characters (including no characters), and ? matches any single character. For example:
- ba*
Matches all names that begin with the string ba
- ba?
Matches all three-character names that begin with the string ba
- *.dt
Matches all names that end with the .dt suffix
- *.???
Matches all names that have a three-character suffix
The file name and contents can be specified using the same regular expression syntax allowed by the find command. (Refer to the find man page and grep man page for more information.)
- Type the folder where you want the search to begin into the Search Folder field. (By default, this field contains the name of the current folder.)
Find will search this folder and all of its subfolders.
- Click Start or press Return.
File Manager begins searching the Search Folder and the folders it contains for files that match the name you provided. Matches that are found are listed in the Files Found list. Once you have found an object, you can select it and click Open Folder to open the folder it is in or Put in Workspace to place its icon on the current backdrop.
To stop the search, click the Stop button or press Return.
- Choose Find from the File menu.
- Optional. You can use the File or Folder Name text field to narrow, and therefore speed up, the search.
If you enter a partial name (using wildcards) File Manager examines only the files that match the File or Folder Name field. If you leave the File or Folder Name field empty, File Manager searches every file within the search folder. Names can be specified using the same regular expression syntax allowed by the grep command. (Refer to the grep man page for more information.)
- Type the text string you want to search for into the File Contents field.
Case is ignored for this string (upper- and lowercase letters are equivalent). You do not have to use complete words. For example, if you type fi it will find both "fish" and "File."
Contents can be specified using the same regular expression syntax allowed by the grep command. (Refer to the grep man page for more information.)
- Type the name of the folder where you want the search to begin into the Search Folder field. (By default, this field contains the name of the current folder.)
- Click Start or press Return.
File Manager begins searching the search folder and the folders it contains for files that contain the File Contents string. Matches that are found are listed in the Files Found list. Once you have found an object, you can select it in the list and then click Open Folder to open the folder it is in or Put In Workspace to place its icon on the current backdrop.
To stop the search at any time, click the Stop button or press Return.
File Manager provides several ways to see the contents of folders. You can:
- Choose Set View Options from the View menu.
- Determine which headers to display:
- Select Iconic Path to show current folder path as a string of folder icons at the top of the window.
- Select Text Path to show the current folder's full path name in a text field above the view pane.
- Select Message Line to show a count of the number of files in the folder. The line will appear at the bottom of the window.
- To implement the chosen option and close the Set View Options dialog box, click OK.
To implement the chosen option and leave the Set View Options dialog box open, click Apply.
To Configure How Icons are Placed
- Choose Set View Options from the View menu.
- Determine how you want to have the icons placed:
- Select As Placed to leave icons where they are dropped.
- Select Rows and Columns to automatically align the icons you drop into a grid.
- To implement the chosen option and close the Set View Options dialog box, click OK.
To implement the chosen option and leave the Set View Options dialog box open, click Apply.
Using the Tree View
The tree view resembles an outline. Files and folders contained in a folder are listed beneath that folder in an indented list
Figure 5-3 File Manager tree view

In the tree view, a folder can have three states. The states are shown and changed using the buttons to the left of the folder. You can also open and close the tree branches by selecting a folder and then pressing the + and - keys on your keyboard (these are the keys in the center, not the numeric keypad):
- +
- The folder is in its closed state. None of the folder's contents are shown. Clicking the button expands the folder partially or fully, depending on the tree view option currently in effect.
- -
- The folder is in its fully expanded state. All objects in the folder are shown. Clicking the button fully closes the folder.
- +/-
- The folder is in its partially expanded state. The only contents shown are the folders it contains. (This view is possible only when using the Folders, then Files tree view option.) Clicking the button expands the folder to show the filenames.
The tree view will show a folder and the files and folders beneath it.
- Change to the folder where you want the tree view to start.
- Choose Set View Options from the View menu.
- Select By Tree in the Show box.
- Select one of the tree view options:
- Folders only
- The tree shows folders only. To view files, double-click a folder name. This is the default view.
- Folders, then Files
- Folders only appear at first. Click the [+] button next to each folder to view its contents. First click shows subfolders. Second click shows files that are inside. When you click the button the third time, the folder contracts again.
- Folders and Files
- The tree shows both folders and files automatically.
- To implement the chosen options and close the Set View Options dialog box, click OK.
To implement the chosen options and leave the Set View Options dialog box open, click Apply.
You can alter the appearance of files and folders in the tree view by changing the settings in the Show box in the Set View Options dialog box. Changes to the preferences are only for the current session. To make them permanent, see "To Save the Current Preferences as Your Default".
If you double-click a folder in tree view, a new view of that folder opens that is not in tree view mode.
To Display the Folder View
The folder view will show a folder and all the files and folders in that folder.
- Change to the folder that you want to view.
- Choose Set View Options from the View menu.
- Select By Single Folder in the Show box.
- To implement the chosen options and close the Set View Options dialog box, click OK.
To implement the chosen options and leave the Set View Options dialog box open, click Apply.
You can alter the appearance of files and folders in the folder view by changing the settings in the Show box in the Set View Options dialog box. Changes to the preferences are only for the current session. To make them permanent, see "To Save the Current Preferences as Your Default".
To Change How Objects Are Represented
- Choose Set View Options from the View menu.
- Select the representation you prefer from the Representation box.
- By Name Only: Icons will not be displayed in File Manager. File Manager indicates objects that are folders by adding a "/" after their names. Executable programs have a "*" after their name.
- By Large Icons: This is the default. The objects in File Manager will appear with their name and large icon.
- By Small Icons: The objects in File Manager will appear with their name and small icon.
- By Name, date, size, ...: The objects in File Manager will appear with their file date, size, and so on in addition to the file name and icon.
- Click OK or Apply.
- Choose Set View Options from the View menu.
- Select the sort order you prefer from the Order box, and the direction from the Direction box.
- Alphabetically: A to Z (Ascending) or Z to A (Descending). Icons with names that start with capital letters appear first. Icons with names that start with lowercase letters are at the bottom.
- By File Type: By object type. For example, files, folders and actions are different types of objects. Within each group of the same type, the icons are sorted alphabetically (based on the order the data types are read into the database).
- By Date: By date the files were last modified, oldest to newest (Ascending) or newest to oldest (Descending).
- By Size: By file size, smallest to largest (Ascending) or largest to smallest (Descending).
- Click OK or Apply.
If you have Placement set to As Placed, icons are sorted only when you choose Clean Up from the View menu or when you click Apply in the Set View Options dialog box. If Placement is set to Rows and Columns, the icons are sorted each time there's a change to the folder's contents, or when you choose Update from the View menu.
To Re-Sort (Clean Up) Objects
The Clean Up command sorts the objects in the current view (according to the settings in the Set View Options dialog box) and lines them up in a grid pattern. The settings in other File Manager windows are not affected.
Choose Clean Up from the View menu.
The Clean Up command is unavailable if you have the Placement preference set to Rows and Columns.
When you apply changes using the Set Preference dialog box, the changes only apply to the current session. If you want to save the preferences so they will be used the next time you open File Manager:
- Set the preferences that you want and apply them (using Set View Options and Set Filter Options in the View menu).
- Choose Save As Default Options from the View menu.
- Click OK.
These changes to the default view will not take effect until the next time you click the File Manager control in the Front Panel.
After saving the current preferences, all new File Manager views you open use the new preferences and filter list.
Hiding Files and Folders
Hidden files and folders are those whose file types are selected in the filter list.
The criterion for hiding or showing a file or folder is based on its data type. Use the Set Filter Options command to change which data types are shown and hidden. (See "To Specify Which Data Types Are Hidden" below.) The default hidden data types are DOT_FILE, DOT_FOLDER, and CURRENT_FOLDER.
Choose Show Hidden Objects from the View menu.
Choosing the command a second time again reverses the toggle (from shown to hidden and back again).
The criterion for hiding or showing a file or folder is based on its data type. Use the Set Filter Options command to change which data types are shown and hidden. (See "To Specify Which Data Types Are Hidden" below.) The default hidden data types are DOT_FILE, DOT_FOLDER, and CURRENT_FOLDER.
- Choose Set Filter Options from the View menu.
Data types that have already been chosen to be hidden are highlighted.
- In the Select File Types to be Hidden box, select the data types you want to be hidden. File types that are already being hidden are highlighted.
Or, to reset the default filter list (DOT_FILE, DOT_FOLDER, and CURRENT_FOLDER), click Defaults.
- Optional. Type a name pattern into the Also Hide (Optional) field specifying additional file and folder names to be hidden.
The filter list specifies which files are not to be displayed. If you select all object types or type * into the Filter String field no files are displayed. If you type *.txt, then any file whose name ends in .txt will be added to the filter list and not displayed.
Advanced users: The Filter String may be any regular expression. Refer to the regexp(5) man page for more information.
- Click OK.
If you want to view the results before closing the dialog box, click Apply.
To reset to the default filter list, choose Defaults. This resets the default values but does not apply them until you click Apply or OK.
Icon Browsing
Files with names that end in .pm or .bm contain icons. These are the files that File Manager uses to build icons. By default, you must open these files to see the icons they contain. If you enable icon browsing, File Manager displays the contents of .pm or .bm files so you don't have to open them to see what they look like.
Figure 5-4 Icon with icon browsing enabled (left) and disabled (right)

To Enable Icon Browsing
- Copy the file
/usr/dt/examples/types/language/IconBrowse.dt into your /HomeDirectory/.dt/types folder.
- Open Application Manager and double-click Reload Actions in the Desktop_Tools application group.
- Restart File Manager.
Note: The maximum default display area for icons is 38x38 pixels. So, if a picture file is larger than 38x38, the picture will be clipped and only the top left 38x38 pixels will be shown. You can increase the size of the display area for icons if you want larger images to be fully visible (see "To Change the Icon Display Area Size"). However, a larger display size area will slow down the opening of folders, and icons will be spread further apart in folder views.
To Disable Icon Browsing
- Remove your personal copy of the
IconBrowse.dt file.
- Open Application Manager and double-click Reload Actions in the Desktop_Tools application group.
- Open a Terminal window and type dtpad ~/.Xdefaults.
- When the file is displayed, it may be empty or there may be text already in the file. In either case, add the following four lines of text to the file:
Dtfile*smallIconWidth:24
Dtfile*smallIconHeight:24
Dtfile*largeIconWidth:38
Dtfile*largeIconHeight:38
When you type in these lines, replace the default numbers at the end of each line with the new display area size you want.
- Choose Save from the File menu.
- Choose Close from the File menu.
Note: The change will not take effect until you exit the desktop and log back in. If you should want to return to the default display area size, type the default sizes back in or just remove the four lines you added, and then exit and restart the desktop.
Generated with CERN WebMaker