


Common Desktop Environment: User's Guide
8 Using Mailer
Contents of Chapter:
 To Start Mailer
-
- Mailer Main Window
-
- Viewing and Acting On Your Mail Messages
-
- To Read a Mail Message
-
- Sorting Mail Messages
-
- To Reply to a Message
-
- To Forward a Message
-
- To Save a Message as Text
-
- To Find a Mail Message within a Mailbox
-
- To Delete a Mail Message
-
- To Undelete a Mail Message
-
- To Destroy Deleted Messages When Closing the Mailbox
-
- Sending Mail Messages
-
- Using Aliases
-
- To Create an Alias
-
- To Address, Compose, and Send a Mail Message
-
- Editing Text in a Mail Message
-
- Formatting Text in a Mail Message
-
- To Include a Template in a Mail Message
-
- To Include Multiple Messages in a New Message
-
- To Include a Text File in a Mail Message
-
- To Send an Automatic Message (Vacation Mail)
-
- To Send Mail Messages in MIME or Sun Format
-
- To Find or Change Text in Your Message
-
- To Check Spelling in Your Mail Message
-
- To Edit Text in Message View
-
- Creating and Using Mailboxes
-
- To Create a Mailbox
-
- To Open a Mailbox
-
- To Close a Mailbox
-
- To File a Message in Other Mailboxes
-
- To Remove a Mailbox from Your File System
-
- To Drag and Drop Messages to Other Mailboxes
-
- To Add Mailboxes to the Move and Copy To Menus
-
- To Display Recently Visited Mailboxes in the Move Menu
-
- Printing Mail Messages
-
- To Print a Message with Default Options
-
- To Print a Message with Specific Options
-
- To Print a Message Using Drag and Drop
-
- Working with Attachments
-
- To View an Attachment
-
- To Print an Attachment
-
- To Add an Attachment
-
- To Save an Attachment to Your File System
-
- To Delete both an Attachment and the Mail Message
-
- To Attach a File from File Manager
-
- To Attach a Calendar Appointment
-
- Customizing Mailer
-
- To Display Message Numbers in Your Mailbox
-
- To Change the Character Marker for Included Text in a Reply
-
- To Set How Often Mailer Checks for Messages
-
- Creating Templates
-
- To Create Templates for Mail Messages
-
- To Add Custom Fields to Your Format Menu
-
- Opening and Saving
-
- Mailer Keyboard and Menu Shortcuts
-
Mailer is a desktop application that enables you to send, receive, and manage your electronic mail (email) messages.
The instructions in this chapter assume you are familiar with basic desktop skills and keyboard navigation. For more information, see Chapter 1, "Basic Skills" and Appendix A, "Keyboard Shortcuts for the Desktop." Many of the tasks you do in Mailer can be done using drag and drop.
To Start Mailer
 Click the Mailer control in the Front Panel.
Figure 8-1 Mailer icons showing new and read mail

Mailer Main Window
The Mailer main window is shown in Figure 8-2 and described below.
Figure 8-2 Mailer main window example

- Message Header List
- Displays information about mail messages
- Sash
- Used to resize the Message Header List and message view area
- Message view area
- Contains header fields and text of message
- Attachment list
- Displays icons of mail message attachments, if any
Once you've started Mailer and begun to collect email messages, you'll want to read, sort, find, delete, and (possibly) undelete them.
After using Mailer you may need to file certain mail messages away for safekeeping. You have a default mailbox (Inbox) where all your messages are received. Since keeping all your mail messages in your Inbox is not practical, you may want to set up other mailboxes to store groups of messages together.
See "To Create a Mailbox" for information on how mailboxes can be created or "To File a Message in Other Mailboxes".
- Choose Check for New Mail from the Mailbox menu to retrieve any messages waiting for delivery to your mailbox.
- Click to select the message to be viewed from the Message Header List.
The text of the message appears in the message view.
Use the Pointer, the Next and Previous buttons, or the View menu to continue to select and read messages in the message view.
To open a message into a single window:
Double-click the message or choose Open from the Message menu. From this window, the Edit and Attachments menus become available.
The message remains in the separate window even when you select another message in your Inbox.
Sorting Mail Messages
The View menu provides several ways to order your messages:
- Date/Time
- Sorts messages with the most recent at the bottom
- Sender
- Groups messages by a particular sender
- Subject
- Groups message titles together by the same subject
- Size
- Groups messages from smallest to largest
- Status
- Groups messages together by read and new (useful if you read your mail in non-sequential order)
The message headers are rearranged and redisplayed in the mailbox in the new order.
To Reply to a Message
- Select the message for reply.
- Decide on the type of reply:
- To reply to the sender, click Reply to Sender or choose Reply to Sender from the Compose menu.
A Compose window appears with the email address of the recipient and the message subject filled in.
- To reply to the sender and all recipients, choose Reply to All from the Compose menu.
A Compose window appears with the email address of the recipients and the subject of the message filled in.
- To reply to the sender or all recipients and include a copy of the message, choose Reply to Sender, Include or Reply to All, Include from the Compose menu.
A Compose window appears that includes the text of the message with the email address of the recipients and the subject filled in.
- Type your reply and send your message as usual. For more information, see "To Address, Compose, and Send a Mail Message".
To Forward a Message
- Select or open the message you want to forward.
- Choose Forward Message from the Compose menu.
You see the text of the message to be forwarded is displayed within a new message, as well as its attachments, if any. For more information see "To View an Attachment".
- Optional. Remove any attachments you do not want to forward by selecting them and choosing Delete from the Attachments menu.
- Type the addresses of the message recipients in the To or Cc fields.
- Add any additional text and click Send.
See "To Address, Compose, and Send a Mail Message" for more information.
To Save a Message as Text
- Choose Save As Text from the Message menu.
- Type a file name and location for your message.
- Click Save.
To Find a Mail Message within a Mailbox
- Choose Find from the Message menu.
The Find dialog box appears.
Figure 8-3 Find dialog box

- Type the text you want to search for in the appropriate field.
You can search for a match on one or more of the To, From, Subject, or Cc fields.
- Select Forward or Backward to set the search direction within the mailbox.
- Click Find to select the first message found.
If you think there may be several messages, click Select All to mark (by selection) each message header.
Note: You can remove all the text in the fields at any time by clicking Clear.
To Delete a Mail Message
- Select a message for deletion.
Shift+Click enables you to select several messages in a row by moving the highlight up or down the message header list. Control+Click enables you to select discontiguous messages one at a time from the list.
- Choose Delete from the Message menu, or click the Delete button.
The message and attachments (if any) are deleted from the list.
See "To Delete both an Attachment and the Mail Message" for more information on attachments in a mail message.
Note: Even if a message has been deleted, you can get it back unless you made your deletions permanent by choosing Destroy Deleted Messages from the Mailbox menu.
- To restore a message you just deleted, choose Undelete Last from the Message menu.
- To restore an earlier message, choose Undelete from List from the Message menu, select one or more messages from the list of deleted messages, and click the Undelete button.
Note: To make the deletions in the list permanent, choose Destroy Deleted Messages from the Mailbox menu.
To Destroy Deleted Messages When Closing the Mailbox
You can set your options so that when you close your mailbox, the messages you deleted will be permanently destroyed. This means that you cannot get a message back that you deleted once you close your mailbox.
- Choose Message Header List from the Category menu of the Mail Options dialog box.
The Message Header List dialog box appears.
- Select "When I close the mailbox" under Destroy Deleted Messages.
- Click OK or Apply to make your changes take effect.
Note: You can remove the confirmation notice that appears each time you close the mailbox and asks if you want to destroy deleted messages by deselecting "Show confirmation notice."
An email address is like your personal ZIP code for receiving mail messages. This is also the way you send messages to other email users. The format used for email addresses is username@location. Your system administrator uses this format to set up user (email) addresses.
This section gives you most of the information you need to address, compose, and send a message to another user.
An alias is just a private name for one or more user names (or user addresses). By creating a distribution list of user addresses to which you frequently send mail and giving it an alias, you can just type the name of the alias instead of typing each address in the To field every time you send messages. The name you give to your alias can be descriptive of a group of users or just a name you will remember. This alias only works for your user name from your machine.
- Choose Aliases from the Category menu of the Mail Options dialog box.
- Type the name for your alias in the Alias field.
- Type the user addresses that will make up the alias in the Addresses field. Each of these should be in the form username@location and be separated by a comma, space, or both.
- Click Add to add the information in the Alias and Addresses fields to the Aliases list.
You can also change or remove an alias in the same manner using either the Change or Delete button.
- Click OK or Apply to make the settings take effect.
Once you have a user's email address, you can send a message.
Note: If this is the first time you are using email and if you know your own email address, you can use these procedures to send a test message to yourself.
- If Mailer is not already started, click the Mailer control in the Front Panel.
The mailbox appears.
- Choose New Message from the Compose menu.
The (New Message) Compose window appears.
Figure 8-4 Compose window
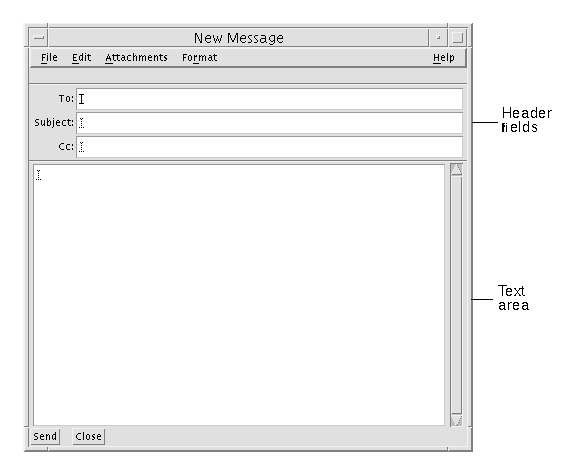
- Type the email address of the recipient in the To field and press Return.
You can send a message to a single user, multiple users, or an alias. For information on aliases, see "Using Aliases".
- Optional. Type the topic or title of the message in the Subject field and press Return.
- Optional. Type the email addresses of users you want to be carbon copy recipients of this message in the Cc field.
- Once your message is addressed, press Return to go to the text area and compose the message.
To find out about editing text in your message, see "Editing Text in a Mail Message" or "Formatting Text in a Mail Message". Choose Include from the File menu to insert a text file into your message.
You can save the message you are composing at any time by choosing Save As Text from the Compose File menu.
- Optional. Add files to the message, if necessary.
To find out how to add an attachment, see "To Add an Attachment".
Note: Choose Log Message from the Compose File menu to save a copy of the message to a mailbox.
- Click the Send button or choose Send from the Compose File menu.
The Compose window closes and the message is sent.
Note: Clicking Close removes the Compose window and discards your message. Be sure to save any text you might want later before closing the Compose window.
The Compose Edit menu provides ways to change the message text you are composing:
- Undo
- Reverses the last editing action in the text area.
- Cut
- Removes the selected text and stores it on the clipboard. Only one selection can be stored on the clipboard at a time. If text is already there, the most current selection overwrites it.
- Copy
- Stores a copy of the selected text on the clipboard. Only one selection can be stored at a time. If text is already there, the most current selection overwrites it.
- Paste
- Inserts the contents of the clipboard at the insertion point.
- Paste Special
- Inserts the contents of the clipboard at the insertion point surrounded above and below by Begin and End Included Message text, or indented markers.
- Clear
- Removes the selection and leaves the resulting white space.
- Delete
- Removes the selection and the resulting white space.
- Select All
- Selects all the text in the text area.
- Find/Change
- Opens a dialog box that enables you to search for words or phrases in your message and make changes to occurrences that are found.
- Check Spelling
- Runs the spell checker on your mail message and display a dialog box that lists words that might be spelled incorrectly. You can Find, Change, or Change All instances of a word.
For more information on editing functions, see Chapter 10, "Using Text Editor."
The Compose Format menu enables you to make formatting changes to the message you are composing:
- Word Wrap
- Toggle the text entry mode that causes lines to automatically wrap at the edge of the message. This may cause problems if the sender has word wrap turned on and the recipient window is a different size.
- Settings
- Display a dialog box for setting margins and paragraph alignment, and applying format settings to your message.
- Templates
- Enables you to quickly access the templates (text files) you created for using in your mail messages. For more information, see "To Create Templates for Mail Messages".
- Add Bcc:
- Adds the Bcc (Blind Carbon Copy) header to your Compose window. Bcc enables you to send a copy of a message to someone without those on the To or Cc line seeing the user's address. If you added other headers beside Bcc, they show up here.
For more information on editing functions, see Chapter 10, "Using Text Editor."
To Include a Template in a Mail Message
- Choose New Message from the Compose menu.
- Choose Templates from the Format menu and select the desired template from the list.
Your template is added to your mail message.
For more information on templates, see "To Create Templates for Mail Messages".
To Include Multiple Messages in a New Message
- From the Message Header List, select the email messages to be included in your new message.
Shift+Click enables you to select several messages in a row by moving the highlight up or down the message header list. Control+Click enables you to select discontiguous messages one at a time from the list.
- Choose New, Include All from the Compose menu.
- Compose and send your message as usual.
You can drag and drop a text file from File Manager to the Compose window of a mail message or follow these steps.
- Choose New Message from the Compose menu.
- Choose Include from the File menu in the Compose window.
You see your file system.
- Indicate the text file to be included in your email message.
- Click OK.
The file is included in the text area of your message.
- Compose and send your message as usual.
To Send an Automatic Message (Vacation Mail)
- Choose Mail Options from the Mailbox menu.
The Mail Options dialog box appears.
- Choose Vacation from the Category menu.
- Select On.
- Type a subject and message for your vacation message.
If you use the variable $SUBJECT in your message, the user will see his or her message title in your reply. For example: "I am on vacation. Your message regarding "$SUBJECT" will be read when I return."
- Click OK or Apply.
Your vacation message takes effect the next time someone sends you a message.
Note: To turn off vacation mail, follow steps 1-3 but select Off instead.
To Send Mail Messages in MIME or Sun Format
You can send messages in two different formats: Internet MIME or Sun Mail Tool.
- Choose Send As from the File menu.
- Select either Internet MIME or Sun Mail Tool.
Your message is sent in the selected format.
To Find or Change Text in Your Message
- Choose Find/Change from the Compose Edit menu.
The Find/Change dialog box appears.
Figure 8-5 Find/Change dialog box
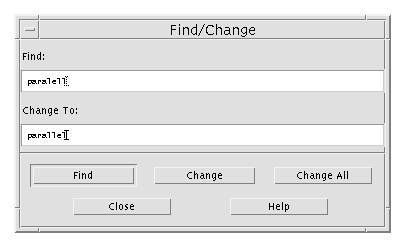
- Type (or copy and paste) the text you want to locate in the Find field.
- Optional. To automatically change the located text to replacement text, type the replacement text in the Change To field.
- Click the appropriate Find option:
- Click Find to find and select the text.
- Click Change to change the first instance.
- Click Change All to change all instances.
- Click Close to remove the dialog box.
To Check Spelling in Your Mail Message
- Click in the Compose window at the beginning of your mail message.
- Choose Check Spelling from the Compose Edit menu.
The Spell dialog box appears, displaying a list of potentially misspelled words with the first word highlighted.
- To correct a word, select it, and type the correction in the Change To field.
To see a word in context, select it and click Find.
- Click Change to correct a single occurrence, or Change All to correct all occurrences.
The word is corrected in the text.
To Edit Text in Message View
To edit the text in an existing mail message:
- Select the message you want to change.
- Choose Forward Message from the Compose menu.
- Address the message to yourself.
- Edit the message in the Compose window and send it.
Note: You may want to create a separate mailbox for these edited messages as they can add to the size of your Inbox.
Creating and Using Mailboxes
Once you create a few mailboxes, you can use them to help you organize your mail. You can create mailboxes by project, users, email lists, or any other system that works for you.
- Choose New from the Mailbox menu.
- Type the mailbox name and location in your file system.
Refer to "Opening and Saving" for more information.
- Click New.
The new mailbox is created and opened.
- Choose Open from the Mailbox menu.
- Select the mailbox you want to open.
Refer to "Opening and Saving" for more information.
- Click Open
The mailbox is opened into a separate window.
To Close a Mailbox
Choose Close from the Mailbox menu or Window menu.
When the last open mailbox is closed, Mailer quits completely.
Once you have created a mailbox other than your Inbox, you can file messages in it. You can create mailboxes by project, users, email lists, or any other system that works for you.
There are several ways to file messages in other mailboxes:
- Open File Manager and locate the mailbox to be deleted.
- Choose Delete to Trash from the File menu.
The mailbox is deleted.
See "To Put an Object in the Trash Can" in Chapter 5, "Managing Files with File Manager," for more information.
- Make sure your mailbox is open on the desktop and its Message Header List is visible.
- Open two or three frequently used mailboxes on the desktop, making sure you can see the Message Header List.
- Select the message to be copied.
- Drag the message and drop it onto the appropriate mailbox Message Header List.
A copy of the message is placed in the target mailbox.
Once you have set up a number of mailboxes, you may discover that there are several mailboxes you use frequently. You can customize your menus to show these few key mailboxes, which makes filing by mailbox menus much more efficient.
- Choose Message Filing from the Category menu of the Mail Options dialog box.
The Message Filing dialog box appears.
- Type the path to the mailbox and click Add.
The mailbox is now added to the Move menu and the Copy To submenu of the Message menu.
Use Delete or Change to alter what is in the Path/File Name field once a mailbox name is selected.
Note: You can change the path where Mailer starts looking for your mailboxes if you would like it someplace other than the default location.
To Display Recently Visited Mailboxes in the Move Menu
- Choose Message Filing from the Category menu of the Mail Options dialog box.
The Message Filing dialog box appears.
- Increase or decrease the amount of mailboxes you have recently opened in the "Display up to: Recently visited mailboxes" field.
- Click OK or Apply to make the change take effect.
The desired number of mailboxes appear on the Move menu.
From your mailbox, you can use the Print button or the Message menu to print a message with the default options or you can set different print options.
To Print a Message with Default Options
- Select the message to be printed in the Message Header List.
Shift+Click enables you to select several messages in a row by moving the highlight up or down the message header list. Control+Click enables you to select discontiguous messages one at a time from the list.
- Click the Print button.
- Select the message to be printed.
Shift+Click enables you to select several messages in a row by moving the highlight up or down the message header list. Control+Click enables you to select discontiguous messages one at a time from the list.
- Choose Print from the Message menu.
- Set the following options you want to change:
- Type a new printer name in the Printer field.
- Indicate the number of copies in the Copies field.
- Type a banner page title in the Banner Page Title field.
- Select Print Page Numbers to print page numbers in your document.
- Type print command options in the Print Command Options field.
- Click Print.
To Print a Message Using Drag and Drop
- Select the message to be printed.
- Drag the message onto the Printer control in the Front Panel.
The Print dialog box appears.
- Set the print options as desired and click Print.
For more information, see "To Print a Message with Specific Options."
An attachment is an image, document, or executable file that you send or receive with your messages.
Note: If Open does not appear on the Attachments menu, you cannot open the attachment.
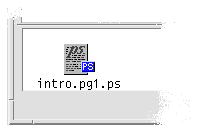
- Select the attachment icon in the attachment list.
Choose Show List from the Attachments menu to show the attachment list in the Compose window.
Figure 8-6 Attachment icon example
- Choose Open from the Attachments menu, or double-click the attachment icon.
If your system does not provide the ability to print attachments, the Print item will not be available.
- Select the attachment.
- Choose Print from the Attachments menu.
- Compose your email message.
- Choose Add File from the Attachments menu.
The Mailer Add dialog box appears. See "Opening and Saving" for more information on this dialog box.
- Select a file to attach and click Add.
The attachment is added to the attachment list in the lower portion of the Compose window.
To remove an attachment you just added, choose Delete from the Attachments menu.
To restore deleted attachments, choose Undelete from the Attachments menu.
- Optional. Use Rename to change the name of the added attachment.
- Select the attachment you want to save.
See "Opening and Saving" for more information.
- Choose Save As from the Attachments menu.
- Indicate where you want to save the attachment.
- Type a new name for the file.
- Click Save.
The file is saved to the selected location.
Note: You can also drag and drop an attachment to File Manager. See Chapter 5, "Managing Files with File Manager," for more information.
You delete an attachment in the same way you delete a mail message.
- Select the email message that contains the attachment.
- Click the Delete button.
- Select the file within File Manager.
- Optional. If the attachment list is not displayed, choose Show List from the Compose window Attachments menu.
- Drag the file from File Manager and drop it onto the attachment list in the Compose window.
- Send the message as usual.
Note: You can also drag an attachment from the attachment list to File Manager. See Chapter 5, "Managing Files with File Manager."
- Create the calendar appointment.
- Drag the appointment from the Calendar Appointment Editor dialog box and drop it onto the attachment list in the Compose window.
- Send the message as usual.
Note: You can also drag a calendar appointment attachment from the attachment list to Calendar. See "To Drag an Appointment from Another Application to Calendar," in Chapter 11, "Using Calendar."
Once you have been an email user for some time, you might want to change some of the Mailer defaults.
- Choose Mail Options from the Mailbox menu.
The Mail Options dialog box appears.
Figure 8-7 Mail Options dialog box

- Select the Options category relating to the area you want to change.
The Mail Options categories are:
- Message Header List
- Message View
- Compose Window
- Message Filing
- Vacation
- Templates
- Aliases
- Advanced
- Choose Message Header List from the Category menu of the Mail Options dialog box.
The Message Header List dialog box appears.
- Select the Display message numbers option.
- Click OK or Apply to make your changes take effect.
The numbering appears on the left side of your mailbox.
To Change the Character Marker for Included Text in a Reply
Having a marker for text you include when you reply to a message sets it off from text you want to add. You can customize your marker to a character of your choice.
- Choose Compose Window from the Category menu of the Mail Options dialog box.
The Compose Window dialog box appears.
- Type the character you want to use.
The default is a right angle bracket (>).
- Click OK or Apply to make your changes take effect.
- Choose Message Header List from the Category menu of the Mail Options dialog box.
The Message Header List dialog box appears.
- Increase or decrease settings in the Check for New Mail Every field.
- Click OK or Apply to make your changes take effect.
Creating Templates
You may want to create a template (file) that contains text you frequently use when composing messages, such as a status report format or signature and closing message. For example:
John Person
Email Address: john.person@hismachine
Phone number: (100) 555-1234 Fax number: (100) 555-5678
- Create your template using your text editor and save it in your file system.
- Choose Templates from the Category menu of the Mail Options dialog box.
The Templates dialog box appears.
- Type the name of the template as you want it to appear in the menu in the Menu label field.
- Type the location, path, and file name of the template.
- Click Add to add the template name to the Templates list.
You can click Delete or Change to remove or alter the selected template name.
- Click OK or Apply to make the changes take effect.
The template is now part of the Compose window Format menu.
To Add Custom Fields to Your Format Menu
Besides the To, Subject, Cc, and Bcc fields in the Format menu, you may want to add some of your own fields such as Reply-To, Return-Receipt, and so on.
- Choose Compose Window from the Category menu of the Mail Options dialog box.
The Compose Window dialog box appears.
- Type a name in the Header Field field as it will appear in the Compose window header (for example, return-receipt).
- Type a default entry for the defined header field in the Default Value field (for example, your email address).
- Click Add to add the values to the list.
You can click Delete or Change to alter the items in the list.
- Click OK or Apply to make your changes take effect.
When you perform certain functions (like opening a mailbox or saving a message), there is a standard method to access your file system.
Figure 8-8 File Selection dialog box

- Enter path or folder name - Indicate the path to the item. This can be a location anywhere in your file system. If folders or file names are selected, the path appears here.
- Filter - Optional. An asterisk (*) shows all files. You can enter wildcard characters to display only those files that match a suffix. For example,
*.doc lists only those files with a .doc suffix.
- Folders - Lists your folders beginning with your home folder.
- Files - Lists files within the selected folder.
- Show hidden folders and files - Optional. Enables you to choose whether to list certain files that are usually hidden from view, such as . (dot) files.
- Enter file name - Type the name of the mailbox or select it from the list. From this type of dialog box you are presented with a place to enter a path or folder name or a place to select from the folders and files in your file system.
Click OK to perform the specified action and dismiss the dialog box.
Click Update to display a new list of files after changing the filter key or changing to a new folder.
Click Cancel to halt the operation without applying the changes.
Click Help to display information about this dialog box.
You can use keyboard alternatives to the mouse to navigate and perform some functions in Mailer. The mnemonics and shortcuts in Table 8-1 apply to Mailer only. For more information on keyboard shortcuts, see Appendix A, "Keyboard Shortcuts for the Desktop."
Note: Some Mailer shortcuts may interfere with UNIX key bindings. For more information on UNIX key bindings, see Chapter 10, "Using Text Editor."
Table 8-1 Keyboard and Menu Shortcuts

Generated with CERN WebMaker