


Common Desktop Environment: User's Guide
Contents of Chapter:
- Mouse Skills
-
 To Click
-
- To Double-Click
-
- To Drag
-
- Basic Keyboard Skills
-
- Overview of the Desktop
-
- Working with Windows
-
- Window Frame Controls
-
- To Open an Application Window
-
- To Close an Application Window
-
- To Turn a Window into an Icon
-
- To Restore a Window from an Icon
-
- To Move a Window or Window Icon
-
- To Resize a Window
-
- To Bring a Window or Icon Forward
-
- To Copy and Paste Text into Windows
-
- Using Workspaces
-
- To Display Another Workspace
-
- To Place a Window in Other Workspaces
-
- To Rename a Workspace
-
- Using Controls in Application Windows
-
- To Choose a Push Button
-
- To Select a Check Box or Radio Button
-
- To Scroll the Contents of a Window
-
- To Select a List Item
-
- To Enter Text into an Empty Field
-
- To Edit Text in a Field
-
- Using Menus
-
- Window Menu
-
- Workspace Menu
-
- To Choose a Window Menu Item
-
- To Choose a Workspace Menu Item
-
- To Choose a Menu Item with the Mouse
-
- To Choose a Menu Item with the Keyboard
-
- Leaving the Desktop
-
- To Log Out
-
- To Lock Your Display
-
- Getting Help
-
- Help Menu
-
- To Display the Help Manager
-
This chapter provides an introduction to the Common Desktop Environment.
For information about logging in to the desktop, refer to Chapter 2, "Starting a Desktop Session."
To Click
 Press and release mouse button 1 without moving the mouse.
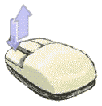
By default, mouse button 1 is the left button.
Tasks that you perform by clicking include:
- Selecting a window or icon, making it active or selected
- Choosing a button in a dialog box or a control in the Front Panel
- Choosing a hyperlink within a help window
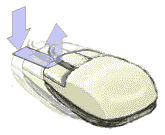
To Double-Click
Press and release mouse button 1 twice in rapid succession, without moving the mouse.
Here are some tasks you perform by double-clicking:
- Starting the default action for a File Manager or workspace icon
- Restoring a window icon (displaying the whole window again)
- Closing a window to remove it from the workspace--double-click the Window menu button in the upper left corner of the window frame
To Drag
To move a window or drop an icon, use the press-drag-release motion.
Point to the window's title bar or anywhere on the icon, press and hold mouse button 1, drag the mouse, then release the button.
Tasks you perform by dragging and dropping include:
- Moving windows and icons on your screen
- Moving or copying files and folders within File Manager
- Dragging a slider within a scroll bar to scroll the contents of a window
- Printing a file by dropping its icon on the Printer control in the Front Panel
You can perform desktop tasks using your keyboard instead of your mouse. When you use your keyboard for desktop navigation, note the following:
Keyboard focus uses the highlight to show you which element of a window, menu, or control will respond to your input. To activate a selected menu item or control (such as a button), press the Spacebar.
Here's a summary of several common keyboard operations:
For more information about using your keyboard for desktop navigation, refer to Appendix A, "Keyboard Shortcuts for the Desktop."
To help you organize and manage your work, the desktop provides windows, workspaces, controls, menus, and the Front Panel.
- Windows contain software applications and are framed with controls so you can move them, size them, or place them in additional workspaces.
- Workspaces are the screen areas where you place the windows needed for your work, arrange them, and put them away when you're done.
- Controls enable you to manipulate objects, select choices, or type information.
- Menus provide access to commands you use to manage windows and operate applications.
- The Front Panel is a collection of frequently used controls, available in every workspace.
Some of the windows, icons and objects you'll encounter as you use the desktop are:
- Window icons
- The Front Panel
- Style Manager
- File Manager
- Application Manager
- Workspace objects
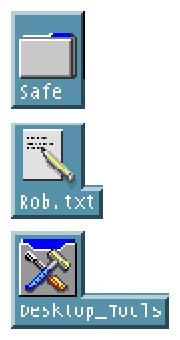
Window Icons
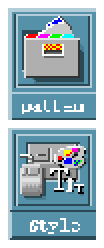
When you minimize a window, it becomes an icon on the workspace. Shown here are the window icons for File Manager and Style Manager.
To minimize a window, click the minimize button near the upper right corner of the window frame.

To restore the window, double-click mouse button 1 on the icon. You can also restore the window by clicking its icon to display the Window menu and then clicking on the menu's Restore item. See "To Restore a Window from an Icon" for more information.
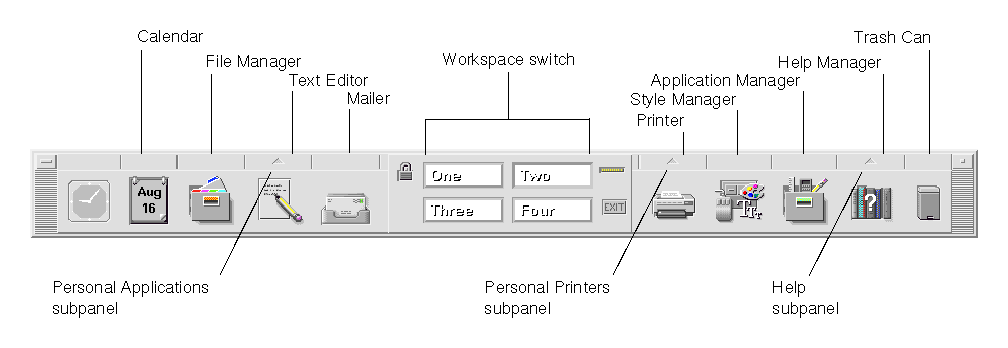
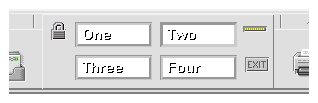
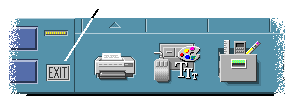
Front Panel
The Front Panel is a special window at the bottom of the display. It provides controls, indicators, and subpanels you use in your everyday work. The Front Panel also provides the workspace switch for selecting a workspace.
Many controls in the Front Panel, such as the File Manager control, start applications when you click them. Some controls, like the Printer control, are also drop zones. You can drag a file icon from File Manager and drop it on the Printer control to be printed.
The clock is an example of an indicator.
Arrow buttons over Front Panel controls identify subpanels--click an arrow button to open a subpanel.
Figure 1-1 Front Panel controls
For more information, see Chapter 4, "Using the Front Panel."
Style Manager
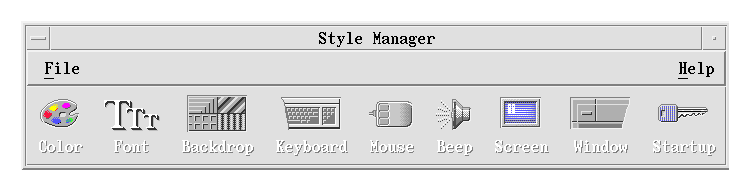
Use Style Manager to easily customize many elements of the desktop including:
- Colors
- Workspace backdrops
- Font size
- Keyboard, mouse, and window behavior
To start Style Manager, click its Front Panel control.

For more information about Style Manager, see Chapter 7, "Customizing the Desktop Environment."
File Manager
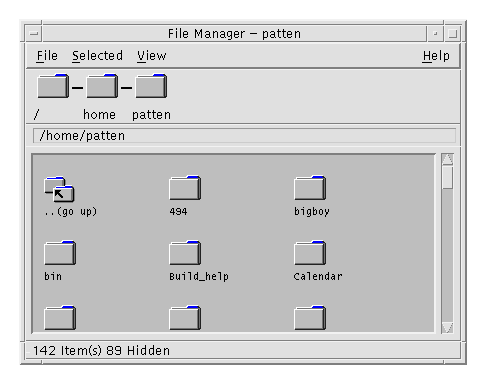
File Manager displays the files, folders, and applications on your system as icons. Working with File Manager icons saves you from having to learn complex commands.
To open a File Manager view of your home folder, click the File Manager control in the Front Panel.
For more information, see Chapter 5, "Managing Files with File Manager."
Application Manager
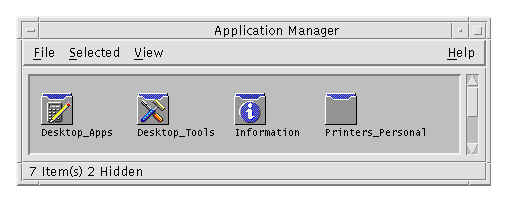
Application Manager provides access to applications you use in your everyday work through action icons. You use action icons to start applications. Application Manager stores action icons in special folders called application groups.
You can place the action icons you use frequently on the workspace backdrop.
To open Application Manager, click its Front Panel control.
For more information, see Chapter 6, "Running Applications from the Desktop."
Workspace Objects
You can place the files, folders, and actions you use frequently on the workspace backdrop as icons.
To place an object on the workspace, drag its icon from a File Manager or Application Manager window and drop it directly on the workspace backdrop.
A workspace object is a reference to the actual object, not a copy. The actual object remains unchanged within File Manager or Application Manager.
This section describes how to open, close, and manipulate windows in a workspace.
Window Frame Controls
A window's frame provides controls with which you can:
- Focus attention on a window, making it active for input from your mouse or keyboard. When you select a window and it becomes active, its frame changes color.
- Move a window.
- Minimize a window into an icon.
- Size a window.
- Close a window, removing it from the desktop.
- Display a window in other workspaces.
Refer to Chapter 7, "Customizing the Desktop Environment," for information about settings that make windows active.
Figure 1-2 Window frame controls
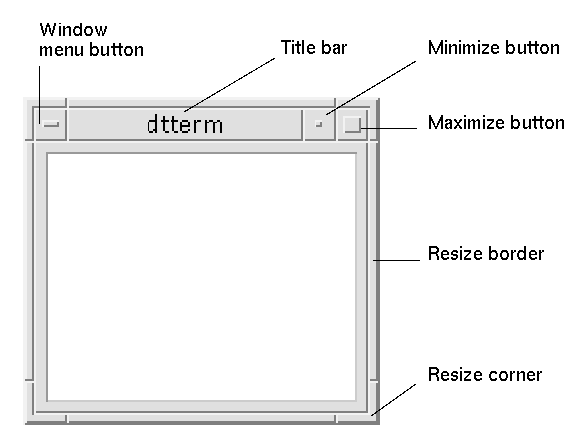
Click the Window menu button to display the Window menu.
To close a window and remove it from the desktop, double-click the Window menu button or display the Window menu and click on Close.
Click the minimize button to turn the window into a window icon. To restore a window from its icon, double-click the icon.
Click the maximize button to display the window in its largest allowable size. Return the window to its former size by clicking the maximize button again.
The title bar shows the name of the application that owns the window. Select a window by clicking its title bar. You can move a window by dragging its title bar.
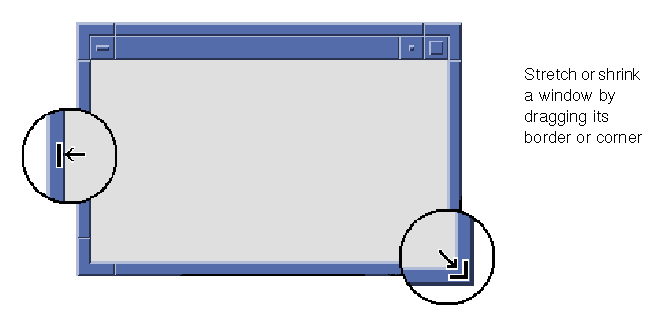
Drag a window's resize corner or border to resize the window.
For information on keyboard navigation and windows, see "Opening and Closing Windows" in Appendix A, "Keyboard Shortcuts for the Desktop."
To Open an Application Window
Mouse
Click the application's control in the Front Panel.
Or:
- From within Application Manager, double-click the application's icon.
- From within File Manager, choose an action for a selected icon from the Selected menu.
You can also select an icon in a File Manager or Application Manager window by clicking it and then choose an action for the selected icon from the Selected menu.
Keyboard
From the Front Panel:
- Press Alt+Tab to move the keyboard focus to the Front Panel.
- Press the arrow keys to move the highlight within the Front Panel and select a control.
- Press Spacebar or Return to choose the control and open the application's window.
From Application Manager:
- Open the Application Manager window by choosing its Front Panel control as described above.
- Press the arrow keys to move the highlight to an application group icon within the Application Manager window.
- Press Return twice to open the application group.
- Press the arrow keys to move the highlight to an application or action icon, then press Return twice to start the application.
To Close an Application Window
Closing an application window removes it from all workspaces. Closing an application is the same as quitting an application on other systems.

Caution: Before closing an application window, save your work. In most applications you can do this by choosing Save from the File menu.
Mouse
- Choose Close from the application's File menu.
- Or, double-click the Window menu button (in the upper right corner of the application's window). See Figure 1-2.
Keyboard
- Press Alt+Tab to move the highlight to the window you want to close.
- Press Alt+F4.
To Turn a Window into an Icon
To save screen space, you can minimize windows into window icons. This keeps the windows easily available and programs running in them continue to run.
Mouse
Click the window's minimize button. 
Keyboard
- Press Alt+Spacebar to display the Window menu.
- Choose Minimize:
- Press Down Arrow until you select Minimize, then press Return.
- Or, press N, the menu's mnemonic for Minimize.
Mouse
Double-click the icon.
Keyboard
- With keyboard focus on the icon, press Alt+Spacebar to display the Window menu.
- Press Down Arrow to select Restore, then press Return.
To Move a Window or Window Icon
Mouse
- Point to the window's title bar or icon.
- Drag the window or icon to its new location.
Keyboard
- Press Alt+Spacebar to display the Window menu.
- Press M, the menu's mnemonic for Move.
- Press the arrow keys to relocate the window or icon.
Hold down Control while you press an arrow key to speed up the movement of the window or icon.
- When you've moved the window or icon to where you want it, press Return.
To cancel the move operation, press Esc.
To Resize a Window
Mouse
- Place the pointer on a window's border or corner.
The pointer changes to a resize arrow.
- Drag the border or corner. An outline appears to show you the window's new size.
- Release the mouse button when the outline shows the window's desired size.
Keyboard
- Press Alt+Spacebar to display the Window menu.
- Press S, the menu's mnemonic for Size.
- Press the arrow keys to stretch or shrink the window.
Hold down Control while you press an arrow key to size the window faster.
- When the outline shows the size you want, press Return.
To cancel the resize operation, press Esc.
To Bring a Window or Icon Forward
Mouse
- To bring a window or icon to the foreground of the workspace, click a visible part of the window's frame or anywhere on the icon.
- To bring a concealed window or icon to the foreground, choose Shuffle Up from the Workspace menu.
Keyboard
- To bring the bottom window or icon in a workspace forward, press Alt+Up Arrow.
- To place the top window in the background, press Alt+Down Arrow.
- To cycle through and select the windows and icons in a workspace, press Alt+Tab or Alt+Esc.
- To cycle through and select the windows and icons in reverse order, press Shift+Alt+Tab or Shift+Alt+Esc.
To Copy and Paste Text into Windows
Copying and pasting eliminates the need to retype text.
You can copy from and paste text into:
- Text fields
- Terminal emulator windows
- Text Editor windows
- Mailer Compose windows
You can also copy text from a Mailer message view and a Help Viewer window and paste it into Text Editor, terminal emulator, and Mailer Compose windows.
Selecting the Text To Be Copied
- Move the pointer to the start of the text to be pasted.
- Drag to the end of the text to be pasted, then release the mouse button, leaving the text highlighted.
Pasting Text
- Place the text insertion cursor in the target location.
- Click mouse button 2 to paste the text.
To deselect text, click in an empty area of the window that has the text selected, or press Esc.
For related information, refer to:
Workspaces are like separate screens of windows. To help organize your desktop, you can place specific applications in a particular workspace and name that workspace accordingly. For example, a workspace you've named Reports could contain the tools you use to prepare reports, such as a spreadsheet, desktop publisher, and graphics applications. You might set up other workspaces according to your projects.
This section describes how to display workspaces, place windows in specific workspaces, and rename workspaces.
For information about using your keyboard for desktop navigation, refer to Appendix A, "Keyboard Shortcuts for the Desktop."
To Display Another Workspace
Mouse
Click the workspace's button in the workspace switch of the Front Panel.
Keyboard
- Press Alt+Tab until the keyboard focus, as shown by the highlight, is on the Front Panel.
- Press the arrow keys to move the highlight to the button for the workspace you want to display.
- Press Return.
To Place a Window in Other Workspaces
Mouse
- Click the Window menu button.
The Window menu appears.
- Choose Occupy Workspace from the Window menu.
- In the Workspaces list of the Occupy Workspace dialog box, select the workspaces in which you want the window to appear.
- To select more than one contiguous workspace name in the list, hold down Shift while you click.
- To select discontiguous workspace names in the list, hold down Control while you click.
- Click on a selected workspace to deselect it.
- To place the window in every workspace, click the All Workspaces button.
- Click OK.
Keyboard
- To display the Window menu, press Alt+Spacebar.
- Press the Down Arrow key to select Occupy Workspace, then press Return.
The Occupy Workspace dialog box appears.
- Press Tab until the keyboard focus, as shown by the highlight, is in the Workspaces list.
- Select the workspaces in which you want the window to appear:
- Press Down Arrow or Up Arrow to move through the list.
- To select more than one workspace, press Shift+Down Arrow or Shift+Up Arrow.
- Press Return.
To Rename a Workspace
Mouse
- Click the Front Panel button for the workspace whose name you want to change.
That workspace is displayed.
- Click the workspace's Front Panel button again.
The button becomes a text field.
- Edit the workspace's name in the text field.
- Once you've renamed the workspace, press Return.
Keyboard
- Press Alt+Tab until the keyboard focus, as shown by the highlight, is on the Front Panel.
- Press the arrow keys to move the highlight to the button for the workspace you want to rename.
- Press Shift+F10 to display the workspace button's pop-up menu.
- Press the Down Arrow key to select the Rename item, then press Return.
The button becomes a text field.
- Edit the workspace's name in the text field.
- Once you've renamed the workspace, press Return.
Windows and dialog boxes contain controls that help you work with applications. You use controls to manipulate objects, select choices, or type information.
This section describes various types of controls you'll come across while using the desktop. Here's a list of the most common controls:
- Buttons initiate commands, start actions, or specify options and settings. Types of buttons include push buttons and radio buttons.
- Check boxes specify options and settings.
- Text fields provide areas where you can type information.
- Lists display a scrollable list of choices from which you can select.
- Sliders provide incremental selection from a range of values.
- Scroll bars enable you to scroll through a window's contents
To Choose a Push Button
Choosing a push button immediately performs the associated command or action. For example, choosing an OK button applies any changes made to a dialog box then closes it.
As a shortcut, many dialog boxes automatically give focus to the OK button so that you can quickly specify settings and then press Return to choose OK.

Mouse
Click the button.
Keyboard
- Press Tab and the arrow keys until the button has the keyboard focus, as shown by the highlight.
- Press Return.
To Select a Check Box or Radio Button
You select a check box to specify an option or setting. You can select more than one check box in a group.
You also use a radio button to specify an option or setting, but only one radio button in a group can be selected at a time.

Mouse
Click the check box or radio button you want to select.
Keyboard
- Press Tab and the arrow keys until the check box or radio button has the keyboard focus, as shown by the highlight.
- Press the Spacebar.
To Scroll the Contents of a Window
Windows often contain more information than you can see at one time. Use a window's scroll bar to bring the window's contents into view.
Mouse
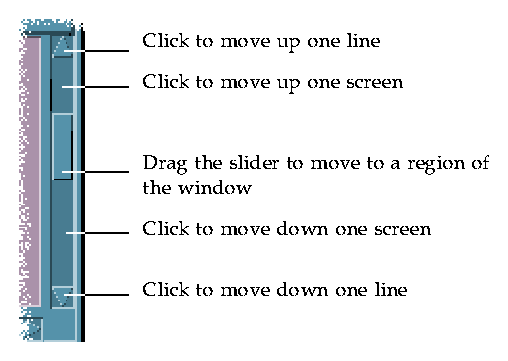
Keyboard
- Press Tab to move to the window area you want to scroll.
- Press the arrow keys, or Prev and Next, or Page Up and Page Down.
Hold down Control while you press an arrow key to scroll faster.
To use a slider:
- Press Tab or an arrow key to move the highlight to the slider.
- Press Up Arrow or Down Arrow to move the slider.
Hold down Control while you press an arrow key to move the slider faster.
To Select a List Item
A selected list item becomes highlighted. The highlighted item is acted upon when you click a button, such as OK.
Mouse
- Click the list item.
In a multiple-selection list, hold down Shift while you click the items.
To deselect an item, click it again.
- Click a button, such as OK.
In some lists, double-clicking an item selects the item and chooses the default command.

Keyboard
- Press Tab to move to the list.
- Select the list item:
- In a single-selection list, use the arrow keys to reach your choice.
- In a multiple-selection list, use the arrow keys to reach your first selection, then press Shift+Up Arrow or Shift+Down Arrow.
To deselect an item, press the Spacebar.
- Press Tab to move to a button, such as OK or Apply, then press Return.
To Enter Text into an Empty Field
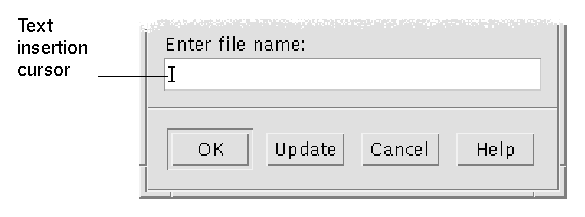
A text field accepts information you type.
Mouse
- Click the field to display the text insertion cursor.
- Type the text.
In many dialog boxes, pressing Return completes the text entry and activates the default button, such as OK or Apply.
Keyboard
- Press Tab, Shift+Tab, or the arrow keys until you reach the text field.
A blinking cursor indicates that the text field has the keyboard focus.
- Type the text, then press Control+Tab to move keyboard focus out of the text field.
To Edit Text in a Field
Mouse
- Select the text in the field to edit:
- Characters
- Drag from the first character to the last character
- Word
- Double-click the word
- Line
- Triple-click the line
- Multiline
- Quadruple-click the field
To deselect text, click an empty area in the window.
- Type the replacement text.
Keyboard
- Press Tab, Shift+Tab, or the arrow keys until you reach the field.
- Use the editing keys to edit the field's contents, then type the replacement text.
- Editing key
- Function
- Arrow key
- Move the text insertion cursor
- Backspace
- Delete the character to the left of the cursor
- Delete or Delete char
- Delete the character to the right of the cursor
- Control+Delete or
- Control+Delete char
- Delete from the cursor to the end of the line
- Press Control+Tab to move keyboard focus out of the text field.
Menus provide access to commands you use to manage windows and operate software applications.
Choosing a menu item performs an associated action on the currently selected object. For example, when you select a window and choose Minimize from its Window menu, the window becomes an icon.
Menu items that appear dimmed are available only under certain conditions. For example, the Window menu's Restore item is available only when the window is an icon.
Menus you'll use on the desktop include:
- Menus that you "pull down" from an application's menu bar by clicking the menu's name or typing Alt and its mnemonic. A mnemonic is an underlined character in a menu or item name.

An application's File menu is shown here.
The sequence of keys listed to the right of some items is called a shortcut key. Typing mnemonics and shortcut keys gives you quick keyboard access to menu items.
Menus that "pop up" when you press mouse button 3 (or press Shift+F10) in an application window or on a workspace object.
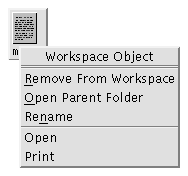
Use Window menu items to control windows and window icons.
This menu is displayed when you:
- Click the Window menu button in the upper left corner of a window
- Click on a window icon
- Press Alt+Spacebar with the keyboard focus on a window or window icon
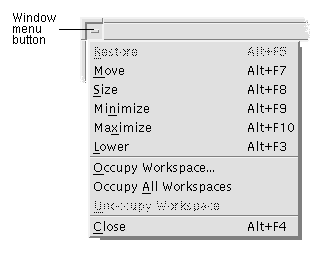
- Restore
- Turns an icon back into a window
- Move
- Changes the window's location
- Size
- Changes the size of the window (inactive for icons)
- Minimize
- Turns the window into an icon
- Maximize
- Enlarges the window to its greatest allowable size
- Lower
- Moves the window to the background
- Occupy Workspace
- Use to select the workspaces in which you want the window to appear
- Occupy All Workspaces
- Displays the window in all workspaces
- Close
- Closes the window, removing it from the workspace
Workspace Menu
The Workspace menu is a pop-up menu that contains items for managing the workspace.
To display the Workspace menu, click mouse button 3 on the workspace backdrop.

- Shuffle Up
- Brings the bottom window (in a stack of windows) forward
- Shuffle Down
- Puts the top window (in a stack of windows) in the background
- Refresh
- Repaints the display
- Minimize/Restore Front Panel
- Turns the Front Panel into an icon or restores the Front Panel from its icon
- Restart Workspace Manager
- Stops then restarts the Workspace Manager (typically used after you have customized configuration files)
- Log out
- Begins the logout process (equivalent to the Front Panel Exit control)
Note: You cannot access this menu through your keyboard.
To Choose a Window Menu Item
Mouse
Press mouse button 1 over the Window menu button or icon, drag to the item, then release the mouse button.
Or:
- Click the Window menu button to display the menu.
If the window is an icon, click the icon.
- Click a menu item.
To close the menu without choosing an item, click anywhere other than the menu.
Keyboard
- Press Alt+Tab until you've placed the keyboard focus, as shown by the highlight, on the window or window icon.
- Press Alt+Spacebar to display the Window menu.
- Press the key for the item's mnemonic, the underlined character in the item name.
To close the menu without choosing an item, press Esc.
To Choose a Workspace Menu Item
- Move the pointer over the workspace backdrop.
- Press mouse button 3, drag to the item, then release the mouse button.
To close the menu without choosing an item, move the pointer away from the menu and click.
Note: You cannot choose a Workspace menu item through your keyboard.
To Choose a Menu Item with the Mouse
- Display the menu:
- Pull-down (menu bar) menu: Using mouse button 1, click the menu name.
- Pop-up menu: Click mouse button 3 inside the application.
- Object's pop-up menu: Click the object with mouse button 3.
- Click the item.
You can also choose a menu item by pressing the mouse button, dragging to the item, then releasing the mouse button.
To close a menu without choosing an item, move the pointer away from the menu and click.
To Choose a Menu Item with the Keyboard
Pull-down Menus
- Press Alt+Tab until you've placed the keyboard focus, as shown by the highlight, on the application window.
- Display the menu by holding down Alt and then pressing the key for the menu's mnemonic (the underlined character in the menu's name as shown in the menu bar).
- Press the key for the item's mnemonic.
Or, press an arrow key to move to the item, then press Return.
Pop-up Menus
- Press Alt+Tab until the keyboard focus is on the application window or workspace object.
- Press Shift+F10 to display the pop-up menu.
- Press the key for the item's mnemonic.
Or, press Down Arrow to move to the item, then press Return.
To close a menu without choosing an item, press Esc.
For more information about using your keyboard for desktop navigation, refer to Appendix A, "Keyboard Shortcuts for the Desktop."
This section describes how to log out of and exit the desktop, and how to lock your display to prevent unauthorized use of your system when you are away from it and have not logged out.
To Log Out
Caution: Before logging out of the desktop, save your work in all open application windows. Remember to check each workspace.
- Click the Exit control in the Front Panel.
- Or, choose Log out from the Workspace menu:
- Move the pointer over the workspace backdrop.
- Press mouse button 3 to display the Workspace menu.
- Drag to choose Log out, then release the mouse button.
Note: You cannot display the Workspace menu using your keyboard.
As you log out of the desktop, your current session is saved. When you log back in, the desktop will appear as it did before you logged out.
Applications that do not get saved as part of the current session include:
- Applications that you run in terminal emulator windows
- Non-desktop applications that do not preserve their state during logout
You'll need to restart these applications when you log in. For more information, see Chapter 2, "Starting a Desktop Session."
To Lock Your Display
To prevent unauthorized use of your system when you are away from it and have not logged out:
Click the Lock control in the Front Panel.
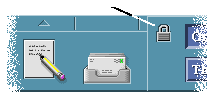
To unlock your display, type your password.
For information about screen lock options, refer to Chapter 7, "Customizing the Desktop Environment."
You can request help by:
- Pressing F1 or the Help key
- Choosing an item from an application's Help menu
- Clicking the Help button in a dialog box
- Opening the Help Manager to browse all the available help
For more information on using help, refer to Chapter 3, "Getting Help."
The quickest and easiest way to get help is to press the F1 key. When you press F1, the application you are using displays the help topic most closely related to your current activity.
Some keyboards have a dedicated Help key that may take the place of the F1 key.
Help Menu
Most applications have a Help menu for requesting specific kinds of help.

- Overview
- Displays introductory information about the application
- Tasks
- Displays instructions for using the application
- Reference
- Displays summary information about application components
- On Item
- Changes the pointer to a question mark--click the question mark pointer on an item to display its description
- Using Help
- Displays information about using Help
- About ...
- Displays version and copyright information about the application (in this case, Text Editor)
To learn more about using help windows, choose Using Help from an application's Help menu. Or, you can press F1 while using a Help window.
To Display the Help Manager
The Help Manager lists all the online help volumes installed on your system.
- Click the Help Manager control in the Front Panel.
The Help Viewer opens, displaying the Help Manager.
- Choose the Common Desktop Environment topic to display the list of help volumes for the desktop.
- Browse the list of titles. To open a volume, click its title.
Generated with CERN WebMaker