


Common Desktop Environment: User's Guide
13 Using Icon Editor
Contents of Chapter:
 To Start Icon Editor
-
- Basic Drawing Tasks
-
 To Open an Existing Icon
-
 To Start a New Icon
-
 To Clear an Icon
-
 To Draw an Image
-
- Drawing Tools
-
 To Undo a Drawing Operation
 -
- Saving Icon Files
-
- Icon Size Conventions
-
 To Save the Icon
-
 To Save the Icon with a New Name
-
- Color Usage
-
- Advanced Drawing Tasks
-
 To Select an Area of the Icon
 -
 To Cut a Region of the Icon
-
 To Copy a Region of the Icon
-
 To Move a Region of the Icon
-
 To Rotate Part of the Icon
-
 To Flip (Mirror) Part of the Icon
 -
- Resizing Icons
-
 To Resize the Current Icon
-
 To Resize (Scale) a Region of the Icon
 -
- Hotspots
-
 To Add a Hotspot
-
 To Delete a Hotspot
-
- Screen Captures
-
 To Capture (Grab) a Region of the Display
-
- Modifying the View of an Icon
-
 To Hide the Grid
 -
 To Change the Magnification of an Icon
 -
Icon Editor is a tool for creating both bitmap and pixmap image files for use as icons or backdrops.
Icon Editor enables you to create and edit images in two formats:
Table 13-1 Icon Formats

You create images by selecting drawing tools and colors, and using them in the work area. As you draw, Icon Editor displays an actual-size copy of your icon in both formats. You need to consider the two-color version of the icon even if you are drawing an image for use on color systems, because icons may revert to two colors if there are not enough free colors available on the workspace.
Figure 13-1 Icon Editor main window
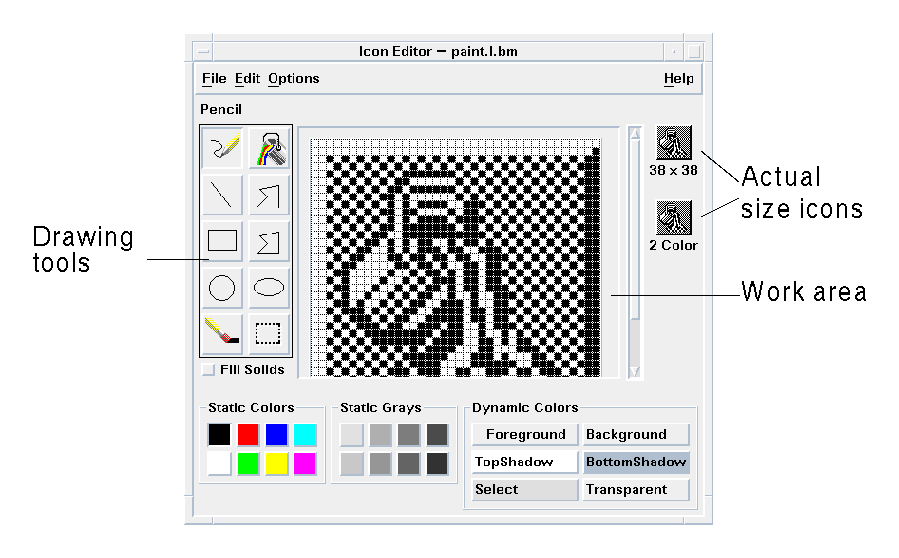
For information on designing icons, read the Visual Design chapter in the "CDE Style Guide and Certification Checklist."
 Open the Personal Applications subpanel and click the Icon Editor control.
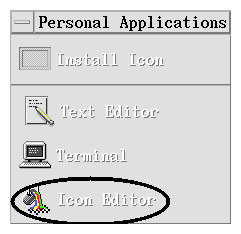
Icon Editor starts with an empty drawing work area.
Other Ways to Start Icon Editor
You can also start Icon Editor and have it load an icon into the work area in one of the following ways:
- In a File Manager view, locate the icon file and double-click on it to open it. (The default action for pixmap and bitmap files runs Icon Editor and loads the file.)
- Drop an icon file on the Icon Editor control in the Personal Applications subpanel.
- Click the Application Manager control in the Front Panel, then open Desktop_Apps and double-click on Icon Editor.
- Type the following command in a Terminal window:
dticon -f filename &
This section describes how to create and edit an icon and how to use the Icon Editor drawing tools.
 To Open an Existing Icon
- Choose Open from the File menu.
If you have unsaved changes, Icon Editor warns you that your changes will be lost by loading another icon. Click Cancel to cancel the Open command. Click OK if you don't want to save your changes.
- Type the name of the file you want to load in the Enter file name field, or select the icon file you want to load from the Files section of the Open File dialog box.
- Click Save.
Note: When you load a file, the Output Format (in the Options menu) is automatically set to the format of the file you load.
You can also open an existing icon by double-clicking the icon file in File Manager.
 To Start a New Icon
 Choose New from the File menu.
- If you have unsaved changes, Icon Editor warns you that your changes will be lost by starting a new icon. Click Cancel to cancel the New command or click OK if you don't want to save your changes.
Icon Editor clears the work area and resizes it to the default size (32x32).
If you have an icon already loaded, you can choose Clear Icon from the Edit menu to start a new icon with the same size and name as the previously loaded icon.
 To Clear an Icon
- Save your current icon, if necessary.
- Choose Clear Icon from the Edit menu.
The entire icon drawing work area is cleared.
 To Draw an Image
- Select one of the drawing tools (listed in Table 13-2).
- Select a color (static color, static gray, or a dynamic color).
- Begin drawing with the tool you've selected.
More details on drawing with each tool are provided below.
Drawing Tools
The drawing tools area of Icon Editor is shown in Figure 13-2.
Figure 13-2 Icon Editor drawing tools
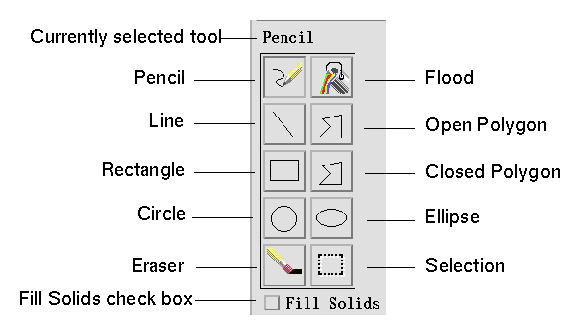
Table 13-2 Using the Drawing Tools
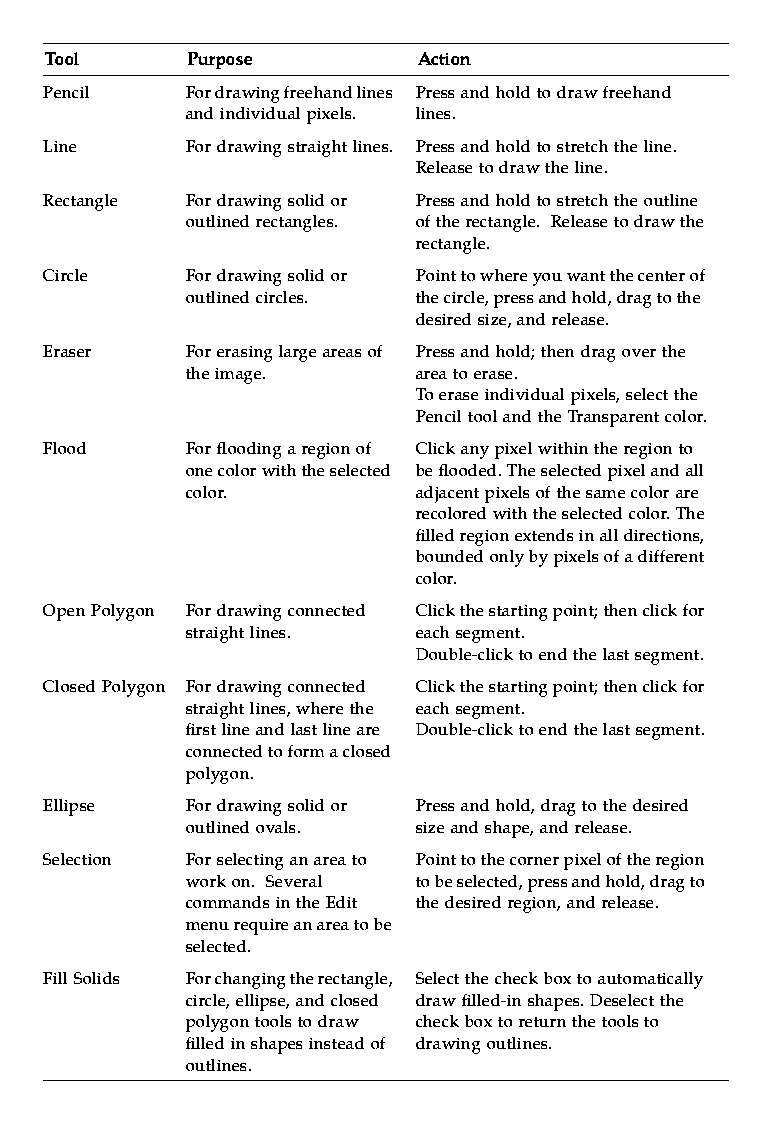
 To Undo a Drawing Operation
 Choose Undo from the Edit menu.
- Only the single, most recent change can be undone.
When saving icon files, you must use the appropriate file-name suffix. There are two suffixes appended to the base name of the icon, one for size and one for format. Many icon names are in these general forms:
basename.size.format
basename.format
The basename is the image name used to reference the image.
size is a single letter indicating the standard size of the icon: l for large (48x48 pixels), m for medium (32x32), s for small (24x24), or t for tiny (16x16). (See "Icon Size Conventions".) If your icon is not a standard size, you can omit this letter.
format is pm for X pixmaps (the color icon format) or bm for X bitmaps (the monochrome icon format).
If you save an icon in XBM format that has transparent color in it, an icon mask file is also saved. The icon mask file is named basename.size_m.format. If you move the icon you saved to another folder, you must also move the mask file.
For example, suppose you specify an icon named mail for a file type you've written. If you have a color display and have set the File Manager preferences to use tiny icons, the assumed icon name is mail.t.pm. If it had transparent color and you saved it in XBM format, two files would be created: mail.t.bm and mail.t_m.bm.
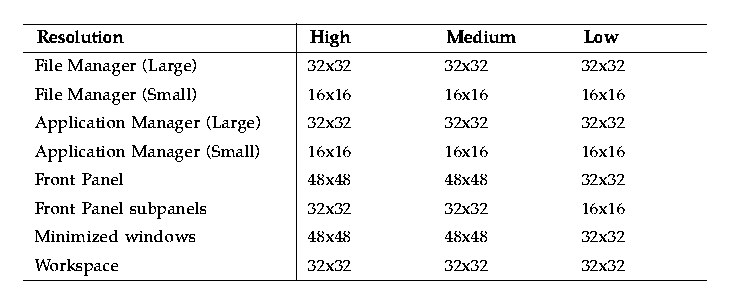
Table 13-3 lists the recommended sizes--in pixels, width x height--for creating new icons for use in CDE. Icons can be up to 256x256.
Table 13-3 Icon Size Recommendations
 To Save the Icon
- Choose an output format from the Options menu:
- XBM for two-color X bitmap format
- XPM for multicolor X pixmap format (the default)
- Choose Save from the File menu.
If the icon is unnamed or you choose Save As, Icon Editor prompts you for a file name. Type the name and then click Save.
Note: If you save an icon in XBM format that has transparent color in it, an icon mask file is also saved. The icon mask file is named basename.size_m.format. If you move the icon you saved to another folder, you must also move the mask file.
 To Save the Icon with a New Name
- Choose Save As from the File menu.
- Type (or select) the file name under which you want to save the icon file.
- Click Save.
If the file already exists, you will need to click OK in the warning dialog box to overwrite the existing file.
Icons in the desktop use a palette of 22 colors:
- Eight static grays
- Eight static colors: red, blue, green, cyan, magenta, yellow, black, and white
- Five dynamic colors: Foreground, Background, TopShadow, BottomShadow, and Select
- A transparent "color" that allows the background to show through
These colors are the default colors in Icon Editor. This set of colors provides a reasonable palette with which to create icons. This limited palette was chosen to maximize the attractiveness and readability of icons without using an unnecessary number of colors.
The dynamic colors represent the colors used to display the application on which your icon will appear. If your icon appears in File Manager, File Manager determines what the background color is. Dynamic colors are useful for icons that you want to change color as different color palettes are selected in Style Manager. Dynamic colors are also useful if the icon will be used in more than one place and you want it to use the colors of the application where it appears.
TopShadow and BottomShadow can be used for drawing a shadow under your icon. You can use these colors to make the icon appear to be etched into the surface. This is only recommended for Front Panel style icons.
The transparent color is useful for creating icons that have the illusion of being nonrectangular, since it allows the color behind the icon to show through. If your icon does not fill the entire bounding box, you should fill the unused area with the transparent color.
After you become familiar with the basic drawing facilities in Icon Editor, you may want to try some more advanced operations. Many of these operations require you to first select an area of the icon. This is done using the Selection tool (next to the eraser).
When an area of the icon is selected, you can:
- Cut, copy or move it
- Resize (scale) it
- Flip it (horizontally or vertically)
- Rotate it (right or left)
 To Select an Area of the Icon
- Click the Selection tool (next to the eraser).
- Drag a box around the area you want to select.
When an area is selected, a box flashes around the selected area.
 To Cut a Region of the Icon
- Select the area of the icon you want to cut using the Selection tool.
- Choose Cut from the Edit menu.
When you cut a portion of an icon, the exposed area becomes transparent (that is, filled in with the Transparent color).
Note that after cutting a region, you can paste it back into the icon by choosing Paste from the Edit menu.
 To Copy a Region of the Icon
- Select the area of the icon you want to copy using the Selection tool.
- Choose Copy from the Edit menu.
- Choose Paste from the Edit menu.
- Position the outline where you want to paste the copy, and then click.
You may repeat steps 3 and 4 as many times as you like to paste multiple copies of the region you copied.
 To Move a Region of the Icon
- Select the area of the icon you want to move using the Selection tool.
- Choose Cut from the Edit menu.
- Choose Paste from the Edit menu.
- Position the outline where you want to paste the copy, and then click.
You may repeat steps 3 and 4 as many times as you like to paste multiple copies of the region you cut.
 To Rotate Part of the Icon
- Select the area of the icon you want to rotate using the Selection tool.
- Choose Rotate then Left or Rotate then Right from the Edit menu.
- Position the outline where you want to paste the rotated area, and then click.
 To Flip (Mirror) Part of the Icon
Flipping an area creates a pixel-for-pixel mirror image of the selected area.
- Select the area of the icon you want to flip using the Selection tool.
- Choose Flip then Vertical or Flip then Horizontal from the Edit menu.
Resizing Icons
You can resize the entire icon or a region of the icon.
 To Resize the Current Icon
- Choose Resize Icon from the Edit menu.
Icon Editor displays a dialog box that prompts for the new size.
- Edit the current width and height to specify the new size.
- Click OK.
Note: If you make the icon smaller, the right and bottom edges are clipped off. If you make the icon larger, the existing image remains in the upper left of the icon.
 To Resize (Scale) a Region of the Icon
- Select the area of the icon you want to resize using the Selection tool.
- Choose Scale from the Edit menu.
- Drag a box that defines the size and shape that you want the scaled image to be.
The size of the box is shown in the upper right area. This determines how the selected portion of the image will be scaled; it does not determine where to place the results.
- Position the outline where you want to paste the scaled copy, and then click.
Hotspots
Bitmap images (XBM format) can be used as special mouse pointer shapes. A hotspot marks a single pixel within the image that is the true point of the mouse pointer.
 To Add a Hotspot
You can only have one hotspot in an icon.
- Choose Add Hotspot from the Edit menu.
- Click the pixel where you want the hotspot.
 To Delete a Hotspot
 Choose Delete Hotspot from the Edit menu.
Screen Captures
You can copy any area from any part of the screen into the Icon Editor. You can copy ("grab") a text or graphic that is displayed and load it into the Icon Editor work area.
 To Capture (Grab) a Region of the Display
- Save your current icon, if necessary.
- Choose Grab Screen Image from the Edit menu.
- Drag a box around the portion of the workspace you want to capture (press mouse button 1, drag, and release).
Note: Capturing a region of the display could cause the icon to use up some of the available colors on the desktop.
Modifying the View of an Icon
You can change the view of an icon in the Icon Editor work area by changing the magnification or using a grid.
 To Hide the Grid
 Choose Visible Grid from the Options menu.
- This will hide the grid. Choose Visible Grid from the Options menu again to display the grid. The grid is displayed by default.
 To Change the Magnification of an Icon
- Choose Magnification from the Options menu.
- Choose the Magnification level you want from the submenu.


Generated with CERN WebMaker


![]()
![]()
![]()
![]()
![]()
![]()


