3.2.5 Choosing Items from Submenus

| Previous | Contents | Index |
Pop-up menus make it easier for you to work with files and applications by giving you quick, direct access to an application's commands and functions. Pop-up menus duplicate commands and functions available on pull-down menus. Unlike pull-down menus, which require you to move the pointer to the menu bar, you can display a pop-up menu anywhere in an application's work area.
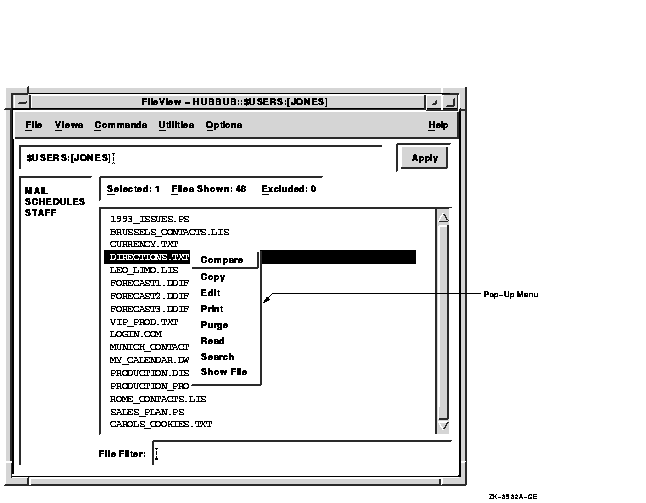
To display a pop-up menu:
If you change your mind while looking at a pop-up menu, drag outside
the menu and release MB3. The menu disappears and no action is taken.
3.2.4 Choosing Items from Options Menus
An options menu is a pop-up menu that appears in a dialog box. An options menu allows you to choose one option from many. In the dialog box, only the current option is displayed. To see the other options from which you can choose, you display the option menu.

To display an options menu:
If you decide not to change the original option, drag outside the menu
and release MB1. The menu disappears and no changes occur.
3.2.5 Choosing Items from Submenus

A menu item with a submenu icon---an arrow pointing to the right---indicates that a corresponding submenu is available. If you choose that menu item, the submenu is displayed and you need to refine your choice by choosing a menu item from that submenu.
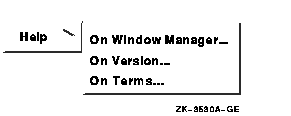
To display a submenu and choose a menu item from it:
When you work with DECwindows, you can have one window or many windows open at the same time. Using multiple windows lets you work with many applications and switch between them. This section describes basic features of windows and explains how to move, size, and arrange them.
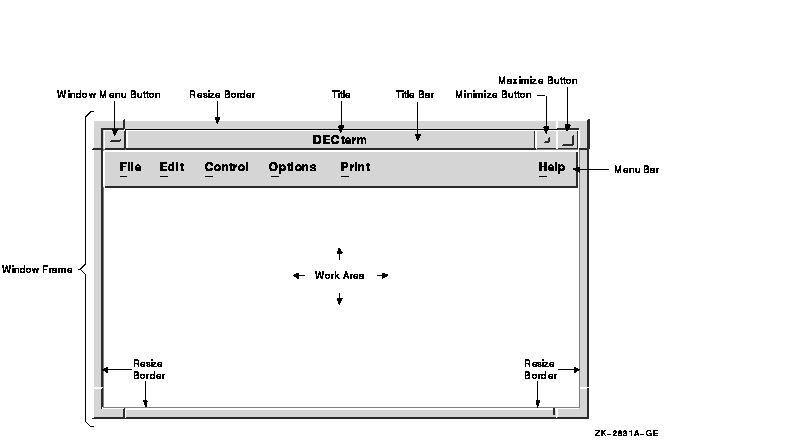
Most windows include the following components:
When you have more than one window open, DECwindows needs to know which one you're currently working on so that the commands you choose and the text you type end up in the right place. To work with a window, you must make it active or give it input focus. When you make a window active, by default it moves to the front of the stack of overlapping windows and its window frame is highlighted. Any keystrokes you type appear in this window. When you make another window active, the new window is given input focus. Only one window can have input focus at a time.
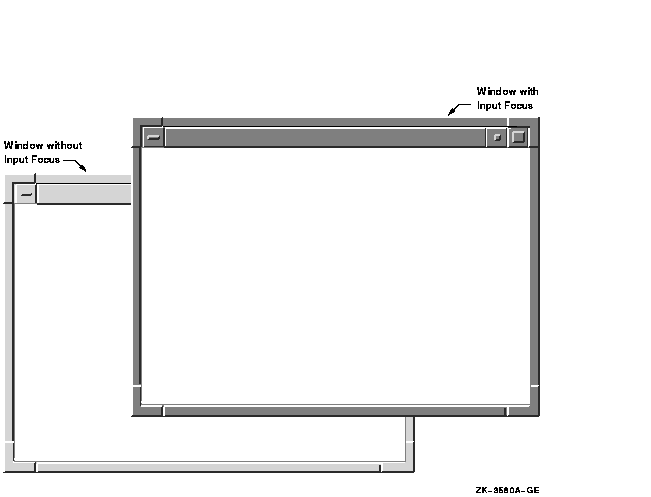
To make a window active:
DECwindows provides two ways to give windows input focus:
explicit focus and implicit focus.
With an explicit focus policy, you must move the pointer to a window
and click on a mouse button or press a key on the keyboard. This is the
default focus policy for DECwindows. With an implicit focus policy,
moving the pointer into a window gives the window input focus. For more
information about changing your input focus policy, see Chapter 10.
3.3.3 Moving Windows
If one window partially obscures another, you might want to arrange them so that each is completely visible. To move a window:

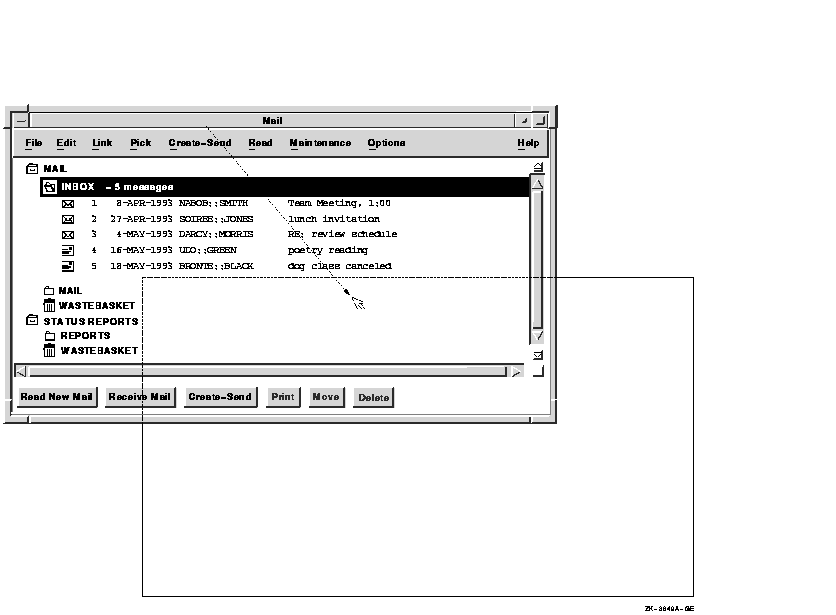
To cancel a move operation, press the Escape key (or F11).
3.3.4 Sizing Windows
Sometimes you want to make one window very large so you can see everything in it. Other times, you might want to work with small windows, such as when several applications are running simultaneously. You can change the size of your windows to suit your needs by using the window's resize borders.
To change the size of a window:


To cancel the operation, press the Escape key (or F11).
3.3.5 Minimizing Windows

If you have several applications running at the same time, you can free up space on your screen to run another application by minimizing a window, which means that you shrink the window to an icon. When you minimize a window, the application it represents continues to run and remains easily accessible. All processes continue to execute while the application is stored as an icon.
To minimize a window:
You can also minimize a window by double clicking MB1 on the window's title. |
When you restore an icon, you open a window for that application. If you have more than one window open and restore an icon to a window, by default the new window is placed at the front of the stack of overlapping windows.
To restore an icon to a window:
The window opens, is given input focus, and is available for your use.
3.3.7 Maximizing Windows

If you are working with only one application, you might want to maximize (enlarge) the application window so that it fills your screen. When you maximize a window, your other windows and icons stay on the screen, but they are covered by the maximized window.
To maximize a window:
To restore a maximized window:
By default, icons are displayed as separate windows on the screen. You can move them anywhere on your screen.
If you want to display your icons in one central place, you can store them in an icon box. An icon box is a window that contains the icons for all the windows on the screen. To find how to create an icon box, see Chapter 10.
In an icon box, if you double click on any icon, the window becomes active by default and is raised to the top of the screen. Using the keyboard, you can press Return on a highlighted icon to make the window active. If you Shift+double click on any icon, it will minimize that window.
When a window is restored from an icon, the icon is dimmed. If you do not use an icon box, the icon is not dimmed when you restore a window. Instead, the icon is removed from the screen.
If you store your icons in an icon box, as you close windows your icon box develops gaps where the icons used to be. To rearrange the icons in the icon box to fill in these gaps, choose Pack Icons from the Workspace menu. Packing icons can also help you to locate icons that are obscured by windows. |
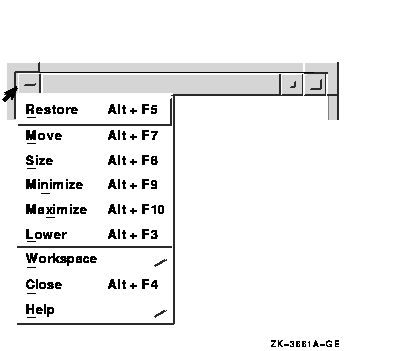
The preceding sections describe how to manage your windows using the buttons and resize borders on the window frame. You can also access many of these window features using the Window menu and the Workspace menu.
The Window menu contains menu items for working with windows. To display the Window menu, click on the Window Menu button on the left corner of the title bar.
The Workspace menu contains general information for arranging windows and customizing the window manager. To display the Workspace menu, click MB1 or MB3 on the Workspace. You can also display the Workspace menu by choosing Workspace... from the Window menu.

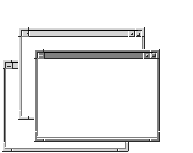
When you are working with stacked windows and select a window, it moves to the front of the stack and is given input focus. But if a larger window obscures a smaller window, you can't select that small window without moving the larger window out of the way. If you use the title bar to move the larger window, you disrupt your work arrangement.
By using the window-arranging options on the Workspace menu, you can shuffle your windows without moving them to another location. Shuffle Down and Shuffle Up lower and raise windows on the screen without affecting input focus. Next Window and Previous Window change which window is active. By default, they also raise the window to the top of the screen.
| To | Do this |
|---|---|
| Raise the bottom-most window to the top of the screen | Choose Shuffle Up from the Workspace menu. |
| Lower the top-most window to the bottom of the screen | Choose Shuffle Down from the Workspace menu. |
| Give input focus to a previously active window | Choose Next Window from the Workspace menu. |
| Give input focus in the reverse order of Next Window | Choose Previous Window from the Workspace menu. |
The Shuffle Up and Shuffle Down menu items are useful if you are working in a large window and want to refer to a window that is obscured. You can shuffle the windows on the screen until the hidden window is displayed and then continue to type in the large window. If no windows are obscuring other windows, then shuffling the windows has no effect.
Next Window and Previous Window are useful if you want to circulate through all the windows on the screen. Using these options differs from shuffling windows. Next Window always brings you to the next window even if it is not obscured and always makes that window active.
For example, suppose you have three windows: a clock, Session Manager, and a DECterm window. The DECterm window is active. If you select Next Window, then the clock may become active. If you select Next Window again, then Session Manager becomes active. If you choose Previous Window, then the clock becomes active again.
To raise a window that you lowered or shuffled, click on the title bar. |
The DECwindows Motif Window Manager controls the way your windows look
(for example, the style and contents of the title bar) and behave when
you are working with them. By using the Window Manager's customize menu
options, you can customize your workspace and windows to suit your
working needs and style. For more information about using the Window
Manager's customize options, see Chapter 10.
3.4 Working with Dialog Boxes
DECwindows displays a dialog box whenever it needs additional information from you to carry out a task. Sometimes you need to type text; other times, you need only click on a button to change a setting.

Dialog boxes offer various ways to supply information to an application:
How you move focus in a dialog box depends on the object---for example, a check button or text entry box---you want to work with. The following table describes the ways you can move focus and change settings in a dialog box:
Once you change the settings you want, click on either the OK or the
Apply button and the new settings will take effect. If you decide not
to change the settings, click on the Cancel button. Some applications
save or apply settings in different ways. For more information about
saving your Session Manager, FileView, or Window Manager settings,
refer to the appropriate chapter in Part 2.
3.4.4 Making Selections from List Boxes
A list box is part of a dialog box that contains a list of items, often file names, from which you can choose. Many applications display a list box when you open or save a file.
To select an item from a list box, point to the item and click MB1. The item you select is highlighted.

If an application needs a file name to complete a task, it displays a file selection box. A file selection box contains a list box that displays a list of files in the current directory.
If you select a file name in the list box, you can click on OK to open the file. DECwindows also gives you a shortcut for opening files from list boxes: Double clicking on the file name produces the same results as selecting that file name and clicking on OK.
If you want to work with a file that does not appear in the list box,
type the name of the file in the Selection entry box and click on OK.
Or, use the File Filter entry box to list a subset of files that you
can then select from. For example, to list all the files in another
directory with the file type TXT, enter the complete directory
specification---[JONES.LETTERS]*.TXT---in the File Filter entry box and
click on the Filter button. The list of files that meet the
qualifications are displayed. Double click on the name of the file you
want to open.
3.5 Scrolling

Some application windows display scroll bars, which let you view the text that does not fit in a single window. Some windows have both horizontal and vertical scroll bars.
A scroll bar consists of stepper arrows at either end of the scroll region. The slider is the thicker box that overlays some of the scroll region. If the slider is at the top of the scroll region, the beginning of the file or list is visible. If the slider is at the bottom of the scroll region, the end of the file or list is visible.

The length of the slider is relative to the total amount of text in the document and indicates how much more text remains to be displayed. For example, a short slider indicates that much text remains to be displayed. A long slider that completely fills the scroll bar indicates that all the text is currently displayed.
The following table describes how to use scroll bars:
| To scroll | Do this |
|---|---|
| One line at a time | Click MB1 on the stepper arrows. |
| Forward one window of text at a time | Point to the scroll region below the slider and click MB1. |
| Back one window of text at a time | Point to the scroll region above the slider and click MB1. |
| Continuously through the list or file one line at a time | Press and hold MB1 on either stepper arrow. |
| Continuously through the list or file one window of text at a time | Press and hold MB1 in the scroll region. |
| Move slider to a particular position | Press MB2 in the scroll region. |
| To another location in the list or file | Drag the slider to a position in the scroll region that corresponds to the general location you want to see. If the slider is at the top of the scroll region, you are viewing the beginning of the list or file. If the slider is in the middle of the scroll region, you are viewing the middle of the list or file. Cancel the drag by clicking another mouse button before releasing MB1. |
| Previous | Next | Contents | Index |